Heavenly Homemakers

Encouraging women in homemaking, healthy eating and parenting

  • Home
    • About
    • FAQs
  • Recipes
    • Bread and Breakfast
    • Condiments
    • Dairy
    • Main Dishes
    • Side Dishes and Snacks
    • Desserts
    • Gluten Free
    • Instant Pot
    • Crock Pot
    • Heavenly Homemaker’s Weekly Menus
  • Homemaking
    • Real Food Sources
  • Store
  • Contact
    • Advertise
    • Disclosure
    • Privacy Policy
  • Simple Meals
  • Club Members!

Gardening 101: Planting Potatoes

April 7, 2009 by Laura 42 Comments

This post may contain affiliate links. For more information, please see our disclosure policy.

One of my very favorite foods to plant is potatoes. You put a hunk of potato into the ground….then, it grows into a plant…which produces several brand new potatoes. When it’s time to dig up potatoes in the fall…it’s like Christmas time! I LOVE it!!

Here are some Potato Planting Basics:

seedpotatoes1sm.JPG

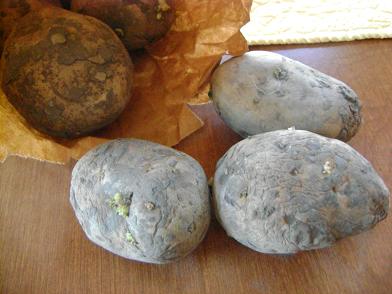
  • Purchase seed potatoes (I got mine at a grocery store). Find seed potatoes with lots of “eyes” if you can. 
  • Keep in mind that the “russet” or “kennebec” potato will store the best…so if you’re planting enough potatoes to store for a few months, you’ll want this kind. Red and Yukon Gold don’t store quite as well (oh but they sure are yummy!). 
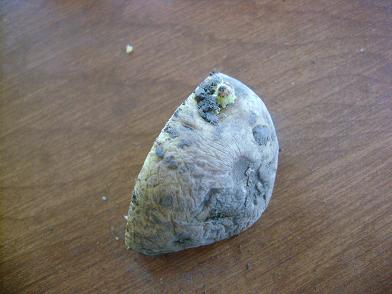
  • Cut your seed potatoes into hunks. Each hunk needs to have at least one good “eye” (see the one in the picture below?). That’s what your new potato plant will grow from. 

seedpotato2sm.JPG

  • Be sure not to cut your potato hunks too small. They need to have enough potato on them to provide nourishment for the plant as it starts to grow.

  • It’s a good idea to cut your potatoes a few days before they are planted so that they can “cure”. This helps to prevent rotting under the ground once they are planted. However, most years I don’t know that I’ll be planting until the day I plant! Cutting the potatoes right before you plant them won’t hurt anything!

garden3sm.JPG

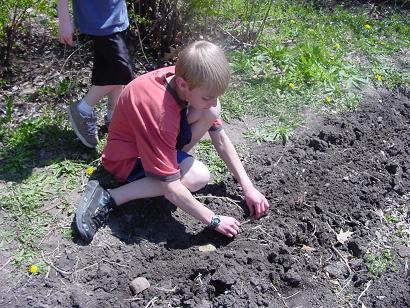
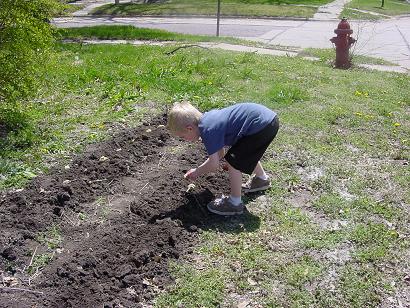
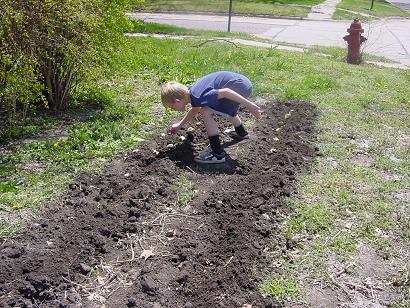
  • Place your potato hunks in the ground with the “eye” facing upward. They need to be about one foot apart. To make this easier for my kids, I usually break a stick into a piece one foot long. They lay down a potato…then lay down the stick…then lay down another potato at the end of the stick. It’s a great way for them to measure the distance and avoid putting the potatoes too close together.

garden1sm.JPG

  • Your rows should be about two feet apart. Cover your seed potatoes with about 3-4 inches of soil.

  • Once you’ve got your potatoes planted, give them a nice drink of water. Then, leave them alone for a few days. It isn’t neccessary to give them much water for the first several weeks. After a week or so, you’ll see some nice sturdy plants coming up out of the ground (at which point, you’ll do a happy little potato dance!).

  •  Once the plants are about eight inches tall, pull the soil up around each of them and kind of pack it in around the base of the plant.
  • When your potato plant begins to flower, you’ll know that there are now some new potatoes growing under the ground (and you’ll do another happy little potato dance!). At this point, your potato plants need plenty of water. Big fat potatoes can grow bigger and fatter with lots of water.
  • All summer long, be sure that the soil is pulled up high around the base of your plant. You don’t want any growing potatoes to start popping up out of the soil. They’ll turn green….and you don’t want green potatoes.
  • You can begin to “steal” little new potatoes from your plants anytime after they flower. But, if you leave them there and continue to water them well, they’ll grow into baked potatoes and french fries and bowls of mashed potatoes. Really, it’s true.

And may I just say….you haven’t eaten a potato until you’ve eaten a fresh potato right out of the ground!!! 

I will also be planting some “containers” of potatoes this year since I don’t have enough garden space to plant enough potatoes to last us the entire winter. Soon, I’ll share that technique with you….and maybe all of you who don’t have big garden spaces will want to play along with me. Start looking out for big garbage containers!!

A couple more things…I live in the midwest and I haven’t actually planted my potatoes yet. (I took the above pictures last year when we were planting.)  You’re safe to plant potatoes a few weeks before the last freeze…so for me that means I can plant them pretty soon. We just haven’t had a chance to get our garden ready for planting yet, what with all the SNOW THAT HAS FORGOTTEN TO REMEMBER THAT SPRING IS HERE. Really, I do love living in Nebraska.

Are you planting potatoes this year? Interested in learning more about planting potatoes in a container? Have any more potato planting tips for us?
————————————

This post is linked to Works for me Wednesday.

Heavenly Homemaker's Club Members: Access your homepage and all your fantastic resources here! Not a member yet? Please join us!

Gardening 101: The Basics

March 24, 2009 by Laura 30 Comments

This post may contain affiliate links. For more information, please see our disclosure policy.

I’ve been asked by several of you if I would share more about what I know about gardening. As my friend Serenity put it, sort of a “Gardening for Dummies” series.

I’m happy to agree to this…as long as you realize that this series is also written by a Dummy. (that wood be me.)

I PROMISE you that my garden grows completely IN SPITE OF ME.

Here are a few things I’ll share with you to start of this series:

  • Some years are good years for some crops and some years are not. Whenever I have a poor crop of something, most everyone around me has had a poor year too. If you have a bad crop of something, you don’t need to feel like you failed. (And by all means, don’t give up entirely!)  Some years you’ll have so many green beans you’ll be paying others to take them off your hands…some years you’ll barely get enough for everyone in your family to have one bean on their plate at dinner. That’s normal. (Unless I’m the one whose not normal?)
  • Worms are good. You want worms in your garden.  I have been known to chatter excitedly to the worms I see when I’m digging around in my soil, wishing them a prosperous life of going forth and doing whatever good things God made them to do in my garden. Sometimes I’m tempted to lay my hands pinky on them and pray over them. Worms are good.
  • Bugs are bad. I do a different kind of “laying on of the hands” (and feet) when I see them. (I also talk to them, like I talk to the worms, but my words aren’t nearly the same.)
  • To help control bugs, if you want to try to have a chemical free garden, like I do….you can try to plant some merigolds here and there when you plant your seeds. Bugs don’t like merigolds…
  • Compost is great for your garden (and a great way to use produce waste from your kitchen)…the Happy Housewife has a wonderful tutorial here if you want to learn to start composting.
  • Plant your seeds like it says on the package. If it says to plant the seed after the last frost…don’t plant them before the last frost. If it says to plant them four feet apart, plant them four feet apart. You don’t want squash vines working their way into your green beans. Trust me (the dummeee), I should know.
  • If you can get your hands of them, heirloom seeds are best. They may not produce as well as hybrid (because hybrids have been genetically modified to produce like crazy), but they are better seeds. I usually have a mix of both in my garden. I’m hoping to work my way toward more heirlooms through the years.
  • Don’t plant potatoes beside tomatoes. They are both night shade vegetables (except a tomato is a fruit, but whatever) and for some reason they don’t do well together. As far as I know with the searching I’ve done, there are not others you need to be so careful about.
  • You can try starting seeds in the house (for tomatoes, broccoli, etc.), but if you don’t have a good source of light for them they usually get long and spindly very quickly (and non-transplantable). Starting seeds has never worked very well for me so I buy what I can from my 10 year old friend, Hannah, who has started a little “seed starts” business. Her mom has a good set up for her in their house, so Hannah’s already got tomatoes, cabbage, broccoli and other starts going. Yay Hannah…and yay me!
  • If you have enough garden space, it’s best to rotate your crops each year since each plant takes something different out of the soil.

This year we’re planting potatoes, peas, spinach, lettuce, broccoli, green beans, corn, spaghetti squash, tomatoes, bell peppers, chili peppers…and maybe another fun thing here or there. Here’s a (lovely) drawing of our garden plans for the year.

I’ll plan to show you all of our seeds and plants as they go into the soil. I’d love to hear any questions you might have that you’d like me to address in this series. Plus share with us here any great gardening tips you know of to get us started on the right foot!


Heavenly Homemaker's Club Members: Access your homepage and all your fantastic resources here! Not a member yet? Please join us!

Putting up Corn for Winter

August 8, 2008 by Laura 30 Comments

This post may contain affiliate links. For more information, please see our disclosure policy.

No. 1 thing to know about preserving produce for winter:  It takes hard work and time and might make a big mess.

No. 2 thing to know about preserving produce for winter:  In the winter when you get to pull yummy things out of your pantry and freezer…all the hard work and time and big mess will have been worth it. Very worth it!

Here’s a bit about how I put up corn…and you should also check out this post at Amy’s Finer Things because she blogged about this already. I really liked her technique for cutting the corn off the cob!

First…here is our happy little party of Nebraska Cornhuskers….

corn7sm.JPG

corn9sm.JPG

corn8sm.JPG

Check it out…they make a game of how far they can throw the husks. Hey, whatever it takes to get the work done with a happy attitude!

corn3sm.JPG

Meanwhile…I’m in the kitchen sticking those ears into boiling water. Just for a short time. Two to three minutes. Blanching stops the aging process of your produce.

corn4sm.JPG

Ah, but you don’t want them to continue to cook…so you immediately pull it out of the boiling water (with tongs of course) and run it under cold water to try to cool it off right away. (And Amy recomended putting it in ice water…a much better idea!!)

corn2sm.JPG

Now, I line up my ears (hehe…line up my ears…hehe)

corn5sm.JPG

And then I cut the corn off the cob into a bowl with a sharp knife. If you have an electric knife, you can use that too. Or do it the way Amy does it. (Oh, so many options.)  (But no matter what option you choose, your hand will probably cramp up and feel like it will never again be them same by the time you’re done. But don’t worry, after several operations, you’ll be okay again.)  (Kidding…just give yourself a few minutes of a hand massage.)

corn6sm.JPG

I then use a measuring cup to scoop the corn into freezer bags. Sometimes I use quart…sometimes I use gallon. Just don’t fill the bags too full, or after it freezes, you’ll have a terrible time getting your corn out of the bag! 

corn1sm.JPG

Then get the air out of the bag and seal it up and press it flat. And it’s ready to go into the freezer. Isn’t it beautiful?

When you’re ready to cook it, break off whatever amount of corn you want, put it into a saucepan with a little water and cook it until it’s bubbly. Turn it off, drain out the excess water and stir in butter and salt! 

Awesome!

I’ll show you to process of freezing green beans another time!

Heavenly Homemaker's Club Members: Access your homepage and all your fantastic resources here! Not a member yet? Please join us!
« Previous Page

Join Our Community!

 Facebook Twitter E-mail Instagram Pinterest

Popular Posts

~ Will All of the Real Moms Please Stand Up?
~ Easy! Stir-and-Pour Whole Wheat Bread
~ How to Make Gatorade
~ 31 Real Food Breakfast Ideas
~ Dear Teenage Girls...
~ When Mom Takes a Step Back
~ The Inexpensive Health Insurance We Love!
~ Let's Talk Real Food Grocery Budgets

Check out our latest posts!

  • Big Family Food and Fun: April 19-25, 2026
  • Big Family Food and Fun: April 12-18, 2026
  • Big Family Food and Fun: April 5-11, 2026
  • Big Family Food and Fun: March 29-April 4, 2026
  • My 2026 NON-Grocery Budget Update
Home  ~  Simple Meals  ~  Club Membership  ~  Shop  ~  Privacy Policy  ~  Disclosure  ~ Contact

Copyright © 2026 · Beautiful Pro Theme on Genesis Framework · WordPress · Log in