Heavenly Homemakers

Encouraging women in homemaking, healthy eating and parenting

  • Home
    • About
    • FAQs
  • Recipes
    • Bread and Breakfast
    • Condiments
    • Dairy
    • Main Dishes
    • Side Dishes and Snacks
    • Desserts
    • Gluten Free
    • Instant Pot
    • Crock Pot
    • Heavenly Homemaker’s Weekly Menus
  • Homemaking
    • Real Food Sources
  • Store
  • Contact
    • Advertise
    • Disclosure
    • Privacy Policy
  • Simple Meals
  • Club Members!

Stir-and-Pour Whole Wheat Pizza Crust

March 21, 2016 by Laura 22 Comments

This post may contain affiliate links. For more information, please see our disclosure policy.

Remember the Whole Wheat Stir-and-Pour Bread recipe I shared a few months ago? Not too long after I shared that, a reader Shelby, and then others, emailed to let me know they’d been using that recipe to make pizza crust.

Stir and Pour Pizza

Bless you. Bless you all. Now our homemade pizza making lives are easier than ever! Mix the dough, let it sit, spread the dough on baking sheets, let it bake. Your hands won’t even get messy. 

It took a little tweaking for me to get this crust just right. The recipe is the same as the bread, but it took a few tries for me to learn how thick or thin to spread this dough. I’m not a big fan of a thick crust, but the beauty of this recipe is that you can make it as thin or thick as you like!

I spread the dough into two large pizzas and could probably spread it into three if I tried. This recipe goes a long way toward a big pizza meal!

Whole Wheat Stir-and-Pour Pizza CrustYum

5.0 from 3 reviews
Stir-and-Pour Pizza Crust
 
Save Print
Author: Laura
Serves: 2 large pizzas
Ingredients
  • 4 cups whole wheat flour (I use freshly ground hard white wheat)
  • 2 teaspoons active rise yeast
  • 2 Tablespoons sucanat or sugar or honey
  • 1 teaspoon sea salt
  • 2 cups warm water
Instructions
  1. Stir all ingredients together.
  2. Cover and allow it to sit for 30 minutes.
  3. Spread dough on two *well-buttered* large pizza pans (three if you want a thinner crust)
  4. Bake in a 375° oven for 10 minutes.
  5. Pull partially baked crust out of the oven and top it however you like.
  6. Bake for 10-15 minutes more or until cheese has melted and becomes bubbly.
3.4.3177

Whole Wheat Stir and Pour Pizza Crust

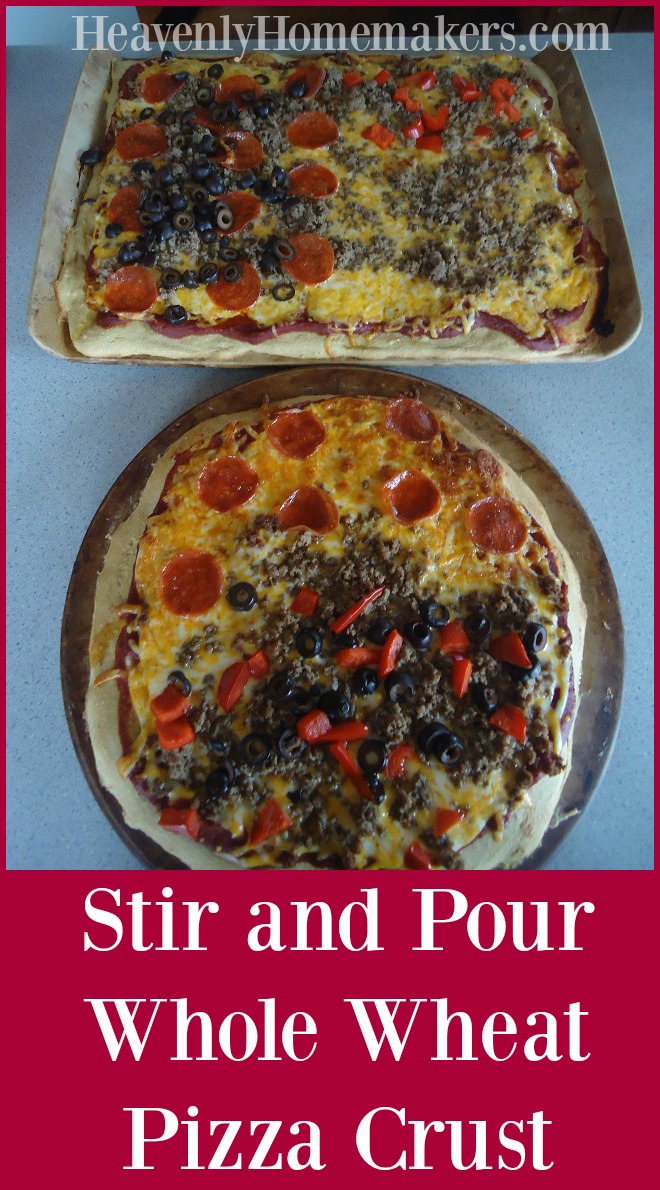
I found that spreading the dough onto my baking pans with a rubber spatula worked best. I always use baking stones (like these) for pizza because I think they turn out the best crust. I’ve not tried them on metal baking sheets, so you may need to adjust the baking time if you don’t use stoneware.

You can definitely make these crusts ahead of time and freeze them until you are ready to bake pizza. This means that the easiness just gets easier. Amen and amen.

Have you tried the Whole Wheat Stir-and-Pour Bread recipe? How about Pizza Crust? Have you tried using it for pizza crust?

Just wait until later this week! I’ve got another great way to use this recipe that I’ll share with you!

Heavenly Homemaker's Club Members: Access your homepage and all your fantastic resources here! Not a member yet? Please join us!

Crustless Pizza

July 4, 2013 by Laura 8 Comments

This post may contain affiliate links. For more information, please see our disclosure policy.

crustless_pizza_1

Yum

Do you like how I cleaned up the crusty baked-on edges of the pie plate before snapping the shot?
Oh my bad. I was thinking of another picture I didn’t take.

Sometimes, I just don’t feel the need to have grains or carbs with every meal. I’ve been learning to listen more to my body and to give it what it needs – or to not give it what it doesn’t need.

I have especially become more aware of my body’s nutritional needs since I began working out regularly. There are times I find my body screaming for protein. Other times, I can tell that if I don’t get some carbs in me, I am not going to feel well. Later, I might be craving a huge salad or an orange.

I’m not sure how to explain away yesterday’s chocolate chip cookie. Cookies. Plural. Did my body need them? Yes I think so. But of course, not really.

One day recently, while making pizza for my family, I found that I was not hungry for the crust. That day, I was just in it for the meat and veggies. Therefore, I cooked up some hamburger meat with mushrooms, sweet peppers and onions, stirred in some sauce, spread it in a pie plate, and topped it with cheese. I put it into the oven with the regular pizzas I had made, just long enough to melt the cheese the way I wanted it.

crustless_pizza_3

In case you ever find yourself short on time and not able to make a crust, or if you simply don’t want a pizza crust on your pizza – I highly recommend the Crustless Pizza. So incredibly tasty.

Ever tried this before? 


Heavenly Homemaker's Club Members: Access your homepage and all your fantastic resources here! Not a member yet? Please join us!

How To Make Pizza on the Grill

July 10, 2012 by Laura 15 Comments

This post may contain affiliate links. For more information, please see our disclosure policy.

Yum

I’ve always left the grilling up to Matt. He would head outside and cook the meat, I would be in the kitchen making the side dishes, and all was well.

But one day several weeks ago, I felt like cooking something on the grill for lunch. It just sounded good, you know? But Matt wasn’t home. It was then that I realized that I had no earthly idea how to even turn on the grill. Duh. But it’s true.

Why, yes I do feel ridiculous admitting that to you. And hey, if you want, I could list off all kinds of things I have no clue about.  Nah, how about we save that list for another day?

Well anyway, when he got home later that day, I asked my loving husband to teach me the fine arts of turning on a grill, which involved, as most of you probably already know, the push of a button and the turn of a knob. Wow, do I ever feel so much smarter than I did before.

With my newly found knowledge, I have become a little bit addicted to the grill. It is as if a whole new world has opened up to me. And this is why, after mastering burgers, hot dogs, bbq chicken legs, Italian chicken breasts, and several other varieties of meat,  I decided to try making pizza on the grill. I had heard it was great, so why not?

The good news:  Pizza on the grill tastes incredible and my whole family loves it. The bad news:  Pizza on the grill takes more time and effort than a hot dog or even chicken on the grill. Shucks. But hey, it sure beats heating up the house by baking it in the oven. And well, it tastes so good that I think it is worth the effort. 

How To Make Pizza on the Grill:

1. Make pizza crust – I used my favorite Whole Wheat Pizza Dough recipe. Roll it thin, and keep it small.  Individual sized pizzas are best for the grill.

2. Freeze the unbaked pizza crusts on a cookie sheet lined with parchment paper. This will make your crusts much easier to work with on the grill. 

3. Prepare all pizza toppings. It is important to have this done before you begin cooking your pizzas. Really, really important.

4. Get your grill hot and ready. (If you need my husband to come show you how to turn on your grill, he is very nice and I’m sure he would be happy to walk you through this step.)

5. Place crusts on the grill on low heat, as many as your grill will hold. Close the lid and allow the crusts to cook on one side for about three minutes.

6. Remove the crusts from the grill. Turn them cooked side up and fill with sauce and toppings of your choosing. Go easy on the sauce, unless you want soggy pizza. 

7. Place the topped pizzas back on the grill, close the lid, and cook for another 3-5 minutes or until cheese is melted.

Not that I personally experienced any moments of absolute insanity my first time making these, but be aware that you may be forced to deal with a bit of craziness while feeling like everything needs to be done at once and everyone needs to get out of your way and not ask you any questions while you are trying to grill the crust, top the crust, grill the pizza, and not burn anything along the way. Just so you know. (It does get easier after you’ve done it once.)

And that is why it is very important that your pizza toppings are prepared and ready ahead of time. I am so not kidding. ;)

Heavenly Homemaker's Club Members: Access your homepage and all your fantastic resources here! Not a member yet? Please join us!

Join Our Community!

 Facebook Twitter E-mail Instagram Pinterest

Popular Posts

~ Will All of the Real Moms Please Stand Up?
~ Easy! Stir-and-Pour Whole Wheat Bread
~ How to Make Gatorade
~ 31 Real Food Breakfast Ideas
~ Dear Teenage Girls...
~ When Mom Takes a Step Back
~ The Inexpensive Health Insurance We Love!
~ Let's Talk Real Food Grocery Budgets

Check out our latest posts!

  • Big Family Food and Fun: May 10-16, 2026
  • Big Family Food and Fun: May 3-9, 2026
  • Help Your Kids Become Independent in the Kitchen!
  • Big Family Food and Fun: April 26-May 2, 2026
  • Big Family Food and Fun: April 19-25, 2026
Home  ~  Simple Meals  ~  Club Membership  ~  Shop  ~  Privacy Policy  ~  Disclosure  ~ Contact

Copyright © 2026 · Beautiful Pro Theme on Genesis Framework · WordPress · Log in