After seven days of feeding your sourdough starter with water and flour…it is fermented and ready to make into bread!
Now, keep in mind that this method of making bread is an old fashioned method. It isn’t quick. (Neither is it difficult.) From start to finish, the bread takes anywhere from 8 to 24 hours. Most of those hours are spend just waiting for the dough to rise.
I happen to like the pace of this bread making. Slow and easy wins the race. AND, the nutritional benefits?! Because the bread is fermented, all of the difficult-to-digest phytates from the grain are broken down making this bread GREAT for your digestion! This is the best, most healthy bread you can make.
Okay, so are you ready?

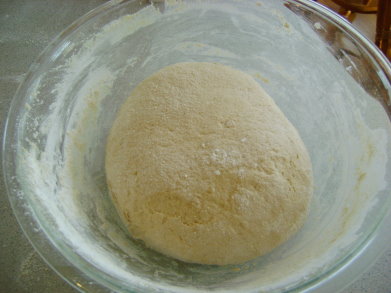
Here is what my starter looked like on the eighth morning.
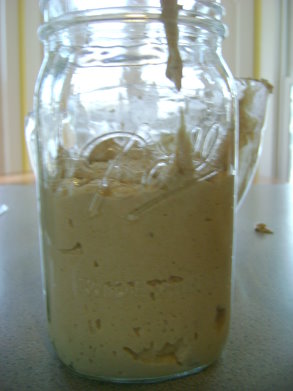
Put about one to two cups of starter into a quart jar, seal it with a lid and put it into your refrigerator for future use.
Here’s what you’ll need to make your bread:
2-3 cups sourdough starter
2 teaspoons sea salt
1 1/2 cups cold water
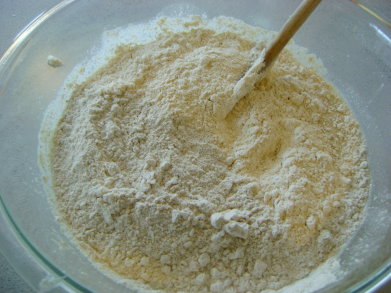
4-8 cups whole wheat, rye, or spelt flour (if your flour is freshly ground, make sure it has had a chance to cool)
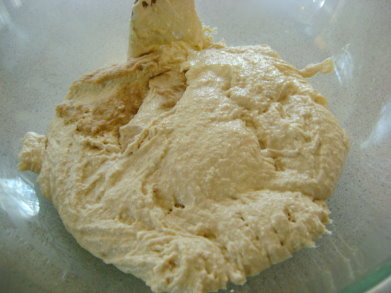
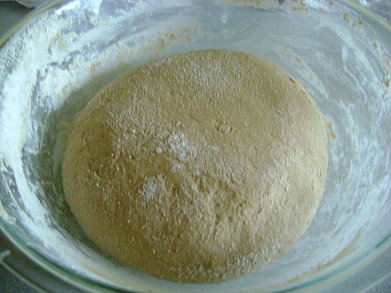
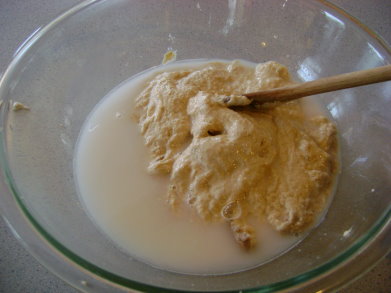
Pour the remaining starter into a large clean glass bowl. (I had about 3 cups of starter in my bowl to start with.)
Add 2 teaspoons of sea salt to the starter.

Pour in 1 1/2 cups of cold water and stir until the salt it disolved.

Slowly stir in flour, two cups at a time. For this batch, I only used about five cups. This is because my starter was not very liquidy to begin with. Remember, the more soupy your starter, the more sour your bread. I was trying to create a starter that was a little on the thicker side.
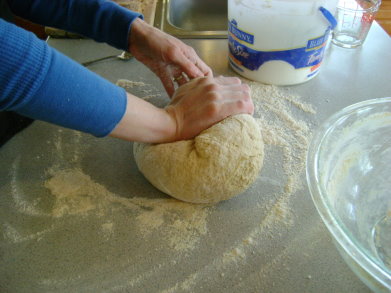
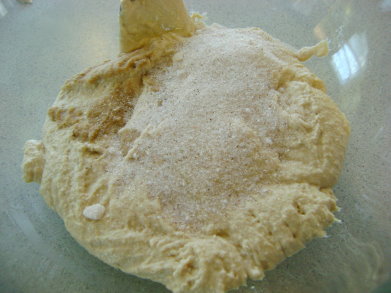
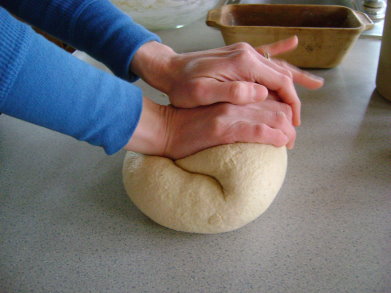
Work in the flour on a clean surface until your dough is knead-able. Knead your dough for 8-10 minutes (or until you think you might pass out). Hey, how do you think we breadmakers get these amazingly buff arm muscles anyway? :)
(You can also knead your dough in a machine if you’d rather!)
Place your well kneaded dough back into your bowl.
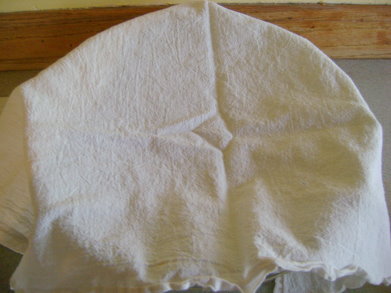
Cover your bowl with a clean cloth and set it on your counter. Now, the natural yeast in your sourdough will go to work to make the dough rise…and all the healthy bacteria in the dough will work to break down the phytates and release the nutrients!
I put my dough in the bowl ready to start rising at 9:00 a.m. By 3 p.m. it had risen to about double. So this time, it took six hours for my dough to rise. In the summer you may find that it takes less time.
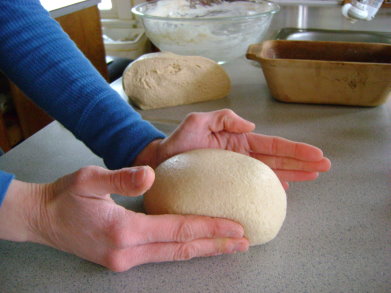
Knead your dough for a good solid five minutes. (Yay, another upper body workout.)
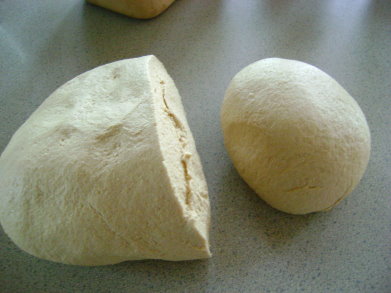
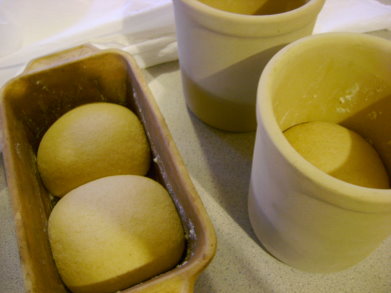
Divide your dough into three sections, using a knife to slice. (Yes, I realize this picture only shows you two sections. The picture is to show you the slice. Focus on the slice.)
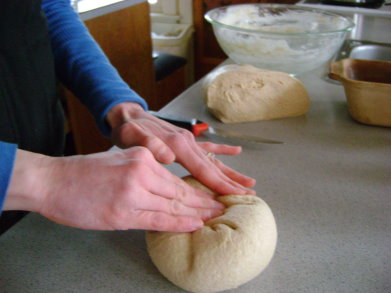
Shape your dough into balls.
Good job Asa , taking time away from your math assignment to come take pictures of your mother’s hands with the dough. Oh wait, I think I was blinking in that one.
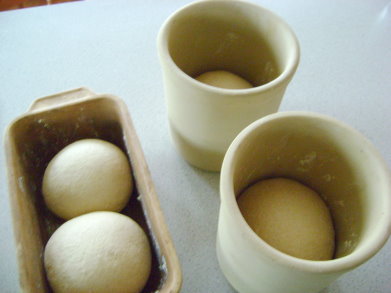
I prefer to use my round loaf pans from Pampered Chef. When I use my regular loaf pans, you’ll notice that instead of making one long loaf to fit the pan, I shape two balls and set them side by side into the pan. The sourdough rises much better this way. When you are deciding on the size of dough for your pan, think small. If you have too much dough in your pan, the bread not rise well and it will be very heavy.
Because the sourdough has been sitting and working all day, the natural yeast in it has been activated so that the bread rising in the pans will not take as long as the initial rising of the dough. In about three hours, my bread was ready to go into the oven.
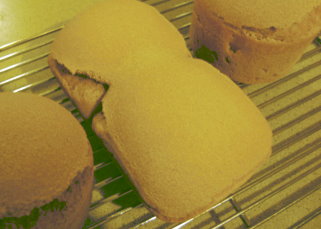
Bake your bread in a 350 degree oven for one hour or until the bread sounds hollow when you thump it.

I always have a hard time getting a “pretty” loaf of bread. The older the starter gets, the easier it will be to work with and the tastier it will be. We thought these loaves tasted great even if they were a little funny looking. The sourness was just right! In fact, it hardly tasted sour at all! (Also, I’m having trouble with the flash on my camera. I tried to fix the coloring on this very yellow original picture and this is the best I got since it is evening. I’ll keep making sourdough and keep taking pictures…hopefully I’ll be able to show you a better one soon!)
Now, the next time you want to make a batch of sourdough bread…get your starter out of the fridge in the evening. Pour it into a clean glass jar or bowl. Feed it by adding 1 cup of flour and some cold water. (You need to keep your starter fed about once a week whether you bake bread that often or not.) Place cheesecloth on top and let it sit in a warm place all night.
In the morning, if there are bubbles in the sourdough, indicating that the yeast has been activated, begin the above process of making a batch of bread…being sure to leave a few cups of starter in the jar for future use!
Want to figure out sourdough pancakes with me too? I’m working on it!
————————————————-

I think I can smell it from here! YUM!!
I was wondering if it would work to knead it in a machine with a dough hook?? :)
Thank you!! I am going to get my starter going tomorrow. It’s too late to grind the wheat right now & I’m headed for bed! :)
How neat! It looks yummy. I can’t wait to try it. By the way, if you ever hear of another resource for the round loaf pans, let us know. I tried to order some (long story), but unfortunately missed the boat and Pampered Chef is out of them now.
Andrea,
I know people who use large tin cans to bake their bread. I don’t know if all tin cans have the plastic lining? That’s probably not good…anyway something to check into.
I have heard that using metal pans of any kind with sourdough is not
advised. I’m not sure exactly why, but I was always told that you
should use only glass or stoneware for baking sourdough bread. Also,
the bowls you use to mix/rise should also be glass.
Thank you so much for this series of posts. I have always wondered if sour dough would turn out using whole wheat flour and I’m excited to try this out this week. Also wanted to let you know that I linked to this series on my blog.
Can’t wait for the sour dough pancakes!
Eww! Great job! They look great!
The texture of your dough looks perfect!!!
BTW, was that a Blue Bunny bucket in the back ground? ;-) lol
What about sourdough english muffins?
Donna asked, “Is that a Blue Bunny bucket in the background?”
Hehe, yeah that’s my FLOUR bucket!!! My friend had an abundance of them and gave me a couple to store things!!! Forgot all about that! I suppose it looked like we were having sourdough with a side of ice cream!
Thank you for the tutorial. I will get bread baking down I will get…..
SUCCESS! What a fun project this has been. I have never started my own sourdough, only benefited from other people’s work.
The dough was beautiful. I had added 1 cup of water each time instead of a smaller amount because I really enjoy the “sour” in sourdough. The smell is fabulous. I wish I could post a picture. I made 2 large loaves.
thank you Laura.
I have a recipe for sourdough english muffins, pancakes, and waffles if anyone is interested.
Hi, I recently found your website and from there your blog.
I just wanted to say thank you so much for sharing how to make sourdough starter and using it for bread! I have been wanting to do this for a long time.
I will be making some starter today.
I have a question about the baking part. May I just make a round of dough and put it on a baking sheet to cook?
Thanks again for sharing this valuable lesson.
Blessings, Deborah
Really dumb questions…when you say “work in the dough” and “knead”, how exactly do you do that? I’m sorry, I’ve never made bread from scratch before!
Thanks for the tutorial!
Thank you so much. I’ve been searching for too long for just this recipe for ww sourdough starter and bread. The tutuorial was such a bonus. Pampered Chef website said the round crocks are discontinued :0(
Any replacement suggestions? What size is your bread pan? Does this recipe make 2 loaves-that’s what it looks like to me.
Thanks again.
Looks delicious! I did the sourdough thing for awhile and now we’re gluten free. But this recipe for pancakes is so yummy. http://thebeginningfarmerswife.blogspot.com/2007/09/sourdough.html
Hello….I found your blog through a Kitchen Tip Tuesdays link and have been hooked ever since. :) I followed along as you went through your sourdough starter prep and then got the courage to go ahead and start my own. Something went horribly wrong, though!
Everything began okay, but then my starter on day three looked and smelled like how you describe day four. I went ahead and continued, thinking it might have had something to do with the crazy weather we have (I live in one of those no-snow states where snow ice cream is wishful thinking). The following days seemed okay, though there wasn’t a whole lot of liquid. When it came time to take some of the starter and make it into dough, it was so sticky! I kept adding and adding and adding and adding flour and it still wouldn’t begin to knead properly. After the 8th cup of flour and an hour of working the dough, I gave up and put the dough in the pans. I couldn’t form them into balls, they didn’t rise hardly at all, and they came out hard as a rock. My good, sweet, wonderful husband has been eating the bread faithfully (he’s never had sourdough before so he doesn’t know the difference. :) and he says it’s not so bad toasted), but I can’t bring myself to trying it.
I’m so sad. Can I blame it on the weather? :) The week I was making the dough our temperatures fluctuated from highs in the 50s to highs in the low 80s. Because it’s mild and our house stays comfortable, we don’t use the heater. However, that made it difficult to find a warm spot to place the starter each day. I would have tried above our refrigerator, but not only is that cabinet full of ’emergency’ paper plates and cups, it isn’t any warmer than our other cabinets.
Anyway, I wanted to share my tale of woe. I still have starter in the refrigerator….maybe I’ll try again…..
Hi,
I was wondering how much of starter, salt and water I would use if I only had one ceramic 1quart bread loaf pan? Ive made the starter now I just need to make the bread but Im not sure how much of everything I need for one pan? Thanks!
The bread turned out great! Thanks!
I am just learning to make sourdough bread. I was wondering what you do with the leftover starter. You post says you put in in the fridge – do you have to keep feeding it? If so, how often? How long can you keep your starter?
Thank you so much for posting such detailed instructions. I am really excited to try it out.
Thanks so much for your wonderful descripton and photo’s. I havent seen a better step by step guide in all my cooking travels. You’re a legend. Im all fired up to make some sour dough bread!!
My starter had a crust on top every evening with I fed it. I did lessen the water like you suggested but it still was too sour. When I baked the bread on the eighth day it barely rose and was too sour.
I’m continuing on with this starter and trying different flour. I also added a little vinegar which I read to try on The Fresh Loaf site.
My bread didn’t turn out either twice. It doesn’t raise much and is heavy. I am totally bummed. What kind of flour did you use? The pictures look like white flour.
Anyone have helpful hints?!? Please – I really want to make this work using whole wheat.
I’m curious to try making sourdough bread, and hope to begin with the starter this week, but looking through the instructions, I had a couple of questions. When you say that you need to feed the starter once a week after you begin using it, do you need to set it out overnight with the added flour and water and put it back in the fridge if you’re not baking with it or can you simply add the flour and water to the jar and stick it back in the fridge immediately? Also, do you think it would work to make free-form loaves and bake them on a pizza stone? I don’t have any glass or stone loaf pans, so that would probably be my best option.
Thanks for you simple, step-by-step instructions! I really appreciate you taking the time to put them up!!!
When you feed it once a week, let it sit out overnight to “get it going” before you put it back in the fridge.
Yes, making free form loaves and then baking on a pizza stone would work great!
Laura,
Have you ever tried rye flour w/ this recipe? I was excited to see it on the list as I have heard “sourdough rye” is sort of the classic, and I’ve never used rye before. Yikes. My dough was weird, not like bread dough at all, but I was afraid to add more flour. I let it rise almost 24 hours…but nothing happened. I will bake it into something today – maybe flat free form loaves in case I need to just make it into croutons!!! — but it’s really quite scary. My starter has been successful with other bread (recipe here: http://sarahs-musings.blogspot.com/2008/07/sourdough-honey-whole-wheat-bread.html), so it’s not that. The other weird thing, and this is so ironic: when I added rye flour to my starter, it bubbled so high it overflowed my jar, which has never happened before! What an odd, backward experiment.
Sorry to type so much – but my main question is just if anyone has tried this with rye.
Thanks!!!
Katie
Ooh, sorry. I haven’t used rye so I don’t know.
One idea I have is that maybe it worked with the honey bread recipe because the added sugar (honey) helped to activate the yeast?
I am work full time and did not have the time for day 8 on a weeknight. I did want to make some bread with my starter though, so I used a sourdough recipe calling for a starter and made a loaf in my breadmaker. Delicious. I am hoping next weekend to pull it out of the fridge and bake an additional loaf. When you refridgerate the starter, do you put a lid on it so it does not pick up fridge flavors?
Yes, I do put a lid on the jar when storing it in the fridge!
I started this whole process a few days ago. I realized this morning that I completely forgot to do anything with my starter yesterday!!!! Do you think it’s ruined or should I just carry on? I had done 3 days. Yesterday would have been the 4th. So, would I just make today the 4th day? Or throw the entire thing out and start over?????
SO sorry I’m very behind on answering questions!!! Not sure what you decided to do, but you would have been just fine to keep going with the starter as is. Again, so sorry I took so long to answer
What size loaf pan did you use? 9×5? I only have 2 9×5 stoneware pans and am wondering if I could divide the dough between those 2 pans instead of 3. Will that mess things up?
I use a 9×5 too. You don’t want to put too much in the pans…so if you only have 2 pans, it would be better to cut the recipe in half I think.
Okay, so I did this whole process twice….EXACTLY as you said to do it. It didn’t work either time. :( The dough never rose. Any idea as to what I’m doing wrong???
Oh, how frustrating! I’m guessing that you need to go beyond the eight day starter process and keep feeding it for several more days to get it REALLY going. It certainly won’t hurt it to stay on your counter for several more days being fed. Hopefully that would kick in in gear. Or, if you still have the starter that never rose, pull that out again and feed it for several days until it gets really bubbly and starts growing, then try making bread again. The older the starter, the better it works.
Hope you find success with this. It really is a tricky process sometimes!
I make bread on a very regular basis for our family. Should I keep my starter out on the counter and feed it daily in order to have enough starter for bread to be made several times a week? Does it ever NEED to be refrigerated?
If you just keep using it, I don’t think it HAS to be refrigerated at all.
Okay, dumb question…what is sourdough starter???
Well, it may be easier to explain if you go back to the beginning of this sourdough series and read though it to see how it works! https://www.heavenlyhomemakers.com/category/sourdough-starter Sourdough starter is basically a way to make bread without commercial yeast, but with natural yeast from the air!
Thank you, thank you, thank you!! I’ve been fiddling with a sourdough starter for over a year, and now realize (after reading your wonderful blog) that I was STARVING the poor thing. I have revived it to a happy, bubbling blob and just made the most spectacular loaf I’ve ever made. Thanks so much–
H
Hi Laura! I’m really excited about this….but I’m a little confused. At the end you said to leave 2-3 cups for future use. Then you said to use 3-4 cups to make the bread.
My questions:
1) Does that mean next time I use ALL of my leftover starter for my bread, add new flour, let it sit overnight, THEN remove another 2-3 cups for future use?
2) If I only saved 2 cups….should I decrease the other ingredients, or can you be flexible with the amount of starter in there?
I hope my questions make sense!! Thanks Laura!
That IS confusing…what was I thinking????
Let me go back in and edit both posts so that they make more sense. :) It is true though that you can be flexible with the amount you use!
I can’t find these answers in your previous posts. did I miss that? I also want to know how to do that.
I’m in the process now of resurrecting my sourdough starter so that I can become more of a sourdough expert. I’ll repost about it once I have more of this figured out!
For beginners like myself, I have found it was easy to mix and get the feel of the dough with a smaller recipe. I use 1 cup starter, 1/2 cup water and between 2.5 – 3 cups of whole wheat flour. I use a 1/4 cup of honey and 2 tablespoons of coconut oil or olive oil also. I have noticed the heavier/coarser the flour the less you use. One thing about your instructions, I have read not to re-knead after your initial kneading. It’s my understanding that you want to keep the air bubbles that have developed. Just use whatever pressure it takes to form your shape. I also use the 8-12 hour rule for each step and have not really messed up since I first started a month ago. Another thing I read that helped me is the feeling of the intial dough. Add slowly, like 1/2 cup at a time. Stop adding when the dough is still moist, but not sticky. If you go beyond that, the bread will be too dense. I also use an oblong ceramic pyrex dish after using a fold and roll loaf technique I found online. Put a cookie pan in the bottom of your oven and fill with a cup or 2 of boiling water before you put the dough in. Place dough in cold oven and set to 375 for 55 minutes. Hope this helps other beginners like me!
Also, start the timer once the oven actually hits 375, sorry.
One more thing, unless making a large batch of dough, I would
start with room temperature water. No need for cold water to slow the
reaction.
I made my first attempt at sourdough bread. It was quite sour like my husband likes it, thanks for the tips on making it more sour.
My loafs were quite dense though. Any suggestions on something I may have done differently to make them not so dense?
That’s pretty typical, and will get better as your sourdough starter ages. It may need a little bit more rising time, but overall I’ve found that my sourdough is a little more dense that regular breads.
Great, thank you for the quick response. I made a second batch
yesterday and it turned out a bit better. I really appreciate
all your tutorials on cooking. Thank you again for helping me
be a better wife and mom to my family with healthy cooking.
so I did this over 9 days (because I was too busy on day 8 to bake the bread) Apparently I didn’t catch enough yeast because my dough barely rose at all. Me being super frugal, I don’t want to throw out what is left of my starter to start all over, but I was wondering the best way to try to save it. Should I add some active dry yeast to it? Should I let it sit out on the counter and keep feeding it on a daily basis and hope that it finally catches enough yeast? Any suggestions?????
Oh good…I’m glad you didn’t throw out your starter!!! Go ahead and let it sit out on your counter for several more days, feeding it every day or every other day. During the winter it sometimes takes a little bit longer…you WILL capture that yeast soon!!
Hi Laura,
You mentioned that when you want to make bread again, you need to pull the starter out of the refrigerator and feed it with 1 cup flour and some cold water. About how much cold water do you use?
Thanks for your help!
1/2-1 whole cup, depending on how thick/thin you want your starter. Remember, the thinner it is, the more sour tasting the bread.
Laura, this is great! :)
I had enough for six loaves! My first two, I let quadruple in size the second rise. Consequently, they didn’t rise in the oven. I researched and found that after rising so much out of the oven, they didn’t have any more “umph!” to rise in the oven.
My next batch I paid closer attention to the bread while rising. Once it had doubled, I put it in the oven! They are so delicious! I’m so thankful you provided this tutorial! My great great grandmother would be so proud!
Thanks for the great website. The last two days of getting my starter going a thick layer formed on the top. I noticed a white mark that appeared to be the beginning of mold. Each day I just removed the thick layer and continued as you directed. It was bubbly under the layer and smelled sour like you said. Any tips?
Thanks again.
Sounds like you’re doing it right, with removing the white layer and continuing the process. This is exactly what I would have recommended.
I made bread today. It tasted kinda like it smelled. lol Is that the “sour”. This is much different tasting than the store bought sourdoughs. So as I feed my starter I should have less water for a less sour? Thank you for the step by step instructions! They are great! One suggestion, link to the day before and the next day on the post.
Thanks for the suggestion! Yes, less water will give you less sour! :)
The last couple of days, since I started decreasing the water, my starter didn’t rise Like before(tho it still had bubbles)and had a greyish layer on top. I scraped as much as I could off before feeding it, but then when I went to make bread, it didn’t rise at all (left it overnight). What am I doing wrong?
My starter gets a crust on it. Is this ok? It still smells good. Doesn’t look bad and the finished bread tastes good. Why am I getting a crust? What can I do to prevent this?
Thank you.
Yes, that’s fine. It’s just caused by the air, so it gets a little dry. You may want to cover it with an additional layer of cheesecloth.
I keep my fresh ground flour in an ice cream bucket too–in the freezer. When I grind flour to make my bread, I always grind extra so I have some to pull out of the freezer to make muffins or pancakes or whatever else. The vitamins and antioxidants and all the good stuff in the fresh wheat that disappears after 72 hours stays if the flour is frozen.
I started my starter 8 days ago, but I think I have a problem. The first few days I had a good amount of liquid and puffy looking on top and smelling quite foul. Since then I have little liquid, less odor and no bubbles at all…any suggestions? Time to try again?
Hmmm…Not sure exactly what killed it. It might be a good idea to just start fresh.
You could also try to continue and see what happens. It may still be good. :)
Hi!! Where did you get such a good baking pan? Is it ceramic ?
I got it from pampered chef – It’s stoneware. :)