Heavenly Homemakers

Encouraging women in homemaking, healthy eating and parenting

  • Home
    • About
    • FAQs
  • Recipes
    • Bread and Breakfast
    • Condiments
    • Dairy
    • Main Dishes
    • Side Dishes and Snacks
    • Desserts
    • Gluten Free
    • Instant Pot
    • Crock Pot
    • Heavenly Homemaker’s Weekly Menus
  • Homemaking
    • Real Food Sources
  • Store
  • Contact
    • Advertise
    • Disclosure
    • Privacy Policy
  • Simple Meals
  • Club Members!

Homemade Sausage Gravy

January 1, 2012 by Laura 65 Comments

This post may contain affiliate links which won’t change your price but will share some commission.

Biscuits and Gravy

Have I ever told you about the time I made a cream gravy for a special boyfriend many years ago? We had reached our six month dating anniversary, and so, to celebrate, I was making him a dinner of hamburger steak, mashed potatoes, gravy, and I can’t remember what else.

Everything was coming along pretty well. I called my mom five or twenty times while I was preparing the food, mostly so that she could walk me through the gravy making process. I thought I had it all figured out and soon, it was time for us to enjoy our meal together.

But the gravy. Somehow between hanging up the phone with mom, calling my boyfriend in for the meal, and serving the food – the gravy (if, in fact, we can call it gravy) had turned into a thick, heavy paste like substance. How could this have happened?

Never fear. My boyfriend was very kind. He simply got a butter knife and spread chunks of gravy onto his meat and potatoes. Then he proceeded to eat heartily, and even complimented me on the great flavor of the food.

Yeah, he was a nice one all right. I shouldn’t have let that one get away. Oh wait. I didn’t. A few months after I made him choke on gravy, that nice boy asked me to marry him. I guess he figured that if he could survive my gravy, we could get through anything – thick and thin. (Ha, get it? Thick and thin? The gravy was thick. Get it? Okay, it wasn’t that funny.)

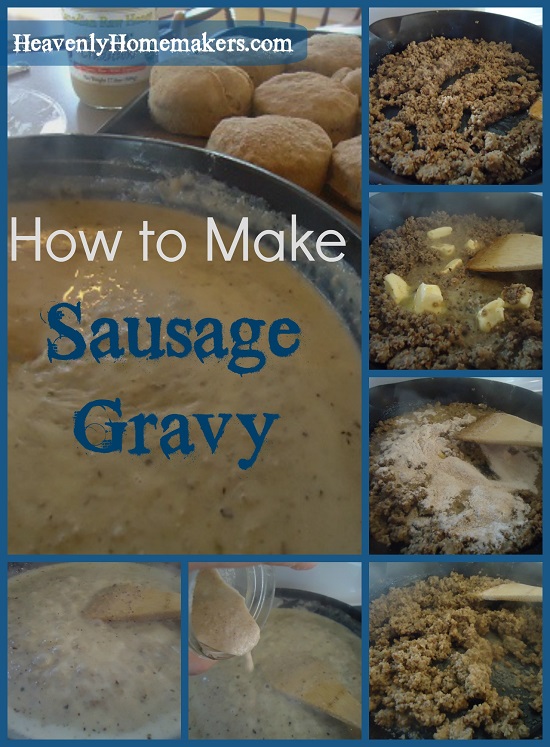
I have since then perfected my gravy making skills, much to the delight of my boyfriend husband, and all of our darling offspring. Here is my sausage gravy recipe and a picture tutorial that will hopefully spare you all from making the same pasty mess that was once my “gravy”.

Homemade Sausage GravyYum

1 pound turkey sausage (I like using this homemade recipe.)
1 Tablespoon plus 3 Tablespoons butter
3 Tablespoons flour (I use freshly ground white whole wheat)
2 1/2 cups milk
Sea salt and pepper to taste

Begin by browning the sausage with one tablespoon of butter in a large skillet until it is cooked thoroughly.

Add the remaining 3 tablespoons of butter, stirring it around until is has melted.

Sprinkle in the flour. Stir it around with the meat and butter until it is absorbed.

You should now have kind of a thick, meat mixture in your skillet. Turn the heat on your burner up to “high”.

Pour in the milk, and stir constantly. I find that I must leave the burner turned to “high” in order for the gravy to thicken.

Continue to stir over high heat until gravy becomes thick and bubbly. Remove the gravy from the heat, add salt and pepper to taste, and serve.

Trouble shooting your gravy:  If your gravy turns out too thick, simply add more milk, small amounts at a time, continuing to stir, until gravy is the desired consistency.

If your gravy fails to thicken, mix a “paste” of 2 Tablespoons flour with 3 Tablespoons of water. Stir the mixture into your gravy, little bits at a time until the gravy thickens to desired consistency. Do NOT sprinkle flour directly into the gravy. That’s how lumpy gravy is made. :)

We love this gravy served over these Whole Wheat Biscuits.

Have any fun stories about boyfriends or gravy you’d like to share? :)

Heavenly Homemaker's Club Members: Access your homepage and all your fantastic resources here! Not a member yet? Please join us!

High Five Recipes: Chicken Fried Steak Strips

February 9, 2010 by Laura 79 Comments

This post may contain affiliate links which won’t change your price but will share some commission.

You can easily make Chicken Fried Steak into yummy strips which are easy to eat! Now a little tip…

High Five Recipes 2

I do almost all of the cooking around here…not because Matt can’t or won’t cook. I just really, really love to cook and have more time to be in our kitchen.

However, ever since Matt started working at a restaurant, he’s been quite a bit more interested in learning about food preparation – and guess what? My husband has a really great cooking tip for you today.

chickenfriedsteakstrips2sm

Yes indeed, this nugget of Chicken Fried Steak Strip wisdom is brought to you by the Heavenly Homemaker’s Husband! (Maybe you knew this tip already, but I didn’t.)

Here’s what he shared with me the last time I made these Chicken Fried Steak Strips:

If you keep dipping the meat in the flour and then in the milk and then back in the flour and then back in the milk and then back in the flour and then back in the…

It will make an extra yummy, extra crispy coating on the outside of the strip.

My strips were good, but I had just been single dipping. Following Matt’s advice, I am now double and even triple dipping. Now, they are Oh My Goodness Amazing. All thanks to my husband. I love that man. You will too after you try his double/triple dipping advice. But you can’t have him. He’s mine.

Chicken Fried Steak StripsYum

High Five Recipes: Chicken Fried Steak Strips
 
Save Print
Author: Laura
Ingredients
  • 1 pound beef cube steak
  • 1¼ cups whole wheat flour
  • ½ t. garlic powder
  • ¾ cup milk
  • oil for frying (I usually use Palm Shortening)
Instructions
  1. Cut cube steak into 1 inch strips.
  2. In a bowl, stir together flour and garlic powder.
  3. Pour milk into a separate bowl.
  4. Heat oil in a skillet (350° for electric skillet or medium heat on the stove top).
  5. Dip beef strip in milk, then in flour mixture.
  6. Dip, repeat. Dip, repeat. Dip, repeat. (More or less is fine.)
  7. Place strip in oil.
  8. Cook for about 7 minutes on each side. (Salt to taste.)
3.4.3177

Chicken Fried Steak StripsSo let’s review: The more you dip, the better the strip. You’ve gotta try it!

Read a great tip about Preparing Ahead and Flash Freezing your Chicken Fried Steak Strips here!

Heavenly Homemaker's Club Members: Access your homepage and all your fantastic resources here! Not a member yet? Please join us!

Join Our Community!

 Facebook Twitter RSS E-mail Instagram Pinterest

Popular Posts

~ Will All of the Real Moms Please Stand Up?
~ Easy! Stir-and-Pour Whole Wheat Bread
~ How to Make Gatorade
~ 31 Real Food Breakfast Ideas
~ Dear Teenage Girls...
~ When Mom Takes a Step Back
~ The Inexpensive Health Insurance We Love!
~ Let's Talk Real Food Grocery Budgets

Check out our latest posts!

  • How to Make Uncrustables
  • The Easiest No-Bake Cheescake
  • Do I Still Buy Organic Food?
  • How I Shop and Budget for Our Large Family
  • Why I Make Little Birthday Cakes for my Big Family
Home  ~  Simple Meals  ~  Club Membership  ~  Shop  ~  Privacy Policy  ~  Disclosure  ~ Contact

Copyright © 2023 · Beautiful Pro Theme on Genesis Framework · WordPress · Log in