Heavenly Homemakers

Encouraging women in homemaking, healthy eating and parenting

  • Home
    • About
    • FAQs
  • Recipes
    • Bread and Breakfast
    • Condiments
    • Dairy
    • Main Dishes
    • Side Dishes and Snacks
    • Desserts
    • Gluten Free
    • Instant Pot
    • Crock Pot
    • Heavenly Homemaker’s Weekly Menus
  • Homemaking
    • Real Food Sources
  • Store
  • Contact
    • Advertise
    • Disclosure
    • Privacy Policy
  • Simple Meals
  • Club Members!

Make Easy Christmas Potpourri Gifts

November 25, 2020 by Laura Leave a Comment

This post may contain affiliate links which won’t change your price but will share some commission.

Need an easy homemade gift that is unique and inexpensive? These Easy Christmas Potpourri pouches are fun and simple!

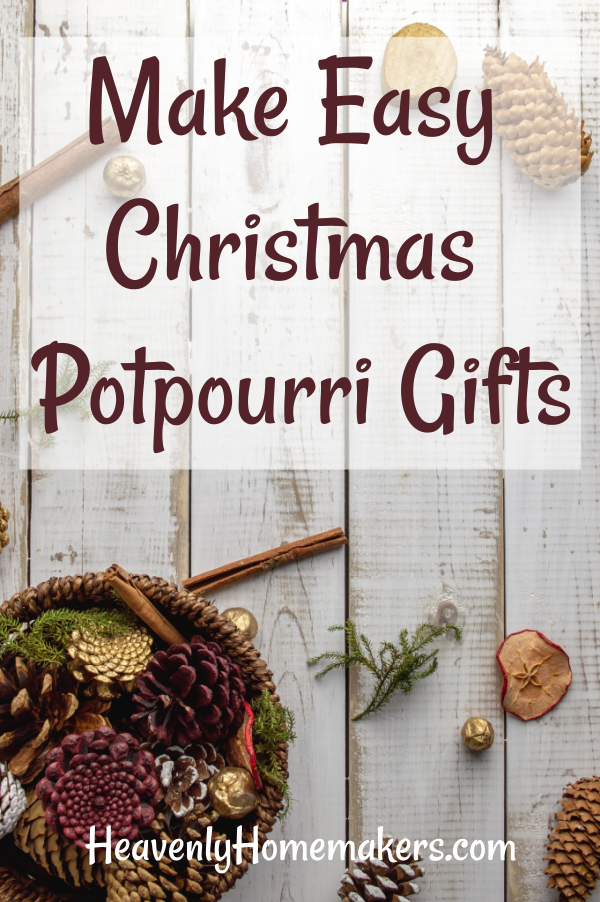
I began making these a few years ago and love how fun and easy they are. The combination of ingredients is perfect for the holidays, and you can make several at once which is very inexpensive and perfect for gifting teachers, neighbors, church members – whoever you want!

Easy Christmas Potpourri Gifts

Make Easy Christmas Potpourri Gifts
 
Save Print
Author: Laura
Ingredients
  • ½ cup cranberries
  • 1 small orange
  • 3 Cinnamon Sticks (use the code “HOME” for a 15% discount!)
  • 1 Tablespoon Mulling Spice (use the code “HOME” for a 15% discount!)
  • 2 Tablespoons Star Anise
Instructions
  1. Place all ingredients in a bag. (I use bags like these.)
  2. Tie up with a ribbon and a gift tag, which can be downloaded and printed below.
3.5.3251

Download FREE Christmas Potpourri Pouch Gift Tags Here.

Christmas Potpourri Gift Tags

I get most of my ingredients for these at Olive Nation (free shipping if you spend $50 or more; 15% off any size order when you use the code: home).

Other fun things to make with cinnamon sticks

If you’re going to take advantage of that 15% discount I mentioned and grab cinnamon sticks from Olive Nation (I buy them in large quantity this time of year!), here are some other great ways to use them:

Make Cinnamon Extract. Get the details and directions here.

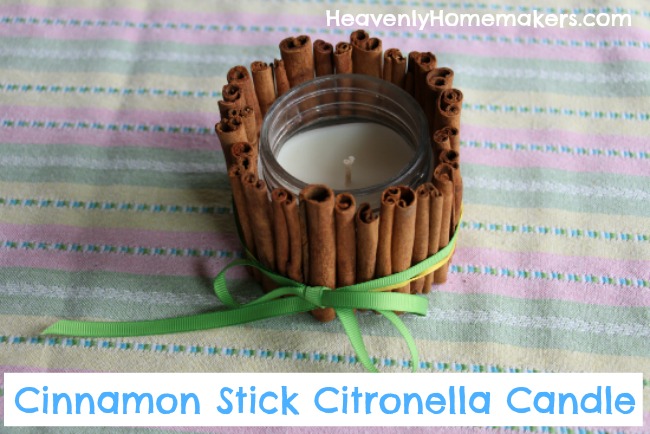
Buy a fun holiday candle and glue cinnamon sticks onto the jar for a fun and festive look! Get the details and directions here.

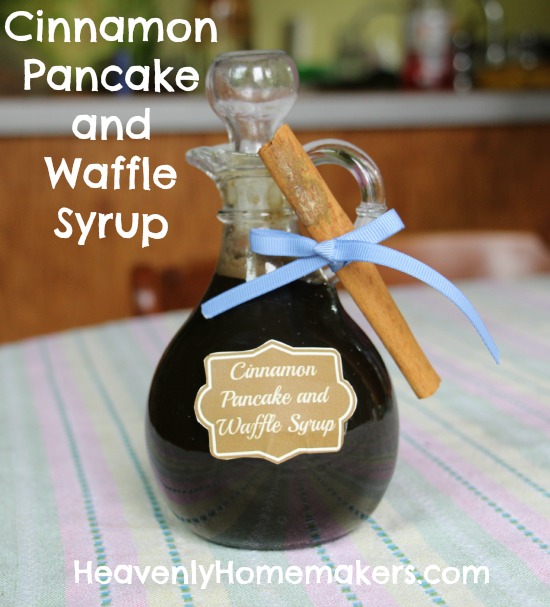
Make Cinnamon Pancake and Waffle Syrup. Get the details and directions here.

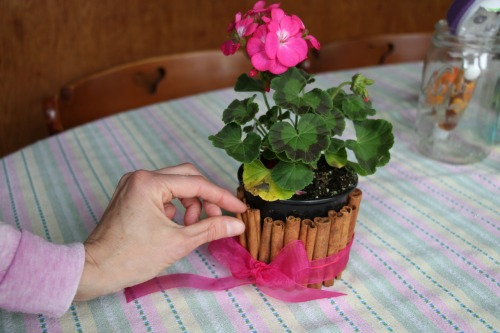
Purchase a small plant and glue cinnamon sticks around the pot. The example shown below is one I made in the summertime. But for a holiday gift, purchase a small poinsettia or another wintery plant. Tie with a red ribbon and you have a lovely gift! Get the details and directions here.

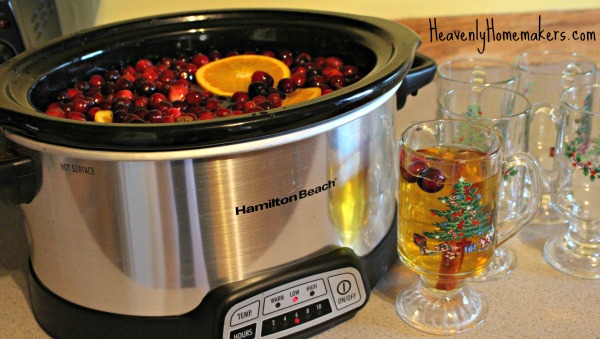
Make Crockpot Cranberry Apple Cider. This is always a hit with guests and so very easy to make!

Need another homemade gift idea?

Try making Homemade Vanilla Extract. EVERYONE loves receiving this gift!

Heavenly Homemaker's Club Members: Access your homepage and all your fantastic resources here! Not a member yet? Please join us!

Make Sensory Bottles for Infants and Toddlers ~ Homemade Gifts for Less Than $5

December 14, 2014 by Laura 1 Comment

This post may contain affiliate links which won’t change your price but will share some commission.

Where was this idea when my boys were babies? Lacie sent in these instructions and pictures. What a fun gift!

Homemade Sensory Bottles for Infants and Toddlers

Sensory Bottles are a cheap, easy gift for infants and toddlers. I purchased Voss waters because they look so cool! They are a bit pricey but since I can reuse the bottles I’m ok with it. ( I was able to find them cheapest on sale at Walgreens locally for $1.25 each.)

Drink the water. Then remove the labels and wash. Decide what you want your bottle to be. Obviously for $5 you can’t do a whole color set, but you could do 3 or 4.

I used only items I had on hand for the color ones. Some  Items I used:  Marker lids, pompoms, q-tips, crayons, colored pencils, buttons, pennies, scraps of paper or fabric, yarn, or ribbon, legos, small plastic animals, straws, plastic utensils, foam shapes, shoe strings, chalk, marbles, anything!

For the Christmas ones I did purchase things to put inside. The red and green rice one is easily made by mixing a capful of rubbing alcohol with a small amount of food coloring and putting it on rice. Mix together (wear rubber gloves or you will have colored hands). Lay out on paper towels in a thin layer stirring occasionally until it dries out. Then put it in the sensory bottle. The colored tinsel can be purchased at a dollar store.

You could do an eye spy one for any age, even older child by putting rice in the bottle with various small items (many of the ones listed above would work) and include a “To Find” List naming all the items you have included). The recipient can turn the bottle to move the rice around and find all the included objects.

You could do different sounds by placing small items that would make different sounds in each one (buttons in one, jingle bells in one, rocks in one, etc.).

The lids CAN be hot glued on to prevent spillage and a choking hazard. I have found that if I tighten them as tight as I can, I can barely get the lids off myself and have yet to see a little one even try to take them off.

This is not an original idea. My inspiration came from pinterest.

~~~~~~~~~~~~~~~~~~~~~~~~~~~~~~~~

Thank you, Lacie! Everyone be sure to check out all the other Homemade Gifts for Less Than $5 Ideas shared so far. I hope you are all enjoying this series as much as I am. So many wonderful ideas!

Heavenly Homemaker's Club Members: Access your homepage and all your fantastic resources here! Not a member yet? Please join us!

No-Sew Rice Heating/Ice Pads ~ A Great Gift for Men, Coaches, or Anyone for Less Than $5

December 10, 2014 by Laura 19 Comments

This post may contain affiliate links which won’t change your price but will share some commission.

No Sew Rice Heating and Cooling Pads

I came home from the store with socks, rice, and ribbon. Here are the questions I heard from my boys when they saw the supplies for this project:

  • Are those socks for me? (No, they are for a gift for your basketball coaches.)
  • You bought our coaches socks? (Yes, but it’s for a craft project.)
  • Why did you buy such a huge bag of white rice? (To put in the socks for your coaches.)
  • You’re putting rice in socks for our coaches. Why would you do that?

I have no idea why none of this made sense to my boys. It is so self-explanatory.

I quickly had to explain that we weren’t going to cook the rice before putting it into the socks. Still, I don’t believe the idea made sense until they saw the finished product, and even then, I think they thought it would have made more sense to just make our coaches a plate of cookies. I’ll admit, this is kind of a silly idea. But it’s a useful gift, so hopefully they’ll like it at least a little bit. :)

If you, like my boys, have never heard of this lovely Rice Heating Pad idea, allow me to share one of the easiest gift projects on the planet. There are many ideas for these out there, many of which include fabric, a sewing machine, and a pattern. This one though? It only involves socks. The clean kind. New is preferred.

No-Sew Rice Heating Pads

What You’ll Need

  • White Rice (raw, non-instant)
  • Essential Oil (optional)
  • Socks
  • 3/8″ Ribbon
  • Scissors
  • Tall Drinking Glass

How To Make No-Sew Rice Heating Pads

Fill the glass with dry rice. Add 1-3 drops of essential oil if you like (peppermint is a great choice). Fit the opening of the sock over the top of the glass filled with rice, as shown in the picture above, then turn the cup over to fill the sock with rice. Continue this until the sock is full, leaving 2-3 inches of empty sock at the top. (The rice in the drinking glass idea was the best way I figured out to fill the socks since using three hands was not an option that day.)

Tie a ribbon (grosgrain works best) securely at the top. If you want to be very sure the sock won’t open and spill, feel free to use a needle and thread to close the sock with a few stitches before tying the ribbon. We could just call that version “Barely-Sew” Rice Heating Pads.

Because I used large men’s socks, 5 pounds of rice only filled three heating pads. I have no idea what I will do with the odd sock. Maybe I’ll just add it to my laundry and let my dryer eat it. Or perhaps I should buy more rice and make more cool gifts.

How To Use Your Rice Heating Pad

If you have/use a microwave, you can heat this up for 1 1/2-2 minutes, then put it around your neck to keep warm or use it to relieve pain from sore muscles. Don’t want to use a microwave? Place your heating pad in a baking dish in a 300° oven for 10-15 minutes.

If you prefer ice to heat, store the rice pad in the freezer for cold therapy. Then you can call this your Rice Heating Cold Pad, which makes no sense but is fun to say.

Rice Bag Gift Tag Instructions

Download a page of Rice Bag Gift Tags

Since I’m making these for our boys’ basketball coaches, I bought socks in our team colors and basketball ribbon. Here’s football, soccer, more soccer, volleyball, softball, and baseball. You could also look for ribbon with your recipient’s favorite sport’s team.

Or, skip the sport idea altogether and pick fun socks and ribbon that fits any person on your list. From Hello Kitty to Duck Dynasty, I’m pretty sure you could tailor make these heating/cooling pads for just about anyone.

I figured this gift costs just a little over $2 each. Not too shabby!

Ever used a Rice Heating/Cooling Pad?

This post contains affiliate links.

Heavenly Homemaker's Club Members: Access your homepage and all your fantastic resources here! Not a member yet? Please join us!

How To Make Geoboards ~ Homemade Gifts for Less Than $5

December 8, 2014 by Laura 1 Comment

This post may contain affiliate links which won’t change your price but will share some commission.

Cantina sent in this idea, along with instructions and pictures. This is a great homemade gift for kids!

geoboard 1

Our middle child loves to build and he is great with a hammer. With a little help he is making geo-boards this year.

We had a scrap piece of lumber that he spray painted (picture above is the first one we did and it wasn’t painted). Then we use graph paper to hammer in nails in 2 inch squares. Don’t nail them all the way down. Then with colored rubber bands you can make all kind of fun shapes. My children have had the best time with this board and Elijah is now making a few for Christmas presents. The nails cost $1.97 per pack and the rubber bands were $.97 a pack. Since we had the scrap lumber and spray paint these will cost us under $5 per board.

How to Make a Geoboard

Thank you, Cantina! I think I will put my 12 year old on this project. What a fun idea!

Heavenly Homemaker's Club Members: Access your homepage and all your fantastic resources here! Not a member yet? Please join us!

Join Our Community!

 Facebook Twitter RSS E-mail Instagram Pinterest

Popular Posts

~ Will All of the Real Moms Please Stand Up?
~ Easy! Stir-and-Pour Whole Wheat Bread
~ How to Make Gatorade
~ 31 Real Food Breakfast Ideas
~ Dear Teenage Girls...
~ When Mom Takes a Step Back
~ The Inexpensive Health Insurance We Love!
~ Let's Talk Real Food Grocery Budgets

Check out our latest posts!

  • What to Make When It’s Too Hot to Make Dinner
  • How God Used My Cheesecake
  • Big Family Food and Fun: Meals and Photos from Last Week (May 17-27, 2023)
  • The Coppinger Castle
  • How Our Youngest Became Oldest of 9
Home  ~  Simple Meals  ~  Club Membership  ~  Shop  ~  Privacy Policy  ~  Disclosure  ~ Contact

Copyright © 2023 · Beautiful Pro Theme on Genesis Framework · WordPress · Log in