Heavenly Homemakers

Encouraging women in homemaking, healthy eating and parenting

  • Home
    • About
    • FAQs
  • Recipes
    • Bread and Breakfast
    • Condiments
    • Dairy
    • Main Dishes
    • Side Dishes and Snacks
    • Desserts
    • Gluten Free
    • Instant Pot
    • Crock Pot
    • Heavenly Homemaker’s Weekly Menus
  • Homemaking
    • Real Food Sources
  • Store
  • Contact
    • Advertise
    • Disclosure
    • Privacy Policy
  • Simple Meals
  • Club Members!

Unique and Easy Way to Transport Hot Food For Lunches

March 15, 2018 by Laura 6 Comments

This post may contain affiliate links which won’t change your price but will share some commission.

Apparently necessity is the mother of invention. Though I’d prefer to think that I’m the mother that came up with this great way to transport hot food for lunches.

Easy way to transport hot food for lunch

You will certainly love this “transporting of hot food” idea, but first I must tell you why we needed to transport the hot food in the first place.

I don’t think I ever told you about my husband’s latest entrepreneurial endeavor. (Please never make me say the word “entrepreneurial” out loud. I can barely type it, much less pronounce it. There are too many “r’s” in weird places and it is just too much for my mouth to handle.)

So about Matt’s latest entrepre– business venture. Several months ago he studied and apprenticed and studied some more, then he took two extremely difficult tests in order to become a licensed radon mitigator. What does a licensed radon mitigator do, you ask? Well, they mitigate radon, of course.

And by that I mean that he does a lot of hard work for many hours per project in order to safely and legally remove radon gas from homes. It is extremely hard work. There are pipes, holes, and fans involved, and that, my friends, is about all I know. Matt though? Well, he can do all the chemical equations and precise measuring and hole drilling and pipe placing and um…other stuff with brilliant accuracy. I am very proud and impressed with all he knows and does.

All this husband-bragging to tell you about my genius idea for sending a hot lunch to a work site with him. Oh please. If Matt can be a genius who mitigates radon gas out of homes in order to prevent people from getting lung cancer, surely my “here’s your hot lunch, Babe” idea is also genius. Nod and smile. Nod and smile.

portable food11

It all started on a cold day I was sending Matt off to another city for his latest radon mitigation job. Packed lunches are a must for these jobs so that he can grab a few bites and keep on working to get as many hours of work in as possible in a day. But sandwiches? Well, he is a bit tired of those at this point.

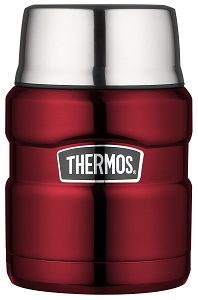
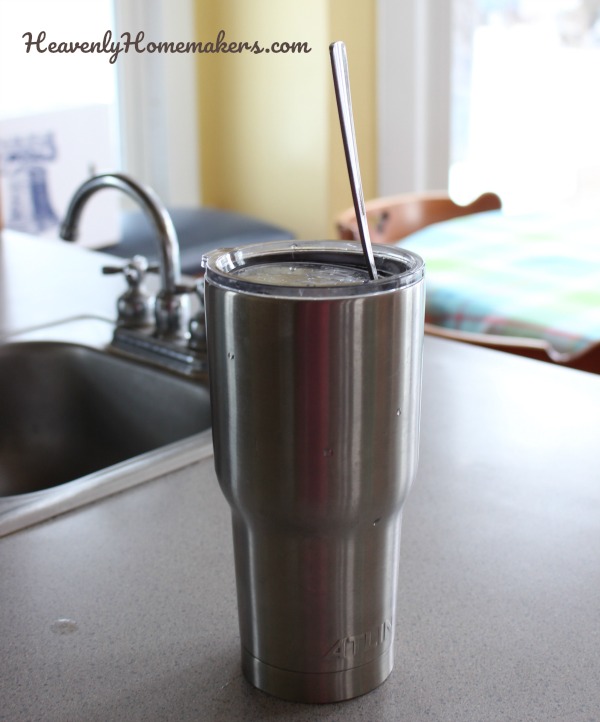
So I decided to try putting hot leftovers into the awesome “fake Yeti” Matt and the boys got me for Christmas. (By the way, actual Yetis are awesome but can be expensive! Matt found me this knock off for only $13, and it came with a stainless steel straw. I love it!)

I’ve been very impressed with how my insulated cup keeps hot drinks hot for HOURS! So I thought, surely it would keep hot food hot for hours too. I decided to give it a try, with a ready apology in advance to Matt if my brilliant idea provided him with barely tepid chicken and rice for lunch that day.

I’m happy to share that Matt’s lunch was piping hot that day, even after he let the cup sit in his cold truck all morning. (And by cold, I mean it was 15 degrees that day.)

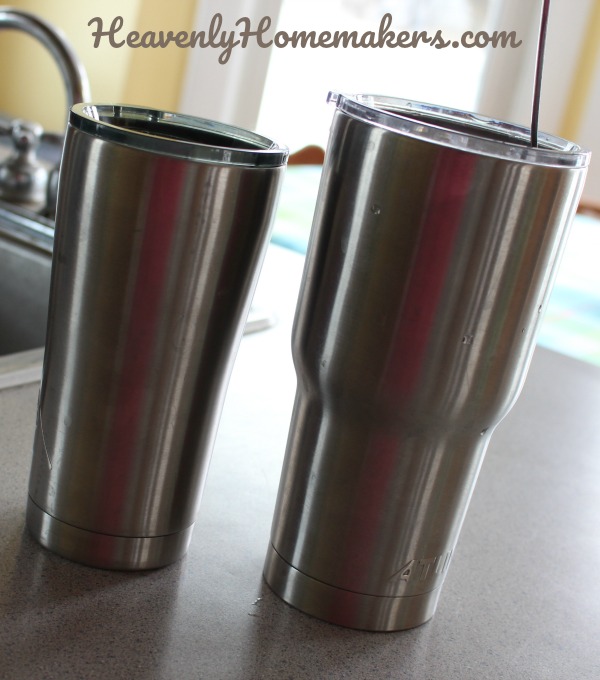
Oh, and do you see the fork sticking up through the drinking slot in the lid? Brilliant idea, if I do say so myself. I inserted the fork and let the end stick up through the mouth piece so he didn’t risk losing track of it. Also? The smaller insulated cup is one Justus had received as a gift. I filled it with steamed veggies to send along with the bigger mug filled with chicken and rice. Matt ate like a king that day. I was so glad to provide him with a great meal to help sustain him in his hard work day.

portable food22

Radon? You don’t stand a chance when my husband comes to take you on. Hot lunch for the hard working radon mitigator? No problem at all.

Quick Links for insulated cups to transport hot food (and drinks)

  • 30-ounce Double Wall Stainless Steel Mug with lid and straw
  • 20-ounce Double Wall Stainless Steel Mug with lid

These links are my affiliate links.

Heavenly Homemaker's Club Members: Access your homepage and all your fantastic resources here! Not a member yet? Please join us!

Beef Summer Sausage Recipe

November 25, 2014 by Laura 22 Comments

This post may contain affiliate links which won’t change your price but will share some commission.

Summer Sausage has always been a favorite finger food of mine during the holiday season. I’ve tinkered with recipes before, but haven’t felt like I’ve nailed them – until now.

Folks, we can now eat Summer Sausage – worry free. High fives all around!  No MSG, no nitrites, no preservatives. Actually, salt is a natural preservative, so I guess I can’t say “no preservatives.” But the least of my worries is sea salt, especially when I use Redmond. That means that “summer sausage” and “good for you” can be used in the same sentence. Yay!!!

I think you’ll be as excited about this recipe as I am. It’s homemade beef summer sausage!! You will not believe how crazy easy this is to make.

Homemade Beef Summer Sausage - Easy and Healthy!

Homemade Beef Summer SausageYum

5.0 from 1 reviews
Beef Summer Sausage Recipe
 
Save Print
Author: Laura
Serves: 2 sausages
Ingredients
  • 2½ pounds hamburger meat
  • 2½ Tablespoons liquid smoke (I prefer Wright's Brand)
  • 1 Tablespoon sea salt (I prefer Redmond brand)
  • 1 teaspoon sucanat
  • 1 Tablespoon ground pepper
  • 1 Tablespoon minced garlic
  • 1 Tablespoon mustard seeds
Instructions
  1. Mix all ingredients together in a bowl, squishing with your hands until everything is well combined. Cover and refrigerate for 24 hours.
  2. Knead meat mixture, then shape into 2 logs, about 13x2 inches each. (I found that rolling them in parchment paper helped form a nice, round shape.)
  3. Place logs in baking dishes such as Pyrex 9x13 inch pans (so fat drippings will not spill over into the oven).
  4. Bake in a 300° oven for 2½ - 3 hours.
3.4.3177

To freeze Summer Sausage:  Allow baked summer sausage to cool completely. Wrap in parchment paper, then with plastic wrap. Place in a freezer bag, storing in freezer for up to 2 months.

As if it wasn’t already wonderful news that we can enjoy healthy summer sausage – it’s even better news that this will be perfect for your Make-Ahead Lunch Box. I’ll be packing this for road trips, for sure.

Share with us! What’s your favorite holiday finger food?

Heavenly Homemaker's Club Members: Access your homepage and all your fantastic resources here! Not a member yet? Please join us!

Re-Usable Containers For Your Make-Ahead Lunch Box

August 21, 2014 by Laura 6 Comments

This post may contain affiliate links which won’t change your price but will share some commission.

Let’s talk about food containers to go along with our Make-Ahead Lunch Box series.

I love all the eco-friendly packaging available now. Occasionally, we still use a disposable ziplock baggie or two. But if at all possible, packaging “to-go” foods in containers we can wash and reuse just makes so much more sense – and saves so much money!

You all know I have and love this Pyrex Storage 10-Piece Set. The lids in this set seal very well. The variety of sizes offer great options for packing side dishes of cut fruits and veggies, or main dishes like pasta salads and wraps.

pyrex

As I was looking at other great options to share with you, I came across a good price on this 10-Piece Set of Round Glass Storage Bowls. Oh yeah, I filled them up in my head within about 2 seconds of looking at them. Fruit salad, potato salad, soup, pasta salad, tossed salad, pasta leftovers…

glass storage

If you’re more into BPA free plastic for packing lunches, I like these Fit & Fresh 1-cup containers at iHerb. I love that they have a built-in ice pack to keep food cold. Even better, iHerb will give you a free $10 (with $40 purchase) if you purchase through my referral links. So click here if you want to get these containers for FREE, along with some other goodies! (You can also use the code BID487 at check-out to receive $10 off your $40 purchase. Shipping at iHerb is free with orders over $20.

fit fresh

I really like these Lunchskins re-usable sandwich and snack bags. BUT, I don’t recommend you pay these Amazon prices. Surely you can find them cheaper at an actual store? What has been your experience purchasing these types of bags? Is there a store you can suggest? My small town doesn’t offer items like this that I know of.

lunchskins

How about for packing hot food? I’ve heard from several of you that thermoses just don’t hold enough food. I found this 16-ounce stainless steel thermos that seems to be a good option. At least it would hold more than a 10-ounce thermos, right?

thermos

What do you use for packing food to go?

This post contains affiliate links.

Heavenly Homemaker's Club Members: Access your homepage and all your fantastic resources here! Not a member yet? Please join us!

Ham and Cheese Pasta Salad ~ The Make-Ahead Lunch Box

August 19, 2014 by Laura 8 Comments

This post may contain affiliate links which won’t change your price but will share some commission.

The Make-Ahead Lunch Box

Sick of sandwiches? Need fresh, healthy lunch ideas? Whether or not you pack lunches or eat lunches at home, I believe we can all use some new, easy, and quick lunch ideas. Recipes that can be made ahead of time and pulled out for immediate use? Even better.  Follow along with this Make-Ahead Lunch Box series – and share your ideas too!

~~~~~~~~~~~~~~~~~~~~~~~~~~~~~~~~~~~~~~

What’s fun about this recipe for Ham and Cheese Pasta Salad is that you can add veggies to your liking. Don’t like sweet peppers? Add extra cucumbers. Don’t like cucumbers? Add extra carrots. Don’t like carrots? Oh, come on.  Surely we can come up with some vegetables you like. :)

Feel free to switch out the ham for chicken, take out the cheese if you need to go dairy free, and stick with brown rice pasta if you need to eat gluten free. See how accommodating this meal is?

Ham and Cheese Pasta Salad

24 ounces whole wheat or brown rice pasta
1 pound ham, cut into chunks
8 ounces cheddar or Colby jack cheese, cut into chunks
16 ounces frozen peas (uncooked)
4 cups chopped veggies of your choice (green, red, yellow, and orange peppers; onion, tomato, cucumbers, carrots)
sea salt to taste
4 Tablespoons Italian Salad Dressing
1 1/2 cup Ranch Salad Dressing

Cook pasta until just tender. Drain and rinse under cold water. In a large bowl, stir together cooked pasta, ham, cheese, peas, and chopped veggies. Toss with Italian Salad Dressing and salt. Stir in Ranch Salad Dressing until coated. Chill for at least 2 hours before serving. Makes 8-10 main dish servings. (<— That is a great, big bowl full.)

Ham and Cheese Pasta Salad Lunch

To prepare for the lunch box:

Scoop salad into containers with lids. (I like using Pyrex bowls with lids like these or like these.)  Store individual containers in the refrigerator until packing for a lunch. Be sure to pack an ice pack in the lunch box to keep the salad cold!

Side dish ideas:

  • Fresh fruit like cantaloupe, grapes, and strawberries
  • Hard boiled eggs
  • Olives
  • Pickles
  • Homemade Chewy Granola Bars
  • Raspberry Lemon Cream Cups – recipe coming soon!

I love that this pasta salad is a full meal all by itself – with whole grain pasta, meat, cheese, and lots of veggies! I love even more that it can be put together ahead of time and pulled out as needed.

What are your favorite veggies to add to pasta salad?

Heavenly Homemaker's Club Members: Access your homepage and all your fantastic resources here! Not a member yet? Please join us!

Whole Wheat Pizza Swirls ~ The Make-Ahead Lunch Box

August 10, 2014 by Laura 13 Comments

This post may contain affiliate links which won’t change your price but will share some commission.

The Make-Ahead Lunch Box

I’m excited to kick off our new Make-Ahead Lunch Box series with a fun new recipe I recently tried for my family. We all love these Whole Wheat Pizza Swirls.  Here are my favorite perks to this recipe, and why I think this is perfect for your Make-Ahead Lunch Box:

  • You can make Pizza Swirls ahead of time, wrap them individually, and store them in the freezer until you need them.
  • You can fill the Pizza Swirls with any of your favorite toppings, making this recipe versatile and ideal for accommodating food preferences.
  • These taste great both hot and cold.
  • Pizza Swirls are simple to make.
  • Pizza Swirls are filling and easy to eat.

Whole Wheat Pizza SwirlsYum

1 recipe of Whole Wheat Pizza Dough
1 cup pizza sauce
2 cups shredded cheddar or mozzarella cheese
3 Tablespoons grated parmesan cheese
variety of pizza fillings – your choice – like meat, olives, and veggies
2 Tablespoons olive oil (optional)

Mix Whole Wheat Pizza Dough as directed. On a clean, well floured surface, roll dough into a long oval until it is about 1/4 inch thick. Spread pizza sauce over the dough. Sprinkle with cheeses and your favorite pizza toppings. Roll the dough up, beginning on the long side. Tuck the ends under. Place on a cookie sheet. Spread olive oil over the top if you like. Bake in a 375° oven for about 15 minutes or until the top is golden brown. Slice and serve. Makes about 8-10 Pizza Swirls.

Whole Wheat Pizza Swirls

Bonus Tips:

  • Want to pack these Pizza Swirls to go? Once the swirls have cooled completely, wrap them individually and place them in an air tight container in the freezer. Set frozen wrapped Pizza Swirl in the fridge overnight to thaw to pack in a lunch box the next day.
  • Need to eat Gluten Free? Copy the idea and use your favorite gluten free dough recipe.
  • Tired of pizza? Skip the sauce and use turkey or chicken with cheese to make Meat and Cheese Swirls.

Great to Serve with Pizza Swirls:

  • Fresh fruit like apple slices, orange slices, peaches, cantaloupe, pineapple, or pears
  • Carrot sticks, sliced cucumbers, celery, or sweet peppers
  • Olives or pickles

I double, triple, or quadruple this recipe so that I can make lots at once to make my getting-ahead efforts worthwhile. This also means I can make a variety of different Pizza Swirls to have on hand. Our favorites are:

  • Pepperoni and Cheese
  • Combination (meat, cheese, green peppers, mushrooms, olives)
  • Hamburger and Green Pepper
  • Pepperoni and Olive

What kind of pizza swirls do you think your family will like? Have any other ideas you feel would be good to serve with Pizza Swirls (especially ideas that will pack well in a lunch box)?

Heavenly Homemaker's Club Members: Access your homepage and all your fantastic resources here! Not a member yet? Please join us!

Join Our Community!

 Facebook Twitter RSS E-mail Instagram Pinterest

Popular Posts

~ Will All of the Real Moms Please Stand Up?
~ Easy! Stir-and-Pour Whole Wheat Bread
~ How to Make Gatorade
~ 31 Real Food Breakfast Ideas
~ Dear Teenage Girls...
~ When Mom Takes a Step Back
~ The Inexpensive Health Insurance We Love!
~ Let's Talk Real Food Grocery Budgets

Check out our latest posts!

  • Big Family Food and Fun: Meals and Photos from Last Week (May 17-27, 2023)
  • The Coppinger Castle
  • How Our Youngest Became Oldest of 9
  • May 1- 17, 2023 Groceries and Meals We Ate (Big Family Food!)
  • The Coppingers Have Decided to Move
Home  ~  Simple Meals  ~  Club Membership  ~  Shop  ~  Privacy Policy  ~  Disclosure  ~ Contact

Copyright © 2023 · Beautiful Pro Theme on Genesis Framework · WordPress · Log in