Heavenly Homemakers

Encouraging women in homemaking, healthy eating and parenting

  • Home
    • About
    • FAQs
  • Recipes
    • Bread and Breakfast
    • Condiments
    • Dairy
    • Main Dishes
    • Side Dishes and Snacks
    • Desserts
    • Gluten Free
    • Instant Pot
    • Crock Pot
    • Heavenly Homemaker’s Weekly Menus
  • Homemaking
    • Real Food Sources
  • Store
  • Contact
    • Advertise
    • Disclosure
    • Privacy Policy
  • Simple Meals
  • Club Members!

Easy Orange Julius

June 2, 2021 by Laura 3 Comments

This post may contain affiliate links which won’t change your price but will share some commission.

This Easy Orange Julius is a perfectly refreshing summer treat!

You guys. I totally cheat now when making so many of our meals and snacks. I only make whatever is the easiest and fastest because there are people to love and we just wanna play outside.

I’ve made Orange Julius for our family for years and years. But this little “cheater” idea came about after a local church had offered a food distribution to our community. They had several boxes leftover at the end of the day, and since we have so many kids, they thought of us. How kind and fun! They piled five boxes of food onto our porch, and we were super grateful!

Some of the items included in the box? Vanilla Yogurt, Milk, and Oranges

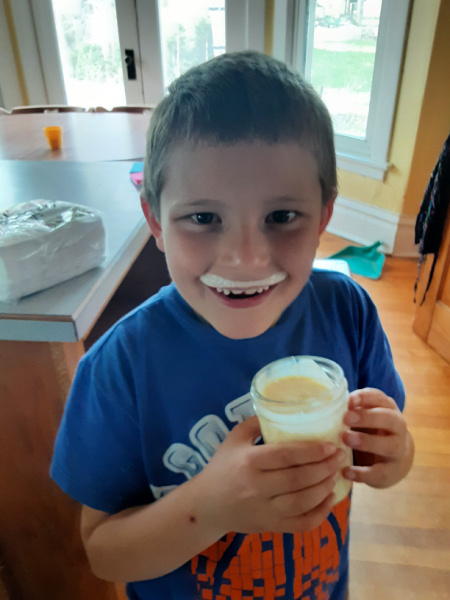
Does that sound like a delicious Orange Julius to you? Indeed it does. Brayden thought so too. :)

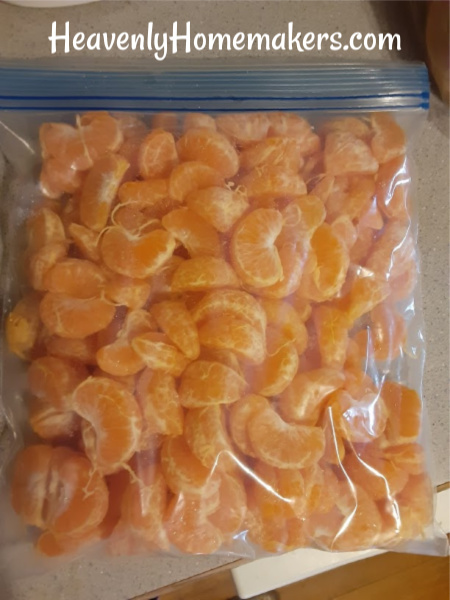
With a huge pile of oranges rolling off of our countertops, we started with an “Orange Peeling Party.” Our kitchen smelled citrus-y good, and soon we had several bags of these frozen orange slices:

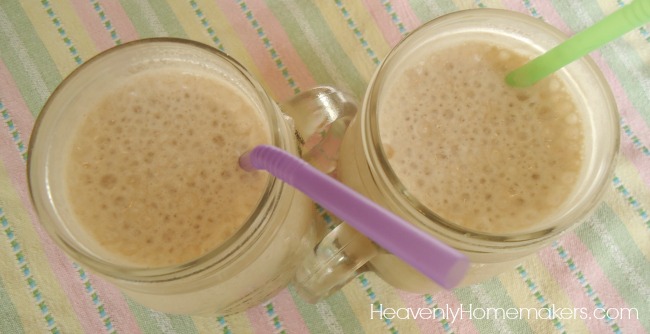
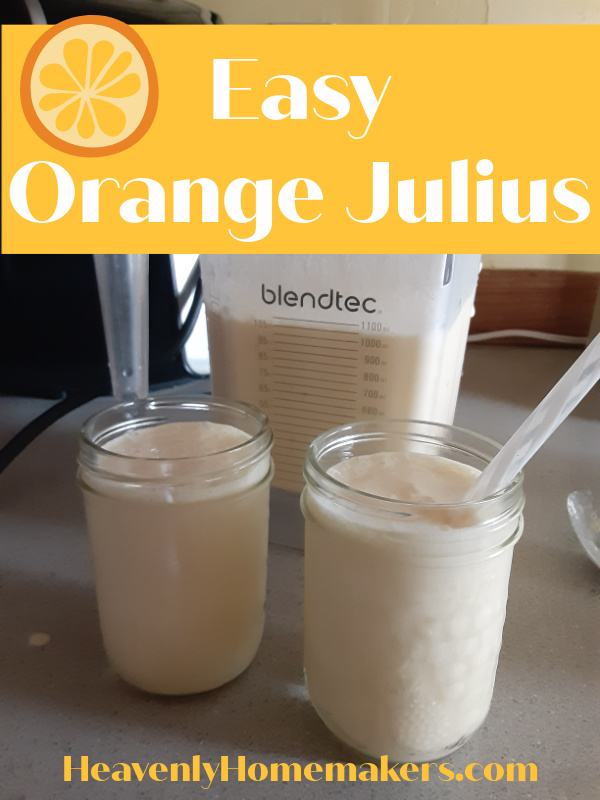
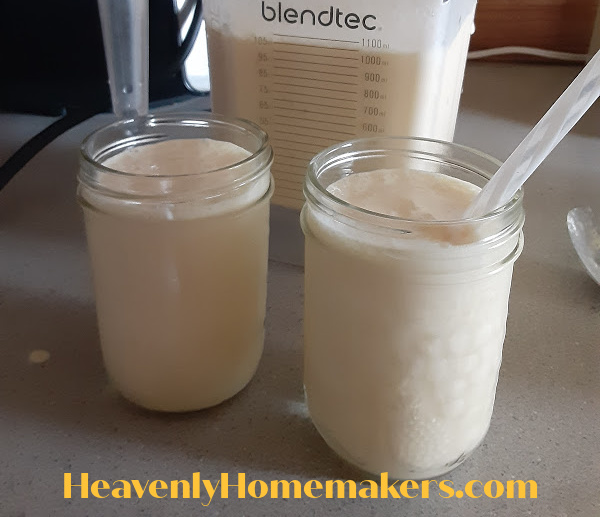
Then, I took those frozen oranges and blended them up with the vanilla yogurt and some milk. Easy Orange Julius perfection!

So, if you find yourself with an abundance of oranges, freeze them like this. Then blend them up with yogurt and milk and grab yourself a straw!

Easy Orange JuliusYum

Easy Orange Julius
 
Save Print
Author: Laura
Serves: 6 cups
Ingredients
  • 2-3 cups frozen orange slices
  • 2 cups vanilla yogurt
  • 2 cups milk
Instructions
  1. Blend the three ingredients together until smooth.
  2. Serve right away!
3.5.3251

Don’t want the added sugar in the yogurt? I usually don’t either, but hey, it was free food! You can make this treat with plain yogurt and honey or maple syrup if you want to cut down on the sugar content. This will be just as delicious and even better for ya!

Heavenly Homemaker's Club Members: Access your homepage and all your fantastic resources here! Not a member yet? Please join us!

The Easiest No-Churn Strawberry Ice Cream

July 23, 2017 by Laura 12 Comments

This post may contain affiliate links which won’t change your price but will share some commission.

As one who types for a living, I often find myself shocked at the words my fingers produce without asking me first. It’s as if they go on auto-pilot, typing with a mind of their own. There’s nothing I can do about this, and we can all be thankful for my ability to edit the words my fingers type without first asking my permission.

For instance, I’m so used to typing “Heavenly” (because I type HeavenlyHomemakers.com at least twelve times a day) that every time I write the words “heavy whipping cream” into a recipe my fingers automatically type “heavenly whipping cream.” In this case, I do think my fingers are brilliant because heavy whipping cream is quite heavenly, is it not?

The recipe I’m about to share with you happens to include said heavenly whipping cream. But also? According to my fingers that type on auto-pilot, this ice cream is of the un-churched variety. Sad, isn’t it? Allow me to explain…

strawberry ice cream

Without exception, each time I’ve typed the title of this recipe, it has come out like this: The Easiest No-Church Strawberry Ice Cream. Every single time. So this recipe is “the easiest” because you don’t even have to churn it. But no matter how much I concentrate on telling you that, my fingers type the words “No-Church” and this leads us to believe that this ice cream needs Jesus.

Do not miss the irony of this, because as we’ve already discussed, this “no-church ice cream” is made with none other than “heavenly whipping cream.” Thank you, fingers, for keeping me on my toes and confusing my brain. From now on, please let me tell you what to write instead of taking matters into your own hands. Literally.

The Easiest No-Churn Strawberry Ice Cream

5.0 from 1 reviews
The Easiest No-Churn Strawberry Ice Cream
 
Save Print
Author: Laura
Serves: 6-8
Ingredients
  • 4 cups heavy whipping cream
  • 3 cups fresh or frozen strawberries
  • Maple syrup to taste (1/4-3/4 cup)
  • 1 teaspoon vanilla extract
Instructions
  1. Blend all ingredients thoroughly until smooth, creamy, and slightly thickened.
  2. Pour mixture into a 9x13 inch pan.
  3. Cover and freeze for 2-3 hours.
  4. Scoop out ice cream and serve!
  5. If Ice Cream is in the freezer for a long time, simply set it on the counter for about 15 minutes before serving to make it easier to scoop.
3.4.3177

The Easiest No Churn Strawberry Ice Cream2

So as you can see, you don’t need to churn this Strawberry Ice Cream. And contrary to the message my fingers are trying to convey, you and I can actually take this to church if we want (because my fingers are not the boss of me.)

If we do take this treat to church and people ask how it’s made, we can tell them about the “heavenly whipping cream” that is the not-so-secret ingredient that makes the ice cream taste so good.

Who knew that an easy ice cream recipe could be the gateway to deep spiritual discussion? Who even knew?

Want more No-Churn Ice Cream recipes?

  • Low Sugar No-Churn Chocolate Ice Cream
  • Low Sugar No-Churn Vanilla Ice Cream

A note about sugar content:

In this Strawberry Ice Cream recipe as well as the Chocolate and Vanilla versions shared above, replace maple syrup with stevia or the other way around. My preference is to use about 1 Tablespoon of maple syrup and about 30 drops of liquid stevia. The stevia cuts the sugar content dramatically while the maple syrup takes away any bitterness the stevia leaves behind.

Enjoy not churning your ice cream. Or not churching it. Whatever.

Heavenly Homemaker's Club Members: Access your homepage and all your fantastic resources here! Not a member yet? Please join us!

Iced Chocolate Using Homemade Nesquik!

June 29, 2016 by Laura 15 Comments

This post may contain affiliate links which won’t change your price but will share some commission.

Iced Chocolate

When you are the youngest of four boys, growing up in a home filled with silliness and sarcasm, you pretty much have no hope of becoming anything but silly and sarcastic.

Malachi, our 11 year old, barely remembers how to shoot it straight anymore. When we say, “How’s your project going?” he’ll answer with an enthusiastic, “Terrible!” which of course translates to mean, “I’m making some great headway here.”

This is funny-not funny because sometimes I just really need to know the answer to something without being given the run around. And then there is the issue with him using sarcasm around younger kids or unsuspecting adults. Someone might say, “You look nice today, Malachi.” and he’ll come back with with a happy, “I know.” which takes people off guard and I always hope they know he’s kidding.

We’re working on teaching discernment on when to be “funny” and when to simply answer a question already.

In the meantime, I tried a new recipe a readers sent to me that sounded amazing, but then of course, I cut down the sugar so I didn’t send everyone off to Bible class with a major sugar high. I prepared the drink, then ran upstairs to finish getting ready for church. Later when I hesitantly hollered down, “Does it taste okay? Do you like it?” Malachi promptly answered with, “No. It is really not good.”

Oh man, I had hoped this would be a fun, refreshing, filling drink I could make this summer. Oh well, I’d move on to the next idea.

Then he smiled and said, “It’s actually really amazing. Make it again.”

That kid!! I give up.

(Because that’s what frustrated parents do. They give up. They stop trying. There is no other way.)  Weird. It’s as if Malachi comes by his sarcasm naturally.

We’ll continue to work on when to be silly and when to shoot it straight, but according to Malachi, you should definitely not try this recipe. You won’t even like it. It’s disgusting.

Welcome to my world.

Iced Chocolate Using Homemade NesquikYum

By the way, all credit goes to Laura on this one. Not me. Another Laura. Laura D. She emailed me this idea!

Iced Chocolate Using Homemade Nesquik!
 
Save Print
Author: Laura
Serves: 3 servings
Ingredients
  • 3 cups whole milk
  • ½ cup Homemade Nesquik (see recipe below)
  • 2 cups ice cubes
Instructions
  1. Blend ingredients on high in the blender until smooth.
  2. Serve right away.
3.4.3177

You’ll find my easy Homemade Nesquik recipe here.

Delicious and Easy Iced Chocolate

Take note that there’s still quite a bit of sugar in this because I don’t know how to adjust that in my Homemade Nesquik recipe. This makes for a great summer treat, though!

Thank you Laura D. for sending in this recipe idea. Malachi really does appreciate it, even though you might not be able to tell at first. :)

Heavenly Homemaker's Club Members: Access your homepage and all your fantastic resources here! Not a member yet? Please join us!

7-Minute Strawberry Ice Cream ~ Dairy Free Option

June 25, 2014 by Laura 14 Comments

This post may contain affiliate links which won’t change your price but will share some commission.

Healthy food always takes a long time to make, right? Not at my house.  Healthy food always tastes like “health food,” right? Oh, for real.  Healthy food always costs a lot of money, right? Not if I can help it. 

Most of the guests I feed at my house don’t even suspect that I’m serving them healthy food. In fact, I fed this simple Strawberry Ice Cream to someone last week, and all he knew was that I was handing him a dish full of homemade ice cream. All he knew was that it tasted delicious, he loved it, and he asked for seconds. He was impressed that I had “taken the time” to actually make homemade ice cream. He had no idea it was made in 7 little minutes. He had no idea the dessert didn’t have any added sugar (I used stevia). He had no idea the health benefits of what he was eating. He just thought he was eating really good ice cream. Boom.  Score one for healthy food that doesn’t appear to be health food.

Yes, from start to finish, this ice cream just takes about seven minutes to make. No ice cream freezer necessary – all you need is a strong blender or food processor. By the way – those seven minutes it takes to make this treat? Well, it’s not like it takes 7 minutes of work on my part. I just put the ingredients into the food processor and walk away. God bless the person who invented food processors so that I can check email while I’m making ice cream.

7-Minute Strawberry Ice CreamYum

4 cups (give or take) frozen strawberries
1 can (13.5 ounces) chilled coconut milk or 1 1/2 cups whole milk
1 teaspoon vanilla extract
10 drops liquid stevia or 1 Tablespoon real maple syrup or 1 Tablespoon honey

Blend all ingredients together in a food processor or blender until smooth and creamy. Serve right away. Makes 4-8 servings.

7-Minute Dairy Free Strawberry Ice Cream

Have you tried the Cool Pineapple Cream Dessert recipe yet? This is pretty much the same recipe, except for the obvious switch from pineapple to strawberries. I found that when using pineapple, I didn’t need to add anything else to sweeten the treat. Strawberries are a little more tart, so adding a tiny bit of stevia made this perfect.

Next I plan to make this treat using frozen peaches. Then maybe frozen blueberries. Then frozen raspberries.

Health food? You can keep your rice cakes. I’m having ice cream.

What’s your favorite “healthy food” to serve that doesn’t appear to be health food?

Heavenly Homemaker's Club Members: Access your homepage and all your fantastic resources here! Not a member yet? Please join us!

Icy Cold Milkshake Treats

June 10, 2014 by Laura 7 Comments

This post may contain affiliate links which won’t change your price but will share some commission.

I’ve been sharing quite a bit about coffee treats lately. Iced Coffee, Homemade Chocolate Frappe, Chocolate Whipped Cream for Coffee…yum. This is great for everyone except for those who don’t like coffee, right? Yes, well. This post should take care of that.

My family definitely fits into the “don’t like coffee” category of people. In fact, they really don’t understand why I’ve suddenly started loving the stuff. Okay by me. It’s the one and only food/drink in this house I get all to myself. Ha! It’s mine. All mine!! (she says, lovingly.)

So for all the “don’t like coffee” people out there, including my family, who thinks my Homemade Chocolate Frappe looks really good but tastes really bad – here’s what I’ve come up with as a delicious alternative. Icy Cold Milkshake Treats.  Instead of starting out with coffee ice cubes, simply start out with regular ice cubes. Instead of adding cold coffee and milk, simply add cream and milk. Instead of adding chocolate…oh wait. We’re still adding chocolate. Unless you want straight up vanilla. That works too.

Icy Cold Milkshake Treats
 
Save Print
Prep time
5 mins
Total time
5 mins
 
Author: Laura
Recipe type: Milkshake
Serves: 3 servings
Ingredients
  • 2 cups ice cubes
  • 1 cup heavy whipping cream
  • 1 cup whole milk
  • 1 teaspoon vanilla extract
  • Liquid stevia to taste (I use about 10 drops NuNaturals brand)
  • 3 Tablespoons unsweetened cocoa powder (omit if you prefer a vanilla milkshake)
Instructions
  1. Blend ingredients together until slushy-like. Serve right away.
3.4.3177

You’ll love how easy this is, how “real food” this is, and how it’s a treat completely void of sugar. It doesn’t get any better. (Unless you add coffee, but we’ve been through this already.)


Icy Cold Milkshake Treats

Most of the ingredients in the list are in “give or take” proportions. You’ll figure this out if you actually try to measure 2 cups of ice cubes. Rectangle shaped ice cubes don’t cooperate very well in a round measuring cup.

In addition, you may want your shake to be creamier, smoother, sweeter, chocolatier, or with coffee. Oh wait. This one doesn’t have coffee in it. Well anyway, feel free to add more or less of any of the above listed ingredients to make this shake just what you want it to be.

As for me, I’m going to stick with the Homemade Chocolate Frappe. And I’m going to drink the entire blender of coffee goodness all by myself because no one else in my house likes it so I don’t have to share, so ha! (she says, with kindness.)

What do you think? Which will you like better? And which will your family members like better?

Heavenly Homemaker's Club Members: Access your homepage and all your fantastic resources here! Not a member yet? Please join us!

An Easy Way to Freeze Pudding Pops

August 28, 2013 by Laura 6 Comments

This post may contain affiliate links which won’t change your price but will share some commission.

Malachi and I made Pudding Pops in the middle of our school day last Wednesday. Why?  Because he was being a typical eight year old boy and we needed a break from writing words and solving math problems. (Want an example of his typical eight year old self? Read If You Give Your Eight Year Old Boy A Math Lesson…)

He announced between phonics and science that Pudding Pops sounded good, and who am I to disagree on a 90° day? Plus cooking, measuring, and real life learning always count as “school time” in my book.

And so, Malachi and I whisked together homemade Creamy Vanilla Pudding, then together we came up with a brilliant idea to make transporting the Pudding Pops to the freezer much easier. Why not put the cups into a muffin tin so that they won’t slide around?

pudding_pops_1

These muffin tins have been getting a workout lately, huh?

If you haven’t made pudding pops, I encourage you to try it. We have made them in chocolate and butterscotch too – and have even layered the flavors within one cup! Check out the Pudding Pop tutorial here.

Need to eat dairy free? These pudding recipes work great with coconut milk!

Heavenly Homemaker's Club Members: Access your homepage and all your fantastic resources here! Not a member yet? Please join us!

Join Our Community!

 Facebook Twitter RSS E-mail Instagram Pinterest

Popular Posts

~ Will All of the Real Moms Please Stand Up?
~ Easy! Stir-and-Pour Whole Wheat Bread
~ How to Make Gatorade
~ 31 Real Food Breakfast Ideas
~ Dear Teenage Girls...
~ When Mom Takes a Step Back
~ The Inexpensive Health Insurance We Love!
~ Let's Talk Real Food Grocery Budgets

Check out our latest posts!

  • Simple Bran Muffin Recipe
  • Easy Meatballs with Sweet Sauce (Freezer Friendly)
  • How to Make Uncrustables
  • The Easiest No-Bake Cheescake
  • Do I Still Buy Organic Food?
Home  ~  Simple Meals  ~  Club Membership  ~  Shop  ~  Privacy Policy  ~  Disclosure  ~ Contact

Copyright © 2023 · Beautiful Pro Theme on Genesis Framework · WordPress · Log in