Heavenly Homemakers

Encouraging women in homemaking, healthy eating and parenting

  • Home
    • About
    • FAQs
  • Recipes
    • Bread and Breakfast
    • Condiments
    • Dairy
    • Main Dishes
    • Side Dishes and Snacks
    • Desserts
    • Gluten Free
    • Instant Pot
    • Crock Pot
    • Heavenly Homemaker’s Weekly Menus
  • Homemaking
    • Real Food Sources
  • Store
  • Contact
    • Advertise
    • Disclosure
    • Privacy Policy
  • Simple Meals
  • Club Members!

Strawberry Shortcake Muffins

June 26, 2013 by Laura 20 Comments

This post may contain affiliate links. For more information, please see our disclosure policy.

It’s no secret that I like to serve fun treats for breakfast. If it’s made with whole grains, is low in (natural) sugar, can be served with fruit and/or eggs, and will keep my family nourished and full for at least two hours before they start asking for a snack or lunch, I consider it a breakfast food. Don’t get me started on my frequent rant of “who decided store bought donuts, honey buns, fruit loops, or other sugar-filled negative calories are a part of this balanced breakfast????”

You’ve already been informed of my Giant Breakfast Cookies, Breakfast Cake, and Homemade Poptarts. I’ve also shared that I occasionally serve homemade apple pie or peach cobbler for breakfast. Filling and wholesome, less sugar than drizzling syrup over a pancake = breakfast of champions. (Or at least of my boys, who I consider to be champions, without a doubt.)

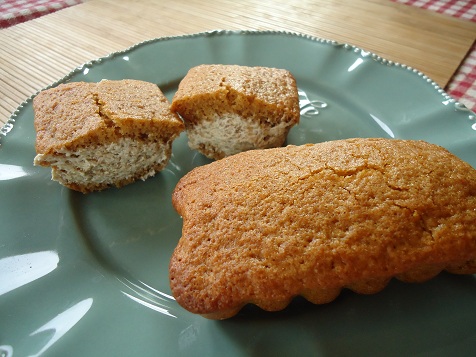
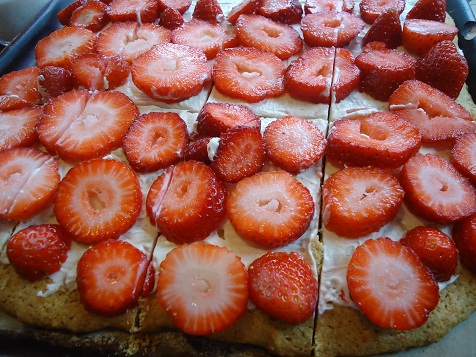
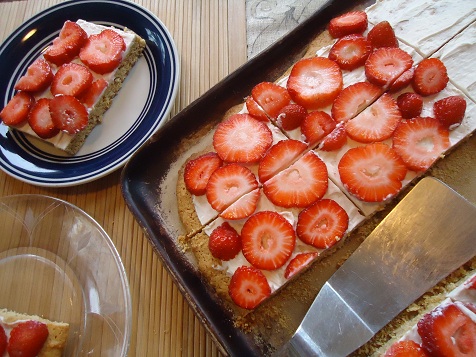
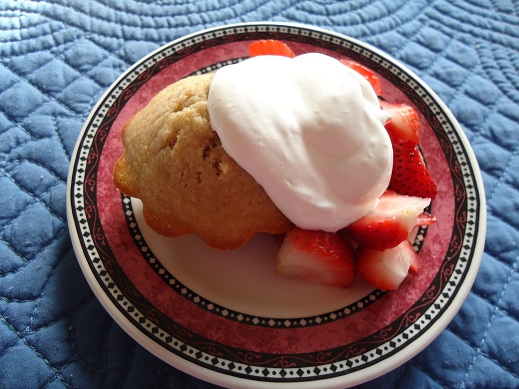
While strawberries have been in season, from time to time, I have served Strawberry Shortcake for breakfast. It’s made with whole wheat and honey, and topped with fresh strawberries and whipped cream. If that’s not breakfast, I don’t know what is. My boys agree, of course.

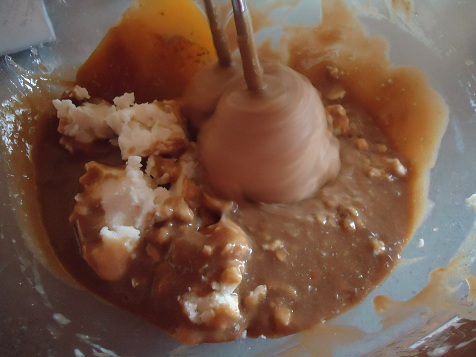
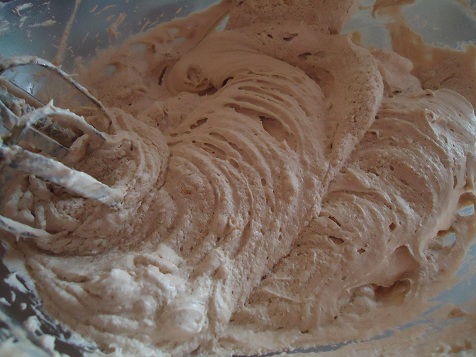
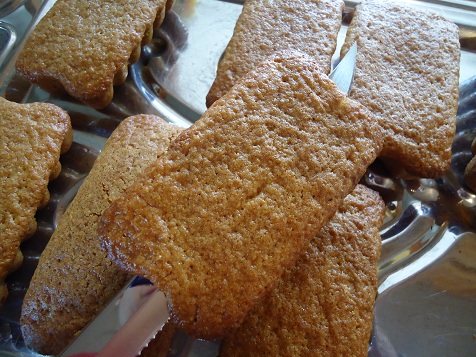
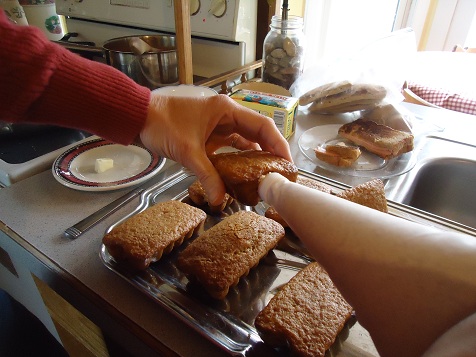
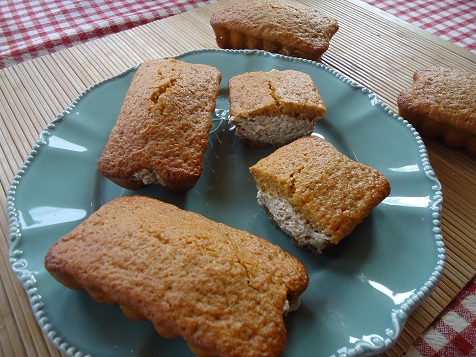
Recently, I decided to bake my Shortcake batter in muffin cups for a fun twist. It was super easy. I made them the night before, and had a great breakfast to present to my family the next morning.

strawberry_shortcake_muffins_1

Yum

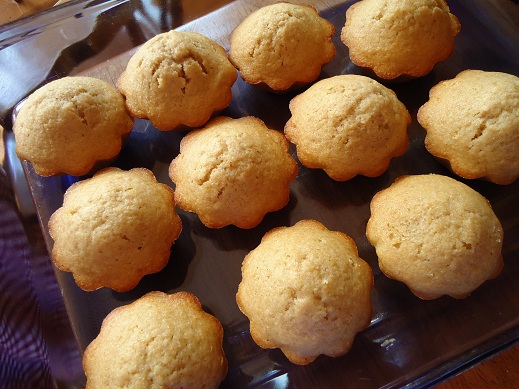
Find the recipe here. Instead of spreading the batter in a pan, scoop it into 10-12 well greased or paper-lined muffin cups. Bake at 350° for about 20 minutes. Serve with fresh strawberries and whipped cream.

strawberry_shortcake_muffins_2

What are some “treats” you serve for breakfast? 

(And by the way, we enjoy the occasional Krispy Kreme when we’re visiting family or friends. It’s fun -just not a regular occurrence at our house. )  :)

Heavenly Homemaker's Club Members: Access your homepage and all your fantastic resources here! Not a member yet? Please join us!

Flourless Peanut Butter Chocolate Chip Cookies

June 20, 2013 by Laura 38 Comments

This post may contain affiliate links. For more information, please see our disclosure policy.

flourless_cookie_2

What’s great about having a recipe that is flourless? If you have run out of flour, you can still make this cookie.

Profound.

But there’s more.  Because these don’t have flour in them, they turn out super moist and chewy. Trust me when I say that there is much yum in one of these cookies. (Or in three or more of these cookies if you just can’t control yourself.)

And…if you’re someone who eats gluten free or you’re baking for someone who eats gluten free, these cookies fit the bill. I have no idea what the phrase “fit the bill” means. Are we talking about a dollar bill, or the bill of a hat? Or maybe we’re talking about a duck? I went to school with a boy named Bill. As far as I know, he can eat flour. But I’m guessing he would still really like these cookies.

Anyway, I should look up the phrase “fit the bill” someday when I have spare time, which will be never, since I typically spend my free time rambling about ducks, hats, and my classmates who like cookies. Come to think of it, I don’t remember Bill ever wearing a hat.

Flourless Peanut Butter Chocolate Chip Cookies

Flourless Peanut Butter Chocolate Chip CookiesYum

1 cup natural peanut butter (I use homemade)
1 cup sucanat or brown sugar
1 egg
1 teaspoon vanilla extract
1 teaspoon baking soda
3/4 cup chocolate chips

Cream together peanut butter, sucanat, egg, vanilla, and baking soda. Fold in chocolate chips.

Place 1 1/2 inch balls of dough about two inches apart on a parchment paper-lined cookie sheet. Bake in a 350° oven for 8-10 minutes or until lightly browned. Cookies will firm up as they cool, so do not overbake. Allow the cookies to sit on the cookie sheet for about 5 minutes before transferring them to a cooling rack. Makes about 18 cookies.

flourless_cookie_1
You will love how easy these cookies are to make. If you need to, you can prepare this dough up to five days in advance, pulling out the dough and baking as needed. How very handy. You can also mix up the dough, shape it into balls, and freeze them unbaked. Then, when you need a cookie fix or you need to quickly bake cookies for an event, all you have to do is put them on a pan and bake them as directed.

I’m telling you, if you’re looking for an easy, delicious cookie, these really hit the nail on the head (because I just hate to use the phrase “fit the bill” twice in one post).

And for the record, I couldn’t resist. I took the time to look up where the phrase “fit the bill” comes from. Turns out, “Fit the bill” is a British, American and Australian idiom which means to have the qualities or experience which are needed. Thank you online search engine. I already understood what it meant. I just didn’t understand its origin.

Well, I guess we’ll never know. Maybe I should just ask Bill. He was, after all, our class Valedictorian.

Heavenly Homemaker's Club Members: Access your homepage and all your fantastic resources here! Not a member yet? Please join us!

Peanut Butter Chocolate Granola

May 8, 2013 by Laura 13 Comments

This post may contain affiliate links. For more information, please see our disclosure policy.

pb_choc_granola_3

I’m guessing that many of the greatest recipe “inventions” have happened by accident. Asa (our 15 year old) really didn’t mean to create this wonderful Peanut Butter Chocolate Granola. His real intent was to make No-Bake Cookies for a mission trip fund-raising meal last Sunday. But somehow the liquid ingredients got slightly overcooked, the oats made the mixture way too dry, and no way no how was a cookie going to be formed once it was all said and done. I told him to press his mixture into a 9×13 inch pan and that we’d try cutting them into bars later. While that was a brilliant idea, it didn’t work any better than forming the mixture into cookies. We ended up with peanut butter chocolate oat crumbles instead. Peanut butter chocolate oat crumbles that tasted really, really good. :)

And so – we all just grabbed a bowl and a spoon and had at it. (While planning a different dessert to take to the fund-raising meal.)

I’m calling this “granola” because that’s what it looks and feels like. But I do have a hard time calling this a healthy breakfast or snack. While it is made with real food ingredients, it is still more dessert-like, for sure. In an effort to make this a little less sugary, and a bit more diverse for “stir-in” options, I’ve tweaked the ingredients from the original cookie recipe Asa used. I’m pretty sure it will still taste awesome with less sugar than originally called for in the cookie recipe!

By the way – depending on how you make this, it can be completely dairy free if you wish. :)

Peanut Butter Chocolate GranolaYum

1/2 cup butter or coconut oil
1/2 cup milk or coconut milk
1/2 cup natural peanut butter (we use homemade peanut butter)
1 cup sucanat or 1/2 cup honey
4 Tablespoons cocoa powder
1 teaspoon vanilla extract
3 cups rolled oats
1/2 cup coconut flakes (optional)

Put butter, milk, peanut butter, sucanat, and cocoa into a medium sized saucepan. Cook over medium heat until butter is melted and mixture is smooth. Bring to a boil, stirring constantly. Allow the mixture to boil for one minute. Remove from heat. Add vanila, oats, and coconut flakes. If the mixture is too liquidy add a few more oats or coconut flakes until you reach desired consistency.

pb_choc_granola_2

Or shucks. If you “mess up” this recipe and the mixture turns out to be nice and smooth instead of crumbly – go ahead and spoon it onto wax paper and make No-Bake Cookies. ;)

 UPDATE:  If you do find your mixture too wet:  Add a few extra oats to soak up the liquid. Then put it on a parchment paper lined cookie sheet and baked it at 250° for one hour, stirring occasionally. The granola should get nice and crispy!

Heavenly Homemaker's Club Members: Access your homepage and all your fantastic resources here! Not a member yet? Please join us!

Homemade Healthy(er) Twinkies

February 27, 2013 by Laura 27 Comments

This post may contain affiliate links. For more information, please see our disclosure policy.


Have a recipe you’d like me to try and make over?
Submit your recipes on this Real Food Recipe Makeover Submission Page.

Twinkies bring up a very special memory for me. The only time we ever got Twinkies when I was little was when we needed to pack a lunch on school field trip days. Therefore, about two days each year, my mom bought my brother and me a Twinkie, and packed it in our sack lunch – along with a cold grape soda wrapped in tin foil to keep it cold. Such fun memories!! (And the only real reason I liked field trips.) :)

So here we are, over thirty years later, and about three years after the first healthier Twinkie recipe request I received. Obviously, this recipe make-over really had me stumped. While I had an idea about how to make a whole wheat spongy cake, I had no idea how to make a healthier cream filling. So when one reader, Stacy, left a comment a couple of weeks ago on the Redless Velvet Cake post, sharing a recipe that she said tasted “like Twinkie filling” – I tried it right away. 

twinkie_2

Unbelievable.  It really does taste like the Twinkie filling I remember from back in the day. Upon tasting it, I suddenly had the urge to get a grape soda, climb onto a loud school bus, and take a trip to a museum. (But not really.) 

I will admit that it was harder than I thought it would be to duplicate the airy, empty-calorie cake part of a Twinkie. Regardless, these “Twinkies” taste delicious and were a fun treat for my family. My kids devoured them!

Homemade Healthy(er) TwinkiesYum

2 eggs
1 cup sucanat
1 cup whole wheat flour (I use freshly ground flour from hard white wheat)
1 teaspoon baking powder
1/2 cup milk
2 Tablespoons butter

In a bowl, beat the eggs with an electric mixer for about four minutes or until thick. Gradually add sucanat, beating for an additional 4 minutes. (Yes, I know, lots of beating. That’s how it becomes spongy, light, and airy.)

Add flour and baking powder, beating until just combined. Heat milk and butter on the stove until butter melts. Add milk mixture to batter, beating until combined. 

Pour batter into baking pan, and bake in a 350° oven for 20 minutes. (I used a cool Flexipan that I’d gotten from Demarle. Muffin tins would work great, or small loaf pans.)  Allow cakes to cool completely before filling.

Twinkie Filling

3 Tablespoons whole wheat flour
1 cup milk
1 cup sucanat
1 teaspoon vanilla extract
1 cup Palm Shortening or softened butter

Cook milk and flour, stirring constantly until mixture is very thick. Set aside to cool. Whip milk mixture with sucanat until sucanat has dissolved. 

twinkie_6

Add palm shortening and vanilla and whip until light and fluffy.

twinkie_7

Check it out! Stick your finger in and taste it…just like Twinkie Filling! (Except better. Of course.)

twinkie_8

To fill your Twinkies:

Slide a long knife through each cake – just to make an opening.

twinkie_9

Put Twinkie Filling into a frosting bag with a large, open tip. Place the tip into the slit in the cake and squeeze to fill. (I found that putting some in each end of the Twinkie worked best to fill the Twinkie evenly.
 twinkie_10

When I called the boys in for the treat, it is a fact that my two youngest asked, “Twinkies? What are Twinkies?” I guess they’ll never know – except for what they’ve experienced with this healthified version. :)

Once I explained “Twinkies” to the boys, Malachi said, “Oh! Is this that treat Grammy used to give you on trips?” Yes indeed. {sniff}  I’m so glad he remembered that I had told him the Twinkie story. 

twinkie_3

In case you didn’t already figure this out by reading through the above instructions, Homemade Healthy(er) Twinkies are a little bit of a “high maintenance” recipe. This type of recipe did not make it into my Oh, For Real book. Only recipes that can be made quickly and easily made that book! But hey, this Twinkie recipe is still a keeper. It’s lots of fun and a very special treat to make!

Think you’ll give these a try? Have any fun Twinkie memories to share?

Heavenly Homemaker's Club Members: Access your homepage and all your fantastic resources here! Not a member yet? Please join us!

Whole Wheat Quick Mix Fruit Pizza

February 26, 2013 by Laura 37 Comments

This post may contain affiliate links. For more information, please see our disclosure policy.

fruit_pizza_1

This Fruit Pizza is so yummy – you’ll feel like you are eating something naughty. But in fact, because it is made with whole wheat, honey, and fruit, I believe you could serve it for breakfast. Since figuring out this recipe, I may have done that a time or two at our house. ;)

You will love how easy this is to make!

Fruit Pizza CrustYum

1 1/2 cups Whole Wheat Quick Mix
1/2 cup honey
1/2 teaspoon vanilla extract
1 egg

Mix ingredients together. Press (or pour) dough into an 8×8 inch baking dish. Bake in a 350° oven for 10-15 minutes or until it is slightly golden. Allow crust to cool.

Cream Cheese Layer

3 ounces cream cheese, softened
2 Tablespoons real maple syrup 

Mix well and spread over cooled crust. Top with fresh fruit. (Berries, bananas, and kiwi work best.)

Serves 4-6. I typically double this recipe for my family and spread the crust into my large baking stone.

fruit_pizza_3

I’d love to know – have you made the Whole Wheat Quick Mix yet?!  More sneak peeks into our upcoming Oh, For Real book still to come!

Heavenly Homemaker's Club Members: Access your homepage and all your fantastic resources here! Not a member yet? Please join us!

Whole Wheat Quick Mix “Very Vanilla” Cookies {Sneak peek into our upcoming Oh, For Real! book}

February 21, 2013 by Laura 43 Comments

This post may contain affiliate links. For more information, please see our disclosure policy.

vanilla_cookies

I have to say thank you for giving my younger two boys a bit of educational entertainment this evening. I called them in to help me count the “votes” to determine which Whole Wheat Quick Mix recipe I would share with you first. They made a list of the options, and then made tally marks as I called out “cookies”, “fruit pizza”, “pancakes”, etc.

You know boys. Everything is a competition. As we went through each of your comments, the excitement grew. Who knew that counting recipe votes would be so much fun? At one point early on, Malachi shouted, “Muffins are in the lead!!” And so it went.

Ah, it’s the simple things in life that are the most fun, right?

Malachi and Elias are excited to share that Very Vanilla Cookies won the vote, with Fruit Pizza and Pancakes trailing in very close behind. They personally each wanted to vote for Fruit Pizza. I think they thought I was going to drop everything and immediately make the recipe that won the vote. Sorry boys. Cute as you are, your vote doesn’t count this time. Besides, I don’t have any fresh strawberries on hand. ;)

So here you go – a very easy and delicious cookie recipe that you can stir together in no time using your Whole Wheat Quick Mix. If you happen to have homemade vanilla extract to use in this recipe, yay! But even if you don’t, I bet you’ll still be able to choke these down. :)

Very Vanilla CookiesYum

3 cups Whole Wheat Quick Mix
1 1/4 cup sucanat
3 eggs
2 teaspoons vanilla extract

Mix all ingredients together. Scoop 1 ½ teaspoons of dough onto a cookie sheet, about 3 inches apart. Bake in a 375° oven for 12-15 minutes. Makes about 2 dozen cookies.

More of our new Oh, For Real recipes coming soon – in particular, recipes that use this Whole Wheat Quick Mix.

I’m curious (and this has nothing to do with cookies, books, or quick mixes):  Is it snowing where you are?  We’re getting several inches right now. Fun!

Heavenly Homemaker's Club Members: Access your homepage and all your fantastic resources here! Not a member yet? Please join us!

Red(less) Velvet Cake

February 12, 2013 by Laura 38 Comments

This post may contain affiliate links. For more information, please see our disclosure policy.


Have a recipe you’d like me to try and make over?
Submit your recipes on this Real Food Recipe Makeover Submission Page.

Looking for a special treat for Valentine’s Day? How about a Red Velvet Cake? Without the red. While the red food coloring is pretty, it doesn’t add anything to the cake (except for freakish fake color that I don’t really want in my gut).

This cake experiment became a treat that is super moist and delicious, with a mild chocolate flavor. And hey, if you squint and look through pretend red colored glasses, the light brown color of this cake really does have a reddish tint. It’s true. Can you see it? 

velvet_cake_1

Red(less) Velvet CakeYum

1 cup butter
1/2 cup cocoa powder
4 Tablespoons water
2 1/2 cups whole wheat flour (I recommend using flour made from hard or soft white wheat)
1/2 cup organic cornstarch
1 1/2 teaspoons baking powder
1 1/2 cups sucanat, made into “powdered sugar”
3 eggs
1 cup buttermilk
1 teaspoon vanilla
Cream Cheese Frosting

Place butter, water, and cocoa powder in a small saucepan. Cook over low heat until butter is melted and ingredients are well combined. In a large mixing bowl stir together flour, cornstarch, baking powder, and powdered sucanat. Pour in butter mixture, and the eggs, buttermilk, and vanilla. Beat the ingredients together until smooth.

Pour batter into two well-buttered 9 inch round cake pans. Bake in a 375° oven for 25-30 minutes or until a toothpick inserted in the middle comes out clean. Be careful not to overbake these cakes or they will become dry. Allow cakes to cool for a few minutes, then carefully turn them out onto two separate plates. Allow them to cool completely.

Frost with Cream Cheese Frosting, beginning with a layer in the middle of the cakes, then on the top and around the sides.

velvet_cake_2

See how pretty?

velvet_cake_3

See the red?

velvet_cake_5

 Okay, fine. It really is red(less). But it is crazy delicous. :)

Heavenly Homemaker's Club Members: Access your homepage and all your fantastic resources here! Not a member yet? Please join us!

Homemade Nutella ~ Real Food Recipe Makeover

January 15, 2013 by Laura 44 Comments

This post may contain affiliate links. For more information, please see our disclosure policy.

“Homemade Nutella” is a recipe request I’ve had over and over. I never got around to making it (and I have excuses). But do you remember how I told you that my friend Anne and I exchange Christmas stockings each year? Well this year, one of the items she put in my stocking was Homemade Nutella! I begged her for the recipe – and here it is.

You really don’t want to know all of this, but just in case you do, even though you really don’t, here is the background information on how I managed to get this recipe from Anne:

  1. I emailed Anne after I got back from California to thank her for the lovely stocking and to tell her that later that day when Matt came to pick up our milk, I would send over some of the fresh oranges we’d brought back from our trip. And I asked her for her Nutella recipe.
  2. She emailed back to say that she had also loved what I’d put in her stocking and that her mouth was watering while she waited for an orange. But she said nothing about the Nutella.
  3. Matt went and picked up the milk, but I was upstairs doing laundry when he left, so I forgot to send oranges.
  4. I found mouse poop in some red wheat I had in storage and emailed Anne asking if it would be okay to feed that to her chickens. And I apologized for not sending oranges and told her I’d eat one on her behalf, and that at that very moment, I had the juice from a delicious orange running down my chin.
  5. Then she emailed me back and told me that I was evil to eat her oranges. And she said, “rats” about the mouse poop. See her rodent inspired play-on-words there?
  6. I giggled and emailed her back and said that yes I was evil, and full of citrus, and that really and truly, I’d get her some oranges.
  7. Then I kept forgetting to take over the oranges.
  8. But I really wanted the Nutella recipe. So I emailed her again a few days later and said, “You know how I asked for the nutella recipe and you forgot to give it to me? (Kind of like I told you I would bring oranges and then didn’t?) Any chance you could throw that my way? A few thousand HHM readers would love to hear about it… :) I have a small sack of oranges ready for you by the way. And some poopy wheat.”
  9. She emailed back to say, “Very clever” and then she gave me the recipe.
  10. Then today I finally remembered to give her the oranges.
  11. The end.

You’ve got to admit. That story was a lot more fun than me simply stating, “I got this recipe from my friend Anne.”

Homemade NutellaYum

1 1/2 cup whole hazelnuts
1 1/2 cups whole milk
3/4 cup powdered milk (not an ingredient I typically use, but an okay compromise for this recipe)
1 Tablespoon mild-flavored honey
pinch salt
1 heaping cup chopped bittersweet or semi-sweet chocolate, or chips
1 scant cup chopped milk chocolate, or chips

On a rimmed baking sheet, toast the nuts in a 400º oven for 10 minutes, or until fragrant and their skins begin to pop. Transfer to a tea towel, gather into a bundle and rub together to remove as much of their skins as possible. While warm, transfer to the bowl of a food processor and blend until they go from finely ground to pasty and thick, like natural peanut butter.

Meanwhile, warm the milk, powdered milk, honey and salt in a small saucepan just until it starts to boil. Remove from heat. In a glass or stainless steel bowl set over a pan of simmering water, melt the chocolates, stirring occasionally until smooth.

Add the melted chocolate to the ground nuts and continue to process the mixture, stopping to scrape down the sides of the bowl as necessary. Add the warm milk mixture and process until everything is well blended and as smooth as you can get it. Makes about 2 cups.

nutella_2

 What’s your favorite way to use Nutella?

Heavenly Homemaker's Club Members: Access your homepage and all your fantastic resources here! Not a member yet? Please join us!

Homemade Caramel Brownies

December 30, 2012 by Laura 3 Comments

This post may contain affiliate links. For more information, please see our disclosure policy.

How’s this for a great way to begin the new year?! :)

I got this idea from my friend Kim. Smart! You can either bake these in a 9×13 inch pan, or in muffin cups for fun, individual servings.

Caramel BrowniesYum

2 sticks butter, melted
2 cups sucanat
1/2 cup cocoa powder
2 eggs
1 teaspoon vanilla
1 1/2 cups whole wheat flour
1/4 recipe of Homemade Caramel Sauce

Stir together butter, sucanat and cocoa. Mix in egg and vanilla. Stir in flour and mix until combined.

To make a 9×13 inch pan of these brownies, spread the brownie batter into the pan. Drizzle the Homemade Caramel Sauce over the top and “cut it in” with a butter knife. Bake at 350° for about 25 minutes or until a toothpick inserted in the middle comes out clean.

To make individual Caramel Brownies:

Divide brownie batter evenly into 12-15 paper lined muffin cups.

Make a small “well” in the middle of each brownie cup. I used the end of the spoon to do this, since I’m so professional and fancy.

Next, drizzle warm caramel sauce into the well and over the brownie – one or two tablespoons for each.

Bake in a 350° oven for 25 minutes.

Not interested in the Caramel Brownies? How about Peanut Butter Brownies? :)

Heavenly Homemaker's Club Members: Access your homepage and all your fantastic resources here! Not a member yet? Please join us!

Peanut Butter Chocolate Chip Balls {Christmas Brunch}

December 21, 2012 by Laura 94 Comments

This post may contain affiliate links. For more information, please see our disclosure policy.

I love treats like these Peanut Butter Chocolate Chip Balls that are on the healthy side, plus they are very easy to put together! With four simple ingredients that many of us have on hand – I’ll bet some of you will hop right off your chair and get them started right away. I highly recommend that you do.

But beware – these are little balls of peanut butter, chocolatey, coconutty addictiveness. You’ve been warned.

Peanut Butter Chocolate Chip BallsYum

Peanut Butter Chocolate Chip Balls {Christmas Brunch}
 
Save Print
Author: Laura
Ingredients
  • 1 cup natural peanut butter
  • ¼ cup coconut oil
  • 2 Tablespoons honey
  • ½ cup mini chocolate chips
Instructions
  1. Melt coconut oil and honey together in a saucepan.
  2. Remove from heat and stir in peanut butter until mixture is smooth.
  3. Fold in chocolate chips.
  4. Spread mixture into a 9x9 inch pan.
  5. Refrigerate for about two hours.
  6. Roll mixture into 1 inch balls.
  7. Refrigerate until ready to serve.
3.4.3177

I use homemade peanut butter, which makes all the difference in every recipe if you ask me. You can’t beat the taste of fresh peanut butter. (It’s easier to make than you think!)

Peanut Butter Chocolate Chip Balls

Find more No-Bake Snack and Dessert Ball recipes here:

  • No-Bake Granola Bar Bites
  • No-Bake Peanut Butter Cookie Bites
  • No-Bake Chocolate Fudge Cookie Bites
  • No-Bake Snickerdoodle Bites
  • No-Bake Chocolate Fudge Bites

I use Homemade Almond Butter in most of these recipes. Once you learn to make nut butters, you’ll never go back to store-bought!

No-Bake Cookie Bites - Easy Recipes!

Keep these recipes on hand – especially in the summer time when you don’t want to turn on the oven but you want to make a treat. I love that all of these No-Bake Balls are filling and offer nourishment too. Protein, fiber, lightly sweetened…they are the perfect dessert of snack!

These also work great in a lunch box. To top it all off, these freeze well so you can make several ahead of time and store them in the freezer until you need them!

Heavenly Homemaker's Club Members: Access your homepage and all your fantastic resources here! Not a member yet? Please join us!
« Previous Page
Next Page »

Join Our Community!

 Facebook Twitter E-mail Instagram Pinterest

Popular Posts

~ Will All of the Real Moms Please Stand Up?
~ Easy! Stir-and-Pour Whole Wheat Bread
~ How to Make Gatorade
~ 31 Real Food Breakfast Ideas
~ Dear Teenage Girls...
~ When Mom Takes a Step Back
~ The Inexpensive Health Insurance We Love!
~ Let's Talk Real Food Grocery Budgets

Check out our latest posts!

  • Big Family Food and Fun: May 3-9, 2026
  • Help Your Kids Become Independent in the Kitchen!
  • Big Family Food and Fun: April 26-May 2, 2026
  • Big Family Food and Fun: April 19-25, 2026
  • Big Family Food and Fun: April 12-18, 2026
Home  ~  Simple Meals  ~  Club Membership  ~  Shop  ~  Privacy Policy  ~  Disclosure  ~ Contact

Copyright © 2026 · Beautiful Pro Theme on Genesis Framework · WordPress · Log in