Heavenly Homemakers

Encouraging women in homemaking, healthy eating and parenting

  • Home
    • About
    • FAQs
  • Recipes
    • Bread and Breakfast
    • Condiments
    • Dairy
    • Main Dishes
    • Side Dishes and Snacks
    • Desserts
    • Gluten Free
    • Instant Pot
    • Crock Pot
    • Heavenly Homemaker’s Weekly Menus
  • Homemaking
    • Real Food Sources
  • Store
  • Contact
    • Advertise
    • Disclosure
    • Privacy Policy
  • Simple Meals
  • Club Members!

Putting up Corn for Winter

August 8, 2008 by Laura 30 Comments

This post may contain affiliate links. For more information, please see our disclosure policy.

No. 1 thing to know about preserving produce for winter:  It takes hard work and time and might make a big mess.

No. 2 thing to know about preserving produce for winter:  In the winter when you get to pull yummy things out of your pantry and freezer…all the hard work and time and big mess will have been worth it. Very worth it!

Here’s a bit about how I put up corn…and you should also check out this post at Amy’s Finer Things because she blogged about this already. I really liked her technique for cutting the corn off the cob!

First…here is our happy little party of Nebraska Cornhuskers….

corn7sm.JPG

corn9sm.JPG

corn8sm.JPG

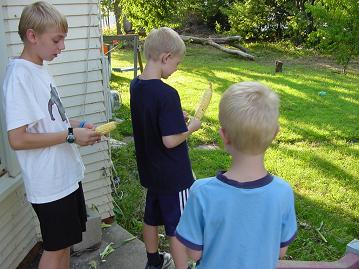
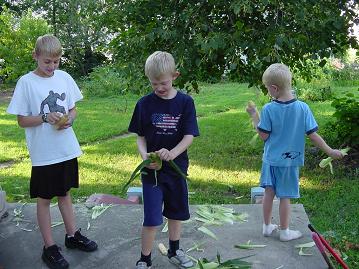
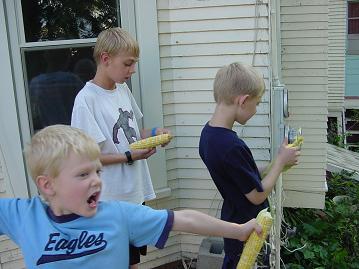
Check it out…they make a game of how far they can throw the husks. Hey, whatever it takes to get the work done with a happy attitude!

corn3sm.JPG

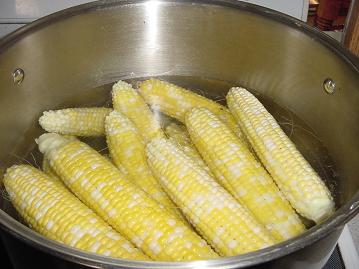
Meanwhile…I’m in the kitchen sticking those ears into boiling water. Just for a short time. Two to three minutes. Blanching stops the aging process of your produce.

corn4sm.JPG

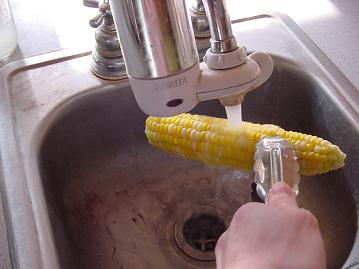
Ah, but you don’t want them to continue to cook…so you immediately pull it out of the boiling water (with tongs of course) and run it under cold water to try to cool it off right away. (And Amy recomended putting it in ice water…a much better idea!!)

corn2sm.JPG

Now, I line up my ears (hehe…line up my ears…hehe)

corn5sm.JPG

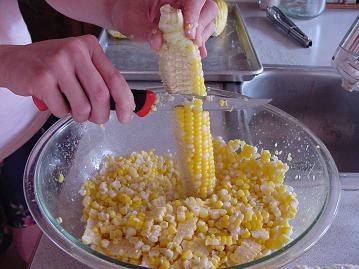
And then I cut the corn off the cob into a bowl with a sharp knife. If you have an electric knife, you can use that too. Or do it the way Amy does it. (Oh, so many options.)  (But no matter what option you choose, your hand will probably cramp up and feel like it will never again be them same by the time you’re done. But don’t worry, after several operations, you’ll be okay again.)  (Kidding…just give yourself a few minutes of a hand massage.)

corn6sm.JPG

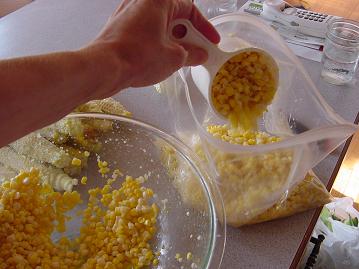
I then use a measuring cup to scoop the corn into freezer bags. Sometimes I use quart…sometimes I use gallon. Just don’t fill the bags too full, or after it freezes, you’ll have a terrible time getting your corn out of the bag! 

corn1sm.JPG

Then get the air out of the bag and seal it up and press it flat. And it’s ready to go into the freezer. Isn’t it beautiful?

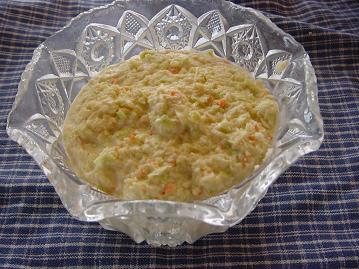
When you’re ready to cook it, break off whatever amount of corn you want, put it into a saucepan with a little water and cook it until it’s bubbly. Turn it off, drain out the excess water and stir in butter and salt! 

Awesome!

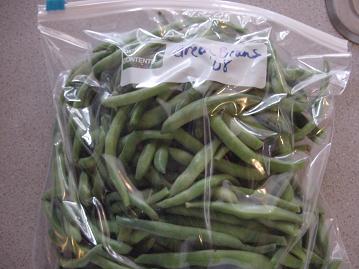
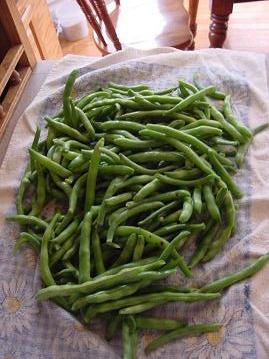
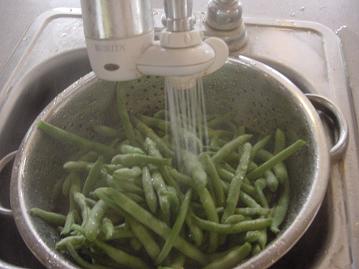
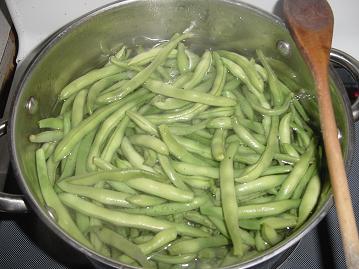
I’ll show you to process of freezing green beans another time!

Heavenly Homemaker's Club Members: Access your homepage and all your fantastic resources here! Not a member yet? Please join us!

Could It Be Possible for us to LIKE Coleslaw?!

July 14, 2008 by Laura 19 Comments

This post may contain affiliate links. For more information, please see our disclosure policy.

I have never liked coleslaw. Ever.

And believe it or not…neither has Matt, my easy to please husband who eats everything.

But for some reason a few months ago, I had a cabbage that I needed to do something with…so I experimented making coleslaw.

And I REALLY liked it. A LOT!!

When Matt got home for lunch that day, I was telling him that I had made coleslaw and that I was so excited about it! He kinda gave me a lopsided smile and looked at me like, “Seriously? You made coleslaw? And you want me to eat it?!” 

But of course since he’s so nice, he did eat it. And guess what? He liked it too. 

So it seems that I have come up with a coleslaw recipe that we both like and will eat. We find it refreshing and great to eat with sloppy joes, hamburgers or BBQ chicken. 

Creamy ColeslawYum

½ medium sized cabbage
2 carrots
1 cup mayonnaise (I use Hain Safflower mayo)
2 T. red wine vinegar
1 T. honey
1 T. minced onion
sea salt, to taste

Place cabbage and carrots into food processor. Shred together. Pour cabbage and carrots into a mixing bowl. Set aside. In a small bowl, mix mayonnaise, vinegar, honey, minced onion and salt. Add mayonnaise mixture to cabbage and carrots. Stir until well combined and creamy.

coleslawsm1.JPG

I hope that even if you don’t like coleslaw…you’ll give this recipe a try! It’s a really yummy way to eat more raw veggies! (And if Matt and I like it and eat it…that’s really saying something!)

Visit Tammy’s Recipes for more great kitchen tips!

Heavenly Homemaker's Club Members: Access your homepage and all your fantastic resources here! Not a member yet? Please join us!

Spinach? I Don’t See Any Spinach…

July 1, 2008 by Laura 65 Comments

This post may contain affiliate links. For more information, please see our disclosure policy.

Whatever you do…don’t look through the ingredients in this slushy and get all freaked out because there’s spinach in it. Don’t do it. Just relax.

There’s nothing to freak out about. I promise you can’t taste the spinach….and this slushy is so refreshing and delicious you won’t even know what hit you.

The first time I made these, I was just messing around trying to come up with a yummy way to get more raw greens into our diet. I figured they’d turn out some ugly brown color, since I was mixing red, yellow and green together. I just hoped I’d be able to make my family look past it and enjoy the fruity taste.

But instead, they turned out to be a beautiful deep red color…and tasted like fruity heaven. So even though you KNOW there’s spinach in them because you made them and put it there yourself, you will forget all about it while you sit down with a spoon and eat this slushy that tastes better than anything I’ve eaten this entire summer.

Try these!!!

Strawberry Peach SlushiesYum

2 cups frozen strawberries
1 cup frozen peaches
1 cup raw mixed greens or spinach
5-8 drops stevia (more if you like)
1 cup water

Put all ingredients into blender. Process until everything is mixed and becomes slushy.

strawberrypeachslushy3sm.JPG

strawberrypeachslushysm1.JPG
And see what my blender did? It made that pretty swirl thingy. My boys beg for me now to show them the pretty swirl thingy everytime I make these.

Strawberry Peach Slushy

These have become one of our favorite side dishes….or sometimes they are our breakfast. WE LOVE THESE SLUSHIES!

Please, oh please, try them. :)

Heavenly Homemaker's Club Members: Access your homepage and all your fantastic resources here! Not a member yet? Please join us!

So Many Strawberries…So Little Time

June 19, 2008 by Laura 5 Comments

This post may contain affiliate links. For more information, please see our disclosure policy.

You may remember me mentioning that I’m getting ready to host a family reunion this weekend. AND that we opened our Shaved Ice business this week.

Between those two events…I’ve felt a bit CRAZY this week. (My poor children…)  ;)

So, you might imagine what I felt when a friend of mine called a couple of days ago to tell me that their strawberry patch had WAY more strawberries than they could ever eat. She told me they were ready to be picked again, and that I could come anytime.

My to-do list is as long as my leg…but I COULD NOT pass up the chance to have as many organic fresh strawberries as I could pick. So yesterday morning the boys and I put on our strawberry pickin’ gear and away we went.

I forgot to take the camera with me so that I could take a picture of my happy strawberry pickers….but allow me to tell you how much FUN it was to walk into that awesome patch filled with so many strawberries you could stand in one place and pick for 10 minutes because there are so many strawberries in one spot. 

My favorite part of the strawberry day was when Matt came home…and I told him that we’d been eating a lot of the strawberries we’d picked, but that we tried to save him just a few. Then he walked into the kitchen to see this:

strawberrypickinsm.JPG

Hehe…

Heavenly Homemaker's Club Members: Access your homepage and all your fantastic resources here! Not a member yet? Please join us!

Carrot Coins

May 15, 2008 by Laura 2 Comments

This post may contain affiliate links. For more information, please see our disclosure policy.

I’m sure this never happens at your house…but sometimes my kids get bored with the same ol’ snack ideas that I present them with.

So one day recently I came up with a new fun way for them to eat their carrots.

I decided that instead of cutting them into carrot sticks…I would just cut them into little carrot bites.

Not too exciting…

But then I realized (in a rare moment of cleverness) that all of the carrot bites were different sizes…which were the same sizes of different coins:  quarters, nickels, pennies and dimes.

So I doled out several of each on a plate for each of my boys, and told them that I had found a great treasure for their snack today!

carrotcoinssm.JPG

They LOVED the idea…and realized that the more they ate…the richer they would be!

It was a good opportunity to talk about the value of each coin…and to talk about spending money wisely, etc.

Oh…and the fact that they were eating a vegetable was pretty cool too!

:)

Be sure to come sign up to win two new HeavenlyHomemakers e-books…one with many fruit and veggies ideas like this one…the other with great breakfast ideas! The giveaway ends Friday night. Hurry over and sign up!!

Then head on over to Biblical Womanhood for more Frugal Friday ideas!

Heavenly Homemaker's Club Members: Access your homepage and all your fantastic resources here! Not a member yet? Please join us!

Eat More Fruits and Veggies: Fun with Fruit!

May 13, 2008 by Laura 8 Comments

This post may contain affiliate links. For more information, please see our disclosure policy.

Here are a couple of simple ideas to help you encourage your kids to eat more fruit!

The first idea is to make some fun fruit shapes with thin slices of cantelope and watermelon!

fruitshapes5sm.JPG

My kids devour these almost faster than I can make them! ( And this time…I had to make them wait until I could take a picture! It was torture!)

fruitshapes3sm1.JPG

I carefully sliced thin strips of cantelope and watermelon. Then we used cookie cutters to cut the shapes!

fruitshapes4sm.JPG

The kids got involved in making these fun shapes too! (Which of course in our case means…climbing up onto the countertop so that they can put their whole body into the task…)  :)

I am not kidding when I tell you that we went through an entire watermelon and almost an entire cantelope in one sitting by doing this activity. (Daddy got to eat the scraps when he got home!)

And the second idea is a simple one…

Use a sharpie marker to draw fun faces on your bananas or oranges (um…I don’t recommend doing this on a strawberry or an apple…just in case you were thinking of doing that…)  ;)

Your kids will love these fruity friends!

fruitfriends2sm.JPG

One additional idea…

If you’re taking food to a sick friend…fruit is a wonderful thing to take along. Draw (or have your kids draw) some happy faces on the fruit for some Get Well Soon cheer!

Looking for more ideas like these?  Come sign up to win my new e-book, Have Your Fruits…and Veggies Too!

Check out more Works for me Wednesday tips at Rocks in my Dryer!

[tags]fun with fruit, ideas for kids[/tags]

Heavenly Homemaker's Club Members: Access your homepage and all your fantastic resources here! Not a member yet? Please join us!

Eat More Fruits and Veggies! Pineapple Orange Slushy Cups

May 1, 2008 by Laura 13 Comments

This post may contain affiliate links. For more information, please see our disclosure policy.

Pineapple Orange Slushies
Here’s a great recipe for you! It’s healthy and refreshing – and uses only THREE ingredients.

Pinepple Orange Slushy Cups

2 cups fresh pineapple, cut into chunks
½ cup orange juice
1 cup plain yogurt

Place pineapple into a food processor and puree. Pour orange juice and yogurt into food processor and blend together with pineapple. Pour mixture into small serving dishes. Place dishes in the freezer for about two hours to become slushy.

These are a great side dish at lunch or afternoon snack!

ENJOY!

Take a peek at other Fruits and Veggie recipes and encouragement here!

Heavenly Homemaker's Club Members: Access your homepage and all your fantastic resources here! Not a member yet? Please join us!

Here’s What YOU are Saying…

April 24, 2008 by Laura 4 Comments

This post may contain affiliate links. For more information, please see our disclosure policy.

 …about Eating more Fruits and Veggies!

fruitssm.JPG

I wanted to encourage you to start…or continue to eat More Fruits and Veggies by reading some of the emails and comments I’ve been receiving! I’ve certainly been encouraged by them!

Here’s part of an email I got from Toni (aka the Happy Housewife): 

I just wanted to thank you for encouraging me in the fruits and veggies department. I feel great! I have been up late the past few nights, and I haven’t been overly exhausted the next day, and I give all the credit to my diet change. Not that I want to make a habit of late nights, but it is interesting to see how I different I feel when I eat better throughout the day.

 Oh and I forgot to mention in the other email… I have lost most any craving for junk food. I wasn’t a big junk food person before, but today I had a small brownie (it was actually pretty healthy w/w flour, natural sugar, etc…) and it didn’t even taste good to me! I had carrots instead! YIPEE!

Toni wrote a great post here about Healthy Eating!

Jennifer left this comment:

Well, I have been visiting your blog the past two weeks. I did not sign up for this challenge officially, BUT I have been incorporating about 60% more veggies and fruits in our diets because of stopping here. We did eat both everyday, but we REALLY have been eating them lately! In fact, I just wrote a post about the potentially embarrassing ways that I get my kids to eat them. Stop by if you like.

Jennifer wrote two great blog posts here and here about training your kids to eat healthy. Go check them out!!

Erin commented:

I just did an update on my blog- while I slipped on my not eating sweets- I have upped my veggies and fruits SIGNIFICANTLY and am starting to not care to eat the junk. Once you start eating all the good healthy food (and making sure that you do) there’s not much room in your belly for any of the bad junk!

She wrote a blog post about her “Green Smoothie Experiment” here! 

Donna says:

I’m still hanging on….been a little out of sorts but hey! -we’re all in this together! I have some good news…DH has decided to go back on our ‘healthy diet’. Praise the Lord! That means more ways to get in fruits and veggies! (without a ‘what’d u do to this?’) ;-)   If you get a chance, I’ll be posting some recipes, some you might could use on your crew! You have lots of good ones here that I aim to try!

I saw this recipe on Donna’s blog that I thought sounded great!! She has lots of yummy looking recipes over there!

Anybody have anything they’d like to add…about how GOOD they feel while they’re eating all these good fruits and veggies?! Have any great fruit and veggie recipes you need to tell us about?!

Go get yourself a banana…then come on and tell us about it!!

Heavenly Homemaker's Club Members: Access your homepage and all your fantastic resources here! Not a member yet? Please join us!

Eat More Fruits and Veggies: The Best Way to Eat an Onion

April 16, 2008 by Laura 25 Comments

This post may contain affiliate links. For more information, please see our disclosure policy.

I’ll tell you right now…I’m not a big fan of onions. I like the flavor of them cooked into my meat…and that’s about it. I don’t put them on my burgers and I think they are weird and slimy in my stew.

I’ve never really liked onion rings.

!!!!Until now!!!!

I recently made homemade onion rings….because I knew my husband would love it. (and because I am such a sweet wife)  :)

As I pulled the first few out of the skillet..I decided to try small one.

OH MY WORD!! I shrieked with great excitement over the amazing taste of this onion jewel…which made the kids come running, of course…

They then started eating them as fast as I pull them out of the skillet…

And to make a long story short (or something like that)…I had to slice up another onion and mix up another batch of batter…so that my husband could have some too. (you know…the guy I was making them for in the first place?)

I’m pretty sure the tears running down my face were for the joy of my new found love of the onion…and had nothing at all to do with the fact that I was cutting up the vegetable that makes everyone’s eyes sting like mad.

onionringssm.JPG

Amazing Onion RingsYum

3/4 cup whole wheat flour
1/2 t. sea salt
1 egg
2/3 cup milk
2 medium onions
Oil for frying (I use palm shortening)

Whisk together the flour, salt, egg and milk. Slice onions into rings. Heat a few tablespoons of oil in a skillet. Turn heat down to medium. Dip a few onion slices into the batter to thoroughly coat. Fry them in the oil, turning once. Cook on each side for 1-3 minutes each. Remove onion rings and devour immediately and place on a plate for serving. Continue to fry onion rings until batter is gone. You can keep onion rings warm in a 200 degree oven while you continue to cook the remaining rings.

Okay, I’m tellin’ ya… Go get yourself some onions and make these!

You’ll be weeping right along with me!

I feel a little teary just talking about it… (sniff)  They’re just (sniff) so…good…

Heavenly Homemaker's Club Members: Access your homepage and all your fantastic resources here! Not a member yet? Please join us!

Eat More Fruits and Veggies: Very Berry Brownie Cups

April 14, 2008 by Laura 9 Comments

This post may contain affiliate links. For more information, please see our disclosure policy.

Many of you are aware that there is a Eat More Fruits and Veggies Challenge going on around here. If you haven’t heard of this…check it out here. 

I had confessed in this post that sometimes I just really want to choose the brownie…instead of the fruit or veggie. (I’m talking really, really want to choose the brownie…)

So then Marie suggested, “Hey, make your brownies with applesauce, then you’ll get fruit and a brownie!”

And I said, “Yeah, but then I’d have to eat the whole pan of brownies in order to get a full serving in.” (which, I could do…)

And then it was suggested to throw in a couple of strawberries with the brownie too… ‘Cause, you know…strawberries and chocolate together…that’s always yummy…

(I LOVED all of your comments on this post…can you tell?! I was cracking up all day.) (Um, while I chewed on my carrot sticks, of course…)

So, here it is folks…inspired by you…the Very Berry Brownie Cup. 

verberrybrowniesm.JPG

Very Berry Brownie CupsYum

1/2 cup unsweetened applesauce
1 cup rapadura (dehydrated cane sugar juice)
1/4 cup cocoa powder
1 egg
1 t. vanilla
3/4 cup whole wheat flour
fresh blueberries and strawberries
3/4 cup heavy whipping cream
3-4 drop stevia
1/4 t. vanilla

Stir together the applesauce, rapadura and cocoa powder. Add egg and vanilla. Mix in the flour. Pour batter into 10 paper lined muffin cups. Bake in a 350 degree oven for 20 minutes.

Whip the cream with beaters until soft peaks form. Add the stevia and vanilla and whip again just to mix.

Serve brownie cups piled with strawberries and blueberries, and topped with whipped cream.

I’ve just gotta say, that eating chocolate truly is a great way to make your home a haven…don’t you think? ‘Cause chocolate makes Mama happy…and a happy mama makes for a happy haven.

Oh, and of course, that means I’m eating fruit too…which is of course is the real point of this post…

;)

Heavenly Homemaker's Club Members: Access your homepage and all your fantastic resources here! Not a member yet? Please join us!
« Previous Page
Next Page »

Join Our Community!

 Facebook Twitter E-mail Instagram Pinterest

Popular Posts

~ Will All of the Real Moms Please Stand Up?
~ Easy! Stir-and-Pour Whole Wheat Bread
~ How to Make Gatorade
~ 31 Real Food Breakfast Ideas
~ Dear Teenage Girls...
~ When Mom Takes a Step Back
~ The Inexpensive Health Insurance We Love!
~ Let's Talk Real Food Grocery Budgets

Check out our latest posts!

  • Big Family Food and Fun: May 31-June 6, 2026
  • Big Family Food and Fun: May 24-30, 2026
  • Free 7-Day Summer Menu Plan
  • Big Family Food and Fun: May 17-23, 2026
  • Easy Side Dishes for Summer
Home  ~  Simple Meals  ~  Club Membership  ~  Shop  ~  Privacy Policy  ~  Disclosure  ~ Contact

Copyright © 2026 · Beautiful Pro Theme on Genesis Framework · WordPress · Log in