Heavenly Homemakers

Encouraging women in homemaking, healthy eating and parenting

  • Home
    • About
    • FAQs
  • Recipes
    • Bread and Breakfast
    • Condiments
    • Dairy
    • Main Dishes
    • Side Dishes and Snacks
    • Desserts
    • Gluten Free
    • Instant Pot
    • Crock Pot
    • Heavenly Homemaker’s Weekly Menus
  • Homemaking
    • Real Food Sources
  • Store
  • Contact
    • Advertise
    • Disclosure
    • Privacy Policy
  • Simple Meals
  • Club Members!

You Can Freeze a Whole Peach

July 17, 2014 by Laura 109 Comments

This post may contain affiliate links. For more information, please see our disclosure policy.

You Can Freeze a Whole Peach

Stick around here, and you might learn a thing or two from me every once in a while. But I guarantee that if you stick around here, you’ll learn loads of great information from all my readers! You all continue to amaze me with all of your cool, helpful, and time-saving knowledge. Ahhh, I love walking this homemaking journey with all of you. {wipes a tear with her stained apron}

Here’s the latest comment that had many of us saying, “Really? You can do that?! I can’t wait to try it!”

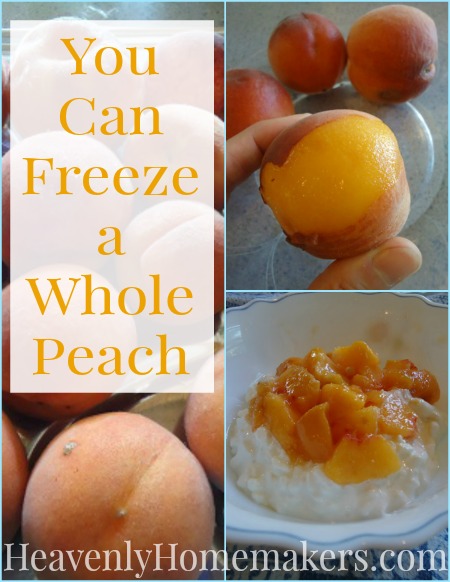
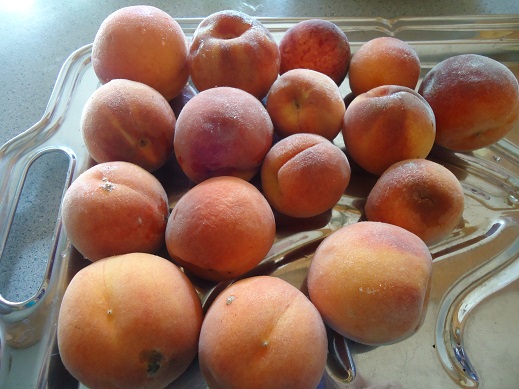
On my 10 Healthy and Easy Peach Recipes post, Jenny from DIY Parenting said, “We learned something VERY exciting last year… you can freeze whole peaches! Wash them, let them dry, then put them on a tray whole WITH the skins in the freezer. Once they are frozen solid, put them into freezer bags. Take out one as you need it. While still frozen, you can easily run your hands over the skin under water to remove it (if you want). Then let sit until thawed. This is how we now enjoy peaches, with no added sugar and without canning them, all year long.”

Well now that’s a tip that will save me loads of time and effort. I decided to try it. (How many of you did too?)

Into the freezer went some peaches…

freezing_peaches_1

Once frozen, I peeled one, just to see how easy it was. Oh wow, look at how that skin came right off with no effort at all!

freezing_peaches_2
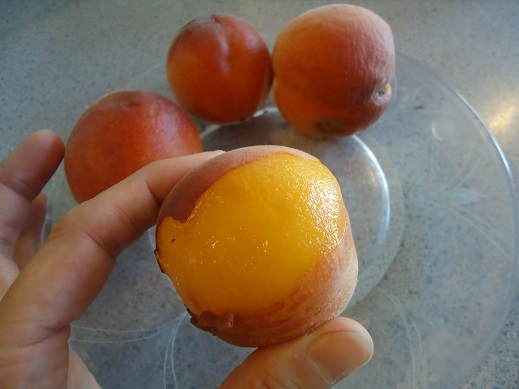
For the record, we will generally be eating our peaches with the skin on, but one or two of my kids prefer it skinless – and at this point, I figure, hey whatever gets them to eat a peach, right?

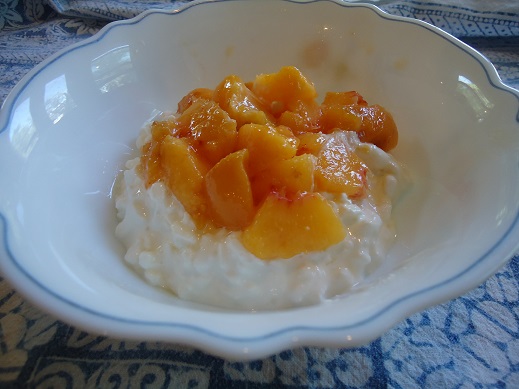
I then sliced the peach into some cottage cheese for a refreshing snack. It was heaven in a bowl.  And it was practically effortless.

freezing_peaches_4

You know what I love best about this freezing peaches whole tip? (Besides how easy it is – because truly, this process could not get any easier. Unless I send my kids to the freezer with the peaches. Which I will. But besides that.)  I love that the nutrients in the peach are preserved with this method. Home canned peaches are great, but the cooking process does kill some of the nutrients. Frozen peaches though? Straight from tree to freezer, then into a bowl for a snack. Nourishing, and so juicy and delicious.

Jenny – I’m so thankful you shared this tip. You’ve changed the way I’ll preserve peaches from now on.

Whatever shall I do with all my extra time??

This post was originally published August 29, 2013.

Heavenly Homemaker's Club Members: Access your homepage and all your fantastic resources here! Not a member yet? Please join us!

Hot Pepper in the Eye Remedy

July 16, 2014 by Laura 122 Comments

This post may contain affiliate links. For more information, please see our disclosure policy.

Have hot pepper in your eye? Grab milk (preferably whole milk) and splash it into your eye. Aaahhh blessed relief. Then come back and read my story.

———————————————————————

Hot Pepper in the Eye Remedy

First I would just like to say that the number one remedy for bringing relief to the pain of hot pepper in your eye is simply to wear gloves while cutting peppers and NEVER EVER TOUCH YOUR EYE after cutting them.

However, since I was not quite so smart last Friday, I had to come up with another remedy.

It all started so innocently. We needed to leave for our homeschool PE class that morning, but I was trying to get some of the peppers from our garden cut up and frozen before we left. Matt has been the pepper guy at our house most of this summer so I was not aware that some of them were of the very freakishly hot variety. (They were shaped like tiny sweet bell peppers.)

I got all the peppers cut up and put away, cleaned up my mess and washed my hands. I then proceeded to help get the boys ready to head out the door for PE. My eye was itchy…and so I scratched it.

Bad idea.

As if someone had lit a match on my eyeball I shrieked and turned in a circle (because I didn’t know where to go or what to do). I believe that little move is called the Eyeball Fire Ballet Step. I then ran out of the kitchen and upstairs to Matt, who was thankfully home that morning. Neither of us really knew what to do, but I quickly put a cold, wet washrag on my eye. This brought a small amount of relief, which is good because all four boys (who aren’t used to seeing their mom run screaming out of the kitchen) had made their way upstairs to see if I was still alive. At least I was able to look up at them with one eye and a half smile to give them a little assurance that I was okay.

Matt went ahead and loaded up the boys to take them to PE. I decided to stay home and be miserable. The pain was not going away, and was in fact creeping all the way up to my forehead and all the way down to my chin (not kidding), making me feel as though I might pass out. I have a pretty high pain threshold, but wow.

With the cold wash rag over my burning eye, I somehow did a swag search on “hot pepper in the eye” to see what I needed to do. Did I need to go to the ER? Could they maybe take off my face so that the intense pain would stop?

I finally found a suggestion to use a shot glass full of whole milk to wash the eye, which would neutralize the capsaicin in the peppers that was causing the burning. Whole milk I had, a shot glass…not so much. In the meantime, one of the homeschool moms (who had heard of my woes at PE class) called to say the exact same thing (although she didn’t mention the shot glass).

Using one of our little drinking glasses, I was somehow able to get milk into my eye. (Don’t ask me to demonstrate.)  I also did a fairly good job of making the milk run all the way down my face and neck, but whatever.

Instant relief.  I stood there, blinking milkily in unbelief. Could I really have just gone from that much pain to practically no pain with just a few swishes of milk? Indeed I had.

I then decided that I should make cookies, both because I deserved and needed a cookie after my trauma…and because I thought that when the boys got home, they might like to see that their mama was normal (relatively speaking) and okay.

Kinda brings a new dimension to the idea of milk and cookies bringing comfort, doesn’t it?

So let’s review:

  1. Wear gloves when you cut hot peppers and don’t touch your eye.
  2. But if you don’t and then you do…swish your eye with milk.
  3. And then make cookies.

(P.S. It wasn’t until after the flame in my eye was extinquished that I realized that my hands were also burning like mad. Funny how the eye pain overshadowed the pain in my hands. I’m still a little afraid to put my contacts in normally. Good grief did I learn my lesson.)

This post was originally published September 19, 2010.

Heavenly Homemaker's Club Members: Access your homepage and all your fantastic resources here! Not a member yet? Please join us!

10 Cold Treats That Are Good For You

July 16, 2014 by Laura Leave a Comment

This post may contain affiliate links. For more information, please see our disclosure policy.

10 Cold Treats That Are Good For You

I’ve shared several fun new summer treat recipes the past few weeks. I thought it would be fun to post them all here to make them easier to find. In addition, I wanted to remind you of a few other great cold treat ideas you can find here that you may have forgotten.

  • Pineapple Cream Dessert
  • Strawberry Creamsicles
  • Strawberry Ice Cream – Dairy Free
  • Icy Cold Milkshake Treats
  • Homemade Ice Cream
  • Pudding Pops
  • Pineapple Mango Smoothies
  • Strawberry Peach Slushies
  • Orange Creamsicles
  • Mock Frozen Yogurt

Do you have any other healthy, cold treat recipe ideas to share?

Heavenly Homemaker's Club Members: Access your homepage and all your fantastic resources here! Not a member yet? Please join us!

Coconut Oil: Why it is Good For You and Where to Buy it

July 15, 2014 by Laura 134 Comments

This post may contain affiliate links. For more information, please see our disclosure policy.

Why Coconut Oil is Good For You

I’m often talking about coconut oil around here.  I use it for baking. I use it on our skin. My favorite lotion bar is made from coconut oil. I highly encourage eating coconut oil and letting coconut oil help heal your system!

Today I’d like to answer a couple of frequently asked Coconut Oil questions…

Why is coconut oil good for you?

Coconut Oil is a saturated fat…something we’re told today to stay away from. My research has taught me to disagree with this. I’m not afraid of saturated fats. Please read this well written and well researched article, which explains saturated fats and coconut oil way better than I ever could!

Coconut Oil:  Why it is Good For You

Coconut oil is a stable fat, which means that it doesn’t go rancid easily like unsaturated fats do. (Unsaturated fats, like canola and vegetable oils, go rancid within just a few hours of being produced. This means that they are already rancid by the time they make it to grocery store shelves.)  Those living in tropical climates, consuming large amounts of coconut oil have low rates of heart desease, cancer and colon problems. Coconut Oil can actually help you lose weight and fight infections. It is anti-fungal. It has the ability to keep your thyroid healthy.

Where can you buy Coconut Oil?

I’ve not seen high quality coconut oil in my local grocery stores, but I live in a fairly small town without a lot of options. I have seen coconut oil at Wal-mart…and it works if I’m desperate…but it is far from great in my opinion.

I always buy my coconut oil online, as this is where I find the best prices. High quality coconut oil may seem expensive, but I consider coconut oil to be a healing, whole food…therefore the cost is worth it!

A good price for high quality virgin coconut oil, according to what I have found, is around $14/quart. I love it (of course) if I can find it for less than that! I watch for it to go on sale and compare prices at any of the following:

~ Tropical Traditions (watch for sales on both their Virgin Coconut Oil or their Expeller Pressed Coconut Oil.)

~ Vitacost – get $10 off your first $30 order!

~ Mountain Rose Herbs (Can be bought by the gallon here, helping this purchase to be very cost effective. Since Coconut Oil keeps for a long time…purchasing a gallon bucket is a great idea to help cut the cost!)

~ Amazon (Nutiva Organic Coconut Oil seems to be the best price at Amazon.)

~ Food Co-ops – If you’re a part of a health food co-op, you’ll likely be able to buy coconut oil through them.

What if I don’t like the taste of coconuts? Does coconut have a strong coconut flavor?

There are two types of coconut oil and both are good for you. One tastes like coconuts, and the other doesn’t!

Virgin (unrefined) Coconut Oil has a strong coconut flavor. It is processed in such a way that helps it keep the coconuty taste. I love Virgin Coconut Oil for baking.

Expeller Pressed Coconut Oil doesn’t have a flavor at all! It is processed differently, taking away any flavor, but keeping the nutrients intact. I’ve almost always found this variety of coconut oil to be less expensive. In fact, Mountain Rose Herbs has Virgin Coconut Oil for only $24/gallon + shipping…making it around $9/quart!!!!

How do I measure Coconut Oil for a recipe?

I addressed this question in my recent post:  How to Adapt a Recipe to Make it Healthier. I encourage you to read this post, and read through the comments as many of you shared easy ways to measure coconut oil. I pretty much just “eyeball it” when I measure! :)

What other Coconut Oil questions do you have? Do you like the coconut flavor, or do you prefer your coconut oil to be flavorless?

This post was originally published March 15, 2011.

Heavenly Homemaker's Club Members: Access your homepage and all your fantastic resources here! Not a member yet? Please join us!

Gratituesday: My One Defense

July 14, 2014 by Laura 6 Comments

This post may contain affiliate links. For more information, please see our disclosure policy.

Hello from camp, again. :)  This week, Matt and I are teaching Bible classes each day to senior high campers. We love these kids!

My internet time is limited, so for Gratituesday today I wanted to share one of my favorite songs. I love worshiping along with this song:

I’d love to hear what you’re thankful for this week. Leave a comment and share!

Heavenly Homemaker's Club Members: Access your homepage and all your fantastic resources here! Not a member yet? Please join us!

Free $10 to Spend at iHerb, Plus Get Sierra Bees Bumpy Road Salve for Only $1.00

July 14, 2014 by Laura 2 Comments

This post may contain affiliate links. For more information, please see our disclosure policy.

If you haven’t checked out iHerb, you’re missing out. But the good news is this: If you are a brand new customer with iHerb, you will get a free $10 to spend on your first order of $40 or more!

Here’s a sample of all you can get for $30 after your $10 discount:

Free Groceries at iHerb

Here are the specifics of what I’ve purchased:

  • Organic Raw Honey
  • Delallo Organic Whole Wheat Pasta (x2)
  • Now Foods Cocoa Powder
  • St. Dalfour Golden Peach 100% Fruit Jelly
  • Redmond Cinnamon Earthpaste

In addition, I suggest adding a container of Sierra Bees Bumpy Road Salve. It’s only $1.00 right now – an amazing deal!

iherb salve

You’ll need to use my referral code: BID487 to get your free $10 to spend at iHerb. Have fun!

Heavenly Homemaker's Club Members: Access your homepage and all your fantastic resources here! Not a member yet? Please join us!

How to Stretch a Chicken to Make Six Meals

July 13, 2014 by Laura 130 Comments

This post may contain affiliate links. For more information, please see our disclosure policy.

How to Stretch a Chicken to Make 6 Meals

When I mentioned that I can stretch a chicken to last us six meals, many of you thought I was kidding. I can’t believe you thought I was kidding. I’m always so serious about everything I say around here. Just kidding.  About being serious. I’m not kidding about the chicken though.

(eh?)

There are six of us in our family and we all enjoy our food. That’s my polite way of saying, “Good grief, my boys can put away a lot of groceries in a short amount of time and then come back in an hour asking for more.” That said, if I roast a nice chicken for dinner and serve it as the main dish, there won’t be much left of said chicken at the end of the meal. Just enough to pull a few scraps of meat together for a small casserole, then the bones are used to make broth. So, worst case chicken scenario at my house:  One Chicken, Two and a Half Meals.

But if I cook a chicken to make broth, and then use the meat from the chicken to make several different meals…now that is the best way to get the most out of a chicken! It’s cost effective, it saves loads of time and it’s easy.

The chickens I buy are from a farm nearby and they are big (between 4-6 pounds) and nice and meaty. I pay good money for them (around $15), which sounds like a lot…but if I get SIX meals from one bird? That’s only $2.50 worth of excellent protein per meal (42¢ per serving)…for my family of six!

Okay, so let’s say I cook a chicken all day to make broth and to have cooked chicken meat ready for meals. This has got to be one of the easiest things to do ever when it comes to cooking nutrient rich and inexpensive meals for your family, by the way. To stretch the chicken to last our family six meals, here is an example of what I might do over the course of a week or week and a half (freezing the broth and/or chicken after a few days to pull out as needed):

1. Use one batch of broth and a little bit of chicken to make Chicken Tortilla Soup. Because I’m using the rich broth, I don’t feel the need to use much chicken (if any) in this soup.

chickentortillasoupsm.JPG

2. Use the other batch of broth to make Chicken Noodle Soup. Again, I would use very little chicken to make this as there is so much goodness in the broth. And if you recall, sometimes I forget the chicken altogether, much like I forget to put the bananas in my banana bread. You’ve got to love my “duh” moments.

3. Next, I’d throw some chicken in Homemade Alfredo Sauce with pasta. I just use about 1 1/2 cups of cooked chicken for this as the sauce and noodles make up the bulk of the meal. (Add steamed veggies and a salad and you’re good to go!)

4. For a tasty lunch later in the week I’d make Black Bean Taco Salad. Because there are black beans and cheese in this salad, it doesn’t require a lot of chicken to complete the meal. Yum – this salad is so good!!

5. Not out of chicken yet, I can now make Three Cheese Garlic Chicken Pasta. Again, the pasta and cheese and milk are so filling, not a lot of chicken is needed. Plus, the cheese helps add protein to this meal.

garlicchickenpastasm

6. Last, I’d use whatever chicken is left to make Chicken Veggie Quesadillas. With all the veggies to fill these quesadillas, the small bits of chicken add just a little bit of protein to complete the meal!

veggiequesadilla1sm.JPG

Now, I feel very strongly that our family needs good, healthy protein at each meal, so I’m not usually parked in the “skimp on meat” camp. We eat lots of eggs and nuts and beef and other meat. But getting a lot of goodness out of one chicken is a great way to cut down on time in the kitchen and save money too!

The moral of the chicken stretching story is:  If you don’t use the chicken as the main part of the meal, but just as a supplementary part…you too can stretch a chicken for all it’s worth.

What is your favorite way to stretch a chicken? As in…what are your favorite meals to eat with leftover, cooked chicken?

Disclaimer:  No chickens were actually stretched during the writing of this post.

This post was originally published on January 23, 2011.

Heavenly Homemaker's Club Members: Access your homepage and all your fantastic resources here! Not a member yet? Please join us!

How to Adapt a Recipe to Make it Healthier

July 11, 2014 by Laura 130 Comments

This post may contain affiliate links. For more information, please see our disclosure policy.

How to Adapt a Recipe to Make it Healthier

I’m often asked how much Sucanat to substitute for white sugar, or if whole wheat flour can be substituted one for one with white flour. I decided to share a little bit about how I adapt “regular recipes” to make them healthier! Please know that when I say “healthier”…I’m not talking low fat. To me, healthier means real, whole food. Click on the following links so read about how I feed my family and why I love real, whole foods!! Be sure to also check out this entire series on Simple Steps Toward Healthy Eating.

Fats


  • If a recipe calls for vegetable or canola oil I switch it out one for one with melted coconut oil or melted palm shortening. It’s a little bit tough to measure out solid coconut oil to an exact needed amount. I just kind of “eyeball it”. If a recipe calls for 1/4 cup of vegetable oil, I make my best guess at how much 1/4 cup of coconut oil (or palm shortening) is while I’m scooping it out…then I melt it down in a small saucepan on the stove. If you are new to cooking/baking…you may prefer to melt it, then pour it into a measuring cup to be sure you  have the correct amount.
  • If a recipe calls for margarine (I gag and then) I switch it out one for one with real butter. This means that if the recipe calls for 1/2 cup margarine, I use 1/2 cup of butter.
  • Usually butter and coconut oil can be used interchangeably. For instance, when I make muffins…sometimes I use coconut oil and sometimes I use butter. It depends on what I have on hand and what sounds good at the moment (coconuty goodness, or rich buttery flavor). If you are unable to eat dairy, you can substititute coconut oil for butter in most recipes.
  • I almost always use melted palm shortening to fry foods (like french fries, onion rings, homemade corn dogs, etc.). Palm shortening does NOT create the same freaky effects from frying that vegetable or canola oils create. This means that foods fried in palm shortening (or coconut oil) are NOT unhealthy!
  • I use olive oil if a recipe calls for just a few teaspoons or Tablespoons of vegetable oil.
  • You can read more about the fats I prefer and why I prefer them here!!

Sugars


  • Sucanat (or Rapadura, which is the same thing…just under a different name) can be substituted one for one with white or brown sugar. This means that if a recipe calls for one cup of white sugar…you can instead use one cup of Sucanat. However, I generally cut the Sucanat down just a hair because the flavor is stronger…and because it is more expensive…and because wow…do we really need that much sugar? :)  Sucanat, by the way, is dehydrated cane sugar juice and the healthiest form of cane sugar I’ve found. You can read more about it  here.
  • Honey can be substituted for white or brown sugar, but I usually use 1/2 to 2/3 the amount the recipe calls for. This means that if a recipe calls for one cup of white or brown sugar, I only use 1/2 to 2/3 cup of honey. Honey has a rich flavor and is sweeter than sugar. I have not found that substituting honey causes much difference in the consistency of a recipe, even though honey is a liquid and sugar is not. If anything, I find that honey makes quick breads, muffins and cookies more moist…and that’s never a bad thing if you ask me!
  • Real Grade B Maple Syrup can be substituted for white or brown sugar, but I don’t often bake with it (ooh, except for Coconut Macaroons!). I use maple syrup for liquid treats like Chocolate Milk and Smoothies and Ice Cream. If a recipe calls for corn syrup, I use Grade B Maple Syrup instead, substituting it one for one.
  • You can read more about the sweeteners I prefer and why I prefer them here!!

Flours

  • I substitute my freshly ground whole wheat flour (made from hard white wheat) one for one in recipes that call for white flour. However, freshly ground whole wheat flour is often lighter in texture, making a one to one substitution possible.
  • If you are using store-bought whole wheat flour, I find that this seems to be a heavier flour. Therefore, I recommend using a lesser amount than the white flour that is called for in a recipe. You may find that this is even true with my recipes that call for whole wheat flour, since I am using freshly ground flour. I receive quite a few comments, particularly on my Honey Whole Wheat Bread from people using King Arthur’s whole wheat flour or another store bought flour that they didn’t need to add in all of the flour the recipe called for. I suggest just adding flour until the dough is the correct consistency…then stop.
  • You can read more about grains and grain mills in this series of posts!!

To make things a little bit easier…I created a free printable “Healthy Recipe Substitutions” download. Click the following link, print it off and keep it in your kitchen as a handy reference!

Healthy Recipe Substitutions

How do you feel about adapting recipes? Are you good at making substitutions…or do you prefer to follow a recipe exactly?

This post was originally published March 9, 2011.

Heavenly Homemaker's Club Members: Access your homepage and all your fantastic resources here! Not a member yet? Please join us!

How to Finish Your Homemade Vanilla Extract

July 10, 2014 by Laura 91 Comments

This post may contain affiliate links. For more information, please see our disclosure policy.

How To Finish Your Vanilla Extract

I’ve talked about making Homemade Vanilla Extract just a little tiny bit on this site. You’ve seen:

  • How to Make Homemade Vanilla
  • Where to Buy Vanilla Beans
  • Where to buy Cute Labels for Your Homemade Vanilla Bottles
  • What to Make with your Vanilla Extract
  • WHY You Should Use Homemade Vanilla Extract.

Just in case you need MORE reasons to make your own Vanilla Extract, here’s a post about All the Nasty Stuff Found in Most Commercial Vanilla Extracts.

But for some reason, I never shared with you how to finish off and bottle your homemade vanilla extract. Sometimes I forget important details, such as the names of my children and telling you how to finish off your homemade vanilla. What’s his name – my youngest son – helped me bottle some vanilla last week and we took pictures. Finally. (Malachi…his name is Malachi.)

Once your vanilla beans  have been sitting in the vodka (or other alcohol of choice) for 4-6 months, it’s strong and ready to be bottled. Begin by lining a colander with a coffee filter or thin tea towel.

Place lined colander in a pot to catch the vanilla. If you don’t, you will have excellent quality homemade vanilla extract running down all over your kitchen table and floors. Your kitchen will smell great for months, but that will only be a long, sad reminder of the wasted vanilla. Put the colander in a pot.

Pour contents of your jar into the colander so that the coffee filter can strain all of the tiny vanilla specks out. The vanilla specks won’t hurt anything, but it’s nice to have speck-less vanilla extract.

Use a funnel to bottle up the strained vanilla. I have found amber bottles (recommended) Mountain Rose Herbs.

I, also, love these pretty labels! They are customizable, and there are several designs to choose from!

Lay your used vanilla beans on a cookie sheet lined with paper towels to dry. You can then put them into a container of sugar for 4-6 months which will turn that sugar into Vanilla Sugar!

Finally, FINALLY I have shown you how to finish up your vanilla. And now, if I can figure out how to call my children by the correct names without running down the list of all four boys before I get to the right one, I’d be all set.

This post was originally published November 28, 2010.

Heavenly Homemaker's Club Members: Access your homepage and all your fantastic resources here! Not a member yet? Please join us!

Hello From Church Camp!

July 9, 2014 by Laura 11 Comments

This post may contain affiliate links. For more information, please see our disclosure policy.

It’s been almost humorous how difficult it’s been to get online while I’m out at church camp with my family! I’ve been too busy to write anyway, but shucks, I’ve missed hanging out here with you. :)

Would you believe the one other time I finally got internet access, my laptop started acting up? I almost cried, but that seemed silly. So I took a nap. I needed that more than anything. (I’m on a borrowed laptop right now. Internet is slow, but it’s working…at the moment. I’m typing quickly so as to hopefully not lose my chance to touch base with you.)

Matt and I have been helping in the kitchen this week, assisting the amazing head cook as we feed around 140 people three meals a day. It has been so much fun – and super exhausting too. I am shocked that so many of my muscles ache from standing all day, lifting heavy pans, and in general working harder physically than I have in a long time. I feel rather wimpy, but I hear I’m normal – at least when it comes to having achy back/legs/arms/feet/shoulders when cooking all day a camp. Kudos to those of you who do this type of work all the time. 

It’s possible that I’m also a little bit sore from playing a game of Ultimate Soccer with all the campers a few nights ago. I’m proud of my bruises, and I still officially stink at kicking a soccer ball – but it sure was a load of fun. I thought you might like to know that while I completely whiffed the ball (missed it entirely. twice. while everyone was watching), and wasn’t fast enough to get to the ball many times over (but who’s counting?), I actually scored a goal for my team. You may have heard me scream with excitement. I think my boys were proud…and very shocked. Heh.

Speaking of soccer, you know Matt must be dedicated to serving this week at camp since this meant he missed being able to watch the semi-final World Cup games. We did look up the game scores on our phones. Dude!! What happened to Brasil? 

Well, that is the end of my scattered thoughts for the evening. Yay for finding a working computer and an hour of online access – at the same time. Hopefully I’ll be able to check in with you over the weekend.

Now you tell me about what you’ve been up to this week. I may not be able to get to a computer much, but I can read your comments through the email on my phone. I’ll welcome the fun breaks to read about what you’ve been doing!


Heavenly Homemaker's Club Members: Access your homepage and all your fantastic resources here! Not a member yet? Please join us!
« Previous Page
Next Page »

Join Our Community!

 Facebook Twitter E-mail Instagram Pinterest

Popular Posts

~ Will All of the Real Moms Please Stand Up?
~ Easy! Stir-and-Pour Whole Wheat Bread
~ How to Make Gatorade
~ 31 Real Food Breakfast Ideas
~ Dear Teenage Girls...
~ When Mom Takes a Step Back
~ The Inexpensive Health Insurance We Love!
~ Let's Talk Real Food Grocery Budgets

Check out our latest posts!

  • Big Family Food and Fun: May 31-June 6, 2026
  • Big Family Food and Fun: May 24-30, 2026
  • Free 7-Day Summer Menu Plan
  • Big Family Food and Fun: May 17-23, 2026
  • Easy Side Dishes for Summer
Home  ~  Simple Meals  ~  Club Membership  ~  Shop  ~  Privacy Policy  ~  Disclosure  ~ Contact

Copyright © 2026 · Beautiful Pro Theme on Genesis Framework · WordPress · Log in