Heavenly Homemakers

Encouraging women in homemaking, healthy eating and parenting

  • Home
    • About
    • FAQs
  • Recipes
    • Bread and Breakfast
    • Condiments
    • Dairy
    • Main Dishes
    • Side Dishes and Snacks
    • Desserts
    • Gluten Free
    • Instant Pot
    • Crock Pot
    • Heavenly Homemaker’s Weekly Menus
  • Homemaking
    • Real Food Sources
  • Store
  • Contact
    • Advertise
    • Disclosure
    • Privacy Policy
  • Simple Meals
  • Club Members!

Well, Hallelujah!

October 28, 2009 by Laura 20 Comments

This post may contain affiliate links. For more information, please see our disclosure policy.

All of our boys are involved in a small home school choir right now. For the past several years our  home school group has asked Michelle, a recent college graduate with a music major, to help us teach music to our kids.

Michelle has done a fabulous job teaching our kids about singing, performing, reading notes…it’s wonderful! She’s worked with our kids on both chorus and drama/musical performances and it’s been very impressive!

This year Malachi was old enough to give it a try. He’s only 4 1/2, so it’s a bit of a stretch for him to stay focused for an entire practice, but he LOVES it. 

From the night of the very first practice, Malachi started walking around saying, “Hahyay”…shakes his head…tries again…”Hahlyay”…shakes his head.

Over and over again for days.

He’d sometimes try to work it into the song, “King of Kings and Lord of Lords, Glory Hahyay…” (shakes his head…tries again…)

Eventually he started adding more to the word, “Hah-Yay-Yoo-Lah.” (shakes his head)  Ah, but he was closer.

Then finally. FINALLY. 

One day he was sitting at the kitchen table, “Hahyay…HahLayYooLah…HahYayYooLah…Hah…Lay…Loo…Yah….” He stopped dead still for a moment. Realization dawned in his face then he screamed, “I DID IT!!!!!!  Hah-Lay-Loo-Yah!!! Mama!! I said it! Hah-Lay-Loo-Yah!!!”

Then he started running circles around the house shouting, “Hallelujah!! Hallelujah!!!” Of course the rest of us were just praising God right along with him that he FINALLY had figured out how to say it! “Hallelujah!”

That night, Michelle stopped by to drop off music CDs for the boys to listen to and practice with. When Malachi saw who was standing at the door, he dropped whatever he was doing…RAN to the door…SHOVED his big brothers out of the way and SHOUTED, “Hallelujah!!!!!”

Michelle, bless her heart, opened up her arms with her face lit up and shouted back, “Well, Hallelujah!!!!”

Malachi was fifty feet up in the air. Ah was he beaming!

And so it continues. Randomly throughout the day during all forms of activity, shouts of “Hallelujah! Hallelujah!” are heard. 

The rest of us are joining it. It’s hard not to.

Kinda makes you wonder what all of us could accomplish if we were so determined, and practiced and tried and worked as hard as he did.

Can I get an amen? 

(Hallelujah!)
——————————————-

This post is linked to Finer Things Fridays.

Heavenly Homemaker's Club Members: Access your homepage and all your fantastic resources here! Not a member yet? Please join us!

Know Your Limits

October 27, 2009 by Laura 32 Comments

This post may contain affiliate links. For more information, please see our disclosure policy.

Last Tuesday night I fed the YC women’s soccer team a lasagna dinner, then spent 4 1/2 hours at a meeting where a few of my friends and I were working through a painful and difficult situation. I got home just before midnight completely exhausted and emotionally drained.

Wednesday I woke up (after a fitful night’s sleep mixed with sorrow and prayer) and looked ahead at my day. I had a lunch date with my friend who had just lost her house in a fire. Adam and BryAnna were coming for dinner to celebrate her birthday, which meant I needed to make a birthday cake as well as cook the dinner. I was teaching a ladies class at church that night I needed to finish preparing for. Matt was at an away soccer game until 11 that night. 

I knew how tired I was and everything about the day ahead of me seemed completely overwhelming. After praying about my day, I made a decision.

We would take a day off from regular school work.

I knew the small amount energy and strength I had inside of myself. Working through a school day with my boys while my mind was so preoccupied felt like climbing a mountain. 

I knew that if I tried to explain a math concept to anyone or keep everyone quiet while I read through History…my patience would wear thin and I’d have a hard time keeping from being grumpy. My boys do not deserve my grumpiness. 

Never, ever, EVER should I be so busy and caught up in doing “good things” for others and for the church that it wears me out and makes me grumpy at my own family. Never.

Instead, we had a movie morning. Then we baked a birthday cake. Then we made hot dogs (yes, I know my limits and it was a hot dog day!!). I went to lunch with my friend. When I got back, the boys and I read three chapters of our read-aloud. Then the boys read on their own. We frosted the cake. I read through my notes for the ladies class. We started dinner. Adam and BryAnna came over. We had a lovely birthday dinner.

And I was completely calm and peaceful the entire time.

If I would have tried to get through our whole regular school schedule in the middle of everything else…I’d have been a mess by 10:30 a.m. Instead, I enjoyed my boys. I enjoyed my friend at lunch. I enjoyed surprising BryAnna with some of her favorite foods. 

Can I choose to “not have school” EVERY DAY that I feel a little tired or overwhelmed? No way. That would be a big cop-out.

Should I always be so involved with outside ministries that I have nothing left for my family? No way. That would be very wrong. Our families are our number one ministries, which means sometimes we have to say “not this time” to a ministry opportunity.

But when you find yourself waking up to a day that is too full…know your limits. Figure out what you need to cut out, stop, cancel, reschedule or give up so that your family life stays healthy, strong and God filled.

God knows your limits better than you do. Ask Him and listen. 

Disclaimer:  No children, young or old, were academically crippled as a result of this day off of school. The very next day they were all still able to multiply, spell words and write creatively. Just in case you were worried. :)
————————————————————–

This post is linked to Works for me Wednesday.

Heavenly Homemaker's Club Members: Access your homepage and all your fantastic resources here! Not a member yet? Please join us!

Gratituesday: It Took a Fire

October 26, 2009 by Laura 10 Comments

This post may contain affiliate links. For more information, please see our disclosure policy.

gratituesdayfall2

A week and a half ago, my friend Connie was driving by her house and noticed that her street was blocked off and there were fire trucks everywhere. She thought to herself, “Oh dear, something is burning.” It didn’t take long for her to see that it was her own house that was on fire.

Three years ago, Connie lost her husband to cancer, leaving her with five children to raise on her own.

And now this.

A few days later I spoke with Connie at church and invited her family over for lunch. She answered with, “Well, we already have plans today, but maybe just you and I can go out for lunch sometime this week.”

Um, okay. I was up for whatever she needed. We made plans to meet for lunch on Wednesday.

The day our lunch together was to take place, I was prepared to offer strength and encouragement to this woman who had lost so much.

Little did I know that I would be the one to leave the restaurant encouraged, strengthened and built up.

The whole time we were eating and visiting I was thinking to myself, “Why did it take a fire for us to sit down and have this conversation? By not spending much time with Connie before, I’ve been SO missing out.”

What a delightful woman. What a woman of faith. What a woman of strong character. I wanna be like that when I grow up.

I wish it wouldn’t have taken a fire…but I sure am grateful for the chance to get to know Connie better. I love how God brings great things out of the bad.
—————————————————–

What are you grateful for this Gratituesday? Write about it on your blog, then come link up with us here. Don’t have a blog? Be sure to leave a comment and let us know what you’re thankful for!

Heavenly Homemaker's Club Members: Access your homepage and all your fantastic resources here! Not a member yet? Please join us!

A Kid Friendly Meal: Sloppy Cornbread

October 25, 2009 by Laura 26 Comments

This post may contain affiliate links. For more information, please see our disclosure policy.

You know how some of your kids like some of your meals some of the time…and all of your kids like some of your meals some of the time and none of your kids like some of your meals some of the time?

And the ones some of them like…the others don’t…and the ones the other ones like the first ones don’t?

But you make them ALL eat it anyway because hello, we are not short-order chefs…but really it’s so much nicer when all of the kids like all of the meals all of the time.

I have discovered a meal that all of my kids like all of the time. 

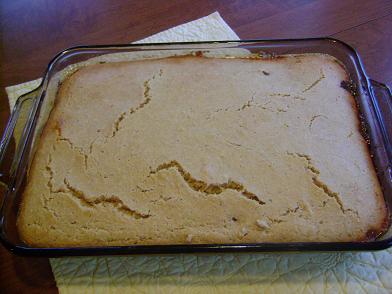
We call it Sloppy Cornbread.

I came up with this recipe because you know how when you have hamburger buns for your sloppy joes in the house some of the time…but not all of the time when you need them…and you don’t have time some of the times to make homemade buns…and the ones from the store are still at the store? That’s what happened to me one time.

But I really wanted to make sloppy joes and while some of the time we eat them without buns, we don’t do that all of the time and I really needed to fill my family up before a soccer game this time. 

And that’s how we came up with Sloppy Cornbread.

To make Sloppy Cornbread you need:

  • This Cornbread Recipe
  • This Sloppy Joe Recipe

Spread the sloppy joes out into a 9×13 inch baking pan:

sloppycornbread2sm

Yum

Spread the cornbread mixture over the top then bake for 2o minutes at 400°. (You can sprinkle cheese on top before baking if you want to!)

sloppycornbread1sm

All of us like this all of the time and some of the time there is some leftover but not all of the time because most of the time we eat the entire pan.

You should try it sometime.

:)

Heavenly Homemaker's Club Members: Access your homepage and all your fantastic resources here! Not a member yet? Please join us!

Menu Plan for the Week

October 25, 2009 by Laura 16 Comments

This post may contain affiliate links. For more information, please see our disclosure policy.

We have had very few days at our house in the past several weeks when I have only fed our family. Almost every day, there have been extra people here to eat. Out of town guests, college students, friends, soccer players. I LOVE it! Feeding people is my favorite hobby!

Do any of the rest of you feel like feeding people is a fun hobby? (Or do some of you feel like it’s a dreaded chore?!)

Here’s our menu this week:

Sunday, October 25
Oatmeal
Chili, veggie tray, Lynn’s no bake cookie bars (these are SO good!)
Popcorn chicken, ranch potato wedges, peas

Monday, October 26
Applesauce bread, bananas
Pizza, apples
Sloppy cornbread, tosssed salad

Tuesday, October 27
Scrambled egg sandwiches, clementines
Chicken and rice stew, cheese muffins
Lamb chops, baked potatoes, green beans

Wednesday, October 28
Simple Sourdough Pancakes
Nachos, grapes
Cheesy chicken and potatoes, carrots

Thursday, October 29
Fried eggs, turkey sausage, hashbrowns
Tuna salad on toast, peaches and cottage cheese
Chicken fried steak, mashed potatoes, gravy, steamed broccoli

Friday, October 30
Breakfast cake, pears
Quesadillas, applesauce
Tacos

Saturday, October 31
Zucchini muffins, apples with dip
Corndog muffins, baby carrots
Hamburgers and homemade fries

If I get a round tuit, I’m hoping to write a marathon of posts in the next few days so that I can get caught up on all the posts I feel behind on. I’ve got a giveaway, a new recipe, more about grain mills, Gratituesday of course, and something like five other posts waiting to be finished and posted. Keep checking back all week to see if I actually get it all done. It all depends on if I get a round tuit. (Yes I know. I already HAVE a round tuit.)  :)
—————————————————

Check out Organizing Junkie for more menu planning inspiration!

Heavenly Homemaker's Club Members: Access your homepage and all your fantastic resources here! Not a member yet? Please join us!

Let’s Talk about Christmas Budgets

October 23, 2009 by Laura 30 Comments

This post may contain affiliate links. For more information, please see our disclosure policy.

When I mentioned on this post about whether or not WE should get a WE…I told you that WE usually don’t spend $200 on our boys for Christmas. Some of you were curious about what that meant exactly. How much do we spend on each boy, etc?

I decided it would be a great discussion with all of you here.

After giving it some thought, I came to the conclusion that every year has been different…we probably have spent $200 total on our four boys for Christmas. But definitely not on only one gift. I would say that we have probably averaged about $50 per child each year.

We usually get each boy one “bigger” thing each. By “bigger” I’m talking a $10-$25 gift. Especially when they’re little…the “big” gift is usually something as simple as a $10 sing-and-play-back microphone.

THEN…we spend the rest on things they need. Thankfully our boys don’t seem to mind getting socks and jammies for Christmas. It gives them more presents to open…and new jammies are FUN!

(Side note:  Our Christmas spending budget is quite low overall. By buying jammies and such for the kids for Christmas, those costs actually come out of our clothing budget.)

We fill their stockings with things I’ve found on clearance throughout the year, and fun food treats I splurge on through Azure Standard.

Between grandparents and aunts and uncles…our boys have so many presents to open they always feel like they’ve hit the jack-pot (because they have)!

We haven’t felt badly about spending $50 each on the boys at Christmas because seriously…we hardly buy them ANYTHING throughout the year. Anything. We don’t need to. We have more hand-me-down clothes and toys than we know what to do with. What a blessing. So the $50 we spend on each boy seems pretty reasonable. AND it’s SO much fun for Matt and I to decide on a “splurge” type gift for the kids at Christmas since we never buy them during the year!

Now, what we spend on our extended family varies…but we usually try to make our gifts for others if we can (last year’s ideas here and more on this year’s ideas soon).

As far as what Matt and I spend on each other…we are sorta boring that way (and I seem like such an unhappy wife as a result, huh?!). Last year he bought me software that I could use for this website, and I bought him a new tool. And then our gifts were tax write-offs.  Best Christmas presents ever. :)  This year we may not exchange gifts unless we think of something we need. (Maybe I’ll ask for new kitchen towels?)

SO…how about you? I realize that some of you may spend much more on your kids than we do…some of you less. That’s okay with me.  What have you found that works best for your family?

Heavenly Homemaker's Club Members: Access your homepage and all your fantastic resources here! Not a member yet? Please join us!

Grain Mills Pt. 2: Which Ones Do I Recommend? Where Should You Buy One?

October 22, 2009 by Laura 62 Comments

This post may contain affiliate links. For more information, please see our disclosure policy.

If you missed the first post of this series where I try to convince you that you SHOULD buy a grain mill because it saves a lot of money and is more nutritious and all of your baked foods taste better, go here. For fewer run-on sentences…keep reading. :)

Now…IF you decide to invest in a grain mill…which one should you buy? There are all kinds of varieties out there. Here are a few that I know something about:

I have a Nutrimill.

I’ve never had a different kind of grain mill, so I don’t have much to compare it to…but I LOVE my Nutrimill. Everyone I’ve talked to that has one LOVES them. The only complaint I’ve ever heard about Nutrimills is that it is a bit hard to clean them. My answer to that is:  Clean them?

While I do clean mine occasionally…I find it hardly worth the effort. I use mine almost daily and while I sort of wipe off the outside a bit after each use…I don’t find it necessary to thoroughly clean it very often. (Also, if you run rice through them occasionally, that will clean the inside!)

While the Nutrimill grinds the flour it does not heat the grain in the process, preserving all of the nutrients in the grain. I’ve ground wheat (hard and soft), spelt, kamut, buckwheat, rye, corn and rice with my Nutrimill. It does give the option of grinding at a finer or coarser setting…although I’ve never found that changing the setting makes much difference. My flour is usually quite fine and I love it.

A friend of mine has a Whisper Mill.

If you own a Whisper Mill maybe you can offer a different opinion about it, BUT my friend really DOESN’T like it. She says, “It takes up a LOT of space. The two pieces make it hard to store… you have to hook up the ‘bucket’  with a plastic arm that breaks easily. Mine has never ground anything bigger than wheat very well.” Anyone else have an opinion on the Whisper Mill?

If you have a Kitchen Aid Stand Mixer, you can purchase this attachment for it.

Any of you grind your flour this way?

I’m also very interested in investing in a hand grinder…just in case we would ever need to grind grain without electricity. Here’s one I’m looking at. Do any of you have experience with hand grinders and want to recommend one?

Several of you mentioned a Vitamix on this post.

Sounds like there are mixed reviews on this one. It seems that if you grind a large amount of flour, it takes too long in the Vitamix. On the other hand, you can do other things with the Vitamix, making it a more multi-purpose investment. Read the comments here if you’re interested in learning more about the Vitamix.

Where should I buy my Grain Mill?

I would recommend looking at your options of grain mills at Amazon (you can maybe even find a used one) OR check out Paula’s Bread.

Paula’s Bread has ALL kinds of great kitchen products and several varieties of grain mills. Read about Paula’s family here and consider supporting her business if you’re looking to purchase a grain mill! Her prices are very reasonable. I’m very impressed with all of the products she carries. (Side note:  Paula’s Bread is a sponsor of mine, but she did not pay me anything extra to write this. I just really love her site and wanted to point you there in case you hadn’t seen her ad on my sidebar!)
————————————————-

If you have a grain mill, please share what kind you have and why you like it or dislike it!!!

Heavenly Homemaker's Club Members: Access your homepage and all your fantastic resources here! Not a member yet? Please join us!

I Have GOT to Get Over it Already

October 22, 2009 by Laura 14 Comments

This post may contain affiliate links. For more information, please see our disclosure policy.

Why is it, do you suppose, that while I was making pretzels yesterday I had a sudden urge to grab a shoe and a cottage cheese container?

pretzelsnakessm

<shudder>

Heavenly Homemaker's Club Members: Access your homepage and all your fantastic resources here! Not a member yet? Please join us!

How to Cut Boys’ Hair Like a Pro, part 2: Clippers

October 21, 2009 by Laura 12 Comments

This post may contain affiliate links. For more information, please see our disclosure policy.

Continuing on from yesterday’s post about Cutting a Boys’ Hair Like a Pro, please welcome again Cheryl from Moms in Need of Mercy as she guests posts more about cutting little boys’ hair with clippers!
————————————————————-

asahaircut5sm

As moms in need of mercy in all walks of life, when we can find ways of doing things ourselves instead of paying someone else to do them for us, we can save lots of money. Replacing a $10 haircut a month with one at home will save $120 dollars a year–and that’s just for one son. How’s that for inspiring!

When we talk about cutting our sons’ hair ourselves, I find clippers less intimidating and more forgiving than scissors. Stick the guard on (I use a longer one for the top and front, a shorter one for the back and sides), slide it carefully through the hair, blend with scissors, voila–you have a fairly decent haircut. But since my friend Liz is the trained cosmetologist and I am just the amateur, let’s go with what she says when it comes to clipper cuts!

Whereas with a scissor cut, you start with damp hair; with a clipper cut, the hair needs to be perfectly dry.

In Liz’s professional opinion, using a guard higher than a number four (or a half-inch) is just about worthless. She says the clippers will miss so many hairs that you might as well just use your scissors and follow those angles that we talked about in yesterday’s post.

So plug those clippers in, and let’s get to work!

As you can see, Liz is starting in the back at the base of the hairline. It may look like there is no guard, but Liz is using a #4 (1/2″) snap-on metal blade. This is definitely not for the faint of heart!
Look closely at this picture. You can see that she uses her finger to hold the hair down. This way you won’t leave behind any stragglers. She is also “scooping” up with the clippers (like a plane pulling up for take-off) to start putting an angle on the hair for blending.

So we work around the head this way and wind up with that “dog at the groomer’s” look. Wonderful, isn’t it? Depending on how your son is behaving that day, you could stop there, or do the right thing and finish it. :) Making everything even is the art and science of blending, which comes later.

Once you’ve clippered the back, you will move on to the sides. The highly trained pro that she is, Liz continues to use a half-inch snap-on metal blade (for safety, I use the plastic guard that came with my $30 Wahl set from Walmart). Remember to tuck the ear down as you cut or clipper around it.
Ok, so we’ve gotten rid of a lot of hair! Now we move to the front and switch to using scissors. Here Liz is figuring out how much to take off the top so it will blend well with the back and sides. Once that’s decided, you will then pull the hair straight up and cut across horizontally to your desired length. These cuts don’t have to be perfect. In a minute, you’ll go back through and even everything up.
Do you see all the various hair lengths in this picture? As we talked about yesterday, you always want to include hairs from the last cut you made in the section of hair you are currently cutting so that they function as your guide. You can see that Liz is cutting the hair to match the shortest lengths (from the previous cut she made). She is also angling the hair toward the crown to compensate for my son’s cowlick at his crown. Continue to work through the crown this way, using the short hairs as your guide as you pull new sections and cut parallel to the head.

The next step is to blend the sides and back by pulling the hair straight out and cutting it parallel to the shape of the head, as the pictures below illustrate.

Ready to try advanced techniques? Use your clippers to blend the haircut. You will use your comb to pull out the hair and then clipper along the comb. A key for success here is to position the blade of your clipper in the middle of the comb and work up (or over). Move your comb down to get hairs below the mid-point. Otherwise you will end up with tell-tale clipper marks in your haircut.

As the cut becomes more blended, you can see that Liz is using a 45-degree angle toward the neckline to blend the back. Depending on the length of the top, you may need a tighter angle (closer to the head) or a wider angle. Think of putting a pen vertically against the back of the occipital bone. You would want the hair to blend nicely to that line.
If you don’t feel comfortable using clippers for blending (I don’t!), feel free to use your scissors. Again, Liz is using the 45-degree angle to blend the back, as you can see here.

Now for a few final notes:
When boys are wiggly (when are they not?!), use a firm hold on the hair. This way, if you’re holding the section you want to cut tightly enough, your little (or not-so-little) bundle of testosterone can move around like he’s on a mechanical bull, and you’ll still be able to make a precise cut without cutting him.
Finally, Liz said the biggest mistakes she sees in home haircuts are 1) leaving the sides too bulky and 2) cutting straight across the neckline (and the forehead too). To remove bulk, you can use your clippers with a guard and follow the techniques we described earlier (using your comb, clippering along it). Here are a few pictures of Liz taking extra hair out of the neckline and sides:

And one last picture of “point-cutting” the forehead (cutting small points on the ends so it breaks up the “straight-across-the-forehead” look):

Now that you’re armed with hair-cutting know-how, do you feel like you’re ready to get to work?
Remember, practice makes perfect! I hope you found these tutorials helpful and that you feel confident enough to give it a try. Think of what you could do with all that money you’ll save. Go give it a try!
“I can do all things through Him who strengthens me” –Philippians 4:13
Head over to Moms in Need of Mercy and give Cheryl a BIG thank you for guest posting all of this wonderful information!!!
How to Cut a Boys Hair with Clippers
Subscribe for FREE to Heavenly Homemakers so you won’t miss all the new Simple Recipes and ideas we share to save you money!
Heavenly Homemaker's Club Members: Access your homepage and all your fantastic resources here! Not a member yet? Please join us!

How to Cut Boys’ Hair Like a Pro

October 20, 2009 by Laura 241 Comments

This post may contain affiliate links. For more information, please see our disclosure policy.

Ready to learn how to cut a boys’ hair like a pro?

asahaircut5sm

Remember how I promised to show you how I give my boys’ haircuts…and then just at the moment I had my long-haired boys all lined up for haircuts and pictures…my camera batteries died? While we’re waiting for my boys’ hair to grow back for the photo op, Cheryl from Moms in Need of Mercy offered to guest post on this subject for us! And she got her PROFESSIONAL cosmetologist to help us out!   
——————————————————–

When thinking about giving your son a haircut, do you:
a) shudder at the thought of what it might look like if you did it yourself,
b) reach for your scissors with a glint in your eye,
c) reach for your phone to make an appointment for him,
d) wish you knew more of what you were doing, so you weren’t just “winging” it (come to think of it, he kind of looks like he has wings when you’re done)

Haircuts, even for boys, are expensive. As often as their hair grows, this adds up to some serious cash. And while there are a number of cool boys haircuts to choose from at the barbershop, if you know how to cut your son’s hair at home, and you know how to do it right, both of you will be pleased.

If you’ve ever wanted professional lessons on how to cut his hair by yourself, my friend Liz–a licensed cosmetologist–agreed to show me (and you) the tricks of the trade. Normally, these lessons would cost you a partial cosmetology school tuition, but we are bringing them to you free! Now go pour yourself an ice water on me, and let’s get to work!

As you can see from the above picture, cutting hair successfully is all about the angles. To begin, you may want to start with the neckline. (Liz thought that beginners may want to start at the top. This way, you can set the top length as your guide and blend down from it, rather than having to cut everything again if it doesn’t blend properly when you get to the top last).

But let’s say you start at the neckline. Working on the back of the head, starting from the area of the top of the ear down, use your water bottle ($1 at the Dollar Store/Walmart/Target) to spray the hair down and cut at a 45-degree angle, slanting toward the neckline. You will hold the hair according to this angle and cut along your fingers, as you can see in these pictures.

Once you have worked your way across the back of the head, you can use your scissors to carefully go straight across to form the base of the neckline. As you can see Liz demonstrating, you want to make sure to hold the hair down firmly so you cut it evenly.
Liz says if you are right or left-eye dominant, it could make your haircut slant. So when you finish the neckline, get eye level with it and check that it does not slant. If it does, correct it!

Once the back area is finished, you can move up to the sides. You will continue with the 45-degree angle.

Do you notice all the different lengths in this closeup? You don’t want that. When you are making a cut, you will want to have a few hairs from the last cut you made included in the section you are currently cutting. These hairs will serve as your guide, and you will cut the hair to match the length of the previous cut (which should be the shortest hairs).
When you come to the ear, you will tuck the ear by folding it down gently, and then cut around the ear as if you were tracing the pattern of the ear.
Once you have completed the sides and worked back around the head in that section, you can move up toward the top. You will now pull the hair out at a 90-degree angle (the mathematicians among us may argue that this is actually 180-degrees) and cut it straight off of the head.

Just as your child’s patience has about reached its limit, you will reach the top. Reassure him that you’re almost done and you’ll give him a reward for sitting so nicely (or not so nicely!) when you’re finished. Take the hair from the center of the top of the head, lift it up, and cut it straight across. If the very front of the forehead looks too choppy when you’re done, you can point-cut it. This is where you will use the point of your scissors to cut small points in the hairline (you don’t want it to look like candy-corn) :)


If your son has cowlicks at the top of their head (mine do), you can leave the hair longer here to compensate. The extra weight will help prevent it from sticking straight up and you can work the look into several cute little boy hairstyles. To accomplish this, you will want to angle the hair slightly toward the front.

Now you’re just about done! The only thing left is to check the cut to make sure it’s even. You should be able to run your fingers through the hair, pull up various sections, and have the lengths line up evenly (angling in places, but with no long hairs jutting out). It should be well blended. Correct any mistakes you find, and try again in another 3-4 weeks, depending on how quickly your son’s hair grows!

Click here to see how to give a clipper cut as well as how to properly use clippers to help take out some of the bulk in a standard haircut.

How to Cut a Boys Hair Like a Pro


Subscribe for FREE to Heavenly Homemakers so you won’t miss all the new Simple Recipes and ideas we share to save you money!

Heavenly Homemaker's Club Members: Access your homepage and all your fantastic resources here! Not a member yet? Please join us!
« Previous Page
Next Page »

Join Our Community!

 Facebook Twitter E-mail Instagram Pinterest

Popular Posts

~ Will All of the Real Moms Please Stand Up?
~ Easy! Stir-and-Pour Whole Wheat Bread
~ How to Make Gatorade
~ 31 Real Food Breakfast Ideas
~ Dear Teenage Girls...
~ When Mom Takes a Step Back
~ The Inexpensive Health Insurance We Love!
~ Let's Talk Real Food Grocery Budgets

Check out our latest posts!

  • Big Family Food and Fun: September 20-26, 2026
  • Big Family Food and Fun: September 13-19, 2026
  • Big Family Food and Fun: September 6-12, 2026
  • Big Family Food and Fun: August 30-September 5, 2026
  • Big Family Food and Fun: August 23-29, 2026
Home  ~  Simple Meals  ~  Club Membership  ~  Shop  ~  Privacy Policy  ~  Disclosure  ~ Contact

Copyright © 2026 · Beautiful Pro Theme on Genesis Framework · WordPress · Log in