Heavenly Homemakers

Encouraging women in homemaking, healthy eating and parenting

  • Home
    • About
    • FAQs
  • Recipes
    • Bread and Breakfast
    • Condiments
    • Dairy
    • Main Dishes
    • Side Dishes and Snacks
    • Desserts
    • Gluten Free
    • Instant Pot
    • Crock Pot
    • Heavenly Homemaker’s Weekly Menus
  • Homemaking
    • Real Food Sources
  • Store
  • Contact
    • Advertise
    • Disclosure
    • Privacy Policy
  • Simple Meals
  • Club Members!

Cheesy Cauliflower Cakes

March 12, 2014 by Laura 28 Comments

This post may contain affiliate links. For more information, please see our disclosure policy.

If it looks like a cheesy hashbrown and tastes like a cheesy hashbrown, it must be a cheesy hashbrown, right? Right. Unless it’s actually cheesy cauliflower cakes.

cauliflower cakes 2

Hey, I wasn’t trying to trick my family. Really, I wasn’t. I was planning to be completely up front and honest about the platter of cauliflower on the table. Is it my fault they just assumed I’d fried up some hashbrowns? And would you believe, when I told them that in fact, there were no potatoes in these – only cauliflower – some of my boys didn’t even believe me? Then my pickiest boy helped himself to seconds. Who am I to argue?

I’ll admit that as hard as I’ve tried, cauliflower is still not at the top of my favorite vegetables list. We all eat it steamed or roasted, but our reactions are usually something like “eh” when it comes to eating cauliflower fixed in those ways. When I found this cauliflower cake recipe and decided to play with it, I was hoping it would at least be just a little better than “eh.” To my surprise, I found myself unable to stop nibbling as I was cooking these for our dinner. These are way, way better than “eh.” I mean, my pickiest boy ate seconds. That is worth stating twice.

I believe these will be a part of our normal veggie rotation. Not only are they tasty, they’re quite easy to put together.

Cheesy Cauliflower Cakes (adapted from this recipe)Yum

Cheesy Cauliflower Cakes
 
Save Print
Author: Laura
Ingredients
  • 1 head cauliflower
  • 2 large eggs
  • ¾ cup shredded cheddar or Colby jack cheese
  • 2 Tablespoons dried minced onions
  • ½ teaspoon sea salt
  • Palm shortening or expeller pressed coconut oil for frying
Instructions
  1. Cut cauliflower into florets.
  2. Boil for about 10 minutes or until tender.
  3. Drain.
  4. Mash with a potato masher. (I found that this created what looked like shredded potatoes.)
  5. Stir in eggs, shredded cheese, minced onions, and salt until well combined.
  6. Melt 1-2 Tablespoons of palm shortening or coconut oil in a skillet.
  7. Scoop 2 Tablespoons of mixture into the melted oil, pressing down into a cake.
  8. Fry over medium heat until brown and crispy - about 2 minutes on each side.
  9. Serve right away.
  10. Makes 12-15 cakes.
  11. (To save time, you can skip forming these into cakes and simply fry them up in a skillet in a big batch like you would do with hashbrowns. )

3.4.3177

Cheesy Cauliflower Cakes

Even if you don’t like cauliflower, you’ve got to try these. Pretend they’re hashbrowns if it helps. It worked for us!


Heavenly Homemaker's Club Members: Access your homepage and all your fantastic resources here! Not a member yet? Please join us!

Black Bean Chicken Nachos – A Last Minute Meal

March 5, 2014 by Laura 21 Comments

This post may contain affiliate links. For more information, please see our disclosure policy.

Where does the time go? My kids are not babies anymore, I’ve been married for almost 20 years, and just last week, I realized that it was almost lunchtime and I had forgotten to put the chicken into the crockpot. Yes, time flies after breakfast. And when you’re happily married, raising kids, and all that.

I have no advice on keeping time from moving so quickly. I can, however, give you an idea for a quick meal for when you haven’t managed to prepare anything in advance. It all starts with frozen chicken. This is because not only did you not start lunch or dinner on time, you also forgot to thaw the chicken. For all of you perpetually prepared people out there, don’t worry – thawed chicken will also work in this recipe. For the rest of us, we rejoice in the fact that frozen chicken and a cold crock pot does not prevent us from putting a great meal on the table in a short amount of time.

This recipe is a result of me realizing at 11:30 one whirlwind morning that while I had been planning to serve Chicken Tacos for lunch that day, not only was the chicken still frozen, I didn’t have any tortillas prepared or purchased. Without thinking too hard, I chucked the frozen chicken into a saucepan on the stove, dumped on salsa, and hoped for the best. I covered the pan and turned the heat on low. Within an hour, my chicken thawed, cooked in delicious salsa flavors, and was ready for lunch – which we had with chips instead of tortillas. It turned out so delicious, I decided we would make it this way again and again. This recipe turned out to be a “six out of six” which means that all six of our family members loved this. A brainless, effortless, healthy recipe that we all liked? Score!

Black Bean Chicken Nachos

Black Bean Chicken NachosYum

Black Bean Chicken Nachos - A Last Minute Meal
 
Save Print
Author: Laura
Serves: 6
Ingredients
  • 1½ pounds boneless, skinless chicken breasts
  • 2 cups salsa
  • 2 cups cooked black beans (or one can of prepared beans, if you've - you know - not remembered to soak and cook them ahead of time while you were busy not thawing your chicken...)
  • tortilla chips, cheese, sour cream, tomatoes, and other nacho toppings of your choice
Instructions
  1. Place chicken and salsa in a medium-sized saucepan.
  2. Cover and cook over medium-low heat for 20 minutes (if chicken is thawed) or 45-50 minutes (if chicken is frozen).
  3. Use a fork and knife to shred chicken and stir it back into the salsa.
  4. Stir in black beans, and continue cooking until beans are hot - about five minutes more.
  5. Serve with shredded cheese and other nacho toppings of your choice.
  6. Scoop up Black Bean Chicken nachos with tortilla chips and congratulate yourself for throwing together such a wonderful meal with such minimal effort.
3.4.3177

Then, before you forget, get out the meat for tomorrow’s meals so it can be thawed and ready to use. Not being prepared certainly worked for this recipe, but let’s not push it.

Heavenly Homemaker's Club Members: Access your homepage and all your fantastic resources here! Not a member yet? Please join us!

How to Make Beef Broth

February 27, 2014 by Laura 27 Comments

This post may contain affiliate links. For more information, please see our disclosure policy.

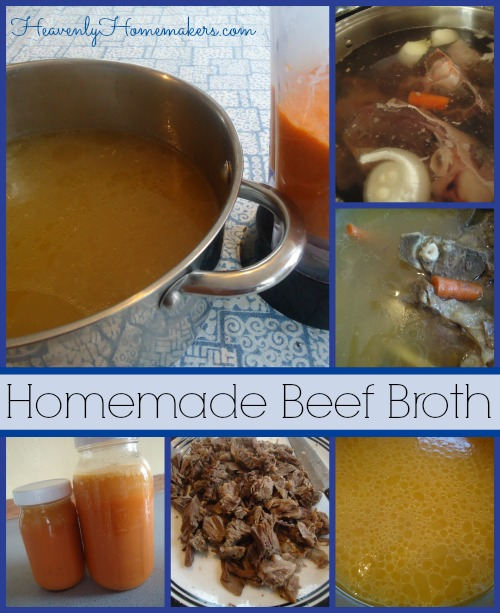
There’s nothing very beautiful about pictures of soup bones and vegetables floating in water. And yet, here I am again, just like the time I showed you all the pictures of my chicken carcasses. Some people create adorable collages of their children. Me? I spent time yesterday crafting a collage of my beef broth. Isn’t it precious?  Take note of the fatty bubbles floating along at the top of the jar. I’m so proud.

Homemade Beef Broth

Yum

Beef Broth is as fantastic for your body as Chicken Broth. There are so many minerals we need that we can get from beef bones, such as calcium, phosphorous, magnesium, sulfur, and potassium – all in their natural, beneficial, and digestible form. The vegetables you add to the pot of broth are invaluable. And the best part? Making homemade broth is one of the most inexpensive ways to provide nourishment to yourself and to your family members.

Look into buying Beef Soup Bones. There’s still a little meat on the bones (more on that later), but mostly you’re just going to pay a small amount for a package of bones. Cook those mineral-filled-bones in a pot with water and veggies, and you’ve just created several jars full of nutritional goodness for a very tiny amount of money.

Here’s how I make Beef Broth. As you can tell from my collage above, my process is very fancy and exact:

1. Place thawed or frozen beef soup bones into a large kettle or stock pot.
2. Add, to your heart’s content, chunks of onion, carrots, leeks, celery and/or any other veggie you enjoy in your broth.
3. Fill your pot with water.
4. Sprinkle liberally with sea salt.
5. Cover and simmer pot of water/veggies/soup bones for 4-6 hours. Or more. Or less. Or whatever works for you.
6. Remove soup bones from pot. Pull cooked beef off the bones with a fork, and set meat aside for soup or salads.
7. Blend liquid and vegetables together until smooth.
8. Allow broth to cool, then refrigerate or freeze until you are ready to use it to make soup, cook rice, or add it to a recipe.

That meat you’ll pull off the bones? It tastes incredible because it’s right by the bone and has been cooked low and slow. I love it in chef salads. I also snack on it as I’m pulling it off the bones.

Why do I blend all the veggies into the broth? Because after 6 hours of simmering, they are mushy. When I blend them in, they just become part of the nutritious broth. Depending on the number of carrots I use, my broth might turn orange. No matter. It’s delicious.

Once you’ve made Beef Broth, what can you do with it? You can use it to make Beefy Vegetable Soup. You can also use it in any recipe that calls for chicken broth – like my Cheeseburger Soup or Pizza Soup. Cook rice in broth for extra nourishment and flavor in a side dish – or add that wonderful rice to Cheesy Beef and Rice. Follow my instructions for Chicken Noodle Soup, but instead use beef broth and the meat that came off the bones for Beef-n-Noodles.

What other ideas do you have? What ways do you use Beef Broth? 

Isn’t this a wonderful way to be healthy and save money at the same time?!

Heavenly Homemaker's Club Members: Access your homepage and all your fantastic resources here! Not a member yet? Please join us!

Peppermint Cream ~ A Non-Guilty Pleasure in Coffee, Hot Cocoa, and Crio Bru

February 11, 2014 by Laura 10 Comments

This post may contain affiliate links. For more information, please see our disclosure policy.

Peppermint Cream on Crio Bru

Yum

I super love this pick-me up and treat in the afternoons while I’m working at the computer. If you haven’t tried the Peppermint Cream recipe I shared at Christmas time, you really must take a few minutes to whip some up (literally). It has zero sugar, is all real, and it tastes delicious in hot drinks.

My favorite use for Peppermint Cream is in and on a hot mug of Crio Bru. What is Crio Bru, you ask? It is ground cocoa beans, which you brew just like coffee. Yup, straight chocolate, no sugar. Sounds bitter? Actually, it really is delicious all on its own without sugar. (You can also doctor it up with maple syrup and milk and make it into the most delicious hot chocolate you’ve ever had.)  I love it all by itself – but topped with this Peppermint Cream? Well, it is amazing. Rich, hot, creamy, and all real. Delicious!

I order Crio Bru from Amazon, iHerb, or Azure Standard. It’s a little pricey, so I definitely consider it a treat. But it’s a no-sugar treat that warms me from the inside out. Love it!

Peppermint Cream

Have you tried Crio Bru? And more importantly, have you tried Peppermint Cream?  Yum, yum, yum, and then some.

Heavenly Homemaker's Club Members: Access your homepage and all your fantastic resources here! Not a member yet? Please join us!

Pizza Soup

February 5, 2014 by Laura 10 Comments

This post may contain affiliate links. For more information, please see our disclosure policy.

Pizza Soup: One of the best inventions in my kitchen so far this winter. Not including the Super Creamy Peanut Butter, of course. I can’t get enough of this soup. Plus, it’s super easy to make. I love this!

In a freaky, way less artificial, and way more wonderful sort of way, this soup tastes kind of like Spaghettios. I only mention this for those mothers who have kids they are trying to break from Spaghettios. If you hate Spaghettios, trust me, this soup tastes nothing like Spaghettios. Really. Okay then.

pizza soup

You’ll notice this recipe is similar to my Cheeseburger Soup recipe. One night as I was making Cheeseburger Soup, I realized I didn’t have enough chicken broth. I decided to add some tomato sauce to the soup for more liquid. Then I added a few different spices and some pasta. Then I fell in love. Don’t worry. I still love Matt best.

Pizza SoupYum

1/2 pound ground beef
1/2 cup chopped onion
3/4 cup shredded carrots
1 teaspoon dried basil
1 teaspoon dried parsley
1 teaspoon oregano
1/2 teaspoon garlic powder
3 cups chicken broth
4 cups tomato sauce
salt and pepper to taste
1 1/2 cups milk
8 ounces whole wheat or rice pasta
2 cups shredded cheddar cheese
1/4 cup sour cream (optional)

In a large pot, brown hamburger meat with onions, carrots, basil, parsley, oregano, and garlic powder. Once thoroughly cooked, add chicken broth and tomato sauce, then bring to a boil. Salt and pepper to taste. Add pasta, then reduce heat to medium while pasta cooks, about ten minutes. Add milk, stirring and cooking until bubbly – about two minutes. Remove from heat.  Add cheese and sour cream, stirring until melted. Serves 4-6.

Make this dairy free by simply substituting coconut milk and leaving out the cheese. Add chopped green peppers to the meat, onion, and carrot mixture for a more flavorful soup.

Is it super cold at your house like it is at mine right now?  Soup is rockin’ my world as I work to keep us warm and fed!

Heavenly Homemaker's Club Members: Access your homepage and all your fantastic resources here! Not a member yet? Please join us!

Super Creamy Peanut Butter – Step Aside Skippy!

February 4, 2014 by Laura 86 Comments

This post may contain affiliate links. For more information, please see our disclosure policy.

For everyone who can’t get their kids to break away from Skippy or Jif. To all who can’t get used to the taste of plain, natural peanut butter. To each person who doesn’t want to struggle to spread homemade creamy peanut butter onto a piece of toast. This recipe is for you! (And for me, because while I love homemade, natural peanut butter – I can’t get enough of this new recipe!)

You’ve read the ingredients in Skippy and Jif, right? Unreal. Literally.  It does have some peanuts in there somewhere, but it mostly has hydrogenated oils and high fructose corn syrup. Poor Peter Pan. I doubt he wanted his good name tarnished like this.

And now, to replace that popular grocery store item, I bring you this completely real food, non-hydrogenated, nothing scary, all natural, wonderful, spreadable, smooth, creamy, delicious peanut butter.

The first day I made this, I licked so many spoonfuls I lost track of trips back and forth to the kitchen. After one such trip to the kitchen, once I finished what was on my spoon, I actually found myself sucking the life out of the spoon, apparently in hopes that more of the deliciousness would secrete out of the metal? Then I realized what I was doing and went back to the kitchen for another spoonful. Someone just bring me the jar!

Super Creamy Peanut Butter

I was not alone. Matt and the kids acted like this was candy. Maybe we’ll make it into a sandwich someday, but for now, we’re getting our protein fix one spoonful at a time. Ah-mazing. Here is the recipe already:

Super Creamy Peanut ButterYum

5.0 from 1 reviews
Super Creamy Peanut Butter - Step Aside Skippy!
 
Save Print
Author: Laura
Ingredients
  • 1 cup natural peanut butter (tutorial link below)
  • 4 Tablespoons palm shortening
  • 1 - 1 1/2 Tablespoons real maple syrup
  • ¼ teaspoon sea salt
Instructions
  1. In a medium saucepan, melt and stir together all four ingredients until smooth and creamy.
  2. You can make this more or less sweet by adding more or less maple syrup.
  3. Pour mixture into a pint sized jar.
  4. Chill until thickened (about 2 hours).
  5. Spread on a sandwich, eat with a spoon, eat with a spoon, eat with a spoon, or eat with a spoon.
3.4.3177

Make Your Own Natural Peanut Butter!

Wondering where to get Palm Shortening?  My favorite source is Tropical Traditions. Spectrum brand Organic Vegetable Shortening (which is made with 100% palm oil) is also good, and can be found at Amazon, or health food stores. Just do not use regular vegetable shortening (like Crisco) – otherwise you’re right back at the not-so-good-for-you peanut butter.

Over the weekend, I made about 8 cups of this peanut butter. I figured my food processor was already messy, my palm shortening was already out, so why not make this effort worth my while? I now have 4 pint sized jars of this peanut butter in my fridge. Well, 4 pints minus several dozen spoonfuls.

Alright – what do you think? Will your family love this?? (The answer is yes.)  What kind of peanut butter do you like at your house?

Heavenly Homemaker's Club Members: Access your homepage and all your fantastic resources here! Not a member yet? Please join us!

How to Roast Vegetables {31 Days of Real Food Reality ~ Day 29}

January 28, 2014 by Laura 29 Comments

This post may contain affiliate links. For more information, please see our disclosure policy.

31 Days 300

Yum

Vegetables just keep coming up during this series, don’t they? They are the best real food out there, so I can’t say enough about the importance of working them into our diets in a big way!

When I mentioned a couple of weeks ago on our menu plan that I was determined to make and eat cauliflower that week – you all really came through on some great ideas for ways to prepare it! Many of you told me that I had to try roasting the cauliflower. That definitely seemed like the easiest first idea to try.

Here’s what I’ve learned since then:  Not only is it a delicious way to eat vegetables, it’s also one of the easiest ways to prepare them. Roasting offers a slight variety in taste and texture, compared to steaming the vegetables as I usually do. I’m loving this, and can’t wait to continue roasting more varieties of vegetables as we work to expand our menu options.

If you are taking baby steps in your real food journey, I encourage you to try roasting vegetables to serve with your meals. Healthy eating doesn’t get much easier!

roasted cauliflower

How to Roast Vegetables:

1. Wash the fresh vegetables.
2. Cut vegetables into small pieces. (The smaller they are, the easier they are to pop into your mouth!)
3. Place vegetable pieces into a casserole dish.
4. Drizzle on 1-2 Tablespoons of olive oil or melted coconut oil.
5. Sprinkle generously with sea salt.
6. Stir veggies to coat with olive oil and salt.
7. Bake in a 375° oven for 15-20 minutes or until veggies are lightly browned and tender.

It really is that simple. Makes me wonder why I haven’t tried this before.

Carrots, broccoli, squash, asparagus…what else would be a tasty roasted veggie?

Heavenly Homemaker's Club Members: Access your homepage and all your fantastic resources here! Not a member yet? Please join us!

Chocolate Cheesecake Pie ~ Real Food Ingredients Make Real Good Treats

January 22, 2014 by Laura 17 Comments

This post may contain affiliate links. For more information, please see our disclosure policy.

31 Days 300

I sure do love the fact that eating real food does not limit us. In fact, I believe it frees us! Do you know all the wonderful food that can be made with just a few real food ingredients? Pretty much everything, including Twinkies. (Although I never have figured out how to make a maraschino cherry without using a bunch of sugar and red food coloring. I guess we’ll just stick with real cherries.)

This Chocolate Cheesecake Pie recipe is so simple, so delicious, and made with all real food ingredients. You still want to make sure you consider this a very occasional treat, because sucanat is still sugar.  But how nice is it that we don’t have to resort to boxed mixes or spend hours in the kitchen when we want to make something special. In fact, last week when I made this, I had a pie crust already baked in the freezer. All I had to do was throw the filling ingredients into the food processor, give it a whirl, then spread the mixture into my pie crust. Seven minutes later – Chocolate Cheesecake Pie!

Chocolate Cheesecake PieYum

1 cup heavy whipping cream
8 ounces cream cheese, softened
1/2 cup sucanat
1/4 cup cocoa powder
1 teaspoon vanilla extract
Baked and cooled whole wheat pie crust

Whip heavy cream until soft peaks form. Mix in cream cheese, sucanat, cocoa powder, and vanilla until well combined and smooth. Pour mixture into a baked and cooled pie crust. Refrigerate for at least two hours before serving. Or skip the pie chilling step if your kids are breathing down your neck and asking for a slice before you even get the filling into the crust. Why wait?!

Chocolate Cheesecake Pie

Don’t want chocolate in this pie? Skip the cocoa powder and end up with plain ol’ Cheesecake Pie. Or leave out the cocoa and add a splash of lemon juice for Lemon Cheesecake Pie. Or a splash of lime juice for Lime Cheesecake Pie. See how much fun real food ingredients can be? It gives us the freedom to go crazy in the kitchen! Trust me, crazy in the kitchen is what I do best.

What fun treats do you make with real food ingredients?


Heavenly Homemaker's Club Members: Access your homepage and all your fantastic resources here! Not a member yet? Please join us!

Now, Now. Let’s Not Make This Difficult ~ Easy Orange Chicken, A Super Quick, Real Food Recipe

January 16, 2014 by Laura 19 Comments

This post may contain affiliate links. For more information, please see our disclosure policy.

31 Days 300

Why do we make it hard? Why do we think that cooking healthier foods always takes a long time? Relax now. My recipes are all made with real food, and most all of them are very low maintenance. This Easy Orange Chicken recipe will prove it.

The truth is that eating a real food diet is actually rather simple. We just have to get the hang of it. We just have to plan ahead a little bit. We just have to buy some chicken – at least if you want to make this recipe. I think I had this dish in the oven after about five minutes of prep time. That’s faster than making a box of mac and cheese, and I think it goes without saying that this tastes much better.

High Five Recipes

Have you scrolled through all of my High Five Recipes? If not, you should. If so, you should again. They are all high quality recipes which call for five ingredients or less. We’re talking everything from main dishes, to side dishes, to snacks and desserts. Real food. Real easy. So how about a new High Five Recipe?

Easy Orange ChickenYum

1 cup orange juice
2 Tablespoons onion soup mix
10-12 chicken legs

Place chicken legs in a 9×13 inch baking dish. Stir together orange juice and onion soup mix. Pour mixture over the chicken. Cover and bake in a 375° oven for 45 minutes. Uncover and bake for an additional 15 minutes.

Variation:

Pour orange juice mixture over 6 chicken boneless, skinless chicken breasts. Bake in a 375° oven for 25 minutes, then uncover and bake for an additional 5 minutes or until juices run clear.

Easy Orange Chicken

During the final few minutes of cook time for your chicken, put together two or three vegetable side dishes. Brown rice is also wonderful with this chicken. Your meal will be satisfying, delicious, and you won’t even break a sweat preparing it.

Having homemade MSG-free Onion Soup Mix on hand is always super helpful. In fact, I encourage you to spend a few minutes putting together several of the seasoning mixes you’ll find on this page. They save so much time, taste so much better than purchased packets, are much healthier, and save money too!

I hope you’re beginning to see that eating a real food diet really isn’t complicated. What are your favorite “throw it together” healthy meals?

Heavenly Homemaker's Club Members: Access your homepage and all your fantastic resources here! Not a member yet? Please join us!

Cheeseburger Soup – for $1 per person {31 Days of Real Food Reality ~ Day 10}

January 9, 2014 by Laura 33 Comments

This post may contain affiliate links. For more information, please see our disclosure policy.

How about some Cheeseburger Soup for less than $1.00 per person?

31 Days 300

It’s a real food recipe that most everyone will love. It’s full of nourishing goodness. After all, there’s chicken broth and carrots in it, not to mention delicious beef, cheese, milk, and sour cream. It’s a full meal all on its own. Just like all of the recipes I share, this one won’t appear to anyone as “health food.” It’s simply delicious food. Comfort food. And yep, it just so happens to be healthy.

I found that this recipe yielded six hearty servings. I did the math on it, and can declare it to be a Dollar Menu Dish. Technically, it cost me just over a dollar per person to feed this to my family. I decided, eh, it counts. :)  So what does it mean that this meal costs about a dollar per person? It means that healthy eating doesn’t have to be expensive! I love it that there are so many economical ways to feed a family well.

If you don’t mind adding a little extra expense to this soup, and you really want to make it appealing to those among you who just might be afraid of anything healthy – try adding 1/4 – 1/2 pound of chopped, cooked bacon. Then it becomes Bacon Cheeseburger Soup, and who wouldn’t want to eat that? By the way: Bacon is real food.  Hallelujah!

Cheeseburger SoupYum

Cheeseburger Soup - for $1 per person {31 Days of Real Food Reality ~ Day 10}
 
Save Print
Author: Laura
Serves: 6
Ingredients
  • ½ pound ground beef
  • ½ cup chopped onion
  • ¾ cup shredded carrots
  • 1 teaspoon dried basil
  • 1 teaspoon dried parsley
  • 3 cups chicken broth
  • salt and pepper to taste
  • 1½ cups milk
  • 5 cups potatoes cut into chunks
  • 2 cups shredded cheddar cheese
  • ¼ cup sour cream
Instructions
  1. In a large pot, brown hamburger meat with onions, carrots, basil, and parsley.
  2. Once thoroughly cooked, add chicken broth and potatoes.
  3. Salt and pepper to taste.
  4. Bring to a boil, then reduce heat to medium while potatoes cook, about ten minutes.
  5. Once the potatoes are tender, add milk, stirring and cooking until bubbly - about two minutes. Remove from heat.
  6. Add cheese and sour cream, stirring until melted. Serve.
3.4.3177

Cheeseburger Soup

Looking for more meal ideas that use healthy, real food ingredients and cost less than one dollar per plate? Here’s what I’ve shared so far:

  • Hearty Chili
  • Spanish Rice
  • Pasta Alfredo
  • Crock Pot Barbecue Chicken
  • Crock Pot Beef Stew
  • Easy Chicken Pot Pie
  • Chili Mac
  • Breakfast Pizza
  • Dark Chocolate Almond Granola
  • Black Bean Salsa

Have you found ways to keep real food eating within a reasonable budget for your family?

Heavenly Homemaker's Club Members: Access your homepage and all your fantastic resources here! Not a member yet? Please join us!
« Previous Page
Next Page »

Join Our Community!

 Facebook Twitter E-mail Instagram Pinterest

Popular Posts

~ Will All of the Real Moms Please Stand Up?
~ Easy! Stir-and-Pour Whole Wheat Bread
~ How to Make Gatorade
~ 31 Real Food Breakfast Ideas
~ Dear Teenage Girls...
~ When Mom Takes a Step Back
~ The Inexpensive Health Insurance We Love!
~ Let's Talk Real Food Grocery Budgets

Check out our latest posts!

  • Big Family Food and Fun: September 6-12, 2026
  • Big Family Food and Fun: August 30-September 5, 2026
  • Big Family Food and Fun: August 23-29, 2026
  • Big Family Food and Fun: August 16-22, 2026
  • Big Family Food and Fun: August 9-15, 2026
Home  ~  Simple Meals  ~  Club Membership  ~  Shop  ~  Privacy Policy  ~  Disclosure  ~ Contact

Copyright © 2026 · Beautiful Pro Theme on Genesis Framework · WordPress · Log in