Heavenly Homemakers

Encouraging women in homemaking, healthy eating and parenting

  • Home
    • About
    • FAQs
  • Recipes
    • Bread and Breakfast
    • Condiments
    • Dairy
    • Main Dishes
    • Side Dishes and Snacks
    • Desserts
    • Gluten Free
    • Instant Pot
    • Crock Pot
    • Heavenly Homemaker’s Weekly Menus
  • Homemaking
    • Real Food Sources
  • Store
  • Contact
    • Advertise
    • Disclosure
    • Privacy Policy
  • Simple Meals
  • Club Members!

Healthy Homemade {Pink} Applesauce

October 19, 2011 by Laura 167 Comments

This post may contain affiliate links. For more information, please see our disclosure policy.

For years, I’ve used this method of making applesauce. The past couple of years, I’ve decided to try something new, in an effort to cut down on preparation time and to make the homemade applesauce a bit healthier. Still, I have to say, this process still takes quite a bit of time and effort. After spending several hours making applesauce yesterday and only yielding five quarts – I felt a little bit discouraged. Several of you have mentioned that a Victorio Food Strainer is a worthwhile investment. After looking into this, I have to say that Matt and I are talking seriously about making the purchase. Check out this pretty tool. Does that not look like a life saver when making applesauce and tomato sauce?

Here is a run-down of yesterday’s applesauce process:

We used a mixture of apples, most of which had very dark red skin (Empire, I think). Cooking the apples with skin on created a lovely pink colored applesauce. To start, we gave the apples a good washing. I looked around for the cutest assistant I could find. Since everyone else was busy with math and vocabulary lessons, Malachi got the job.

Yum

While he was washing apples (about 18 pounds), I prepped my huge stock pot. I stirred 2 heaping tablespoons of Vitamin C Powder (ascorbic acid to keep the apples from turning brown) into 5 cups of water.

Then, I began to quarter and cut out all yucky parts. These apples were mostly organic (he had sprayed a little bit early on before the fruit set on), so there were some wormy parts to cut out. As I added apples, I stirred them around so that they would be coated with the ascorbic acid/water to  keep them from browning.


I continued this process until my pot was full and until my right hand was cramped permanently into a claw-like position.

I then cooked the apples on the stove for about an hour, stirring occasionally, until they became nice and soft.

Next I blended the apples in my Blendtec, careful to dip down to the bottom of the pot to get some of the juices with each scoop. I blend until the peelings are completely pureed along with the flesh of the apples. This makes the applesauce pretty and creamy!

Applesauce Cups

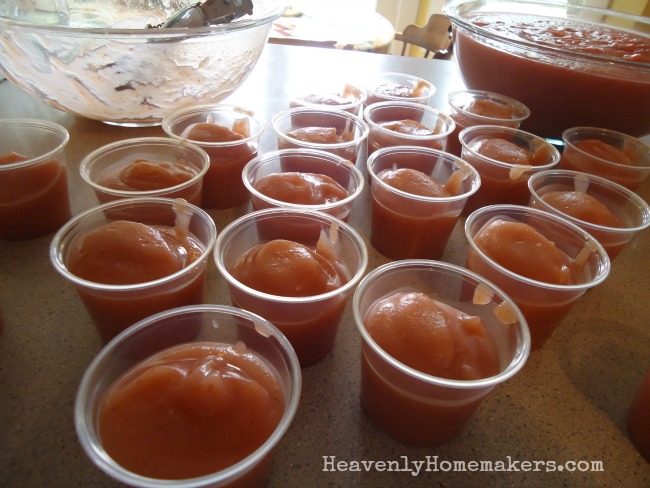
I ended up with smooth, beautiful, delicious applesauce that my family had seconds and thirds of at lunch time.

I then canned four remaining quarts (using this water bath process for 20 minutes) and put them into my pantry.

What do you use to make applesauce? I highly recommend the Blendtec to make this process super easy! (I also love the Blendtec for oodles of other kitchen tasks.)

I have yet to make apple butter or any of the other tasty apple dishes I talked about earlier this week. I do believe that next I will experiment with my crock pot and apple butter. Which means that I really need to make some whole wheat biscuits. Doesn’t apple butter spread on a hot, fresh biscuit sound wonderful?

Heavenly Homemaker's Club Members: Access your homepage and all your fantastic resources here! Not a member yet? Please join us!

Homemade White Chocolate Chips

September 20, 2011 by Laura 46 Comments

This post may contain affiliate links. For more information, please see our disclosure policy.

We have homemade chocolate chips, homemade butterscotch chips, and now we have homemade white chocolate chips! As with the butterscotch chips, I didn’t use sucanat on these because I felt like the flavor would be too strong. Instead, I used organic raw sugar, which isn’t much healthier than regular white sugar, but at least it hasn’t been bleached. :)  (You can read more of my thoughts on healthy sweeteners here.)

I ordered cocoa butter from Mountain Rose Herbs and was very pleased! I also found that I could get it through Amazon, but it was a little more expensive there. The little cocoa butter wafers look good enough to eat all by themselves, but beware, they are not. I may or may not have taken a little nibble just to find out for sure. But alas, chocolate is not chocolate without sugar, no matter how tasty it looks. ;)

White Chocolate ChipsYum

1 cup cocoa butter
1 cup organic raw sugar
1/4 cup coconut oil
1 teaspoon vanilla extract

Combine cocoa butter, sugar and coconut oil in a medium saucepan.


Stir with a whisk and heat until all the ingredients are melted and mixed thoroughly. This takes several minutes.

Remove mixture from heat and add vanilla extract. Pour it into a parchment paper lined baking dish (I used my 9×9 inch pyrex).


Refrigerate for several hours until hardened. The mixture may separate while it’s cooling, but that’s okay!

Break the hardened mixture into little chunks. Store in an airtight container in the fridge.


We stirred some homemade white chocolate chips into these fudge brownies…

See those bits of white chocolate chips in there? It was like candy in a brownie. You must try these. (After you eat a good dinner of course.)

What do you like to make with White Chocolate Chips?

P.S. These are a little bit pricey to make – but I try to avoid white chocolate chips from the store because they are full of hydrogenated oils. I’ll probably only make these every once in a while for a very special treat. :)

Heavenly Homemaker's Club Members: Access your homepage and all your fantastic resources here! Not a member yet? Please join us!

Freezer Full of Healthy Foods

September 19, 2011 by Laura 22 Comments

This post may contain affiliate links. For more information, please see our disclosure policy.

I’m happy to report that I was able to cross off everything on last week’s Make Ahead Healthy Foods list, plus a little extra! I’ve said it before and I’ll say it again:  If you want to get ahead in the kitchen, just do a little extra every once in a while. Here are a few pictures showing what I worked on during the past seven days:

I put my boys on the task of scrubbing 10 pounds of potatoes (the amount that fits well in my big roaster). We baked them to turn them into Hashbrowns.

If you’ve not tried making Hashbrowns this way – you’ve gotta try it! These are so easy, delicious and make for a great quick breakfast or dinner side dish. I freeze them on cookie sheets, then transfer them to freezer bags. Having frozen hashbrowns ready to grab and cook quickly is so nice!

I mixed up a batch of Honey Oat Crunch Cereal that is great to have on hand for a quick breakfast or a snack. (This recipe is in my Think Breakfast Outside the Box ebook.)  I wish I remembered to make this more often – it’s great to have on hand. I just stick it in a jar and put it on top of the fridge. We eat it with raisins and other dried fruit, plain or with milk or cream. So good!

I guess I was on a roll with breakfast foods last week! I made a batch of Giant Breakfast Cookies. We ate half and froze half.

I made six pounds of Turkey Sausage, freezing it into eight meal sized bags. I LOVE having this on hand to use in my Pancake Sausage Muffins and Easy Breakfast Casserole. Plus, since I now have frozen hashbrowns, I can throw some of this sausage in with the hashbrowns, scramble eggs into it and we’ve got a meal. Easy!

I had ordered a big box of strawberries from Azure Standard which arrived last week. We ate as many as we could while they were fresh, but the rest needed to make their way into the freezer. I like freezing them on cookie sheets first so that they don’t stick together in freezer bags later. Aren’t they purty?

I’ve already shared about how I made Homemade Beef Bologna – we ate some and froze some. I also made Tammy’s Homemade Spicy Beef Pepperoni, but if we thought my bologna pictures were not pretty, my beef pepperoni pictures were even worse. Come to think of it, I didn’t even take pictures of the pepperoni. The pepperoni itself was so very ugly, I hid it from my kids before they could see it and decide they didn’t like it before they’d tried it. BUT, when I sliced it and put it on pizza, it was very delicious. So, I now have ugly bologna and ugly pepperoni in my freezers too, but I’ll spare you the agony of having to see pictures of them. ;)

Have you made anything healthy and tasty for your freezer lately?

In case you’re wondering, here’s a post on How I Freeze Food.

Heavenly Homemaker's Club Members: Access your homepage and all your fantastic resources here! Not a member yet? Please join us!

Homemade Beef Bologna

September 14, 2011 by Laura 77 Comments

This post may contain affiliate links. For more information, please see our disclosure policy.

I did it. I made bologna. Mine didn’t turn out nearly as pretty as Tammy’s. Maybe that’s because I adapted the recipe? Or maybe it’s simply because Tammy has a magic touch I don’t seem to have. (Tammy is super talented!)  Either way, we have a healthy, easy-to-make lunch meat that I will feel no guilt about feeding to my family.

A couple of notes about this recipe:

In order to avoid artificial flavorings, you’ll want to use a liquid smoke which does not have any additional ingredients beyond “liquid smoke”. Some liquid smoke varieties have caramel coloring and I don’t know what else. I have found that Lazy Kettle Brand contains only liquid smoke. I’m sure there are other “all natural” brands of liquid smoke – this is the one I found first.

In addition, Tammy’s recipe includes Morton’s Tender Quick Salt, which is a great salt for preserving. However, I hesitate to use this salt now that I’ve learned that it contains nitrates. Therefore, I tried simply using my trusty Redmond’s Real Sea Salt. I figure, I’m keeping the bologna in the fridge or freezer anyway so I don’t need to worry about “preserving” the meat, right?

Overall, I’m pleased with how the bologna turned out. Well, aside from the fact that mine didn’t turn out pretty like Tammy’s. Tammy, how do you do it? :)

Homemade Beef Bologna (adapted from Tammy’s Recipes)Yum

3 pounds ground beef (I used grass-fed beef)
2 Tablespoons sea salt
1 cup water
1/4 teaspoon garlic powder
1/2 teaspoon onion powder
1 1/2 teaspoons “all natural” liquid smoke

Mix all ingredients together, sticking your hands into the bowl to squish it all together in order to mix the ingredients well. Mmmhmm, that’s the fun part.

Divide the mixture into two parts and shape two “logs” of meat. I don’t like having plastic touch my raw meat if at all possible, so I placed parchment  paper on top of plastic wrap to help form the log and to wrap it for the fridge. (Yes, this may seem obsessive, but I’m weird – what can I say?)

Wrap the bologna logs well and place them into the refrigerator for 24 hours.

Unwrap the meat and place both logs into a buttered baking dish. I used a 9×13 inch Pyrex dish. Bake in a 300° oven for 30 minutes, then in a 200° for another 2 1/2 hours.

Cool and store in the freezer or fridge.

Homemade Beef Bologna

A big thanks again for Tammy’s Recipes for inspiring this recipe! Now, on to her Spicy Beef Pepperoni!

I’m super thrilled with this recipe because I totally love bologna. I know that’s a silly thing to love, but love it I do. Kinda like how I love beef hot dogs.

Do you like hot dogs and bologna, or do you think I’m a little bit nuts for thinking they taste good? Hey, at least now I can eat bologna again without feeling like my stomach is turning inside out!

Heavenly Homemaker's Club Members: Access your homepage and all your fantastic resources here! Not a member yet? Please join us!

Easy Chicken Burritos (Perfect for the Freezer!)

September 13, 2011 by Laura 103 Comments

This post may contain affiliate links. For more information, please see our disclosure policy.

As I sat down to write this post, I could think of nothing exciting to say about these Easy Chicken Burritos. Therefore, I have decided to see if I can win “The Most Boring Blog Post Ever Award”. Most of this post has nothing to do with burritos, but really, there’s only so much a person can say about burritos. See look – there they sit:

Here is my very boring post:

Today I cleaned my ceiling fans and dust bunnies fell down onto the math books below. It was gross. When I got the mail this morning, most of it was junk mail so I put it directly into the recycling. We can’t find Malachi’s left tennis shoe. Today I’m wearing a brown shirt. I have a lot of brown shirts. I like brown.

I gouged my thumb on a kitchen cabinet yesterday. It hurts. Today I bonked it again. That hurt worse. The weather today is nice. Tomorrow it might get cooler. I need to pick green beans. And tomatoes.

I picked up our Azure Standard order today. We got a box of strawberries. They are good. Somehow we got strawberry juice on our kitchen floor tonight. I wiped it up.

I did four loads of laundry yesterday. They aren’t folded yet. Asa’s jeans are all too short. So are Elias’. So are Justus’. Kids grow fast.

We have crickets in our house. They are loud.

Here is a burrito recipe. These taste good. They are pretty much exactly like the Bean and Cheese Burritos and Beef and Cheese Burritos I’ve already written about, except that instead of using beans or beef, you use chicken.

(Told ya it was boring. Although that part about the weather was really pretty exciting. Except for not really.)

Easy Chicken BurritosYum

10 whole wheat tortillas (one batch homemade)
2 cups cooked chicken
1 cup shredded cheese (I use white cheddar)
1 cup salsa
Sea salt and/or chili powder to taste

Chop cooked chicken into tiny pieces or run it through a food processor. Stir together shredded chicken, cheese, salsa and spices. Spoon mixture into a warm, soft tortilla. Wrap and serve.


We like freezing these burritos, then rewarming them for quick lunches. To rewarm:  Place desired number of burritos on a baking stone or cookie sheet. Heat in a 350° oven for about 15 minutes or until slightly brown, crispy and hot.

What’s the most boring thing you can think of to tell me right now? Or maybe the most exciting? (If your laundry is folded and put away, I don’t want to hear about it. Over-achievers.)

Heavenly Homemaker's Club Members: Access your homepage and all your fantastic resources here! Not a member yet? Please join us!

Homemade Beef Summer Sausage

September 8, 2011 by Laura 111 Comments

This post may contain affiliate links. For more information, please see our disclosure policy.

My personal Funky Fresh Kitchen “Make it Yourself” Challenge was to make Homemade Beef Pepperoni, using a recipe I found at Tammy’s Recipes. I read through all of her reviews before trying the recipe and many of them suggested that this tastes more like Summer Sausage than Pepperoni. I completely agree – it does taste much more like Summer Sausage. But no matter what you call it, we all really loved the flavor.

I kept having to remind myself while we were eating (one entire log of sausage in one sitting) that we didn’t need to feel guilt or hold back on eating this. We have, on occasion, purchased beef summer sausage from the store to eat on the run. The boys love it, but I’ve always been hesitant because the store-bought sausage is so full of MSG and who knows what. To now have this recipe in my hip pocket to make as a healthy, convenience food for my family is super exciting!

And did I mention that it is crazy easy to make? Yes, practically effortless. I used our healthy Grass Fed Beef and made five pounds of this wonderful meat, which tastes good with cheese and crackers or on sandwiches. I put our leftover meat in the freezer to use later. This is going to be a perfect grab and go snack to take to soccer games this fall!

Making this summer sausage was a three day process (although not time consuming or difficult). On the third day, after we got to smell it cooking on low heat all day, we were thrilled to eat it with cheese and fruits and veggies for dinner. Awesome!

Next, I’d like to try Tammy’s Spicy Pepperoni, which sounds like it has more of a pepperoni flavor. Score! Now we can have healthy summer sausage and healthy pepperoni too!

Does your family like summer sausage and pepperoni? You’ve got to try Tammy’s recipes!

Heavenly Homemaker's Club Members: Access your homepage and all your fantastic resources here! Not a member yet? Please join us!

Whole Wheat Oatmeal Butterscotch Cookies

August 9, 2011 by Laura 54 Comments

This post may contain affiliate links. For more information, please see our disclosure policy.

Finally, we can eat a guilt free Oatmeal Butterscotch Cookie. Made with real-food ingredients and homemade butterscotch chips, we don’t have to worry about hydrogenated oils or empty calories. These are so good for us, we could almost eat them for breakfast. Well, except that the butterscotch chips add extra sugar – which is maybe not the best way to begin our day. Shucks.

What if we eat them for breakfast with scrambled eggs?

And fruit.

Okay. I’ll stop.

Oatmeal Butterscotch CookiesYum

3/4 cup melted butter
1 1/4 cups sucanat or brown sugar
1 egg
1 teaspoon baking powder
1 teaspoon vanilla extract
1/4 teaspoon baking soda
2 cups rolled oats
1 1/2 cups whole wheat flour (I use freshly ground hard white wheat flour)
1 cup Homemade Butterscotch Chips

In a large mixing bowl, stir together melted butter and sucanat. Add egg, baking powder, vanilla and baking soda. Stir in oats and flour until the dough is well combined. Fold in butterscotch chips.

Drop by the teaspoonful onto a cookie sheet. Bake in a 375° oven for 10-12 minutes or until cookies are golden brown.

If we drink a big glass of milk with our scrambled eggs, fruit and Oatmeal Butterscotch Cookies – then could we count it as breakfast?

No really. I’ll stop.

Share your opinion! For breakfast or not for breakfast?? :)

Heavenly Homemaker's Club Members: Access your homepage and all your fantastic resources here! Not a member yet? Please join us!

Homemade Butterscotch Baking Chips

August 3, 2011 by Laura 190 Comments

This post may contain affiliate links. For more information, please see our disclosure policy.


Check one more item off the Heavenly Homemakers Recipe Challenge List! We have Butterscotch Chips!

These are more than just a little bit sweet – wowza, these chips are quite sugary. Therefore, I must advise that you don’t eat the entire pan of butterscotch chips all in one sitting. I’m pretty sure you knew that already. I’m also pretty sure you are planning to eat plenty of vegetables before (and after) you make these. Right?

Here are the reasons I attempted Homemade Butterscotch Chips:

  1. Many of you wanted me to do this. I aim to please.
  2. Every single package of butterscotch chips I’ve seen on the market has hydrogenated oil in them. Bleh. It is very important to avoid hydrogenated oils.
  3. I need some Oatmeal Butterscotch Cookies.

You will notice that I used organic brown sugar in this recipe instead of sucanat. I did this because I was afraid that the molasses flavor of the sucanat would effect the flavor of these chips, making them not taste like butterscotch. I had some organic brown sugar on hand, so I used it and was pleased with the results.

Homemade Butterscotch ChipsYum

1/2 cup butter
1/2 cup coconut oil (I used expeller pressed so as not to have a coconut flavor)
1 cup organic brown sugar
1 teaspoon vanilla extract

In a saucepan, melt together butter, coconut oil and brown sugar. Stir continually until all ingredients are mixed well, bringing the mixture ALMOST to a boil, then turning down the heat. Cook and stir some more on low heat until the sugar is dissolved and the mixture is a liquid.

Remove the mixture from the heat and stir in vanilla extract. Pour the contents onto a parchment paper lined container. I used a 9×13 inch dish.

Place the dish into the fridge for 3-4 hours to allow the mixture to solidify. Cut or break the butterscotch into small “chips”.

Store them in an air tight container in the fridge.

And would you look at that? These homemade butterscotch chips make fantastic Oatmeal Butterscotch Cookies! (I’ll share my recipe next week.)

Are you a fan of butterscotch chips? What’s your favorite way to use them?

Read about making Homemade Chocolate Chips here!


Heavenly Homemaker's Club Members: Access your homepage and all your fantastic resources here! Not a member yet? Please join us!

Healthy Foods for the Freezer

July 27, 2011 by Laura 28 Comments

This post may contain affiliate links. For more information, please see our disclosure policy.

One of my big Two Week Tackle projects was to pre-make some healthy convenience items for our freezer. This way, on busy days all I have to do is grab burritos or pizza pockets out of the freezer and warm them up quickly for us to eat.

I didn’t do all of this cooking at once. This is the result of 14 days of off and on work in which I simply made one extra batch of food to put into the freezer, whenever I could find a spare moment. Sometimes, I just doubled what we were making for dinner and froze half. This is the best way (in my opinion) to do freezer cooking without stress!

I feel like it’s possible that I’ve broken some sort of tortilla making record during the last few weeks. I lost track of how many tortillas I rolled out and cooked. I think I made at least five double batches, in which we ate or made into burritos. We now have loads of frozen burritoes and around 18 plain whole wheat tortillas in our fridge for easy quesadillas next week! (Just doing some quick math, I think this means I may have made 120 tortillas between last week and this week. Not that you cared. I just felt like multiplying it out. Why do I do these things?)

I was excited to try making Chicken Burritos and will be sharing the recipe soon.

And, not that you can tell them apart, but because I somehow feel the need to prove my tortilla making madness, here is a big batch of meat and cheese burritos. (Are you bored with my tortilla picture parade yet?)

I hate to disappoint you, but the rest of the pictures have nothing to do with tortillas. Instead, we have a pan full of lovely pizza pockets that are now frozen and ready to bake for a quick lunch.

I made a batch of homemade hamburger buns and didn’t let us eat any of them. Buns in the freezer means easy burgers, sloppy joes or even turkey/cheese melts.

I made a quadrupal batch of Whole Wheat Waffles – these are the BEST for toasting in the morning when we need a fast breakfast.

One of my favorite main dishes:  BBQ Meatballs. I intentionally made way more than we needed for one meal so that I could freeze the leftovers. Meatball subs anyone?

I needed a batch of homemade rolls for something last week. Therefore, I made bunches. I have no idea what happened to the rolls in the upper right-hand corner. Mysteries like this happen in my kitchen regularly. We may never get to the bottom of it.

I surprised the boys one morning with homemade donuts, then because we had quite a few leftover, I froze them for another breakfast soon.

Last but not least, I shook up a jar each of Taco Seasoning, Ranch Dressing Mix and Italian Dressing Mix. I LOVE having these in my pantry to grab and use in a moment’s notice.

And that, my friends, is the result of the intentional extra cooking I have been doing in an attempt to get ahead before August begins.

What are your favorite ways to get ahead in the kitchen? (Yeah, yeah…I know. Getting ahead in the kitchen is almost like getting ahead on laundry – next to impossible. But still.)

In case you’re curious, here are a few posts that might help answer some of your questions about how I freeze foods and try to get ahead in the kitchen:

  • How I Freeze Food
  • Two Simple Ways to Get Ahead in the Kitchen
  • All of my Make Ahead Meals posts and ideas


Heavenly Homemaker's Club Members: Access your homepage and all your fantastic resources here! Not a member yet? Please join us!

Homemade Non-Toxic Liquid Hand Soap

July 26, 2011 by Laura 339 Comments

This post may contain affiliate links. For more information, please see our disclosure policy.

I have something to say.

Commercial non-toxic liquid hand soap is way, way too expensive. Since switching over all of our household products to chemical free varieties, purchasing liquid hand soap is something that always makes me choke. We need easy access to soap at our sinks, but good grief all the options I found to order were crazy expensive -like around $5.00 for 12 ounces. Ouch.

Shame on them.

Do you know how much it cost me to make an entire gallon of non-toxic, all natural, organic liquid hand soap? Three dollars and fifty cents. Total. For an entire gallon. (A gallon, by the way, is 128 ounces. That’s some awesome savings!)

This may have been one of the easiest items I’ve ever made. It took hardly any time. And it only cost me $3.50. (Pardon my redundancy. I’m hung up on the fact that it only cost me $3.50 for a gallon of the healthiest hand soap ever. $3.50. $3.50!)

Because of this, I plan to get on a soap box (ha!) and encourage all of us to save a bunch of money by making homemade liquid hand soap.

Other recipes I’ve seen call for several ingredients I didn’t feel safe to use. Then, my friend BryAnna told me she’d been playing with making soap and had found these simple directions. She’s a genius. I love her.

Homemade Liquid Hand Soap

Homemade Non-Toxic Liquid Hand Soap

4 ounce bar of natural soap (I used a bar of coconut oil soap from Tropical Traditions. Any natural bar of soap would work. I think the bars from Victorian Rose Soap Company would be great!)
1 gallon of water

First, heat the water in a pot, just long enough to steam:

In the meantime, grate your bar of soap.

Take the steaming water off the heat. Immediately pour the grated soap into the water. Stir the mixture, then let it sit for about 15 minutes.

Use a hand mixer to blend the soap and water mixture well. Let it sit overnight.

The next morning, use the hand mixer again to blend well. Done. You have a gallon of non-toxic liquid hand soap!

When my friend BryAnna made her batch, she found that it was quite thick and almost gel like the second day. My batch, on the other hand, was still quite runny. If your soap is too thick, you may want to blend in a little extra water. If your mixture is too runny…it doesn’t matter. It works just fine!

I had some extra pump bottles around the house which I filled and put by each sink. The remaining liquid soap, I funneled into a gallon water jug for storage.


If you’ve never tried making your own liquid hand soap, you’ve got to give this a try. So simple. So safe and pure. And so, so, so much less expensive.

Like, only $3.50 for a gallon. Or did I mention that already?

Ever tried making your own soaps? Which kind(s) have you tried? Hand soap? Laundry detergent? Bar soap?


Heavenly Homemaker's Club Members: Access your homepage and all your fantastic resources here! Not a member yet? Please join us!
« Previous Page
Next Page »

Join Our Community!

 Facebook Twitter E-mail Instagram Pinterest

Popular Posts

~ Will All of the Real Moms Please Stand Up?
~ Easy! Stir-and-Pour Whole Wheat Bread
~ How to Make Gatorade
~ 31 Real Food Breakfast Ideas
~ Dear Teenage Girls...
~ When Mom Takes a Step Back
~ The Inexpensive Health Insurance We Love!
~ Let's Talk Real Food Grocery Budgets

Check out our latest posts!

  • Big Family Food and Fun: May 10-16, 2026
  • Big Family Food and Fun: May 3-9, 2026
  • Help Your Kids Become Independent in the Kitchen!
  • Big Family Food and Fun: April 26-May 2, 2026
  • Big Family Food and Fun: April 19-25, 2026
Home  ~  Simple Meals  ~  Club Membership  ~  Shop  ~  Privacy Policy  ~  Disclosure  ~ Contact

Copyright © 2026 · Beautiful Pro Theme on Genesis Framework · WordPress · Log in