Heavenly Homemakers

Encouraging women in homemaking, healthy eating and parenting

  • Home
    • About
    • FAQs
  • Recipes
    • Bread and Breakfast
    • Condiments
    • Dairy
    • Main Dishes
    • Side Dishes and Snacks
    • Desserts
    • Gluten Free
    • Instant Pot
    • Crock Pot
    • Heavenly Homemaker’s Weekly Menus
  • Homemaking
    • Real Food Sources
  • Store
  • Contact
    • Advertise
    • Disclosure
    • Privacy Policy
  • Simple Meals
  • Club Members!

Stickers on Produce. I Cannot Handle It.

June 21, 2015 by Laura 66 Comments

This post may contain affiliate links. For more information, please see our disclosure policy.

Stickers on produce. Why? Oh why??

Those of you who know me well are very aware that I have plenty of weirdness lurking in my brain. Hey, we all have a variety or three of weirdness going on, do we not? We all think our personal weirdness makes sense (and is, therefore, not weird) and we do not understand why other people’s weirdness is different from ours. Then when we see someone else being weird we’re all dude, that’s so weird. When in truth, the weirdness we see in others is simply a different variety from our own weirdness because we are all weird.

The Bible backs me up on this although I think it uses more terms like “different gifts” and “knit together uniquely” and stuff like that.

So here’s one of the ways I’m weird that you likely did not know as of yet.

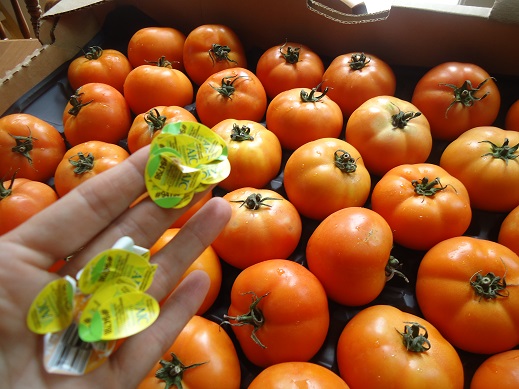
First, I love staring at my groceries. Yes, you knew that one already. That’s not my weird thing even though it kind of is. What you didn’t know is what I’m about to show you. I cannot handle it. I mean, it looks like a lovely table full of grocery and Bountiful Basket purchases. But as it is at this point, I can not admire it. There’s too much distraction.

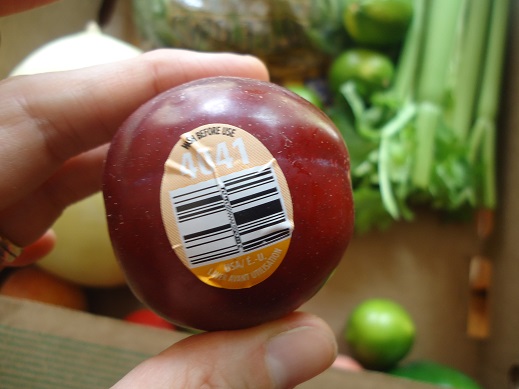
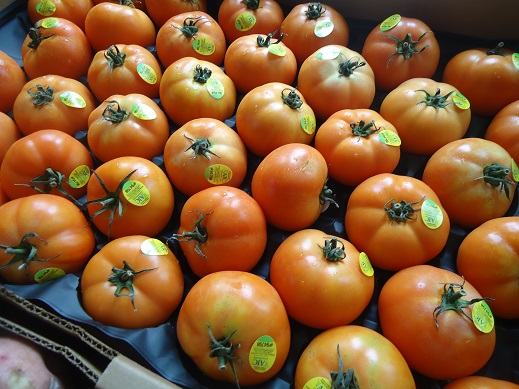
Stickers on Produce!!!!

stickers produce 2

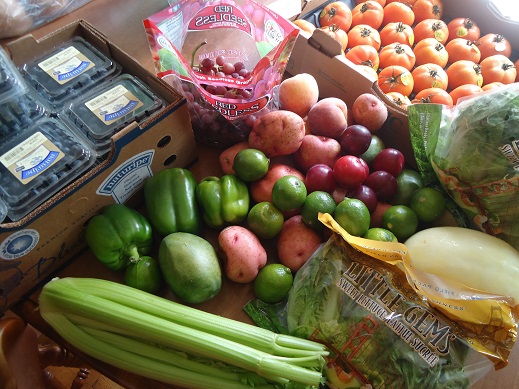
There are stickers everywhere. It’s highly alarming. I want to see the pretty produce in all its natural beauty. But the bar codes and the item numbers and the sticky residue – oh it is all too much.

stickers produce1
Say it isn’t so.

stickers produce 3

So weird thing #672 about Laura: I have to take all the stickers off my produce the minute I set it down in my kitchen. The admiring of the produce cannot happen until all stickers are removed.

stickers produce 4

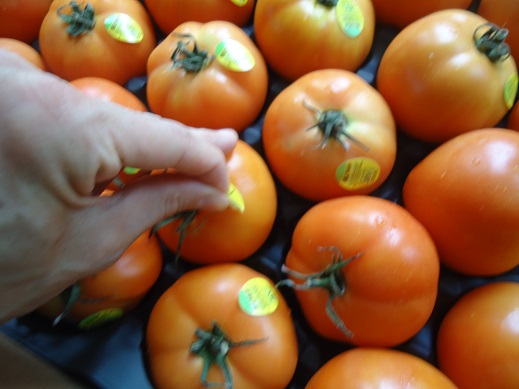
You think I’m kidding.

stickers produce 5

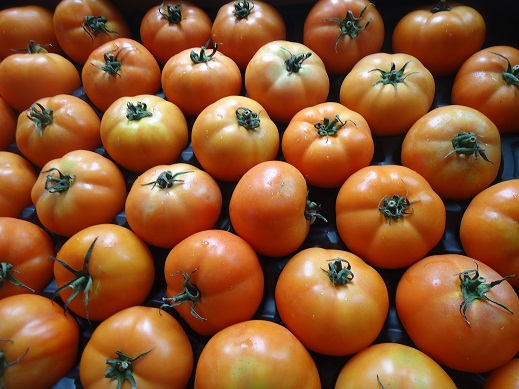
Ahhhhhhhh, there now. Now we can all stare at the pretty produce, without stickers, in all its God given glory.

stickers produce 6
Before you say, wow Laura that’s weird – let me just remind you that you also have weird things that you cannot handle. They are perhaps different from my weird things because God knit us each together uniquely amen and amen. But you, my friend, are also weird. And I mean that in the kindest, most supportive way. I do.

Today, let us embrace our weirdness. Leave a comment confessing one way you’re weird.

Just so you know, if you make fun of my weirdness, I will pretend to give you a big bear hug but what I will actually be doing is placing all 28 of my produce stickers onto your back then watching to see how long it takes you to notice. Then people will see your back full of stickers and think you’re weird and it would be for real.

Heavenly Homemaker's Club Members: Access your homepage and all your fantastic resources here! Not a member yet? Please join us!

Free Summer Blessings Printables ~ Use These Free Printables to Be a Blessing!

June 19, 2015 by Laura Leave a Comment

This post may contain affiliate links. For more information, please see our disclosure policy.

What can you and your family do to be a blessing to someone during the next few days? I encourage you to pray with your family about this. Can you take someone some food? Visit a neighbor? How can you be a light and bless someone? To bless your efforts (blessings all around, right?!) – we’ve made some fun Summer Blessings printables for you. They are free. Help yourself! Print as many as you like.

Summer Blessings Printables

Download the Summer Blessings Printable
Cards and Gift Tags Here!

Suggestions for ways to use these Summer Blessings Printables:

  • Print a set of 6 or 8 of the Blessed and Hello note cards. Tie them up with a ribbon and give them as a gift. Be sure to include envelopes! (Like these.)
  • Print a few Blessed and Hello note cards. Spend some time writing encouraging notes in the cards to give or send.
  • Bake something yummy, package it up and attach one of the cards or gift tags. (Here are some baked good recipes to pick from.)

Since it’s summertime and you might not want to turn on the oven, how about some No-Bake treats you can make to share?

  • Mudballs
  • No-Bake Chocolate Fudge Bites
  • No-Bake Peanut Butter Cookie Bites
  • No-Bake Snickerdoodle Bites
  • Homemade Tootsie Rolls

Other summer friendly ideas include:

  • A basket of fresh fruit with a jar of Homemade Fruit Dip
  • A plate of fresh cut veggies with Easy Veggie Dip

What else? Leave a comment to share ideas of ways we can use these fun new printables!

Heavenly Homemaker's Club Members: Access your homepage and all your fantastic resources here! Not a member yet? Please join us!

Make Orange Creamsicle Ice Cream – No Ice Cream Freezer Required

June 18, 2015 by Laura 2 Comments

This post may contain affiliate links. For more information, please see our disclosure policy.

Orange Ice Cream

Knock, knock.

Who’s there?

Orange.

Orange who?

Orange you glad I didn’t bore you with the ridiculous banana knock-knock joke your three year old thinks is funny every time he tells it over and over? Between my four boys, I heard that joke 45,000 times. It was so hilarious every single time, of course. If you don’t know which joke I’m talking about, I am very, very jealous and and also very happy for you. Look it up if you must, but I’m warning you: do not tell your three year old.

All jokes aside, orange you excited to try this recipe? You should be! It’s very refreshing – and super easy. No need to dig out the ice cream maker and rock salt. You do need a high power blender, however. I invested in a BlendTec about a year ago, and I’m not sure how Ma Ingalls and I ever lived without it. That thing is a power horse and makes my kitchen life so much easier. I probably use it three times every day – no exaggeration.

But speaking of exaggeration, check out this orange:

orange ice cream 1

I got two of these giants in my Bountiful Basket order last week. As you can see, this one was so huge, I could barely hold it in my hand. This recipe calls for two medium-sized oranges. The above orange does not qualify as “medium-sized.” He is an over-achiever and we are so proud. I used about 1 1/2 of this size orange for this recipe. And really, this recipe isn’t rocket science because I don’t know what rocket science is and also because this recipe is flexible in its ingredient quantities. Just freeze some orange wedges and throw them in a blender with the other stuff and it makes a really great treat.

Knock, knock.

Just kidding.

Alrighty, here is the very easy recipe, which I found here and tweaked only slightly. Thank you for the great idea, SuperHealthyKids.com!

Low Sugar Orange Ice CreamYum

2 cups whole milk or coconut milk
2 medium-sized oranges
3 Tablespoons maple syrup or 20 drops liquid stevia
1 teaspoon vanilla extract

Peel oranges and divide them into sections. Lay them flat on a cookie sheet. Place them in the freezer for about two hours or until they are frozen solid.

Put half the frozen orange segments into a high power blender. Add milk and blend until smooth. Add remaining oranges, maple syrup or stevia, and vanilla. Continue blending until smooth.

Pour mixture into a 9×13 inch dish. Place in the freezer for 1-2 hours before serving. (If it is in the freezer longer than 1-2 hours, remove from freezer a few minutes before serving to make scooping easier.

Orange Ice Cream with dairy free option!

Do you have a BlendTec or other high power blender (like Vitamix)? What all do you do with it? Isn’t it great?!

 Some of the links in this post are affiliate links.
Heavenly Homemaker's Club Members: Access your homepage and all your fantastic resources here! Not a member yet? Please join us!

35 Minutes ~ 6 Winner Winner Chicken Dinners

June 17, 2015 by Laura 11 Comments

This post may contain affiliate links. For more information, please see our disclosure policy.

Hows that for a dumb title? Well, you too will feel like saying silly things and maybe even doing the chicken dance after you spend such a short amount of time creating so many delicious meals for your family. Plus, I just had a great cup of coffee so my typing fingers are under the influence of caffeine.

Last week – using ugly meat pictures – I showed you how I used my Eat Right Away: Beef Edition packet to make 6 Beef Meals in only 45 minutes. I promised you that I would do the same with the Chicken Edition. So here I am. But this time – I’m excited to report that it only took 35 minutes of work time to crank out 6 meals. We have big eaters at our house, so the only way I was able to turn 8 pounds of meat into only 6 meals for us is that I’ll be adding several fruit/veggie sides along with potatoes, tortillas, rice, or pasta to stretch that chicken. If your family is smaller than mine – you could do the same amount of work and end up with more than 6 meals!

Eat Right Away Chicken Edition 22

I’m really, really excited about this. One of my biggest goals here is to emphasize that it really doesn’t have to be difficult or time consuming to feed your family healthy, real food meals. Here is the run-down of my 35 minute date with 8 pounds of chicken.

On Friday, I picked up my Bountiful Basket meat order (the first one to come to our town!). I got 24 pounds of nitrite-free bacon and 24 pounds of nicely raised boneless/skinless chicken. I put 8 pounds of chicken in the fridge to thaw.

erwchicken1

On Saturday, I got to work making four out of five of the recipes included in the Chicken Edition packet. (I didn’t make the Teriyaki Chicken and Veggie Kabobs because while I had plenty of chicken, the other ingredients needed were not on sale. No need to pay full price – I’ll make a triple batch of those another time!)

These are the recipes I worked on:

  • Easy Apricot Chicken
  • Sloppy Salsa Chicken
  • Mexi-Chicken Pasta
  • Chicken Tostadas

First I put 2 pounds of chicken into a pot with the Apricot Chicken ingredients, put a lid on the pot, and started it cooking on low. It was an exhausting five minutes. Thank you for your compassion.

erwchicken2

Next, I used kitchen shears (the best way to cut chicken, if you ask me) to cut 4 pounds of chicken into pieces for the Mexi-Chicken Pasta and Chicken Tostadas. Want to know what’s great? You use the same ingredients to cook the chicken for both of those recipes so this is super efficient!

erwchicken3

There it is. Seasoned and ready to cook. Prep took about 15 minutes. Onto the stove it went.

erwchicken5

I put the remaining 2 pounds of chicken into a third pot along with the Sloppy Salsa Chicken ingredients. Two minutes later, it was cooking on the stove. Are you grasping how easy this is? I burn complicated recipes in my fireplace. I like simple foods.

erwchicken4

While all three pots of chicken cooked, I ate lunch with my family. (Tuna casserole, green beans, and raspberries – thanks for asking.) I stirred the chicken from time to time while our older boys shared about their week at camp. (They’d just gotten home a couple hours before lunch.)

After lunch, the Mexi-Chicken Pasta and Chicken Tostada meat was finished – so I set it aside to cool.

erwchicken6

The Apricot Chicken was finished to I used a fork and knife to kind of shred it. I say kind of because it’s not completely shredded. I got to a point where I was like, eh good enough.

erwchicken7

Same thing on the Sloppy Salsa Chicken. I shredded it until it was at the “good enough” stage. It’ll pull apart more when we rewarm and serve.

erwchicken8

(I told you these chicken pictures were ugly. Good thing this stuff tastes so good.)

At this point, I let all three pots sit out to cool. Later, I filled five freezer bags: 2 with Sloppy Salsa Chicken, 2 with Apricot Chicken, and 1 with chicken for Mexi-Chicken Pasta. The remaining chicken was left in the pan to quickly rewarm after church Sunday for Tostadas. Lunch within five minutes of getting home from church? Yes please!

erwchicken9

Those five bags of food joined the 6 beef meals from last week.

I’m going with your suggestions on which packets to work on next – focusing on meatless and slow cooker recipes. It is too much fun and oh so helpful to learn these new recipes.

Learn more about the Eat Right Away Packets here. Or just grab them here:

[wp_eStore_fancy1 id=5]


I love how easy it is now to pull out these prepared foods to serve to my family. Tuesday we put baked potatoes in the crock pot, set out a bag of frozen Apricot Chicken, then went to the swimming pool. We got home, warmed up the meat, cooked some green beans, cut up a cantaloupe, and had our meal. Crazy easy. Plus, all my men raved about how good the Apricot Chicken was. Bonus!

Have you tried any of the recipes in these packets yet? How’s it been going for you? Hope they are a blessing to you as they have been for us!

Heavenly Homemaker's Club Members: Access your homepage and all your fantastic resources here! Not a member yet? Please join us!

Build a Breakfast Burrito Bar

June 16, 2015 by Laura 11 Comments

This post may contain affiliate links. For more information, please see our disclosure policy.

My family ranks the Breakfast Burrito Bar as one of the best ways to feed a crowd in the morning!

It seems that I’ve been on a bit of a Build a _________ Bar kick during the past few months. I believe it just makes sense now that my kids are older. They definitely have specific tastes and preferences. Laying out ingredients and letting individuals put together what they like just makes sense.

That, and it’s much less work for me. I like this part best of all.

Beyond the family, the Build a __________ Bar idea is wonderful for company. Guests can fill their bowl or plate just the way they like. This is a great way to accommodate people with food allergies or differing tastes.

So let’s see. Shall we review the Build a ______ Bar ideas I’ve shared up to this point?

  • Build a Brownie Sundae Bar
  • Build a Fruit Salad Bar
  • Build a Pasta Salad Bar

I thought surely I had posted about Build a Chef Salad Bar, but I guess I never have. That’s one of the easiest meal ideas, so I highly recommend it.

And now, consider a Breakfast Burrito Bar. This worked wonderfully for company a few weeks ago.

Build a Breakfast Burrito Buffet

Simply lay out breakfast burrito items and let everyone fill their plate according to their tastes. Here are some suggestions for the buffet:

Build a Breakfast Burrito BuffetYum

  • Warm tortillas
  • Scrambled eggs
  • Cooked meat like ham, sausage, or bacon
  • Shredded cheese
  • Salsa
  • Chopped veggies like peppers, onions, and mushrooms
  • Spinach

Of course, it’s great to offer a variety of fresh fruit for a side dish.

Do you have any other Build a __________ Bar ideas to share? I love how simple this is!

Heavenly Homemaker's Club Members: Access your homepage and all your fantastic resources here! Not a member yet? Please join us!

Gratituesday: On a Positive Note…

June 15, 2015 by Laura 18 Comments

This post may contain affiliate links. For more information, please see our disclosure policy.

gratituesday[2]

I consider myself to be a fairly positive person. Grumbling helps nothing. I don’t like hearing it from others and I don’t like participating in conversations that are negative and whiny.

Inside my own head, however? I have found myself fighting to take captive every thought and make them obedient to Christ. I haven’t even recognized how negative my thoughts have been because ultimately, I really am trying to figure out positive outcomes for every aspect of my life – my marriage, my boys, our church life, my friendships. But with each of those can come discouragement since life isn’t perfect and my ideals aren’t being rolled out on a red carpet. That’s how I find myself focused on the negative instead of breathing in and relishing in the positive.

This was my brain this morning:

  • Did he really leave his strawberry bowl on the floor after I asked him last night before bed to put it in the sink? I’ve gotta get that boy to listen and obey better.
  • Whose duffle bag is that? I know they are tired after camp, but I asked the boys so many times to unload their dirty laundry in the bathroom. Ugh.
  • I don’t even know where to begin on my to-do list.
  • Is it really cloudy again today? When is the sun going to shine???
  • Shoot. I forgot to thaw meat last night.

This was, of course, all within the first five minutes after I stumbled out of bed this morning. So much for “This is the day the Lord has made. Let us rejoice and be glad in it!”

While frustrations are real, my thoughts and attitude have been very negative.

Without knowing it, a friend of mine – during a 30 second, obviously Spirit led conversation – convicted me in the church foyer yesterday between Bible class and worship time. I don’t even remember her exact phrase. I was just struck by her suggestion that the positive must outweigh the negative. I actually barely heard her at the time because I was gathering my kids so we could find a pew.

Well, God did His work, as He always does. I chewed on my friend’s words, which helped me recognize how negative many of my thoughts have been. This morning (strawberry bowl, duffle bag, list, cloudy, meat – yes that) sealed the deal as I got ready to open my Bible with my coffee.

Even in my prayer life, I have been so focused on the negative. It’s as if I don’t even recognize all of God’s goodness and His promises.

So hi. I’m confessing all of this here to you. God is so good, you guys. He offers so much goodness. My life is full of goodness. When I stop being negative and recognize the positive? It’s a no-brainer that I am more cheerful and have more energy.

I’m sharing this on Gratituesday not just so we can think about what we’re thankful for. It’s more than that. It’s about fully allowing our minds to recognize that God has provided so much goodness! We’ve got to fill our minds with the positive so that we can actually see the God-given blessings that are absolutely overflowing around us.

Please join me today in allowing God to do His work in our minds as we recognize His abundant goodness.

Look around you. Breathe in the good. Leave a comment here to share and encourage us all: In what ways do you see God’s goodness in your life?

Heavenly Homemaker's Club Members: Access your homepage and all your fantastic resources here! Not a member yet? Please join us!

Use Whole Wheat Quick Mix to Make Easy Waffles

June 14, 2015 by Laura 3 Comments

This post may contain affiliate links. For more information, please see our disclosure policy.

Share Your Heavenly Homemakers Recipe Story

It’s been forever since I’ve gotten around to sharing one of your stories of using Heavenly Homemaker recipes! I have excuses. I won’t bore you.

Keep your recipes and pictures coming! I love them!

This was sent in by Cantina. I’ve never thought about topping waffles with kiwi. Great idea!

I wanted you to know that we used the quick mix to make waffles this morning. They are so yummy! Top with blueberries and kiwi…out of this world! I have one son that said he could eat 10! :) This morning we didn’t have many leftover so next time we make them I need to use the whole batch of quick mix (10 cups). That way we can freeze leftovers for another breakfast. Thanks for sharing your recipes!

Blessings,
Cantina Camp

waffles 1

waffles 2

You’ll find these recipes here:

  • Whole Wheat Quick Mix

  • Quick Mix Pancakes (which can be used to make waffles)

These recipes are also included in my Oh, For Real cookbook for easy access.

Have a fun story of how you used a Heavenly Homemaker recipe? Please snap a picture or two and send them to me along with your story. I’d love to feature it here!

Heavenly Homemaker's Club Members: Access your homepage and all your fantastic resources here! Not a member yet? Please join us!

Sunshine and Coconut Oil ~ A Weekend Freebie and Free Shipping at Tropical Traditions

June 12, 2015 by Laura 4 Comments

This post may contain affiliate links. For more information, please see our disclosure policy.

I have two unrelated items to share with you this weekend. I’m squishing them into the same post to save us both time, then I’m off to check other to-do’s off my list!

First…

I love sunshine so, so much. I also love Jesus (so, so much). Which is why, when the sunshine is beaming down on my face and I am soaking in the warmth, I always think of Numbers 6:24-26.

The Lord Bless You and Keep You

When the sunshine is on my face, it’s like the Lord Himself is pouring His life into me. Ahhhh, I love it.

The brightness and cheerfulness of the graphic above made me think of that verse, so I added it in so that we can all print it off and enjoy the reminder of His promise of blessing upon us. Print as many as you like. Keep one for yourself, share some with others. May we all recognize His gracious blessings and gift of peace.

Download The Lord Bless You and Keep You Printable Here

~~~~~~~~~~~~~~~~~~~~~~~~~~~~~~~~~~~~~~~~~~

Second…

It’s always fun to find coconut oil on sale with free shipping to go with it!

pure coconut oil

Tropical Traditions is offering free shipping through Monday, June 15 when you use the code 15615 at checkout. (Minimum $19 order)

Their Pure Coconut Oil is only $13.50 through Sunday – so take advantage of these deals together! This is an odorless, flavorless variety of oil – and it is very rich in nourishment! You can also use this oil for sunscreen (yep, just straight coconut oil).

You’ll see that their Organic Raw Honey is 50% off – a great deal and their honey is delish!

This post contains referral links.

Are you with me? Do you love the sun beaming down on your face?

Heavenly Homemaker's Club Members: Access your homepage and all your fantastic resources here! Not a member yet? Please join us!

I Just Spent 45 Minutes in the Kitchen and Made 6 Meals! Boom!

June 11, 2015 by Laura 8 Comments

This post may contain affiliate links. For more information, please see our disclosure policy.

I decided to give you an idea of how our Eat Right Away Packets work, so I thawed 6 pounds of hamburger and took some really bad pictures of raw meat. My life is glamorous.

Eat Right Away Beef Edition 50
Knowing that your life is probably glamorous also – meaning you might have interruptions in the form of nursing babies, important phone calls, teenagers needing a ride, siblings who need to learn that nice words go a long way, or any other variety of real life stuff – we all know that 45 minutes can turn into an hour and an hour can turn into are you kidding me. So don’t set a timer on this. My 45 minutes of work began at 12:00 noon and didn’t end until 1:30 pm because someone stopped by to pick something up a few minutes after I started, my husband and 10 year old had some questions, and somewhere in there I realized I needed lunch because what was I thinking starting this project on an empty stomach?

In other words, I did 45 minutes of kitchen work, but those minutes were broken up a bit by life and lunch.

The beauty of the Eat Right Away Packets is that they help you be efficient with your time, they help you make the most of your effort in the kitchen, and they help you turn out some pretty awesome meals with very little effort. But there’s no right or wrong way to go about putting these meals together. Case in point:

Here are the five beef recipes in the Eat Right Away: Beef Edition Packet ~

  • Cheesy Salsa Burgers
  • One Dish Cheesy Beef and Potatoes
  • Bacon-Wrapped Individual Meatloaves
  • Easy Hamburger Soup 
  • Baked Ziti 

But seeing as we’re not into soup this summer, and knowing I was low on time – I decided to skip the Easy Hamburger Soup and the One Dish Cheesy Beef and Potatoes. I went with the crazy easy Cheesy Salsa Burgers, the almost as crazy easy Bacon-Wrapped Individual Meatloaves, and the no-brainer Baked Ziti.

I doubled the Baked Ziti. Why not, right? So when all was said and done, I had spent 45 minutes of work time to make 6 meals. Sweet!

NOTE: If your family is smaller than mine or eats less – these Eat Right Away Packets are going to turn out way more than 5 meals for you. How’s that for a bonus return on your time investment?!

So here’s an ugly picture run-down of my Eat Right Away: Beef Edition meal prep…

I threw 2 pounds of meat into a pot to begin cooking (for the double batch of Baked Ziti).

beef1

While it began cooking, I mushed up another two pounds of meat in a bowl, then stirred in the ingredients for Cheesy Salsa Burgers. Here and there, I stirred the meat cooking on the stove.

beef3

Side Note: My dad and his wife got me this amazing meat squisher
(spoken like a true professional) for Christmas. I super love it.

Before shaping the patties, I put a pot of water on to boil. (Had I not taken the time to snap a picture, you all would surely be left in the dark as to what this step looks like. You are very, very welcome.)

beef4

I shaped 18 Cheesy Salsa Burger patties – in a variety of sizes. See how great this is? You can make different sizes to accommodate different sized appetites. That, and you can just be a total non-perfectionist who really doesn’t care if all her patties are uniform in size. This may not work for you Type A’s. Shape your patties according to your personality type. We can all still be friends.

beef5

Somewhere in there, my water hit boiling point. I poured in the pasta and continued shaping patties.

beef6

The meat was finished cooking on the stove, so I added sauce ingredients.

beef7

If you look at my Baked Ziti recipe in the beef packet, you’ll see that I didn’t follow my own instructions correctly. I blame it on the fact that I hadn’t eaten lunch.

And it was at this point that I stopped my work and ate some tuna salad and cole slaw.

Revived by food, I stirred in other Ziti sauce ingredients, then began to build the casseroles.

beef8

beef9

beef12

Having this done, I went to work on the Bacon-Wrapped Individual Meatloaves. Two pounds of meat in a bowl, other ingredients dumped in (because life is too short to get out measuring spoons).

beef10

Meatloaves were shaped and wrapped in bacon. Husband walked in and said some really nice things about my bacon. ;)

beef11

I put the pans of Meatloaves and Salsa Patties into the freezer. Then, I loaded the dishwasher and hit “start.” While the meat froze and the dishes washed themselves, I took Malachi to meet some friends at the swimming pool because life is hard.

beef13

So much glorious vitamin D later, I came home and put the frozen meat items into freezer bags. I labeled them and put them back in the freezer for a quick meal another day. YAY!!

beef14

That night, I threw some of the Cheesy Salsa Burgers on the grill for our dinner (meal #1). In the freezer I have another meal of burgers (meal #2), two meals worth of bacon meat-loaves (meals #3 and #4) and two zitis (meals #5 and #6).

beef15

You guys – this is not hard!! If you don’t love cooking, I believe you will really love this way of prepping ahead to make your kitchen life easier. These recipes are super simple, and once the work of preparing these foods is done (and cleaned up after, woot!) – all you have to do at meal time is pull something out of the freezer and cook it. You don’t even have to think at that point. (I’m not ashamed to say that the not thinking is my favorite part of this.)

I’ve got many pounds of chicken coming in a Bountiful Basket order Friday, so this weekend I’ll be pulling out my Chicken Edition and taking more bad pictures to show you how that one works.

Get all the details on these Eat Right Away Packets here. Ready to add them to your kitchen collection? Download them right away and get started!

Eat Right Away: Beef Edition
$2.00

Add to Cart

Eat Right Away: Chicken Edition
$2.00

Add to Cart


Some of the links in this post are affiliate links.

Heavenly Homemaker's Club Members: Access your homepage and all your fantastic resources here! Not a member yet? Please join us!

Low Sugar Chocolate Peanut Butter Cake

June 10, 2015 by Laura 13 Comments

This post may contain affiliate links. For more information, please see our disclosure policy.

chocolate peanut butter cake 2

Happiness is taking part of one recipe and part of another recipe and putting them together to make Chocolate Peanut Butter Cake recipe. Happiness is having your cake and eating it too because of the low sugar content. Happiness is a cup of coffee with this cake. Really, this whole post and all that is included is really very happy.

Unless you can’t have dairy or gluten or nuts. Then this post really just stinks.

But for the wheaty, milky, nutty (you know who you are) people out there, we shall enjoy this cake on behalf of our dairy free, gluten free, and nut free friends. We’ll feel just a little bit bad that you can’t eat this with us, but we trust that you can take this idea and run with it. You’re good at adapting, right?

So Chocolate Peanut Butter Cake. This is amazing, and it only has 1/2 cup of sugar in it so if you want to eat it for breakfast, by all means, do it.

Here’s what I did:

I made this Chocolate Cake. When it cooled, I topped it with this Peanut Butter Cream Frosting. Everyone at our house loved this cake! (except for Malachi, who hates peanut butter – what is the matter with this child?)

Now, you can also bake this Peanut Butter Cake and top it with this Honey Sweetened, Low Sugar Chocolate Frosting for a variation of Chocolate Peanut Butter Cake. Again, happiness is taking part of one recipe and putting it with part of another recipe. (This concept does not apply to everything. Do not mix and match my Alfredo Sauce with Pasta recipe with Apple Butter or Barbeque Sauce. I should not have to explain this.)

Low Sugar Chocolate CakeYum

1 cup melted coconut oil
1 cup water
4 Tablespoons unsweetened cocoa powder
2 cups whole wheat pastry flour
1/2 cup sucanat
dash of sea salt
1 teaspoon baking soda
1/2 cup sour cream
2 eggs

In a large mixing bowl, stir together flour, sucanat, salt, and baking soda. Set aside. In a saucepan, bring oil, water, and cocoa to a boil. Pour liquid mixture into the bowl with the dry ingredient mixture. Stir well. Add sour cream and eggs, mixing well. Pour batter into a 9×13 inch baking pan. Bake in a 350° oven for 20-25 minutes or until a toothpick inserted in the middle comes out clean. Allow cake to cool completely before frosting.

Peanut Butter Cream Frosting

1/4 cup butter, softened
1/2 cup natural peanut butter, softened
8 ounces cream cheese, softened
1/2 cup heavy whipping cream
1 teaspoon vanilla extract
Liquid stevia

Whip together all ingredients until thick and smooth, sweetening with stevia to taste. Spread over cooled cake.

Low Sugar Chocolate Peanut Butter Cake

Mixing and matching rocks. Who’s a fan of chocolate and peanut butter? What’s the weirdest food combination you like to eat? I have no idea why I’m asking that.

Heavenly Homemaker's Club Members: Access your homepage and all your fantastic resources here! Not a member yet? Please join us!
« Previous Page
Next Page »

Join Our Community!

 Facebook Twitter E-mail Instagram Pinterest

Popular Posts

~ Will All of the Real Moms Please Stand Up?
~ Easy! Stir-and-Pour Whole Wheat Bread
~ How to Make Gatorade
~ 31 Real Food Breakfast Ideas
~ Dear Teenage Girls...
~ When Mom Takes a Step Back
~ The Inexpensive Health Insurance We Love!
~ Let's Talk Real Food Grocery Budgets

Check out our latest posts!

  • Big Family Food and Fun: May 31-June 6, 2026
  • Big Family Food and Fun: May 24-30, 2026
  • Free 7-Day Summer Menu Plan
  • Big Family Food and Fun: May 17-23, 2026
  • Easy Side Dishes for Summer
Home  ~  Simple Meals  ~  Club Membership  ~  Shop  ~  Privacy Policy  ~  Disclosure  ~ Contact

Copyright © 2026 · Beautiful Pro Theme on Genesis Framework · WordPress · Log in