Heavenly Homemakers

Encouraging women in homemaking, healthy eating and parenting

  • Home
    • About
    • FAQs
  • Recipes
    • Bread and Breakfast
    • Condiments
    • Dairy
    • Main Dishes
    • Side Dishes and Snacks
    • Desserts
    • Gluten Free
    • Instant Pot
    • Crock Pot
    • Heavenly Homemaker’s Weekly Menus
  • Homemaking
    • Real Food Sources
  • Store
  • Contact
    • Advertise
    • Disclosure
    • Privacy Policy
  • Simple Meals
  • Club Members!

5-Minute Stove-top Granola Recipe – It is Too Easy!

October 12, 2015 by Laura 26 Comments

This post may contain affiliate links. For more information, please see our disclosure policy.

Stove-Top Granola

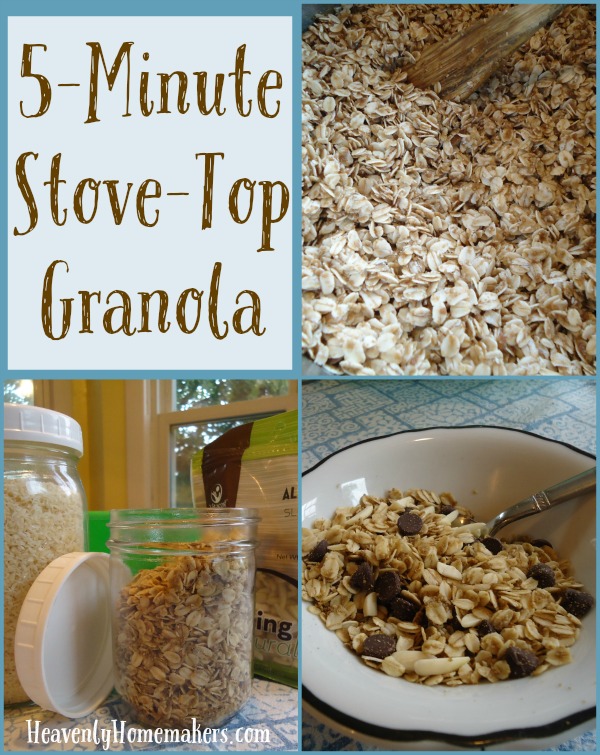
Once upon a time, I spent five minutes stirring together melted coconut oil, sucanat, and oats in order to top an Apple Crisp. (I was making it dairy free for a friend.) While making it, I didn’t measure my ingredients (surprise, surprise) so when it came time to top my apples, I had too much topping. Oh well. I’d store them for later. Into a jar they went (surprise, surprise).

Later, my 13-year old came into the kitchen and saw the jar of apple crisp topping, about which he said, “Ooh, what kind of granola is this?” It was at that moment that I realized that all we had to do was stir in coconut flakes, almonds, dried fruit – whatever we wanted – and we’d have granola.

It was in the next moment that I decided that I might make granola like this every single time because it only took five minutes and it was too easy.

Friends, I present to you:

5-Minute Stove-Top GranolaYum

Make it on the fly. Make it ahead of time. Serve it with add-in options. It will be one of the easiest breakfast or snack options ever.

4.7 from 3 reviews
5-Minute Stove-top Granola
 
Save Print
Prep time
5 mins
Total time
5 mins
 
Author: Laura
Serves: 6 servings
Ingredients
  • 4 cups whole oats
  • ¼ cup sucanat
  • 1 cup coconut oil
Instructions
  1. Melt coconut oil in a medium-sized pan on the stove.
  2. Remove from heat and stir in oats and sucanat.
  3. Serve immediately, or allow it to sit a while to dry somewhat. We like it both ways.
Notes
Add-in options:

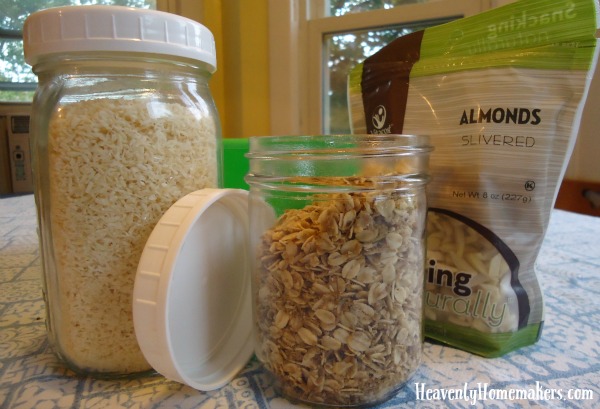
Nuts like almonds, pecans, or walnuts
Coconut flakes
Dried fruit like cranberries, raisins, or blueberries
Chocolate Chips
3.4.3177

When you make granola this way, you can set it out with a variety of add-in options and have a Granola Bar. (Like my play on words there?) This is wonderful for people with food allergies or simply to appease people’s taste preferences.
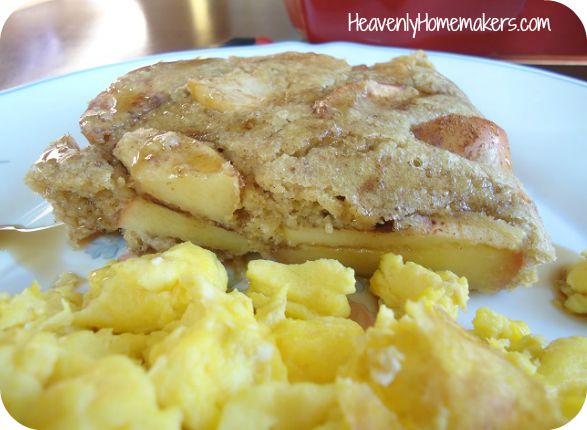
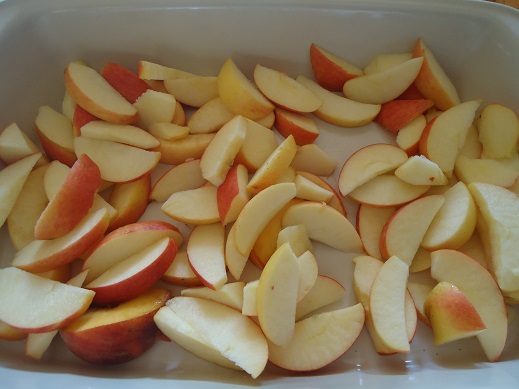
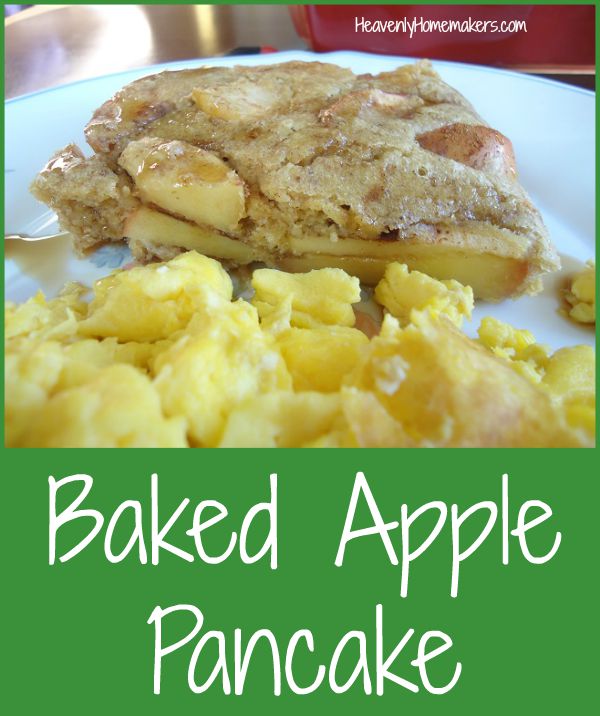
5-Minute Stove-Top Granola

I’d love to hear your ideas for Granola Add-In options!

Heavenly Homemaker's Club Members: Access your homepage and all your fantastic resources here! Not a member yet? Please join us!

Whole Wheat Stir-and-Pour Bread ~ It is So Easy!

October 8, 2015 by Laura 85 Comments

This post may contain affiliate links. For more information, please see our disclosure policy.

Whole Wheat No-Knead Bread

Yum

My life has forever been changed by a new bread recipe. You might think I’m exaggerating, but as soon as you try this, your life will also forever be changed and you’ll be like, “She was actually not even exaggerating. My life, too, has forever been changed by this bread recipe.”

As we all know, I have been avoiding the act of kneading bread lately. My No-Knead Cinnamon Rolls proves this. (You also need that recipe so click over to get it.)

This new Whole Wheat Bread recipe not only skips the kneading, it also skips many other normal bread-making steps. It’s basically like stirring together ingredients for a quick bread, only easier if you can possibly imagine.

This bread is so easy, even a three year old can make it. Whether you have time or not, gather your entire family and all of your neighborhood to watch this video. This kid is three and he shows us all how to make this bread – for real. I can’t get over how brilliant this is. (Click here to view if it isn’t showing up for you.)

Cooking Guy is a friend of ours (along with his sister, his mom, and his dad). This is my new favorite cooking show. I hope Cooking Guy will remember our house with its very fun legos and train set after he has become famous.

When his mom first gave me this recipe last week, I tried it by pouring the ingredients into a cake pan as directed by her (and now Cooking Guy). We cut it like cornbread and devoured it (with butter, obvs).

no knead bread 2

no-knead bread 2

Later I wondered how it would work in regular loaf pans. I buttered a 9-inch loaf pan, poured in the batter, and hoped for the best.

I’m so happy to report that the best is what I got!! When I pulled this out of the oven, this is when I knew my life was changed forever (see first paragraph).

no-knead bread 3

no knead bread 4

Make this for breakfast, make this to go with soup, make this to go with salad, just make this. We ate one loaf fresh out of the oven, then I hid the other one, which we ate for lunch the next day with Chicken Salad. So good.

4.9 from 12 reviews
Whole Wheat Stir-and-Pour Bread ~ It is So Easy!
 
Save Print
Prep time
5 mins
Cook time
45 mins
Total time
50 mins
 
Author: Laura
Serves: 1 loaf
Ingredients
  • 4 cups whole wheat flour (I use freshly ground hard white wheat)
  • 2 teaspoons active rise yeast
  • 2 Tablespoons sucanat or sugar or honey
  • 1 teaspoon sea salt
  • 1 egg (optional)
  • ¼ cup heavy cream (optional)
  • 2 cups warm water
Instructions
  1. Stir all ingredients together.
  2. Cover and allow it to sit for 30 minutes.
  3. Pour contents into a well-buttered cake pan or 1 well-buttered 9" loaf pan.
  4. Bake in a 425° oven for 20-25 minutes (cake pan) or in a 350° oven for 45-60 minutes (loaf pan) or until evenly browned.
Notes
If you have egg or dairy allergies, skip the egg and cream and you'll still turn out a great bread.
3.4.3177

Whole Wheat Stir-and-Pour Bread

I calculated that this bread costs about $1.00 per batch. That’s pretty impressive, seeing as it makes a lovely loaf of whole grain bread.

Thank you, Cooking Guy! You have now changed the lives of thousands of women. Not too shabby for a 3-year old.

Heavenly Homemaker's Club Members: Access your homepage and all your fantastic resources here! Not a member yet? Please join us!

Easy Raspberry Pancake and Waffle Syrup Recipe – Two Ingredients!

October 4, 2015 by Laura 16 Comments

This post may contain affiliate links. For more information, please see our disclosure policy.

Easy Raspberry Pancake and Waffle Syrup

Yum

I just priced it. An 8.5 ounce bottle of Raspberry Syrup costs $6.99. But neener-neener, I just made some for pennies.

Now granted, I got the raspberries for free – although we did pick them ourselves – and time is money, so there’s that. We got fresh air, sunshine, time with friends, and a bit of a workout while picking (swatting bugs) – so I’m going to go with priceless on this endeavor.

Friends, let us not ever pay seven bucks for a tiny bottle of sugary syrup. Let us, instead, save oodles of money by making our own. Let us keep the ingredients healthy. Let us drizzle this good stuff all over our pancakes and waffles, and even top it with homemade whipped cream. Then let us rejoice together at the amazing deliciousness of this treat.

Easy Raspberry Pancake and Waffle Syrup - Only Two Ingredients!

Check out what I finally, finalllllly set up for you here! I seriously should have done this five years ago, but by default it fell low on my to-do list. Therefore, I skipped some housecleaning this weekend and got this done. Seeing as cleaning isn’t my fav, this to-do list swap was perfectly okay with me.

Little by little I’ll switch over all my hundreds of recipes to be easy to read and print like this. You can even leave a recipe review after you give it a try! It is too fun.

Easy Raspberry Pancake and Waffle Syrup Recipe - Two Ingredients!
 
Save Print
Prep time
5 mins
Cook time
10 mins
Total time
15 mins
 
Author: Laura
Serves: 6
Ingredients
  • 3 cups fresh or frozen raspberries
  • 2 Tablespoons sucanat
Instructions
  1. In a saucepan, stir raspberries and sucanat over medium heat for about 10 minutes, stirring occasionally until the berries are tender and the ingredients have formed a syrup.
  2. Serve warm over pancakes or waffles.
3.4.3177

If you need some pancakes or waffles to go with your Raspberry Syrup, here are our favorite recipes:

  • Whole Wheat Waffles
  • Quick Mix Pancakes
  • Peanut Butter Pancakes
  • Pumpkin Pancakes

Hope you are enjoying fall weather, fall food, and fall um…what else? What do you love about fall? I’d have to say it’s all pretty fun except for the way fall soccer season makes our shoe closet smell absolutely terrifying. Ask me how I felt when I realized that all of the York College cheerleaders came into my living room and walked right by the open – OPEN – closet door before I realized that one of my boys had left it that way. Messy closet aside, I just hated that they had to be put through the torture of breathing in the green cloud. No one died, and we are grateful.

One of my boys said that he feels it’s best to leave the closet door open so that it can air out. This is a great idea except for how that creates 3,000 square feet of stink throughout our entire house (notice the double meaning on the word feet there). SHUT THE CLOSET DOOR already. Or maybe burn the shoes.

Friends, you are so sweet to hang out with me here. You all smell so good and you are so nice. Here you came by for a Raspberry Syrup recipe and I share all the gross details of my happy life.

Raspberry Syrup smells oh so sweet. It also tastes good. And look! I installed a new easy-to-use recipe reader and printer-outer.

That was me, distracting you and taking you back to the good parts of this post. Love ya.

Heavenly Homemaker's Club Members: Access your homepage and all your fantastic resources here! Not a member yet? Please join us!

Garlic Cheese Biscuits (Like Red Lobster’s) – the Real Food Way

September 27, 2015 by Laura 10 Comments

This post may contain affiliate links. For more information, please see our disclosure policy.

I used to go out to eat at restaurants just because of the baskets of bread they kept bringing to the table. Red Lobster Garlic Cheese Biscuits? Oh my, yes. But who am I kidding? I really used to go out to eat at restaurants for the unlimited Pepsi refills. Holy sugar crash, Batman.

Garlic Cheese Biscuits

I’m now in the stage of life where I recognize the value of nourishment and moderation, plus if I tried to eat more than one biscuit now my body’d be like, “What are you thinking, girl?” Ah….the 40’s.

We recently treated our boys to their first Red Lobster experience (and by we treated I mean someone gave us a gift certificate). They loved the biscuits in the basket – of course – which reminded me that I know how to make them the healthy way.

Therefore, we grilled chicken and steak a few days ago, prepped some veggies, and baked some of these biscuits. This led to me making them again a few days later and then again a few days after that. Yes, the boys like them because they are amazing (my boys, and also my biscuits).

Garlic Cheese BiscuitsYum

Garlic Cheese Biscuits (Like Red Lobster's) - the Real Food Way
 
Save Print
Author: Laura
Serves: 12
Ingredients
  • 2½ cups whole wheat pastry flour
  • 1 teaspoon baking powder
  • ½ teaspoon sea salt
  • 2 teaspoons garlic powder (divided)
  • 1 Tablespoon sucanat
  • ⅓ cup palm shortening
  • 1 cup shredded cheddar or Colby jack cheese
  • ¾ cup milk
  • ¼ cup butter
Instructions
  1. Stir together flour, baking powder, salt, 1 teaspoon garlic powder, and sucanat.
  2. Cut in palm shortening until the mixture resembles crumbs.
  3. Fold in shredded cheese.
  4. Stir in milk until well combined.
  5. Spoon batter in Tablespoon-sized heaps onto a baking sheet.
  6. Bake in a 400° oven for 12-18 minutes or until they are golden brown.
  7. While they are baking, melt butter on the stove and stir in remaining teaspoon of garlic powder. Brush garlic butter over hot biscuits and serve immediately.
3.4.3177

Garlic Cheese Biscuits - the real food way

With soup weather being right around the corner, I suggest you keep this recipe front and center. Soup with Garlic Cheese Biscuits is a wonderful combo.

Want a gluten free version of this recipe? This one is similar, though you’ll want to switch the onion powder for garlic powder.

How do you handle bread basket refills at restaurants? Or should I ask, how does your body handle it? 

Heavenly Homemaker's Club Members: Access your homepage and all your fantastic resources here! Not a member yet? Please join us!

Baked Apple Pancake Recipe

September 23, 2015 by Laura 7 Comments

This post may contain affiliate links. For more information, please see our disclosure policy.

We all used to think that a pancake was just a pancake. But that made us all go to sleep with boredom and we all screamed for something different. Actually, none of us did that. Normal pancakes are the bomb-diggity and change is hard. Flipping regular round pancakes is nice, easy, and who doesn’t love a fresh pancake right off the griddle?

quick_mix_pancakes

But now we can also make Easy Pancake Muffins. They’re fun and easy too. Our people love them.

Easy Pancake Muffins - Great for the Freezer

To go along with our newly discovered pancake experimentational adventures (seriously, it’s just a recipe idea but here I am trying to pull out big words to make it sound impressive) – we can now add this Baked Apple Pancake to the mix.

apple pancake31

This delicious idea came from “Busy Mom in AL” when I shared about making Easy Pancake Muffins. This long-time reader said,

“Put apples and cinnamon in the bottom of a 9×13 inch pan and then pour the pancake batter on top. Bake at 350 degrees for 20-30 minutes. Serve in squares with tons of maple syrup! :) It is called Apple Pancake Bake.”

Knowing my family would love it, a few mornings later I gave this idea a try. It earned the “take pictures and blog about it” award, so here you go!

apple pancake4 apple pancake5 apple pancake6 apple pancake7

Baked Apple PancakeBaked Apple Pancake Yum

Baked Apple Pancake Recipe
 
Save Print
Author: Laura
Serves: 6-8
Ingredients
  • 5-6 apples, any variety
  • 1-2 Tablespoons ground cinnamon
  • 2 cups whole wheat flour (I use freshly ground hard or soft white wheat)
  • 1 teaspoon baking powder
  • ½ teaspoon sea salt
  • 2 eggs
  • 1½ cups milk
  • ¼ cup melted butter
Instructions
  1. Wash and slice apples, laying them evenly on the bottom of a 9x13 inch baking dish.
  2. Sprinkle liberally with cinnamon.
  3. Mix remaining ingredients well, then pour the mixture over the apples.
  4. Bake in a 350° oven for 20-30 minutes or until a toothpick inserted in the middle comes out clean. Slice and serve with real maple syrup.
3.4.3177

I think you’ll love this simple recipe idea! It’s perfect for this fall, what with its cinnamon awesomeness.

Once again we learn that pancakes don’t have to be just pancakes. Have any more pancake variations to share with us?

Heavenly Homemaker's Club Members: Access your homepage and all your fantastic resources here! Not a member yet? Please join us!

Easy No-Knead Whole Wheat Cinnamon Rolls For the Freezer ~ With Honey’d Orange Glaze!

September 13, 2015 by Laura 13 Comments

This post may contain affiliate links. For more information, please see our disclosure policy.

No-knead breads are THE WAY to go.

Cinnamon Roll with Orange Glaze

I’m not sure that my dearly missed, hard working grandma would be too pleased with me about this – but I’ve decided that kneading bread dough just isn’t my favorite thing. I mean, I’ll do it if I have to. But I’d rather stir ingredients, smile at the pile of dough (you know, for encouragement), then walk away.

This is how I found myself experimenting with my Whole Wheat Cinnamon Roll recipe. I had all the ingredients mixed together, but then I was like, “Really? Do I really have to knead this now? That just sounds soooo hard and time consuming.” (Really, Grandma. I know you lived through the Great Depression and fed nine children three meals a day from scratch with food that you grew or raised on your farm, that you worked from sun-up to sun-down in your teeny-tiny kitchen, and the only time you rested was to watch Judge Wapner after you turned 80. But do try to understand what I’m up against here.)

I figured that at the very worst, I’d have little hard cinnamon roll hockey pucks we could dunk in milk. So I did it. I walked away from my dough without kneading it.

It looked like this when I covered it up:

cin rolls 10

An hour later, it looked like this:

cin rolls2

Did it work, or did it work? 

Thus, my Whole Wheat Cinnamon Roll recipe is being turned into a No-Knead Whole Wheat Cinnamon Roll recipe because our lives are too full from all the hard work it takes to think about Grandma scrubbing all of the manure-crusted clothes on a wash-board.

What you see here is absolutely not a picture of me kneading the dough. It is simply me working a little flour into the dough after it rose so that I could roll it out without it sticking to the countertop.

cin rolls3

After I rolled it out, I spread melted butter over it and sprinkled a little sucanat and cinnamon over it.

cin rolls4

Then (like a boss) I rolled both ends until they met in the middle and separated the rolled dough with a knife. (Start on the outside, top and bottom, and roll them into the middle.)

cin rolls5

cin rolls6

I then proceeded to cut individual rolls, making a huge mess in the process.

cin rolls7

My rolls went on a pan in a most unattractive way because I leave perfectionism up to the perfectionists. Do not poke fun. They can’t help how they look.

cin rolls8

I froze the dough rolls on the pan, then transferred the frozen rolls to a freezer bag for another day. I will use them when I am busy not having to pluck a chicken for our dinner.

cin rolls9

No-Knead Whole Wheat Cinnamon Rolls – for the freezer (or for directly into the oven)

Easy No-Knead Whole Wheat Cinnamon Rolls For the Freezer ~ With Honey'd Orange Glaze!
 
Save Print
Author: Laura
Serves: 15-18
Ingredients
  • 1 cup warm (but not hot!) water
  • 2 Tablespoons yeast (active dry)
  • 2 teaspoons honey
  • 2½ cups milk
  • ½ cup butter
  • ½ cup honey
  • 4 teaspoons sea salt
  • 7-8 cups whole wheat flour (I use freshly ground hard white wheat)
Instructions
  1. In a large bowl, mush the yeast and 2 teaspoons honey together with the warm water and set aside. It will begin to form bubbles soon.
  2. In the meantime, stir together milk, butter, ½ cup honey, and sea salt on the stove until the butter has melted and the mixture has reached 120°.
  3. If the temp exceeds this, allow it to cool before moving on.
  4. Pour the milk mixture into the bubbly yeast mixture and stir.
  5. Mix in flour, two cups at a time until a nice dough has formed.
  6. Do not knead. (There is no need.)
  7. Cover the dough and allow it to rise for at least one hour, or until you remember that you were making rolls.
  8. Prepare the innards:
  9. Ingredients for the “innards” of your cinnamon rolls: ½ cup melted butter, ½ cup sucanat or brown sugar, and ½ Tablespoon ground cinnamon
  10. On a well-floured surface, roll the dough to about ¼ inch thickness.
  11. Spread melted butter over the rolled dough.
  12. Sprinkle with sucanat, then cinnamon.
  13. Roll up the dough from the outsides of the "dough circle" as pictured above.
  14. Cut apart the two rolled lengths, then cut the dough into ½ inch thick rolls.
  15. Place the rolls side-by-side on a baking pan.
  16. Allow them to rest/rise for about 20 minutes, then bake the rolls in a 350° oven for about 25 minutes or until they are golden brown.
  17. Glaze and serve!
3.4.3177

Honey’d Orange GlazeYum

2 teaspoons orange juice concentrate
1/4 cup heavy cream
2 Tablespoons honey

Whisk ingredients together on the stove until smooth. Drizzle over baked cinnamon rolls.

To Freeze and Bake:

Place the prepared rolls about a 1/2 inch apart on a baking sheet. Freeze for about two hours, then transfer them to a freezer bag. Store in the freezer for up to two months.

To bake, place the desired number of frozen rolls on a baking pan. Cover and refrigerate overnight. (In the winter, I leave them on the countertop overnight.) Place the rolls into a cold oven, then turn the oven on to 350°. Bake as directed above, adding a few minutes of additional time as needed.

Easy No-Knead Whole Wheat Cinnamon Rolls for the Freezer with Honey'd Orange Glaze

These are deliciously easy, and mostly low in sugar! They kind of resemble those frozen orange rolls you can buy in the freezer section – except that these have a little bit of nutritional value and not nearly as much sugar, so we can all rejoice.

Are you a perfectionist? Did my frozen roll picture cause you to cringe? I’m just a “get the job done and move on” kind of girl…which basically means that I am a mess when I cook.

Heavenly Homemaker's Club Members: Access your homepage and all your fantastic resources here! Not a member yet? Please join us!

Busy Morning Breakfasts That Can Be Made Ahead of Time

September 2, 2015 by Laura 11 Comments

This post may contain affiliate links. For more information, please see our disclosure policy.

I am so messed up on breakfasts right now. Our second son started taking a college class on MWF and he has to be on campus at 8:00. Color me late to this “get your kids out the door for school on time” game, but well, that’s exactly what I am. We work from home and we’ve home-schooled forever, so getting out the door to church with combed hair on Sundays has been our only morning schedule struggle. On school days, we usually eat while beginning our Bible time and school time in our jammies a few minutes after we wake the kids. Now, if you can possibly imagine, I must actually be dressed and have breakfast on the table by 7:20.

Yes, I’m sure most of you can possibly imagine, and many of you are thinking, “Really, girl? 7:20 am is practically mid-afternoon at our house.” God bless all of you early morning head-out-the-door-to-work-and-school friends. I have some recipes to share with you. We shall all eat well together…at whatever time each of us considers to be early.

Busy Morning Breakfasts That Can Be Made Ahead of Time

Yum

Busy Morning Breakfasts That Can Be Made Ahead of Time

My goal this week was to prep breakfast foods and put them into the freezer so that I’ll be perfectly organized and never have to think again. Scratch that. My goal this week is simply to prep some breakfast foods and put them in the freezer. I’ll never be perfectly organized and in typical mom-life fashion, I found myself having to think straight and answer difficult questions like “are my soccer socks clean?” just a few minutes ago.

Here are my favorite breakfast foods to put into the freezer. They save time, money, and brain – my favorite things to save.

1. Hashbrowns and Hashbrown Patties

I’ll be baking a few pounds of potatoes this week to shred and put into the freezer. Fry up some eggs with these, serve with fruit – done. Everyone loves these and thinks you’re wonderful when you make these. It is fun when everyone thinks you’re wonderful.

Homemade Hashbrown Patties

2. Muffin Batter

You knew I would say this one. I can’t help it. Making and freezing muffin batter saves so much time. Not to mention dirty dishes. Deliver me from dirty dishes.

frozen_muffins_3

3. Cooked Turkey Sausage and Prepared Biscuits

I can make biscuits and gravy sooooo fast when I do this. My family is always amazed. Let’s just let them keep thinking that I am incredible to pull this off. Add the above mentioned Hashbrowns to this meal and you can picture my kids breaking into a lively Mom is Our Favorite Person in the Whole World dance (not really).

Freezer Biscuit Tutorial

4. Oatmeal Cups

You wouldn’t think that this would save time, but it truly does. At least it saves brain. That’s worth a whole lot.

frozen oatmeal3

5. Giant Breakfast Cookies

Best thing to pull out of the freezer for breakfast…ever.

breakfast_cookies

6. Pancake Muffins

Yep. My newest favorite. I cannot get over how easy these are.

Easy Pancake Muffins

7. Quick Breads

Find our favorite quick bread recipes here. I usually double or triple a batch. If I allow them to cool completely, then wrap them well before freezing them, quick breads thaw and serve well. It is so very nice to pull a prepared loaf or two out of the freezer to go with breakfast in the morning.

Pumpkin Chocolate Chip Bread

If you freeze nothing else to save yourself time, brain, and money (while also eating healthy, because you are just that awesome) – make and freeze some of these breakfast foods. It will make your morning routine so much easier. Pick the recipe that looks the easiest to you – then go for it!

What are your favorite breakfast foods to prep ahead? Have any new ideas for me? What time to you eat breakfast at your house?

Heavenly Homemaker's Club Members: Access your homepage and all your fantastic resources here! Not a member yet? Please join us!

Easy Pancake Muffins – Great for the Freezer!

September 1, 2015 by Laura 24 Comments

This post may contain affiliate links. For more information, please see our disclosure policy.

Pancake Muffins? Seriously?! Why did I not think of this before?

Easy Pancake Muffins

I think I heard this idea from one of you brilliant minds a few dozen weeks or possibly even years ago. If it was you, thank you. My apologies for taking so long to try it. It’s just that...change is hard, you know? I’m so used to pouring pancake batter on a griddle, so scooping it into a muffin cup was just such a hard, hard adjustment for me.

Not really. I just never got around to trying it. Sheesh.

The thing about the traditional pancake is how long one has to stand at the griddle flipping the cakes. Yum, and all that. But it is time consuming if you must move make mountains of pancakes to fill up your people. With the muffin idea, you can scoop the very same pancake batter into muffin cups, slide them into the oven, and be on your way. And {please hold your applause} you can make extras of these and put them into your freezer, then pull them out and rewarm them without even having to think or stir or dirty up a bowl.

I may never stand at a griddle again. {standing ovation}

I no longer know how to cook in small quantities, as is evidenced by the following large-sized ingredient list. Forgive me, cut the recipe in half, or simply put your leftovers in a freezer bag and then into the freezer for a no-brainer breakfast of the future.

Pancake Muffins Yum

Easy Pancake Muffins - Great for the Freezer!
 
Save Print
Author: Laura
Serves: 24
Ingredients
  • 3 cups whole wheat flour (I use freshly ground white wheat - hard or soft)
  • 1 teaspoon baking powder
  • ½ teaspoon sea salt
  • ½ cup melted butter
  • 3 eggs
  • 2½ cups milk
Instructions
  1. Whisk all ingredients together until smooth-ish.
  2. Scoop into prepared muffin cups (buttered, paper-lined, whatever you choose).
  3. Drop in berries or chocolate chips if you wish.
  4. Bake in a 350° oven for 15-20 minutes or until muffins are golden brown.
3.4.3177

Easy Pancake Muffins - Great for the Freezer

You’d think I would have done this earlier since I’ve been making Sausage Pancake Muffins for so long.

If you want to make these a “to-go” muffin, simply add about 1/4 cup of real maple syrup to the batter before scooping and baking. Then you can skip the necessary “dip them in syrup while holding your chin over the table” step.

Ever tried this idea? Were you the one who told me about it? Love you.

Heavenly Homemaker's Club Members: Access your homepage and all your fantastic resources here! Not a member yet? Please join us!

Frozen Oatmeal Cups – for a Quick, Hearty Breakfast

August 2, 2015 by Laura 17 Comments

This post may contain affiliate links. For more information, please see our disclosure policy.

Seriously, Frozen Oatmeal Cups. Check this out.

frozen oatmeal8

Yum

Making oatmeal has got to be the most difficult thing to do ever. It’s definitely the most tedious breakfast food there is – requiring time, energy, thought, and absolute sweat-dripping labor over a stove for five entire minutes (because oatmeal won’t cook properly unless someone is staring at it in expectation). Life is hard. We should probably settle for pop-tarts. It’s the only way.

Don’t worry, friends. I’ve found a way to avoid performing this grueling task (and eating pop-tarts) in the mornings – and I’m here to share. I think we can all agree that the more we can avoid the challenge of putting water in a pot to boil, the better. Gather ’round, everyone. This tip will shave at least 1.4 minutes off your morning meal prep, so listen closely. Every 1.4 minutes counts.

Here’s what you need to do: You need to cook up a double or triple batch of oatmeal (you can do it, we’re all in this together, persevere, I believe in you). Once the oatmeal is done, go ahead and feed some to your family. Here’s where it gets good: After your meal, freeze the leftovers in muffin cups, topped with whatever delicious toppings your family likes. Like this:

frozen oatmeal3

The result is easy-to-store cups of frozen oatmeal which are ready to pull out and re-heat at any given time – preferably on those mornings. You know the ones I’m talking about.

But seriously, in all seriousness, because I am always serious – this really is a lovely way to help your children help themselves on a busy morning, and it really does save a tiny bit of time because the cooking of the oatmeal has already been done.

Now, if you get a little bit burned out on oatmeal and you’re still struggling with the urge to buy a pre-made breakfast in a box that promises to save you time – I suggest you consider the possibility of frying an egg. If I can do it, you can do it. There are also apples – a brand new innovative idea for breakfast that I’ve heard are great to grab-and-go. Who knew?

Frozen Oatmeal Cups - a quick, hearty breakfast

The Specifics of Making Approximately 24 Frozen Oatmeal Cups

  1. Boil 6 cups of water.
  2. Stir in 3 cups of whole oats.
  3. Turn the heat down to simmer the oats/water for about 5 minutes, stirring occasionally.
  4. Remove from heat once the water has been absorbed and the oats are soft.
  5. Stir in 1-3 Tablespoons of butter and 1-4 Tablespoons of sweetener like honey or sucanat as desired.
  6. Scoop prepared oatmeal into muffin tins (no need to grease the tins).
  7. Top oatmeal cups with any variety of fruit, nuts, chocolate chips, etc.
  8. Place filled muffin pans in the freezer for 2-3 hours or until oatmeal is frozen solid.
  9. Pull frozen oatmeal out of the freezer and allow it to sit on the counter-top for about 10 minutes.
  10. Use a fork or spoon to gently pop the frozen oatmeal cups out of the tins.
  11. Place the frozen cups into a labeled freezer bag. Store in the freezer for up to three months.
  12. Re-heat by placing frozen oatmeal cup(s) in a small saucepan on medium heat until thawed and warm.

I love this idea (for so many reasons, as explained earlier) – but also because this allows for a variety of sizes of appetites. Little ones may just need one cup to fill them, whereas my sons would likely each pull out 2-4 to rewarm.

So now, go therefore and make yourself some frozen oatmeal cups. Your breakfast – and really, your entire life – is obviously going to be changed for the better because of this tip. Enjoy your extra 1.4 minutes of morning time. You are very, very welcome.

What do you think of this idea? I like the brainlessness of it. I like that the cooking is done so all that needs to be done is rewarm and serve. I love that my kids can do this themselves. Not every freezer meal is about saving time – sometimes it’s just about the comfort of having prepped food on hand for ease!

P.S. We also really love making Homemade Instant Oatmeal to have on hand.

Kudos to Cupcakes and Kale Chips where I first saw this fun idea!

Heavenly Homemaker's Club Members: Access your homepage and all your fantastic resources here! Not a member yet? Please join us!

We Can Bake Quick Breads in a Slow Cooker!

June 25, 2015 by Laura 13 Comments

This post may contain affiliate links. For more information, please see our disclosure policy.

It’s a new way to bake quick breads!

You Can Bake Bread in a Crock Pot!

Yum

I had no idea that this was an actual thing. Did you?? I came across this idea here and am ever so grateful.

I’ve been baking potatoes in a crock pot for several years, but I did not know a person could bake quick bread this way too. (And also yeast bread, but I’m trying to perfect that idea before posting about it. You can look forward to that…as will I if I can ever figure out how to do it right.)

This is going to change how we eat this summer. No more avoiding bread on hot days since I never want to turn on the oven. However, since I only have one crock pot, I can obviously only do one loaf of bread at a time. This is a little bit limiting for my family of huge eaters. But all I’ll have to do to remedy this is scramble up a bunch of eggs and make a blender (or two) full of smoothies to go with our loaf, and we’ve got a meal.

I’ve tried this idea with two different types of quick breads – Chocolate Chip Bread and Snickerdoodle (it was a recipe experiment). Both worked great! This leads me to believe that any quick bread recipe will work. (Actually, I’m not sure about gluten free breads. Anyone have experience with this?)

How to Bake Quick Bread in a Crock Pot

How to Bake Quick Breads in a Crock Pot

1. Turn your crock pot onto “hi” to preheat.

2. Mix your quick bread as usual and put it into a buttered loaf pan. (I used glass as I’m not sure about using a stone in my crock pot. Any have experience with this?)

3. Wad up two pieces of tin foil and place them at the bottom of your crock pot. This will offer some space under your bread pan which will help your bread bake better.

bread in crock pot 2
4. Set your loaf pan into your crock pot. (Mine is actually barely the right size, so it didn’t fit all the way in thus negating the need for wads of foil. As you can see in the pictures above, my pan sat on the edge of the top of the crock. It worked perfectly.)

5. Place the lid on your crock pot slightly off centered so as to allow a little bit of steam to escape during baking.

6. Leave the bread to bake in the crock pot for about 2 hours. You’ll be able to watch it baking from the outside into the middle, making it quite easy to see when it has finished baking.

bread in crock pot 3

How excited are you to learn this fun trick?! What quick bread are you going to try baking in your crock pot first? I’m asking because I know you are going to try this right away, this minute, today, as soon as you stand up.

P.S. Look through our quick bread/muffin recipes here.

Heavenly Homemaker's Club Members: Access your homepage and all your fantastic resources here! Not a member yet? Please join us!
« Previous Page
Next Page »

Join Our Community!

 Facebook Twitter E-mail Instagram Pinterest

Popular Posts

~ Will All of the Real Moms Please Stand Up?
~ Easy! Stir-and-Pour Whole Wheat Bread
~ How to Make Gatorade
~ 31 Real Food Breakfast Ideas
~ Dear Teenage Girls...
~ When Mom Takes a Step Back
~ The Inexpensive Health Insurance We Love!
~ Let's Talk Real Food Grocery Budgets

Check out our latest posts!

  • Big Family Food and Fun: May 24-30, 2026
  • Free 7-Day Summer Menu Plan
  • Big Family Food and Fun: May 17-23, 2026
  • Easy Side Dishes for Summer
  • Big Family Food and Fun: May 10-16, 2026
Home  ~  Simple Meals  ~  Club Membership  ~  Shop  ~  Privacy Policy  ~  Disclosure  ~ Contact

Copyright © 2026 · Beautiful Pro Theme on Genesis Framework · WordPress · Log in