Back in my former life – the one in which I innocently and cheerfully ate Chillsbury* dough from a can – I loved making a cream cheese pastry dish that always got rave reviews. It was simple. You spread a can of Whillsbury* crescent dough on the bottom of a pan, throw in some cream cheese filling, top it with another round of Gnillsbury* crescent dough, bake it, and eat. I loved that stuff, as did everyone else who ate it with me.
Gone are my days of eating biscuits or crescents from a can. Oh, and can I just pause to say this: I do not miss that vulnerable and insecure feeling that always came from never knowing when the can would pop open and dough would ooze out. Maybe it is just me, but waiting for the biscuit can pop always put me slightly on edge. Yeah, it was probably just me. I have can-popping-biscuit-bursting-forth issues, I think.
Anyway, I had forgotten all about this delicious dish, which is crazy, because hello? It does have cream cheese in it. It occurred to me recently that the perfect replacement for Billsbury* crescent dough would surely be my go-to whole wheat yogurt dough. Why I hadn’t thought of using it to figure out a new Cream Cheese Pastry dish, I have no idea. But I finally thought of it, tried it, and here it is. My family devoured it for breakfast this morning, which means that next time, I have to double it for sure!
*name changed to protect the innocent guilty
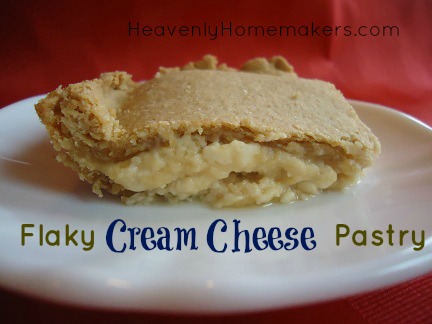
Flaky Cream Cheese Pastry
Dough:
1 3/4 cups whole wheat flour
1/2 teaspoon sea salt
1/2 cup melted butter
1/2 cup plain yogurt
Filling:
1 – 8 ounce package of cream cheese, softened
1 egg
1/2 cup real maple syrup (sugar, sucanat, or honey would work too)
1 teaspoon vanilla extract
1-2 Tablespoons lemon juice (optional)
Mix together all four dough ingredients and knead lightly to form a nice ball. Divide in half. Press one half of the dough into an 8×8 inch baking dish.

Whip together the cream cheese filling ingredients. Pour filling over the bottom crust.

Roll the second half of the dough into a square and place it on top of the cream cheese filling.

Bake in a 350° oven for 30-40 minutes, or until crust is golden brown.

Allow pastry to cool slightly before slicing and serving.

Tell me – am I the only one here with can-popping-biscuit-bursting-forth issues? I’ll admit it right now, it makes me jumpy just thinking about it. ;)