Heavenly Homemakers

Encouraging women in homemaking, healthy eating and parenting

  • Home
    • About
    • FAQs
  • Recipes
    • Bread and Breakfast
    • Condiments
    • Dairy
    • Main Dishes
    • Side Dishes and Snacks
    • Desserts
    • Gluten Free
    • Instant Pot
    • Crock Pot
    • Heavenly Homemaker’s Weekly Menus
  • Homemaking
    • Real Food Sources
  • Store
  • Contact
    • Advertise
    • Disclosure
    • Privacy Policy
  • Simple Meals
  • Club Members!

Easy Homemade Nacho Cheese Pretzel Dip

November 14, 2013 by Laura 31 Comments

This post may contain affiliate links. For more information, please see our disclosure policy.

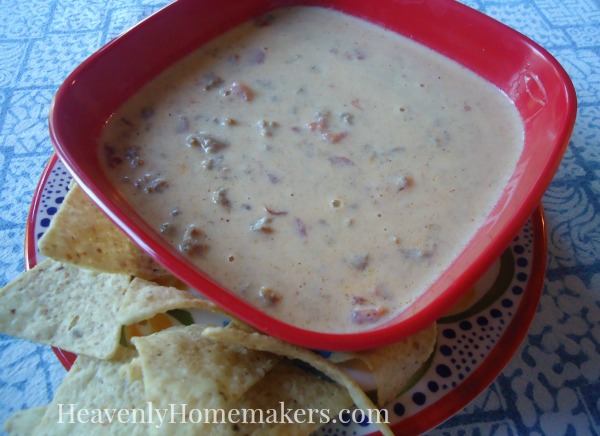
Obviously, this nacho cheese pretzel dip can be eaten with other foods beyond pretzels. I’m thinking tortilla chips, steamed veggies, popcorn chicken…

pretzel_bites_4

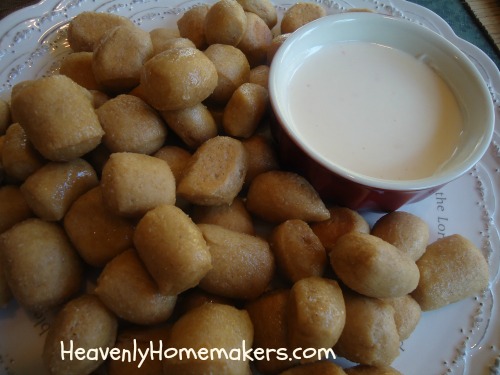
But with these Homemade Soft Pretzel Bites? So delicious!

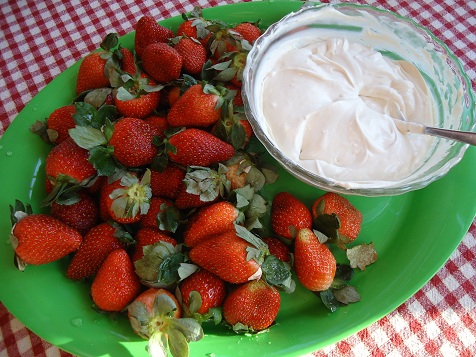
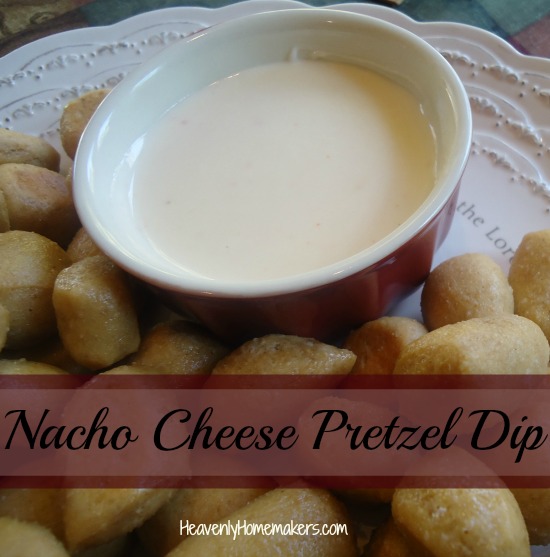
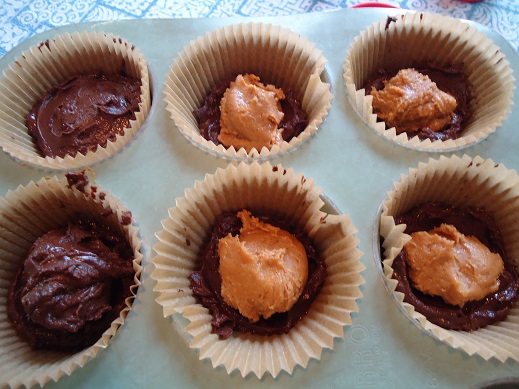
What’s fun about this recipe is that you can make it as spicy or as mild as you like. In fact, our family made individual bowls of the cheese dip, then added as much hot sauce as we each preferred.

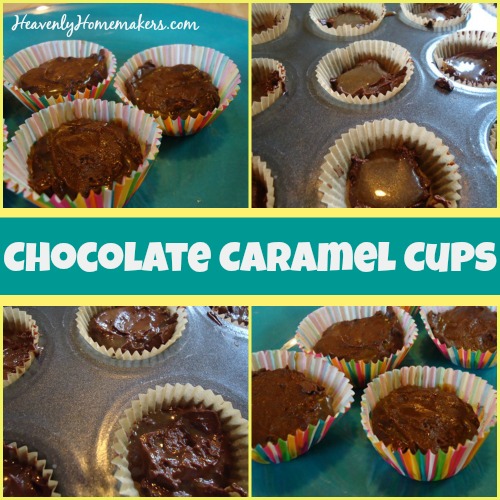
Easy Nacho Cheese Pretzel DipYum

Easy Homemade Nacho Cheese Pretzel Dip
 
Save Print
Author: Laura
Ingredients
  • 4 ounces cream cheese
  • 8 ounces cheddar cheese, cut into cubes
  • 1 to 1½ cups milk
  • hot sauce to taste (we like Cholula)
Instructions
  1. In a medium saucepan, slowly melt cream cheese and cheddar cheese cubes on medium low heat, stirring constantly.
  2. Once melted, gradually add milk and whisk together while continuing to heat.
  3. Once the sauce reaches the consistency you desire, remove from heat and serve - adding hot sauce to taste.
3.4.3177

nacho_cheese_pretzel_dip_1

My boys were so impressed that I was able to make something that tasted so much like the canned fake cheese dip. But never fear – because this is made with real ingredients, it tastes much better than what comes out of a can.

Let’s take a vote: Who likes the cheese stuff that pours out of a can?  Love it? Hate it? Don’t feel bad admitting that you like it. We all have our lingering non-food cravings (says the lady who still chooses Nacho Cheese Doritos when given the opportunity).

But speaking of Doritos and Velveeta (which we weren’t actually speaking of but hang with me here). If you want to avoid cheese from a can and cheese from a box – but you really love Nacho Cheese Dip – I have a recipe you are going to love!

After years of trying, I came up with Real Food “Velveeta” and Rotel Dip.

Real Food Velveeta and Rotel Dip

You guys. This recipe changed my life and I now make this dip every couple of weeks because we love it so much. I exaggerate frequently and am sarcastic often – but I am very serious about this dip.

So there you go. You now have two amazing homemade, real food dips to try so that you can forever and always avoid processed cheese. Amen and amen.

Heavenly Homemaker's Club Members: Access your homepage and all your fantastic resources here! Not a member yet? Please join us!

Flourless Fudge Cookies

August 15, 2013 by Laura 30 Comments

This post may contain affiliate links. For more information, please see our disclosure policy.

flourless_fudge_cookies_3

You can’t go wrong with a recipe that has the word “fudge” in its name. These cookies are very easy to make and live up to their name. Mmm, fudgy cookies. Yes please.

Flourless Fudge CookiesYum

2 1/4 cups sucanat powdered sugar
1/4 teaspoon sea salt
1 cup cocoa powder
2 eggs
1 teaspoon vanilla extract

Put 2 1/4 cups of sucanat into a blender. Process until sugar has become powdered. (Here is a post with picture tutorial showing you how easy this is!)  In a bowl, mix sucanat powdered sugar with the remaining ingredients. Scoop teaspoon sized balls of batter onto a parchment paper lined cookie sheet (very important). Bake in a 350° oven for 8-10 minutes.  Allow the cookies to cool completely while on the cookie sheet.

If you bake them on a baking stone or try to remove them before they are completely cooled, you’ll end up with this:

flourless_fudge_cookies_2

See below, how the cookies sit patiently and cool on their parchment paper so that they will come off the pan nicely?

flourless_fudge_cookies_1
Ah yes, that is the way to do it. These cookies are worth the wait!

flourless_fudge_cookies_4
Have you ever made your own powdered sugar with sucanat?  It’s very easy – and these cookies are a great way to experiment with that idea!

Heavenly Homemaker's Club Members: Access your homepage and all your fantastic resources here! Not a member yet? Please join us!

Crustless Cheesecake Cups

July 30, 2013 by Laura 13 Comments

This post may contain affiliate links. For more information, please see our disclosure policy.

High Five Recipes 2

Cheesecake is one of my favorite desserts. In fact, I believe I will have my boys make these for my birthday on Saturday. Since I’m turning 40, perhaps I could have them double this recipe so we can have 40 little cheesecake cups. (Why, so I can gain 40 pounds as I celebrate?)  Yeah, we’ll just stick with a single batch.

cheesecake_cups_3

Crustless Cheesecake CupsYum

2 – 8 ounce packages cream cheese, softened
1 1/2 cups heavy whipping cream
1 teaspoon vanilla extract
3/4 cup real maple syrup or 1 1/2 cups unbleached powdered sugar

In a medium sized bowl, whip the cream until soft peaks form. In a separate bowl, beat together cream cheese, maple syrup, and vanilla. Fold whipped cream into cream cheese mixture. Scoop cheesecake mix into about 20 paper-lined muffin cups. Refrigerate or freeze until ready to serve. Top with fresh fruit.

cheesecake_cups_1

These Crustless Cheesecake Cups are so easy to make and since they freeze well, they can be made ahead of time. You can even serve them frozen. Delish!

cheesecake_cups_2

Heavenly Homemaker's Club Members: Access your homepage and all your fantastic resources here! Not a member yet? Please join us!

Caramel Oatmeal Bars {High Five Recipe}

July 24, 2013 by Laura 37 Comments

This post may contain affiliate links. For more information, please see our disclosure policy.

celebrating_40

I wanted to include a recipe or two in my Celebrating 40 festivities. But how was I supposed to do that when everything about the celebration has to do with the number 40? I don’t have any recipes with 40 ingredients (you’re welcome).

I decided that the exact opposite of a recipe with 40 ingredients is a recipe with only 5 ingredients. Sort of. So I am including this High Five Recipe in my celebration. It’s one of the easiest and quickest you’ll ever make.

Caramel Oatmeal BarsYum

1 cup butter, melted
1 1/3 cups sucanat
1/2 teaspoon sea salt
1 teaspoon baking powder
3 1/2 cups rolled oats

Stir all five ingredients together. Press mixture into a 9×13 inch baking dish. Bake at 350° for 10 minutes until ingredients have melted together and become lightly brown. Cut into bars while hot.

caramel_oatmeal_bars

Beyond eating these bars as is, we have also discovered that crumbling one onto a bowl of vanilla ice cream is incredibly delicious.

Need more High Five Recipes? (high quality recipes, five ingredients or less)  Find lots and lots of them here!

Heavenly Homemaker's Club Members: Access your homepage and all your fantastic resources here! Not a member yet? Please join us!

Homemade Chocolate Caramel Cups

July 11, 2013 by Laura 8 Comments

This post may contain affiliate links. For more information, please see our disclosure policy.

Chocolate Caramel Cups

Can I interest you in a Chocolate Caramel Cup recipe to go along with the Chocolate Peanut Butter Cup recipe I shared earlier this week?

Upon typing that sentence, I am suddenly reminded of Mrs. Hendricks, my really, really old 2nd grade teacher. Seriously, she had to have been at least 33. She taught us how to carry the 1 when adding double digits and she would never let any of us say the word can.

We would frequently forget this rule, saying in our best whiny 7 year old voices, “Mrs. Hendricks? Can I get a drink of water?” And she would say, “I don’t know. Can you?” We would then roll our eyes without her seeing us because we were really sneaky and cunning and besides at her age, surely her failing eyesight wouldn’t allow her to see our facial expressions clearly. Obligingly we would come back with, “I mean, may I get a drink of water?” I believe those of us who shall remain nameless who were really sweet and running for teacher’s pet of the year award also added a please in there too.

To this day, I am not able to say can I without switching to may I and I think I might also roll my eyes a little bit while I’m saying it. Old habits die hard.

So, can I interest you in this wonderful recipe to go along with the Chocolate Peanut Butter Cup recipe? And together, with all of the second graders and Mrs. Hendricks we say, “I don’t know.  Can you?”

Chocolate Caramel Cups Yum

1 cup chocolate chips
2 Tablespoons butter
1/4 cup homemade caramel sauce

First, whisk together a batch of Homemade Caramel Sauce. You won’t need it all for this recipe, but get yourself some vanilla ice cream and you’ll be serving the best caramel sundaes with the leftovers.

Prepare 6 regular sized or 16 mini-sized muffin cups with paper liners. In a small saucepan, heat chocolate chips and butter, stirring until melted. Spoon half of the melted chocolate mixture into the prepared paper-lined muffin cups.

caramel_cups_1

Place a spoonful of caramel sauce (hot or cold) into each cup, dividing the mixture evenly among the cups. Top each with the remaining chocolate, smoothing it the best you can to cover the caramel.

caramel_cups_2
Refrigerate for two hours until solid. (Or place in the freezer for about thirty minutes to speed the process.)  Store in the refrigerator until ready to serve.

caramel_cups_4

Can I challenge you to refrain from eating these all in one sitting? {I don’t know. Can you?}

Heavenly Homemaker's Club Members: Access your homepage and all your fantastic resources here! Not a member yet? Please join us!

Homemade Chocolate Peanut Butter Cups {Real Food Recipe Makeover}

July 9, 2013 by Laura 21 Comments

This post may contain affiliate links. For more information, please see our disclosure policy.

This recipe was inspired by Laura S., someone I met at the Colorado Springs Meet and Greet. Not only was her idea brilliant, I think her name is absolutely beautiful. ;)

I wasn’t able to make these Chocolate Peanut Butter Cups look perfect and beautiful like one you’d pull out of a Reese’s wrapper. But I did make them taste better, so we’ll go with “taste before beauty” on this one. And of course, with these, you avoid the hydrogenated oils and turn out an even more delicious treat than one that comes from a factory.

Chocolate Peanut Butter Cups
Warning:  These are super rich and slightly messy. Children and adults alike may end up with chocolaty fingers and faces, not to mention a sugar high. You’re welcome and I’m sorry.

Chocolate Peanut Butter CupsYum

1/4 cup natural peanut butter
2 teaspoons honey
1 cup chocolate chips
2 Tablespoons Butter

Stir together peanut butter and honey in a small bowl. Set aside. Prepare six regular sized or 15 mini-sized muffin cups with paper liners.

In a small saucepan, melt chocolate chips and butter, stirring until melted. Spoon half of the melted chocolate mixture into the prepared paper-lined muffin cups.

pb_cups_4

Place a spoonful of peanut butter mixture into each cup, dividing the mixture evenly among the cups. Top each with the remaining chocolate, smoothing it the best you can to cover the peanut butter.

pb_cups_5

Refrigerate for two hours until solid. (Or place in the freezer for about thirty minutes to speed the process.)  Store in the refrigerator until ready to serve.

pb_cups_2
pb_cups_3
You’ll be happy to know that while playing with this idea, I also came up with a Chocolate Caramel Cup. Recipe coming soon…

Heavenly Homemaker's Club Members: Access your homepage and all your fantastic resources here! Not a member yet? Please join us!

Homemade Grape Nuts Cereal

June 11, 2013 by Laura 78 Comments

This post may contain affiliate links. For more information, please see our disclosure policy.

A huge thank you to Michelle for telling me about this recipe idea!!

High Five Recipes 2

First of all, I have to ask – because I know you’re all dying to know the answer to this as well:  Why is this cereal called “Grape Nuts” when there are neither grapes nor nuts included in the list of ingredients? Haven’t you always wondered about that? Who named this cereal? And why, if they were going to call it something random like this, did they not call it “Pickle Sprouts” or Olive Berries?” How about “Banana Seeds?” I mean, if we’re going for titles that don’t make sense…

Yeah, don’t waste much time pondering that paragraph.

At the Colorado Springs Meet & Greet, we talked about everything from kids and media time to cereal. When Michelle told us she made a cereal like this, we all got super excited!

Homemade Grape Nuts

Looks like the real deal, huh? This cereal is pretty tasty with berries!

Homemade Grape Nuts is super easy to make, and I personally think it tastes better than the boxed stuff. Can you guess my kids’ first question when I introduced them to this at breakfast? “Looks good, but why is it called Grape Nuts?” I don’t know, Son. I don’t know.

Homemade Grape Nuts CerealYum

3 1/2 cups whole wheat flour (I use freshly ground hard white wheat)
1 cup sucanat (or brown sugar)
2 cups buttermilk (or milk mixed with 2 Tablespoons vinegar)
2/3 teaspoon sea salt
1 teaspoon baking soda

Mix all ingredients together, beating well until smooth. Spread mixture onto a parchment paper lined (or well buttered) cookie sheet. Bake for 15 minutes in a 375° oven. Remove cereal from the oven, and cool completely. Once cool, grind in a food processor until it becomes “crumb like.”

Return crumbs to cookie sheet or a large baking pan. Bake in a 250° oven for one hour or until crisp, stirring every 15 minutes.

cereal_1 (1)

cereal_1 (3)

cereal_1 (2)
I found it easiest to bake the crumbs in a dish with sides (my 10×15 pyrex) so that I could stir more easily.

cereal_1 (4)

Cool the cereal and store it in an air tight container in the pantry (for about two weeks) or freezer (for up to two months).

5.0 from 3 reviews
Homemade Grape Nuts Cereal
 
Save Print
Prep time
15 mins
Cook time
15 mins
Total time
30 mins
 
Author: Laura
Ingredients
  • 3½ cups whole wheat flour (I use freshly ground hard white wheat)
  • 1 cup sucanat (or brown sugar)
  • 2 cups buttermilk (or milk mixed with 2 Tablespoons vinegar)
  • ⅔ teaspoon sea salt
  • 1 teaspoon baking soda
Instructions
  1. Mix all ingredients together, beating well until smooth.
  2. Spread mixture onto a parchment paper lined (or well buttered) cookie sheet.
  3. Bake for 15 minutes in a 375° oven.
  4. Remove cereal from the oven, and cool completely.
  5. Once cool, grind in a food processor until it becomes "crumb like."
  6. Return crumbs to cookie sheet or a large baking pan.
  7. Bake in a 250° oven for one hour or until crisp, stirring every 15 minutes.(I found it easiest to bake the crumbs in a dish with sides (my 10x15 pyrex) so that I could stir more easily.)
  8. Cool the cereal and store it in an air tight container in the pantry (for about two weeks) or freezer (for up to two months).
3.4.3177

The geek in me decided to do the math to see if this was not only a High Five Recipe, but a Real Food Dollar Menu recipe as well. Sure enough! It took about $2.00 to make a batch of this cereal – using all organic ingredients. This makes about twice as much cereal as you would find in a regular sized box of Grape Nuts. When’s the last time you were able to buy a box of whole grain, organic cereal for a buck?

Looking for more meals on our Real Food Dollar Menu? Here are the recipes I’ve shared so far:

  • Hearty Chili
  • Spanish Rice
  • Pasta Alfredo
  • Crock Pot Barbecue Chicken
  • Crock Pot Beef Stew
  • Easy Chicken Pot Pie
  • Chili Mac

Tell me you’ve always wondered where Grape Nuts got its name.  And by always, I obviously mean, “Yes, I’ve pondered that for a second or two once in my life.”

Heavenly Homemaker's Club Members: Access your homepage and all your fantastic resources here! Not a member yet? Please join us!

Pineapple Mango Smoothies (No Sugar Added – Dairy Free Option)

May 21, 2013 by Laura 15 Comments

This post may contain affiliate links. For more information, please see our disclosure policy.

This Pineapple Mango Smoothie is more refreshing that you can imagine. Mmmm!

High Five Recipes 2

We were on our way home from Kansas City after a weekend event our boys had participated in. The event had been awesome, our boys had done great, and we were all flying high. Except for Asa (our 15 year old) and me. It appeared that the two of us were coming down with the flu. Our throats hurt, our chests burned, and we both began to get feverish. Our eyes were red and achy. Our heads pounded.

(Great story so far, eh?)

We were both a little bit hungry, although nothing really sounded good to eat. We had packed food, but all of it seemed too difficult to eat. Funny how the normally simple act of chewing takes so much energy when you’re sick. All I could think of was, “I just want a smoothie.” (Well, and “I just want my bed.” But out on the interstate, a few hours from home, that was not an option.)

Matt, bless his heart, was determined to find his feverish bride a smoothie. We finally managed to find a place that had some decent options (without too many funky, sugary ingredients). I chose a pineapple mango variety and aside from the fact that it was cold and made my chills just a little bit more miserable – I had never enjoyed a smoothie more. It was so refreshing. It was just what Asa and I needed. We slept the rest of the way home.

Asa and I are all better now. In fact, this all happened a couple of months ago. But ever since, I’ve been craving a Pineapple Mango Smoothie. I typically make my smoothies with berries – which we love. But the refreshment that comes from pineapple, mango, and orange juice all blended up in a glass? I knew I needed to recreate this treasure.

It’s not hard to make – you just need five simple ingredients. Add a little maple syrup or stevia if it’s not sweet enough for you. We think it’s sweet enough as is. Coconut milk makes it taste great and offers a dairy free option if you need it. We like it with plain, whole milk yogurt. I think I may make these every single day this summer.

pineapple_mango_smoothie_2

Pineapple Mango SmoothieYum

Pineapple Mango Smoothies (No Sugar Added - Dairy Free Option)
 
Save Print
Author: Laura
Serves: 4-6
Ingredients
  • 1½ cups frozen mango chunks
  • 1½ cups frozen pineapple chunks
  • 1 cup orange juice
  • 2 cups plain yogurt or coconut milk
  • 1 teaspoon vanilla extract
Instructions
  1. Place all ingredients into a blender or food processor together.
  2. Blend until smooth.
3.4.3177

Pineapple Mango Smoothie

What’s your favorite fruit smoothie combination?  For the record, I don’t recommend getting the flu before trying this. It’s much more fun to eat when you can hold your head up off the pillow.

Heavenly Homemaker's Club Members: Access your homepage and all your fantastic resources here! Not a member yet? Please join us!

Homemade Sweet Potato Fries

May 15, 2013 by Laura 63 Comments

This post may contain affiliate links. For more information, please see our disclosure policy.

sweet_potato_fries

It really pays to listen to your friends. (Not all of them though, because if they’re encouraging you to do things that aren’t good for you, maybe you should consider getting new friends.) Well where did that piece of parenting advice come from?

Anyway, I happen to have good friends, so I feel that it is okay to listen to them. It just so happens that I had two friends in one week tell me that I was missing out by not adding sweet potatoes to my menus more often. When the first friend said it, I kind of nodded and smiled. But when a second friend mentioned it a few days later, I sort of wondered if God was trying to tell me something. Okay, I’m pretty sure He is working in bigger ways in my life than sweet potato consumption encouragement. But still. I figured there might be something to this sweet potato thing since it came up twice in one week with two different people at two separate times. (Am I making too much of this? I mean, should I just get around to sharing the recipe already?) Why have I not been eating or feeding my family sweet potatoes very often, as in, pretty much never?

It’s very simple really. As a child, the only way I had been served sweet potatoes was in a casserole with brown sugar and marshmallows at Thanksgiving and I didn’t like it one bit. If I’m going to eat something sweet, I want it to be a dessert – not as a side dish with my turkey. But that’s just me. I’m the one who needs chocolate with my sugar. What can I say? But, per my friends’ suggestions, I decided to try making sweet potato fries. They looked and smelled great. I ate one. Hmmm, it was okay, I guess. But I kept thinking about marshmallows, and couldn’t get past it. By the way, I don’t like marshmallows. But I’m a big girl, and all grown up, so I made myself eat a second sweet potato fry. And then a third. Oh wait. They suddenly began to taste good to me. Then, before I knew it, I had to tell myself to stop eating the sweet potato fries and save some for my family. (I didn’t feel bad though, because usually it’s the other way around and I’m the one asking my family to save me some food before they inhale all of it.)

So it turns out that while I think my friends may have helped me become an addict in this regard, it does pay to give in to sweet potato peer pressure.

How to Make Sweet Potato Fries

Scrub and cut sweet potatoes into wedges or fries – as thin as you like. Toss them in olive oil or coconut oil (about 1 Tablespoon per sweet potato). Place them in a single layer on a baking pan. Sprinkle on sea salt and bake in a 400° oven for 30-40 minutes. or Deep fry the cut sweet potatoes in a fryer (we have this one, which works great) filled with Refined Coconut Oil or Palm Shortening for 3-4 minutes, remove, salt, and eat. These Homemade Sweet Potato Fries are AMAZING! They are so easy to make, and incredibly delicious. #sweetpotatofries #homemadefries #sweetpotatofryrecipe 
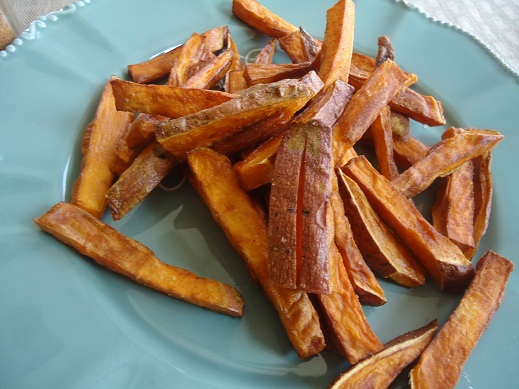
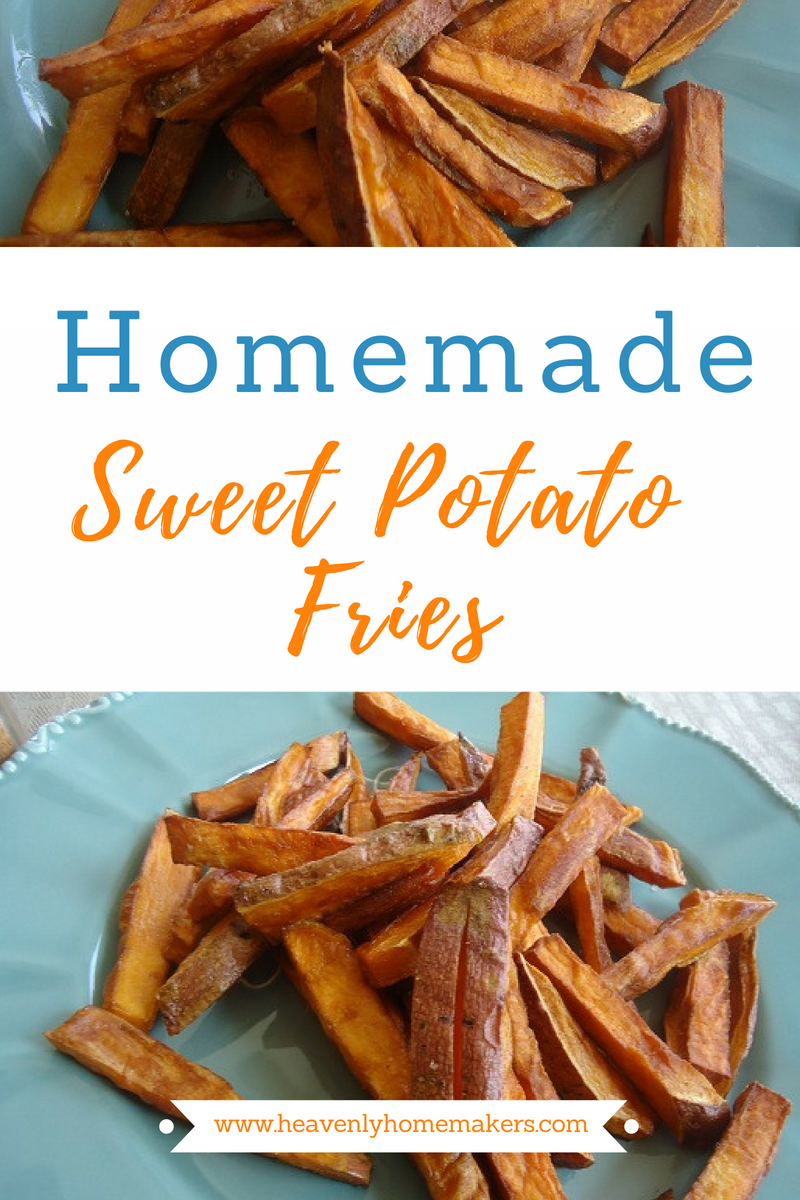
What is your relationship with sweet potatoes? How do you like them cooked? And while it’s completely irrelevant, I am curious. Do you like marshmallows?

Heavenly Homemaker's Club Members: Access your homepage and all your fantastic resources here! Not a member yet? Please join us!

Easy Cream Cheese Fruit Dip

May 7, 2013 by Laura 34 Comments

This post may contain affiliate links. For more information, please see our disclosure policy.

This Cream Cheese Fruit Dip is our very favorite dip to eat with fruit!

strawberry_dip_2

I’ve probably already written this sentence a time or three, but here it is again:  Cream cheese makes everything better!

Or was I talking about butter when I said that? Actually, maybe it was cream? Well, the same is true for cream cheese, butter, and cream. (Although I will draw the line at adding any of the above to my lettuce salad.)

This recipe includes both cream and cream cheese. And homemade vanilla. (Or store bought vanilla, but homemade is so YUM.)  And then there is just a bit of maple syrup to make it sweet. Last but not least – you’ll add a shot of lemon or lime juice. Here are the specifics:

Easy Fruit DipYum

Easy Cream Cheese Fruit Dip
 
Save Print
Author: Laura
Ingredients
  • ½ cup cream (heavy whipping cream)
  • 8 ounces cream cheese, softened
  • 2 Tablespoons real maple syrup
  • ½ teaspoon vanilla extract
  • 2 Tablespoons lemon or lime juice (fresh or bottled)
Instructions
  1. Whip the cream until it forms stiff peaks.
  2. In a separate bowl, cream together the cream cheese, maple syrup, vanilla, and lemon or lime juice.
  3. Fold cream cheese mixture into the whipped cream.
  4. Chill until ready to serve, or serve right away.
3.4.3177

Tastes great with strawberries, grapes, and apples. Makes about two cups of dip.

Cream Cheese Fruit Dip
Have to eat dairy free? This wasn’t a winner of a post for you then, was it?! I’ll try to make it up to you next time. :)  Everyone else – multiple choice question:

Everything is better with:
a) butter
b) cream cheese
c) cream
d) all of the above

I’d love to hear your opinion on this one!

Heavenly Homemaker's Club Members: Access your homepage and all your fantastic resources here! Not a member yet? Please join us!
« Previous Page
Next Page »

Join Our Community!

 Facebook Twitter E-mail Instagram Pinterest

Popular Posts

~ Will All of the Real Moms Please Stand Up?
~ Easy! Stir-and-Pour Whole Wheat Bread
~ How to Make Gatorade
~ 31 Real Food Breakfast Ideas
~ Dear Teenage Girls...
~ When Mom Takes a Step Back
~ The Inexpensive Health Insurance We Love!
~ Let's Talk Real Food Grocery Budgets

Check out our latest posts!

  • Big Family Food and Fun: April 26-May 2, 2026
  • Big Family Food and Fun: April 19-25, 2026
  • Big Family Food and Fun: April 12-18, 2026
  • Big Family Food and Fun: April 5-11, 2026
  • Big Family Food and Fun: March 29-April 4, 2026
Home  ~  Simple Meals  ~  Club Membership  ~  Shop  ~  Privacy Policy  ~  Disclosure  ~ Contact

Copyright © 2026 · Beautiful Pro Theme on Genesis Framework · WordPress · Log in