Heavenly Homemakers

Encouraging women in homemaking, healthy eating and parenting

  • Home
    • About
    • FAQs
  • Recipes
    • Bread and Breakfast
    • Condiments
    • Dairy
    • Main Dishes
    • Side Dishes and Snacks
    • Desserts
    • Gluten Free
    • Instant Pot
    • Crock Pot
    • Heavenly Homemaker’s Weekly Menus
  • Homemaking
    • Real Food Sources
  • Store
  • Contact
    • Advertise
    • Disclosure
    • Privacy Policy
  • Simple Meals
  • Club Members!

How to Thaw Meat Quickly Without a Microwave

March 19, 2015 by Laura 42 Comments

This post may contain affiliate links. For more information, please see our disclosure policy.

I will probably be scolded by the public health and safety people for giving you this tip – so just in case, I will say this:  No matter what, do not follow this advice. This is a terrible suggestion. Do not do this. This is crazy talk.

There, now I’m covered.

I’m not going to tell you what to do. I’m just telling you what I do. Sometimes. Hardly ever, really. Pretty much never, actually. (Or just about every day, but you did not just hear me say that.)

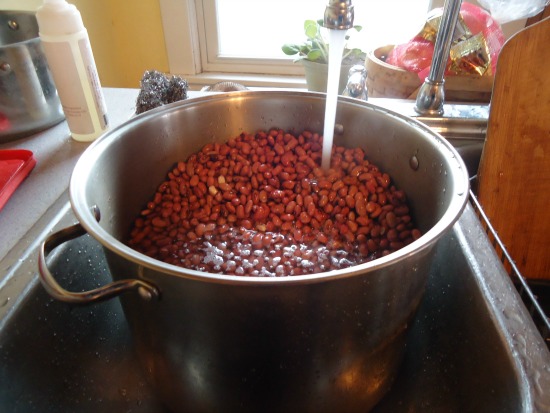
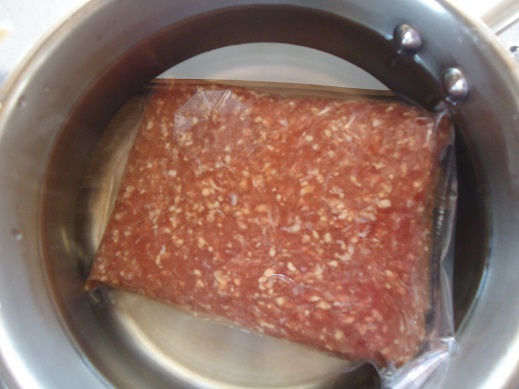
I try to avoid using a microwave. In fact, I find that warming leftovers on the stove is faster anyway. True story. So what do I do when the meat is frozen and I need it for lunch in an hour? I simply put the frozen meat into a pot of hot water. It thaws within minutes. I cook it right away. We eat.

thaw meat quickly

I feel much better about this method than I do about using a microwave. Plus it works great.

Now walk away. This conversation never happened.

(unless you’d like to share how you thaw meat in a pinch)

Heavenly Homemaker's Club Members: Access your homepage and all your fantastic resources here! Not a member yet? Please join us!

Build a Fruit Salad Bar

March 12, 2015 by Laura 2 Comments

This post may contain affiliate links. For more information, please see our disclosure policy.

Create Your Own Fruit Salad

Yum

Sometimes fruits and veggies just need to be served in an exciting way to make them more appealing. That – and some people in my house just won’t eat bananas.  If there are bananas in the fruit salad, one of my kids will refuse the apples, strawberries, and pineapple too. “I’ll just put the bananas on the side,” thought I, as I prepared to make a fruit salad for dinner. But then I got the better idea to put everything “on the side” so each person could fill their bowl as they like. Fun!

As it turns out, I got all the boys involved in prepping a fruit. The result was a beautiful spread of choices that everyone was excited to dig into.

Build a Fruit Salad Bar

Justus (our 15 year old) built his salad and took this picture. Beautiful!

There’s nothing complicated about this:  Simply slice or chop whatever fruit you have on hand and set it out for people to pick from as they fill their bowl. Lay out shredded coconut, dried fruit, and nuts if you like. Real whipped cream or cottage cheese added to the spread wouldn’t hurt my feelings.

This was a perfect side dish with our pasta and mixed greens tonight. I’m thinking it would be fun to serve for breakfast some time soon, too!

What are your favorite fruits to add to a salad?

~~~~~~~~~~~~~~~~~~~~~~~~~~~~~~~

Quick Note!

I made a mistake on yesterday’s Visit Omaha giveaway post. Durham Museum IS NOT free. my bad  It’s the Joslyn Museum that’s free. I made the correction on the giveaway post, but wanted to make sure you got the update!

Heavenly Homemaker's Club Members: Access your homepage and all your fantastic resources here! Not a member yet? Please join us!

Soup or Smoothies? I Can’t Decide

March 11, 2015 by Laura 5 Comments

This post may contain affiliate links. For more information, please see our disclosure policy.

pineapple_mango_smoothie_2

March comes in like a lion and goes out like a lamb. I learned that in Kansas in first grade when my teacher Mrs. Howell explained the concept, then gave us paper plates to make lion and lamb faces. We hung them on the wall in the back of the room above the coat rack. (I remember pointless things.)

I’ve since learned that typically in Nebraska, March comes in like a lion and acts like a lion all month and goes out like a lion and greets April like a lion and once in a while a little lamb pokes it soft little head out just long enough to tease the lion. But this year the lamb appears to be a bit more feisty than the lion because the sun is shining and we’re having some unusually warm weather. The boys have been going outside in shorts because they can. We’ve been shooting hoops in the driveway with the sun in our eyes. Awesomeness.

For the first time in months, a smoothie sounds good, especially after playing or working outside. But then we come back into my house and guess what? Brrrrr! The house hasn’t caught up yet with the outside weather. What should we expect? It is still getting pretty cold at night.

So sweaters or shorts? Flip flops or boots? Iced coffee or hot? Soup or smoothies?

I’m thinking both. Lions and lambs can be friends, can’t they? Here’s what I’m celebrating during this fun collision of lion and lamb during the month of March:

1. THE SUN IS SHINING, even during the cold parts of the day. I heart sunshine.  I’ve probably mentioned that here before.
2. I can enjoy baking and grilling at the same time. This doesn’t happen in the winter or the summer.
3. There are no bugs yet because they haven’t yet realized that it’s warm enough to come out and crawl on us.
4. Soup and smoothies taste good together.

Cheeseburger Soup

Today I present to you, in honor of The Month of Crazy Weather, our favorite soup and smoothie recipes. You just never know when you’ll need one or the other or both at the same time.

Soup

  • Beefy Vegetable Soup
  • Cheeseburger Soup
  • Chicken Noodle Soup
  • Chicken Tortilla Soup
  • Chili
  • Homemade Tomato Soup
  • Pizza Soup
  • Potato Soup

Smoothies (and other fun, cold drinks)

  • Pineapple Mango Smoothies
  • Pineapple-Orange Slushies
  • Creamy Orange Cooler
  • Strawberry Peach Slushies
  • Icy Cold Milkshake Treats
  • Green Machine Milkshakes
  • Homemade Chocolate Frappe

While looking through my archives, I realize that I actually have very few smoothie recipes here. That’s because I just throw in whatever fruit we have, which makes smoothies at our house “non-recipe” items.

What are you experiencing at your house? Lion or lamb? Soup or smoothie? Boot or flip-flop?

Heavenly Homemaker's Club Members: Access your homepage and all your fantastic resources here! Not a member yet? Please join us!

The Day I Got Carried Away With the Beans

March 3, 2015 by Laura 10 Comments

This post may contain affiliate links. For more information, please see our disclosure policy.

It’s not what you think.  {and all the readers breathed a collective sigh of relief}

It’s just that last night I put beans in a bowl to soak, and then I woke up to beans that were threatening to overtake my kitchen. {Wow, Laura. Fascinating.}

beans 1

See, when you add water to beans – they grow.  They grow and they grow and they grow. So if you aren’t thinking about what you’re doing, and you scoop 13 cups of beans into a bowl, then cover the beans with water before you go to bed – beware of the growing bean monster which will greet you when you walk into your kitchen to make breakfast.

I strained the beans and added fresh water, but of course, none other than my largest stock pot would hold the monster.

beans 2

Why, you ask? Why so many beans?

I told you already. I wasn’t thinking about what I was doing.  I needed a large amount of beans for a big batch of chili, so I just kept scooping. I also forgot that beans in a bowl will soak up the water until they become bloated and ready to burst. Whoa, good morning, beans.  That. That is what I said when I walked into my kitchen this morning to find the bloated beans trying to crawl over the top of the bowl onto my counter top and floor.

I didn’t really tell the beans good morning. I don’t talk to my chili beans. Coffee beans, though – for sure. Don’t even doubt that one.

After cooking the chili beans (which of course bubbled up and overflowed onto my stove-top because I forgot that they were cooking and because there were so many of them), I realized that I had way, way too many cooked beans for the big batch of chili I was planning to make. All I’m doing is trying to do is to be prepared to feed our high school youth group on Sunday night, see? But we’re going out of town Thursday afternoon and won’t get home until late Saturday night. And I don’t know if you knew this or not, but we have to change our clocks this Saturday night, so we lose an hour of sleep.  No one asked my permission to do that this weekend.  This is not okay with me.

So in my effort to get ahead, I got very, very ahead. I have beans for chili on Sunday night to feed an army. Plus I now have three other big containers of beans in my freezer to be used another time. Yay me. I am so efficient.

chili beans 3

It seems that I just spent 404 words telling you about my beans – as if I have nothing better to talk about. Blah, blah, blah, beans. Wow everyone. Look at my beans.

So now I shall leave you with this important reminder and advice:

Do not become distracted when you are scooping beans. Stop scooping beans if you know what’s good for you. But if you forget and over-scoop, simply go ahead and freeze your cooked beans for future use.

526 words to tell you that you can freeze beans. Sometimes I amaze myself.

Heavenly Homemaker's Club Members: Access your homepage and all your fantastic resources here! Not a member yet? Please join us!

Why Are There So Many People Now Who Can’t Tolerate Wheat?

February 20, 2015 by Laura 47 Comments

This post may contain affiliate links. For more information, please see our disclosure policy.

After reading my Do We Need to Be Eating So Much Bread post, a friend of mine sent me a link to this article called The Real Reason Wheat is Toxic. I found it to be a great read, especially because this is a question I’ve asked many times the past few years as more and more people are having to cut wheat out of their diets. Why?  Why is wheat, which has been consumed forever, suddenly giving so many people digestive trouble?

Read this and come back here to share your thoughts.

Wheat

If you can eat wheat and reading that article made you want to avoid conventionally grown grain forever and always, here are links to my favorite sources for chemical-free grain:

  • Azure Standard (If you have access to this co-op, you will love the savings and quality products.)
  • Amazon – I was glad to find this 37 pound box of chemical free hard white wheat (my fav).
  • If you live in a city, check stores specialty stores like Whole Foods or Natural Grocers.
  • If you live in a rural community, check with farmers around you to see if they grow chemical free wheat for you to purchase.

Grinding chemical-free wheat is easier than you think and incredibly tasty! Ever since we got a Nutrimill and began grinding our own wheat (and corn) – our whole grain breads and other baked goods are more delicious than ever. Here are all my posts on wheat and grain mills for your reading pleasure. :)

~~~~~~~~~~~~~~~~~~~~~~~~~~~~~~

I also wanted to be sure you saw that it’s a free shipping weekend at Tropical Traditions! Use the code 15223 at check-out. You might check out their Einkorn Grain as it is fantastic quality. Also worth noting is their Natural Soaps and their Coconut Creams are buy-one-get-one-free, which is great since you can also get free shipping. (These links are my referral links.)

Heavenly Homemaker's Club Members: Access your homepage and all your fantastic resources here! Not a member yet? Please join us!

How to Blanch and Freeze Broccoli

February 15, 2015 by Laura 17 Comments

This post may contain affiliate links. For more information, please see our disclosure policy.

There was this one day when I saw that I could order 20 pounds of broccoli for just $12.50 and we all know how much I love good deals on good produce. Then there was that other day I picked up my order and found that 20 pounds of broccoli filled a box big enough for my 10-year old to play in. This was also the day we had four basketball games and the day I wanted to make heart-shaped pancakes for my family because they might not have known how much I loved them unless I shaped their pancakes into hearts and also because it was Valentine’s Day. I  never bite off more than I can chew.

I also never can make nicely shaped heart pancakes, which is clearly another issue to tackle another day.

So there I was, flipping a triple batch of ugly heart pancakes on the griddle, packing lunches to take to our basketball games, and staring down 36 crowns of broccoli. I love relaxing Saturday mornings.

I started a pot of water boiling on the stove, flipped the pancakes, and started to chop broccoli. I almost (happy valentine’s day) slid the prepared broccoli into the pancake batter, but stopped myself just in time, took a deep breath, and got my camera because that’s how quickly my brain moves on to the next thing. I am a blogger, after all, which means that just at that moment I realized that I should probably document the project so as to share the broccoli blanching details with you.

Matt suggested I also take a picture of the heart pancakes and I was all, seriously? No one wants to see these. So instead you get to look at my pot of boiling water which mostly looks like I’m about to set my kitchen on fire. It’s just steam though, I think.

blanch broccoli 2

How to Blanch Broccoli

Step One:  Boil water. One might wonder at the fact that it takes an entire tutorial to explain this process. Don’t worry. The exciting part is yet to come.

blanch broccoli 1

Step Two:  Wash and cut your broccoli. (Told you it would get more exciting.)

blanch broccoli 3

Step Three:  Place cut broccoli into your pot of boiling water for 2-3 minutes. (This stops the aging process so your vegetables will maintain better nutritional value.)

blanch broccoli 4

Step Four:  Immediately remove broccoli from boiling water and run it under very cold water. (This stops the cooking process.)

Step Five:  Spread the cooled broccoli on a clean towel to dry. I didn’t get a picture of this. I was probably flipping ugly pancakes.

blanch broccoli 6

Label a freezer bag and fill the bag with blanched, cooled, and dried broccoli. Freeze for up to 6 months.

You can use your prepared broccoli for soups and stir fry. The work is done!

How to Blanch and Freeze Broccoli

If you have a trick for making nicely shaped heart pancakes – do tell. If you have any tasty broccoli recipes, I believe I’ve made it clear that I would benefit. And in case you’re wondering, I slept very well the night of the basketball/broccoli/ugly pancakes.

Heavenly Homemaker's Club Members: Access your homepage and all your fantastic resources here! Not a member yet? Please join us!

How To Care For Your Silicone Baking Mat

February 10, 2015 by Laura 15 Comments

This post may contain affiliate links. For more information, please see our disclosure policy.

A Safer Kitchen

Remember a couple weeks ago how we talked about using Silicone Baking Mats on your aluminum baking sheets to protect your food from being contaminated by aluminum? Upon seeing the pizza that I baked on my mat, several of you had this question:

Can you use a pizza cutter on the mat or wouldn’t that cut through and ruin the mat??

healthy cooking products 4

Ah yes. You are very smart. These silicone baking mats are high quality and very heavy duty. However, you do want to avoid cutting through them so you can continue using them again and again. After all, not only do these keep your food safe, they save you lots and lots of money since you can use it over and over forever.

How do these mats save you money? Well for years, I’ve been buying and using parchment paper to protect my food from my aluminum pans. I reuse my parchment paper a few times if possible, but over the years, I’ve gone through many a roll of parchment. These silicone mats are a one-time purchase, saving me from ever having to buy parchment again! I have two of the mats so I can bake two pans at once. :)

But back to caring for your silicone mat:

After I bake my food on my baking pan/mat, I simply slide the food off the mat and onto a serving tray. Then I cut the food as needed, keeping my mat out of the way so I don’t accidentally cut and ruin it. By the way, food slides very easily off these mats – another perk!

How about washing your silicone mat?

I simply give mine a good rinse with hot water or with a little bit of soapy water if needed. Then I lay it over my dish drain to dry. Easy!

I’m loving my silicone mats, both for food safety and how it saves me time in the kitchen! I appreciated that Karen left a comment last week stating the same thing:

I received my order of  two of these “Healthy Cooking Products” mats just yesterday based on your recommendation. Today I made cinnamon rolls and some cookies. These mats are wonders! Besides enabling baked goods to just slip off, these mats also produced a superior baking product. Instead of some of the good stuff seeping into the pan or parchment, it stayed on the bottom of the cinnamon rolls. Delicious! Thank you for this recommendation.

Hooray for a great way to save money and time!  And now I’m hungry for pizza. ;)

Heavenly Homemaker's Club Members: Access your homepage and all your fantastic resources here! Not a member yet? Please join us!

15 Delicious Dips for Your Super Bowl Party

January 30, 2015 by Laura 6 Comments

This post may contain affiliate links. For more information, please see our disclosure policy.

As is always the case this time of year, I have absolutely no idea who is playing in the Super Bowl. If it mattered to my husband it would matter to me. But it doesn’t, so it doesn’t. Make sense?

What does matter to me is the fun night of fellowship we will have at our friend’s house during the game. Matt and I actually do enjoy watching the occasional game of football. The big buffet of fun foods never hurt my feelings either. I’m all about the dips at a Super Bowl party. I have several I’m thinking of making to share. Here are some of our favorites:

15 Delicious Dip Recipes

Yum


Black Bean Salsa
 – Five healthy ingredients, it’s like a flavorful meal all by itself.

Cream Cheese Salsa Dip – This is the easiest dip on the planet (2 ingredients!) and everyone loves it.

Easy Veggie Dip – Oh my cucumbers. This is the very best way to enjoy raw veggies. It stirs together in about two minutes.

Healthier Cheese Dip (a Velveeta/Rotel Knock-Off) – Who needs “processed cheese product” when you can have the real deal?!

Hot Spinach and Artichoke Dip – Just like the kind you pay too much money for at a restaurant.

Nacho Cheese Pretzel Dip – Just do it. This is amazing.

Spicy Avocado Dip –  My family devours avocados when we quickly mix this up. Hello, healthy goodness.

Easy Cheesy Bean Dip – This also only includes five delicious ingredients. Easy and healthy – that’s how I roll.

Hamburber Sauerkraut Dip – Even if you don’t like kraut, you will love this. It is incredibly good.

Cream Cheese Fruit Dip – This is like whipped heaven in a bowl, perfect with apples and strawberries.

strawberry_dip_2

But there’s more! A big part of healthy snacking is healthy dipping. I love that dips can add nutrition as well as help us get the veggies down. In our newest eBook, 227 Healthy Snacks, we’ve included several new dip recipes like:

  • Super Easy Hummus
  • Green Chili Dip
  • Fresh and Quick Salsa
  • Spicy Sausage Chip Dip
  • Spicy Lentil Dip

227 Healthy Snacks

Not only will you find these 5 awesome new dip recipes, you’ll find 222 more healthy snack ideas and recipes too. From bars to muffins to hearty cookies to fruit and veggie snacks, you will be totally equipped with loads of healthy snacks to keep your and your family full and nourished! Get all the details about this book here.

227 Healthy Snacks 2

Grab your copy and start putting together these easy, healthy recipes!

227 Healthy Snacks
$7.95

Add to Cart

Heavenly Homemaker's Club Members: Access your homepage and all your fantastic resources here! Not a member yet? Please join us!

A Safer Kitchen ~ From Plastic to Glass

January 29, 2015 by Laura 14 Comments

This post may contain affiliate links. For more information, please see our disclosure policy.

We’ve talked the past two weeks about switching from Teflon to cast iron and stainless steel and switching from aluminum to safer bakeware.

Today, let’s talk about one of my favorites (right, like the others aren’t also my favorites too?). It’s just that this one involves jars and Pyrex. I super love jars, and with all the Pyrex I have in my kitchen now, it may look to an outsider that I have an addiction to glassware.  I won’t deny it.

A Safer Kitchen

Why do I love glass so much? Because hello, it’s pretty. And then there’s all the others stuff about it being much healthier and safer for us to use. You can read this post to learn more about why storing food in glass is safer than storing food in plastic.

It has taken me a few years to switch out all my plastic containers and replace them with glass. Beyond better health, I love that I can see through my containers to easily identify my leftovers in the fridge! Glass is very nice like that. :)

One of my favorite ways to store leftovers is in wide mouth jars. Wide mouth pints and quarts are my favorites, which I use with lids like these. (I don’t mind these lids being plastic as they don’t touch the food to cause harm.)

jars_for_leftovers

jars

And what about Pyrex?

I have two complete sets of this variety of bowls with lids. I love them so, so much.

pyrex bowls 2

See how perfect they are for prepping salads and fruits and veggies? These also double as mixing bowls, of course.

pyrex bowls in fridge2

The following set, with a mixture of rectangle and circle containers with lids is one of my favorites for storing leftovers. I love the variety of sizes, and of course, I love that they have lids to match. A glass container without a lid is really not very beneficial to me.

pyrex

Fruits and Veggies On the Go 2

Of course, I use the following oblong Pyrex dishes all the time for making and baking casseroles. I also use these to freeze extra casseroles for future meals on the fly.

pyrex 5

Without a doubt, I have found that having a wide variety of shapes and sizes of jars and Pyrex dishes with lids is key to efficiently storing food. I use larger containers when I’m preparing food ahead of time for us to pull out and eat. I use smaller containers for leftovers, shredded cheese, or veggie dips.

Switching over from plastic to glass has been a huge help in my kitchen in so many ways! I’ll end with a contented sigh as I think about my lovely glass container selection. Some girls love jewelry and flowers; I love jars and Pyrex. What can I say? 

What are your favorite ways to store leftovers?

This post contains affiliate links.

Heavenly Homemaker's Club Members: Access your homepage and all your fantastic resources here! Not a member yet? Please join us!

How I Prepared 2 Healthy Meals in 20 Minutes

January 28, 2015 by Laura 10 Comments

This post may contain affiliate links. For more information, please see our disclosure policy.

eathealthy

I dropped Malachi off at piano lessons at 10:00 this morning, arriving home at 10:05. I needed to leave again to pick him up at 10:25. That leaves 20 minutes. (That was your math lesson for the day. If only all story problems made that much sense. Who invented those anyway?)

Knowing my day was super full:  school and website work throughout the day; piano lessons for Malachi at 10; soccer for Matt, Asa, Justus, and Malachi at 2; grocery shopping for Elias and me at 2; someone coming by to pick up a co-op order at 3:30; friend coming over to study with Asa at 4; Bible study at 6:30 – and did I mention there’s a “ready to be assembled” shower in my living room  and plaster dust all over my house right now?? Well, I knew I needed to stay on top of meals if we were going to actually eat today.

I decided to see how much meal prep I could get done in my 20 minutes of time before picking Malachi up from lessons. See, I can’t just say, “Here’s how to put a nutritious meal together when you’re low on time.” No. I have to go into all the details about my schedule and give my opinions on math problems and tell you about the new toilet that promises to flush efficiently that’s still in the box but will soon be in my new bathroom but not until we get all the tile issues figured out. (That is a story problem in and of itself.)

So busy day, blah, blah, blah. Here’s how to put a nutritious meal together when you’re low on time:

2 Healthy Meals in 20 Minutes

Today I decided to make Easy Noodle Stir Fry for lunch and Taco Salad for dinner.

At 10:06 I started browning meat for the Taco Salad. While it was cooking I washed and cut carrots and broccoli, throwing it all into a pot with spinach for Stir Fry. (The asparagus I had planned to use up was slimy so I had to throw it out. I was very disappointed and apparently need to re-read this post somebody wrote recently about not wasting food.)

I gave the meat a stir from time to time. I answered a question about an English assignment, drank a few swigs of water, and threw some blueberries into my mouth for a snack. I put water in a pot to boil noodles at noon. I got out the noodles. I dumped mixed greens into a big bowl, poured in cheese I had shredded Monday, and tossed it all around with the freshly cooked taco meat. I mixed up French Dressing for the Taco Salad.

At 10:26 I ran out the door to pick up Malachi.

With all the major prep work done for our day’s meals, at lunch time all I had to do was turn on the stove to cook the prepared veggies and boil noodles. At dinner time all I had to do was get the prepared salad out of the fridge, dice some tomatoes (which I picked up at the store this afternoon on my grocery run), and get out the tortilla chip crumbs I’ve been saving for such a meal as this. I also cut up a pineapple to complete our evening meal. That took two minutes.

Now you tell me. Is it really so terribly time consuming to prepare healthy food? I think not.

What are some of your quick-to-prepare meals that pack a punch with nutrition? Have any great “prep-ahead” methods to share with us?

~~~~~~~~~~~~~~~~~~~~~~~~~~~~~~~~~~~~~~~~~~~~~~~~~~~~

Join the fun! Check out our amazing Simple Meals program!

This will save your money, save your energy, and give you back more time to spend with your family. You will love this!

728x90

Heavenly Homemaker's Club Members: Access your homepage and all your fantastic resources here! Not a member yet? Please join us!
« Previous Page
Next Page »

Join Our Community!

 Facebook Twitter E-mail Instagram Pinterest

Popular Posts

~ Will All of the Real Moms Please Stand Up?
~ Easy! Stir-and-Pour Whole Wheat Bread
~ How to Make Gatorade
~ 31 Real Food Breakfast Ideas
~ Dear Teenage Girls...
~ When Mom Takes a Step Back
~ The Inexpensive Health Insurance We Love!
~ Let's Talk Real Food Grocery Budgets

Check out our latest posts!

  • Big Family Food and Fun: May 3-9, 2026
  • Help Your Kids Become Independent in the Kitchen!
  • Big Family Food and Fun: April 26-May 2, 2026
  • Big Family Food and Fun: April 19-25, 2026
  • Big Family Food and Fun: April 12-18, 2026
Home  ~  Simple Meals  ~  Club Membership  ~  Shop  ~  Privacy Policy  ~  Disclosure  ~ Contact

Copyright © 2026 · Beautiful Pro Theme on Genesis Framework · WordPress · Log in