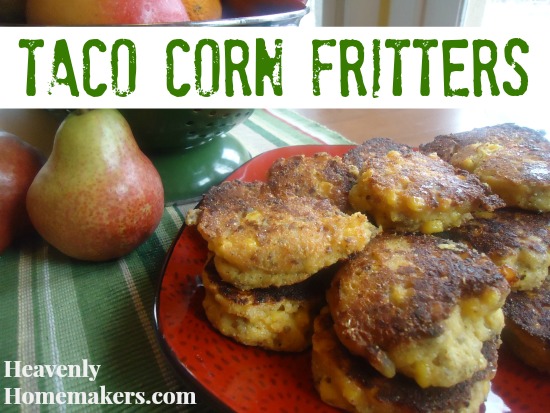
Heavenly Homemakers

Encouraging women in homemaking, healthy eating and parenting

  • Home
    • About
    • FAQs
  • Recipes
    • Bread and Breakfast
    • Condiments
    • Dairy
    • Main Dishes
    • Side Dishes and Snacks
    • Desserts
    • Gluten Free
    • Instant Pot
    • Crock Pot
    • Heavenly Homemaker’s Weekly Menus
  • Homemaking
    • Real Food Sources
  • Store
  • Contact
    • Advertise
    • Disclosure
    • Privacy Policy
  • Simple Meals
  • Club Members!

Taco Corn Fritters

April 3, 2011 by Laura 197 Comments

This post may contain affiliate links. For more information, please see our disclosure policy.

When Matt and I were at Whole Foods recently, we saw that they had some sort of Jalapeno-Corn fritter for sale on their hot bar. They looked SO GOOD, and while I didn’t figure our kids would appreciate the jalapenos, immediately my brain started thinking through how I could create something like this for a quick lunch that would be a little more kid-friendly. Feel free to add jalapenos to this recipe if you want. Just don’t touch your eye after messing with jalapenos. Or at least have milk handy if you do. But really…just don’t touch your eye.

Taco Corn Fritters

I kind of wanted an “all in one” meal, which is why I put taco meat in our fritters. Then, since it had taco meat, I figured it needed cheese. Those items are optional…but wow are they good! Of course though, I’m the girl who needs her beef. ;)

Taco Corn FrittersYum

1/2 pound cooked hamburger meat seasoned with taco seasoning mix (Many commercial taco seasonings contain gluten! I highly recommend making and using this wonderful homemade recipe!)
2 cups cornmeal
1 teaspoon baking powder
1/4 teaspoon sea salt
2 eggs
3/4 cup milk
1/4 cup honey
1/4 cup melted butter or coconut oil
3/4 cup shredded cheddar cheese
2 cups frozen or canned corn
oil for frying (I used palm shortening)

Brown hamburger meat and add  taco seasoning mix to taste. Mix together remaining ingredients, stirring in the seasoned meat. Melt palm shortening in a skillet. Scoop 1-2 Tablespoons of corn mixure into the hot oil and press down to form a “pattie”. Fry for 5-7 minutes on each side until cooked through. (I had my electric skillet set to 350°.)

The great thing about these Taco Corn Fritters is that they even taste good cold, which means they would make a great grab and go lunch or snack!!! I haven’t tried freezing these (because we eat them too quickly!), but I’m pretty sure you could make up a big batch and freeze them for “fast food”.

So would you put jalapenos in these, or not? How would your family like them best?!

Heavenly Homemaker's Club Members: Access your homepage and all your fantastic resources here! Not a member yet? Please join us!

Homemade (Healthier) Chocolate Milk

February 27, 2011 by Laura 75 Comments

This post may contain affiliate links. For more information, please see our disclosure policy.

I have not one, but two recipes to share with you today in regard to making a healthier variety of chocolate milk. If at all possible, I encourage you to stay away from commercial chocolate syrup, as it is full of high fructose corn syrup and corn syrup. (You can’t tell, but I’m making a “blechy” face right now and it isn’t pretty.)

This first recipe for Chocolate Syrup is from a friend of mine right here in town. {hi, Nancy!}  It’s the easiest recipe ever, making it a perfect solution for those of you who really want your chocolate syrup but want to avoid HFCS.

Homemade Chocolate SyrupYum

1 cup sucanat
1/2 cup cocoa
dash of sea salt
1 cup water
1 teaspoon vanilla extract

Mix sucanat, cocoa, sea salt and water in a medium sauce pan. Whisk ingredients together and cook on medium-high heat until the mixture begins to boil. Boil for one minute. Remove from heat. Allow mixture to cool for just a few minutes. Stir in vanilla extract.

Add Homemade Chocolate Syrup to your glass of milk to taste. Store syrup in the refrigerator.

If you look real close, you can see a reflection of me with my camera
in the round part of this cute little pour bottle.
Try to focus on the chocolate syrup. I wasn’t having a good hair day.

Homemade Chocolate Syrup

The boys have declared this Chocolate Syrup to be quite delicious.
It will be a special treat every once in a while at our house!

Now for recipe number two.  This is how I’ve been making chocolate milk for the past several years. (Makes you wonder why it took me so long to share this, huh? I have lots of excuses.)

Now don’t freak out or anything, but I often add a few raw, farm fresh eggs into the blender when I’m mixing these up. I don’t worry one bit about getting sick from raw eggs that come straight from my friend’s farm. Their chickens are allowed to roam free all day long and eat all the healthiest chicken feed and you know…bugs. Healthy chickens means healthy eggs, and we eat them free of fear. Raw eggs are great brain food.

Okay, this post is not about the safety of raw eggs. But I did just want to let you know that if you want to add farm fresh, free ranged eggs to this Quick Blender Chocolate Milk recipe, you’ll find that the nutrition level goes WAY up, as does the creamy-richness of this chocolate milk! (I really don’t recommend putting raw eggs into this – or into anything – if the eggs are not organic, free range, farm fresh eggs. Please do your own research about this to determine what you feel is safe.)

Quick Blender Chocolate Milk

6 cups of milk
3 Tablespoons cocoa
4 Tablespoons real grade b maple syrup (give or take, depending on your taste)
1/2 teaspoon vanilla extract

Put all ingredients into your blender and mix well.

Chocolate Milkshakes

Malachi LOVES the job of serving the Chocolate Milk out of our fun blender.

So there you go. Many of you were screaming for a healthier chocolate milk recipe, so now you have not one, but two to choose from!

And now, the Heavenly Homemakers Recipe Challenge continues. I’m in the process of figuring out a healthier Onion Soup Mix recipe and have played a little bit with Angel Food Cake. The Angel Food Cake I tried first completely sank and went from four inches tall to 2 inches tall. I’m still working on it. I guess that’s why this is called a “challenge”, huh? :)

Heavenly Homemaker's Club Members: Access your homepage and all your fantastic resources here! Not a member yet? Please join us!

Homemade Tater Tots

January 30, 2011 by Laura 62 Comments

This post may contain affiliate links. For more information, please see our disclosure policy.


If all of the recipes in the Heavenly Homemakers Recipe Challenge turn out to be this easy…I’ll whip through the list in no time. (But don’t get your hopes up.)

My first idea for and attempt at making Homemade Tater Tots turned out great. Then I tried them a second time…just to be sure. Even better. All six of us were so excited! These look like a tater tot, feel like a tater tot and well (if I do say so myself) taste better than a tater tot (funny thing about fresh potatoes and healthy oil).

My idea was to try the homemade hashbrown trick. Remember, I bake the potato, let it cool, shred it, then cook up the shredded potatoes into hashbrowns. SUCH a fabulous and easy way to make nice hashbrowns. And now…Tater Tots!!!!!!

Here’s how I did it…

Homemade Tater TotsYum

3-4 medium russett potatoes
Oil of choice (I used the very healthy and delicious Palm Shortening. I’d also recommend Expeller Pressed Coconut Oil because it’s flavorless yet healthy for frying.)  (You can read my research based opinions on healthy frying here.)
Sea Salt

First, scrub and bake your potatoes. Allow the potatoes to cool. Peel the potatoes (and save the skins to make Potato Skins as described in Katie’s Healthy Snacks to Go ebook!).

Chop the peeled and cooled potatoes and throw them in a food processor to shred finely. I’d recommend using the “pulse” setting if you have one. You don’t want your potatoes to turn to mush. Well, maybe you do, but I don’t. 

If you don’t have a food processor, you can always shred the potatoes
with a cheese grater…it’ll just take a bit longer.
And be careful to keep  your fingers away from the grater.
You don’t want fingers in your tater tots. Well, maybe you do, but I don’t.

Next, heat some oil in a skillet (medium heat). You  just need enough oil to barely cover the bottom of the skillet. You don’t want greasy tots. Well, maybe you do, but I don’t.

Use a small cookie scoop and pack in the shredded potatoes to make a nice firm ball. (If you don’t really pack it in, the potatoes will just fall apart when you place the ball in the skillet.)  Gently set the ball into the skillet. Allow it to cook thoroughly on one side before carefully turning it over. Press the ball down slightly when you turn it. Each side takes about 3-4 minutes to cook.

Remove tater tots once they look nice and crispy and golden brown. You don’t want blackened tater tots. Well, maybe you do, but I don’t. Sprinkle with desired amount of sea salt.

You should eat these right away because you don’t want cold tater tots. Well, (say it with me now) maybe you do, but I don’t.

If you can possibly keep your family out of them…we discovered that these freeze and reheat very well!! We used our toaster oven to reheat some leftover tater tots a day or two after I initially made them, just to test and see if these can be made ahead of time and YAY…it can be done!!

Just for fun, you may also want to check out the Homemade Tater Tot recipe at Finding Joy in my Kitchen. She came up with a different way of making tater tots that looks pretty tasty!

Overall, I’d say making Homemade Tater Tots is easy. Is it as easy as opening up a package and throwing the contents onto a cookie sheet? No. But it sure doesn’t take a lot of effort overall. And then, if you make several batches and freeze some…you’ve got easy, healthy tater tots ready to reheat for a quick side dish or snack!!

Okay…one recipe down…fourteen to go. Unless you count all the other ideas you challenged me with.

Now, go bake some potatoes so you can hurry up and make some tots. You don’t want to miss out on the delicious taste of fresh, Homemade Tater Tots.

Well, maybe you do, but I don’t.

Heavenly Homemaker's Club Members: Access your homepage and all your fantastic resources here! Not a member yet? Please join us!

Cheeseburger Macaroni (A Hamburger Helper Make-Over!)

January 26, 2011 by Laura 80 Comments

This post may contain affiliate links. For more information, please see our disclosure policy.

I’ve been meaning to share this recipe with you forever!!! It’s really become one of my favorites because it tastes so good and is SO easy to make. When I threw out the Heavenly Homemakers Recipe Challenge, a few of you mentioned Hamburger Helper make-overs. Isn’t there one that’s like a “Lasagna Skillet” or something like that?? You might want to try Lasagna Casserole as a very tasty alternative. And now…this Cheeseburger Macaroni!

Here’s the background information (that you may or may not care about) for my Cheeseburger Macaroni recipe:

Back in my good ol’ Coupon Queen days, I used to buy oodles of boxes of Hamburger Helper anytime they went on sale for 99¢ and I had a coupon to get them for less than that. Sometimes I’d have cabinets full of them that I’d found for just a few pennies each. I’d enjoy them for a quick and easy meal (and I’d drink a Pepsi or two with it, you can be sure).

My favorite variety of Hamburger Helper was Cheeseburger Macaroni. I LOVED it. I’d save it for special nights. Yes, special nights with Hamburger Helper, Cheeseburger Macaroni style. Wow.

Gone are the days of having a stockpile of Hamburger Helper (and my beloved Pepsi)…and I’ve gotta say that now that I’m used to eating more whole foods, the idea of either one makes me feel a little bit woozie in the tummy. But I still crave that hamburger-cheesy-noodly taste, you know?

So one day, I had some leftover taco meat and just for fun, I stirred it into the Creamy Mac and Cheese I was making for lunch. Wowza!!! My Cheeseburger Macaroni days were back…only better! Here’s how I make it:

Cheeseburger MacaroniYum

1 Pound (give or take) Ground Beef or Turkey
1 Tablespoon Taco Seasoning
1 Recipe of Creamy Mac and Cheese (pasta, milk, cheese)
Sea Salt to taste

The directions are super complicated…are you ready? Make the Creamy Mac and Cheese. Meanwhile, brown the meat. Once the meat is fully cooked, sprinkle in the taco seasoning. Stir the seasoned meat into the Creamy Mac and Cheese. Done.

If you feel like it, you can mix in about 4 ounces of cream cheese, 1/2 cup of sour cream, or 3/4 cup of tomato sauce…this recipe is very flexible. It’s super kid friendly, and very easy to throw together on a busy night.

Now, it’s been several years before I’ve made a “convenient” box of Hamburger Helper, but I’m going to venture to say that this healthier variety of Cheeseburger Macaroni doesn’t take any longer to fix than making a box of Hamburger Helper. How ’bout that?

Were you (are you?) a Hamburger Helper lover? If you currently are…is there anything more I can say that will help you stay away from the pretty little box?

P.S. I have a Tater Tot recipe almost ready to share with you!! :)

Heavenly Homemaker's Club Members: Access your homepage and all your fantastic resources here! Not a member yet? Please join us!

Whole Wheat Lemon Pound Cake

January 21, 2011 by Laura 46 Comments

This post may contain affiliate links. For more information, please see our disclosure policy.

healthy_celebrations_med

It’s been birthday week at our house, as our third son turned nine on Tuesday. We now have 13, 10, 9 and 6 year olds at our house (and two 37 year olds but never mind that). 

Birthday week means mom makes a special treat…usually a cake chosen by the birthday boy. I’ve tried to come up with healthier varieties of cakes and treats so that we’re not just consuming empty calories…even if it is a birthday. You can click through this entire section of Healthy Celebrations if you’re interested in finding other healthier varieties of treats I’ve shared in the past. I mean, Lemon Pound Cake is delicious, but sometimes you just need Chocolate. Or is that just me? Regardless, hopefully you’ll find something fun that will please your sweet tooth in our Healthy Celebrations section…and I plan to continue to add to this category as I continue to experiment. If you recall, White Cake and Angel Food Cake are both on the Heavenly Homemakers Recipe Challenge list!

For some reason, two of the last three birthdays celebrated at our house have included a Lemon Pound Cake. It has been fun to experiement with…although the first time I got a little bit carried away with the lemon juice. We were all pretty puckered up by the end of that cake. Whew! A little lemon goes a long way!

lemon_pound_cake

Lemon Pound CakeYum

1 cup butter, melted
1/2 cup sour cream or plain yogurt
1 1/4 cups sugar (I use sucanat and I’m pretty sure honey would work well in this recipe)
1/4 cup 100% lemon juice (from a bottle or from freshly squeezed lemons)
1 teaspoon vanilla extract
6 eggs
3 cups whole wheat flour
1 teaspoon baking powder

With beaters, whip butter, sour cream, sucanat, lemon juice and vanilla. Add eggs, one at a time beating well with each one, or until you get tired of adding eggs one at a time…then just crack them all in and beat well. (Sometimes I get so lazy about individual egg cracking…)  Beat in flour and baking powder until the batter is well mixed.

Pour cake batter into a well buttered cake pan (I use a fluted cake ring pan). Bake in a 325° oven for 50-65 minutes, or until a toothpick inserted in the middle of the cake comes out clean. Cool for at least 10 minutes before removing cake from pan and placing on a cake plate. Allow cake to cool completely before pouring Lemon Glaze over the top…

Lemon Glaze

1/2 cup 100% lemon juice  (if that’s too much lemon for ya, just cut the amount of juice down and substitute water)
1 cup powdered sugar (I recommend using unbleached organic powdered sugar or your own homemade powdered sugar from sucanat)

Use a fork (or a spoon or a whisk or whatever is clean at the moment) to mix the two ingredients. Drizzle the glaze over the cake. You can even use a toothpick to poke a few holes in the cake before you start to drizzle so that some of the glaze goes down into the cake!!

lemonpoundcake

So are you a lemon lover? Does lemon make you pucker? Have you ever been one of those parents who have given their baby a lemon wedge, just to see the face they make?

Heavenly Homemaker's Club Members: Access your homepage and all your fantastic resources here! Not a member yet? Please join us!

Whole Wheat Gingerbread Men

December 23, 2010 by Laura 123 Comments

This post may contain affiliate links. For more information, please see our disclosure policy.

Whole Wheat Gingerbread Men
It may be that I’ve gone a little loopy with all of the recent Christmas preparations, but for some reason I got really hung up on what I should call these cookies. Are they Gingerbread Men? Or are they Gingerbread Boys? But then, I didn’t want to leave out the girls…so maybe some of them should be called Gingerbread Girls. Or maybe I just go with the politically correct name and call them Gingerbread People?

When did Christmas baking become so complicated? :)

Gingerbread Men/Boys/Girls/People/CookiesYum

1/2 cup melted butter
1/2 cup sucanat
1/2 cup molasses
1 egg
1 Tablespoon vinegar
1 teaspoon baking powder
1 teaspoon ground ginger
1/2 teaspoon baking soda
1/2 teaspoon ground cinnamon
1/2 teaspoon ground cloves
2 1/2 cups whole wheat flour
Sucanat Powdered Sugar Frosting

Cream butter, sucanat and molasses together. Add eggs, vinegar, baking powder, ginger, baking soda and spices. Stir in flour and mix well. Cover and chill dough in the refrigerator for 2 hours (more is fine).

Roll out dough on a well floured surface to about 1/8 inch thickness. Use a cookie cutter to cut into desired shape. Bake cookies about 1 inch apart on a cookie sheet in a 375° oven for 5-8 minutes.

If you don’t put your cookies 1 inch apart on the pan, you’ll end up with one cookie kicking another cookie in the head. I tell ya, I can’t even get my cookies to behave sometimes. A mother’s work is never done…

I recommend spreading Sucanat Powdered Sugar Frosting on the cookies. I had a little bit of Chocolate Fudge Frosting leftover in the fridge and used that for faces and buttons.

I figured they wouldn’t mind if I put chocolate on their faces. I know I would never mind if someone wanted to put chocolate on my face. ;)

Heavenly Homemaker's Club Members: Access your homepage and all your fantastic resources here! Not a member yet? Please join us!

Vanilla Muffins with Cinnamon Crumb Topping

December 21, 2010 by Laura 227 Comments

This post may contain affiliate links. For more information, please see our disclosure policy.

I wanted something cinnamony for our Christmas Brunch (the invented word is pronounced:  sin-uh-money;  not to worry, cinnamony has nothing to do with sin or money, it’s all about the smell and taste of Christmas). I also wanted to use my homemade vanilla. So I played just a little bit and came up with Vanilla Muffins with Cinnamon Crumb Topping. I made mine with a mini muffin tin, but you can use a regular sized muffin tin instead if you prefer.

These muffins are very simple to throw together and will make your house smell just like Christmas while they’re baking. That’s because they’re cinnamony. :)

Vanilla Muffins Yum

1 1/2 cups whole wheat flour
1/2 cup sucanat (you can use brown sugar if you want)
1 teaspoon baking powder
1/2 teaspoon sea salt
1 egg
1 teaspoon vanilla extract
1/4 cup melted butter or coconut oil
3/4 cup milk

Cinnamon Crumb Topping

6 T. sucanat/rapadura (dehydrated cane sugar juice) or brown sugar
1 teaspoon ground cinnamon
2 T. butter, softened

Stir together flour, sucanat, baking powder and sea salt. Add egg, vanilla, butter and milk. Mix until ingredients are combined. Scoop into paper lined muffin tins. (24 mini muffins or 12 regular sized muffins)  Mix together Cinnamon Crumb Topping ingredients and sprinkle on top of each muffin. Bake in a 400° oven for 15 minutes (mini muffins) or 20 minutes (regular sized muffins).

Vanilla Muffins with Cinnamon Crumb Topping

These Vanilla Muffins with Cinnamon Crumb Topping go perfectly with Easy Breakfast Casserole. I also think the cinnamony-ness would taste great with Warm Vanilla Soother.

Up next during our Christmas Brunch:  a great giveaway from Tropical Traditions. Then, to add to our cinnamony pleasure…Gingerbread Cookies. Not only are they cinnamony…they’re gingerlicious. And full of molassessness.

You never knew our Christmas Brunch would be so full of new vocabulary words did you?

(Be sure to leave a comment again on this post for another chance to win one of our great Christmas Brunch Presents!)

Heavenly Homemaker's Club Members: Access your homepage and all your fantastic resources here! Not a member yet? Please join us!

Sucanat Powdered Sugar Frosting

December 20, 2010 by Laura 106 Comments

This post may contain affiliate links. For more information, please see our disclosure policy.

Let’s first do a quick sucanat/sugar review for those of you who are new to these ingredients:

Sucanat:  Organic dehydrated cane sugar juice – my favorite form of natural, unrefined sugar to use in cookies and cakes. Recently I learned that you can use sucanat to make your own powdered sugar. It’s very cool! You can substitute sucanat one for one when a recipe calls for brown or white sugar. Rapadura is the same thing as sucanat…just with a fancier name. Rapadura is usually a little more expensive.

White Sugar and Brown Sugar:  Refined sugars that have been stripped of most their nutrients. 

You can read more about natural sugars and sweeteners I recommend (and don’t recommend) here!

Well…I wish this frosting was a little less…tan. But, what can we expect when we make frosting from our homemade sucanat powdered sugar? The darkness of the sucanat is easily disguised in this Chocolate Fudge Frosting, but there’s no way to make “white frosting” unless you use regular  powdered sugar.

Oh, except that Baking Mama mentioned in my Cream Cheese Frosting post that you use honey granules to make powdered sugar, which makes an unrefined, but whiter frosting. I’ll have to look into honey granules.

I did find that this Sucanat Powdered Sugar Frosting worked great for Gingerbread Men. I’ll share a recipe for those fellas later! I think this frosting would also be good on just about any cake you make…it has a very rich flavor.

Sucanat Powdered Sugar FrostingYum

1/3 cup melted butter
1/4 cup milk
1 teaspoon vanilla extract
4-4 1/2 cups sucanat powdered sugar

Blend all ingredients together with beaters, adding your sucanat powdered sugar a bit at a time until your frosting is the consistency you would like it to be.

Be sure to check out our other recipes using Sucanat Powdered Sugar: 

  • Healthier Caramel Frosting
  • Chocolate Fudge Frosting

I hope you’re having a lovely time at our brunch. If you haven’t had a piece of Easy Breakfast Casserole, go ahead and help yourself. Be sure to leave a comment for a chance to win one of our Christmas Brunch Presents! Coming up next on the menu:  It’s Gratituesday time…which will hopefully offer you a little Christmas Brunch encouragment during this busy time of the year!

Heavenly Homemaker's Club Members: Access your homepage and all your fantastic resources here! Not a member yet? Please join us!

Easy Breakfast Casserole

December 19, 2010 by Laura 320 Comments

This post may contain affiliate links. For more information, please see our disclosure policy.

I used to think that making a Breakfast Casserole was a big deal, difficult, complicated and tricky. It seems that the recipes I found called for ingredients I never had and they always overwhelmed me.

One day a few weeks ago, I had an abundance of eggs and a few leftover ingredients from other meals so I decided to experiment. What do you know? You can build an egg casserole with just about anything. Quickly. Inexpensively. Without difficulty. I am very excited.

Here’s the beauty of this recipe:  You can build your breakfast casserole however you want.  This recipe has a few “base ingredients”, then you stir in whatever “add ins” you want…then you top it with cheese…then you bake it. It doesn’t get much easier than that! (And did I mention that this recipe is naturally Gluten Free?!)

Care to take a peek at how easy it is to put together this casserole? Here’s a quick video my son helped me make!

Easy Breakfast CasseroleYum

5.0 from 1 reviews
Easy Breakfast Casserole
 
Save Print
Author: Laura
Serves: 6-8
Ingredients
  • 8 eggs
  • ½ cup heavy cream
  • ¼ teaspoon sea salt
  • 1 cup shredded cheese (I use white cheddar, but you can use whatever cheese you want!)
Instructions
  1. Begin your casserole by whisking together the eggs, cream and salt.
  2. Pour the ingredients into a 9x13 inch casserole dish.
  3. Sprinkle in any "add in" ingredients you wish.
  4. Stir them around with a fork.
  5. Top casserole with cheese.
  6. Bake in a 350° oven for 30-40 minutes, or until the middle doesn't jiggle.
3.4.3177

Add In options:

Cooked sausage (I have a wonderful recipe for turkey sausage here.)
Chopped ham
Chopped and cooked bacon
Leftover baked potatoes, cut into chunks or shredded into hashbrowns
Sauteed veggies

Add anywhere from 1/2 cup to 2 cups of any of these “add ins”. You can use a different sized casserole dish, you’ll just need to adjust the bake time. The thicker your casserole, the longer it will take to bake.

breakfast_casserole[1]

Want to make this ahead of time and freeze it? I do it all the time, making for a super easy breakfast!

Prepare the casserole as directed, then freeze unbaked. Place frozen casserole in the fridge overnight. Bake the following morning as directed, adding a few additional minutes if necessary.

Join Simple Meals!

728x90

Want all the work of menu planning to be done for you? We invite you to subscribe to Simple Meals! We equip you – every single week – to put great money and time saving meals on the table – every single night!

Heavenly Homemaker's Club Members: Access your homepage and all your fantastic resources here! Not a member yet? Please join us!

Cream Cheese Frosting

December 13, 2010 by Laura 18 Comments

This post may contain affiliate links. For more information, please see our disclosure policy.

healthy_celebrations_med

I’ve had several requests for a good frosting to use for decorating sugar cookies. I’ve worked on a “sucanat powdered sugar frosting” and will share the recipe in a few days. Obviously that frosting is going to be a bit on the brown side and is probably not quite what you’re looking for in a Christmas cookie frosting (unless you’re frosting Gingerbread Men).

Today I have two Cream Cheese Frosting recipes to share with you. One uses unbleached organic powdered sugar, which has no nutritional value, but at least it’s not bleached or filled with pesticides. It is very much a compromise food, but we’re talking about Cream Cheese Frosting here. At Christmas time. Don’t go crazy, but if you’re gonna frost some sugar cookies anyway, you’ve gotta make sure you really enjoy the taste of the splurge!

The second recipe I’ll share uses honey or real maple syrup for sweetener. This frosting doesn’t work as well on cookies…it’s fluffier and better on cakes. BUT, since it uses honey or maple syrup, it’s one step healthier than the unbleached organic powdered sugar variety.

Powdered Sugar Cream Cheese FrostingYum

1/2 cup butter, softened
8 ounces cream cheese, softened
4 1/2 cups unbleached organic powdered sugar
1/2 teaspoon vanilla extract

Whip butter and cream cheese with beaters until fluffy. Add vanilla and powdered sugar and beat until mixed thoroughly.

Fluffy Cream Cheese Frosting

1 cup heavy whipping cream
8 ounces cream cheese, softened
1/4- 1/3 cup honey or real grade B maple syrup (depending on your taste) OR 30 drops liquid stevia
1/2 teaspoon vanilla extract

Whip cream with a mixer until soft peaks form. In a separate bowl, mix cream cheese, honey and vanilla until creamy. Fold cream cheese mixture into whipped cream.

You can make your own cream cheese very easily! I do prefer store bought cream cheese in these recipes however as the homemade cream cheese is cultured and therefore a little too sour for my taste in these frosting recipes.

I will admit right  here and now that if something has cream cheese in it, I have a hard time staying out of it. I CAN NOT make either of these frostings very often because I love them too much. Are you a cream cheese lover  like I am?

Heavenly Homemaker's Club Members: Access your homepage and all your fantastic resources here! Not a member yet? Please join us!
« Previous Page
Next Page »

Join Our Community!

 Facebook Twitter E-mail Instagram Pinterest

Popular Posts

~ Will All of the Real Moms Please Stand Up?
~ Easy! Stir-and-Pour Whole Wheat Bread
~ How to Make Gatorade
~ 31 Real Food Breakfast Ideas
~ Dear Teenage Girls...
~ When Mom Takes a Step Back
~ The Inexpensive Health Insurance We Love!
~ Let's Talk Real Food Grocery Budgets

Check out our latest posts!

  • Big Family Food and Fun: May 31-June 6, 2026
  • Big Family Food and Fun: May 24-30, 2026
  • Free 7-Day Summer Menu Plan
  • Big Family Food and Fun: May 17-23, 2026
  • Easy Side Dishes for Summer
Home  ~  Simple Meals  ~  Club Membership  ~  Shop  ~  Privacy Policy  ~  Disclosure  ~ Contact

Copyright © 2026 · Beautiful Pro Theme on Genesis Framework · WordPress · Log in