Before you try to make this Whole Wheat Pita Bread recipe, here is what you need to know: Pita Bread is EASY to make!
That’s it. That’s all you need to know.
Know why I’m telling you that? Because as I was researching different recipes and trying to figure out the best way to make pita bread – every recipe seemed sooo difficult. I felt like ducking out on my Funky Fresh Challenge committment this week because, really? Did I have time and energy to make such a complicated recipe? And did I really want to share a complicated recipe with you? Why no, I did not.
So, because I just couldn’t help myself – I took short cuts and figured out how to make this recipe easy. And guess what? It worked. There is no reason to make cooking so complicated. Goodness. As if trying to keep my desk cleaned off isn’t difficult enough.
I should also note that these pita pockets tasted so good that we couldn’t get over it. I will definitely be making these again and again. Especially since they are so easy! And I know that they will freeze well, and will be a wonderful item to have in the freezer to pull out for quick meals!
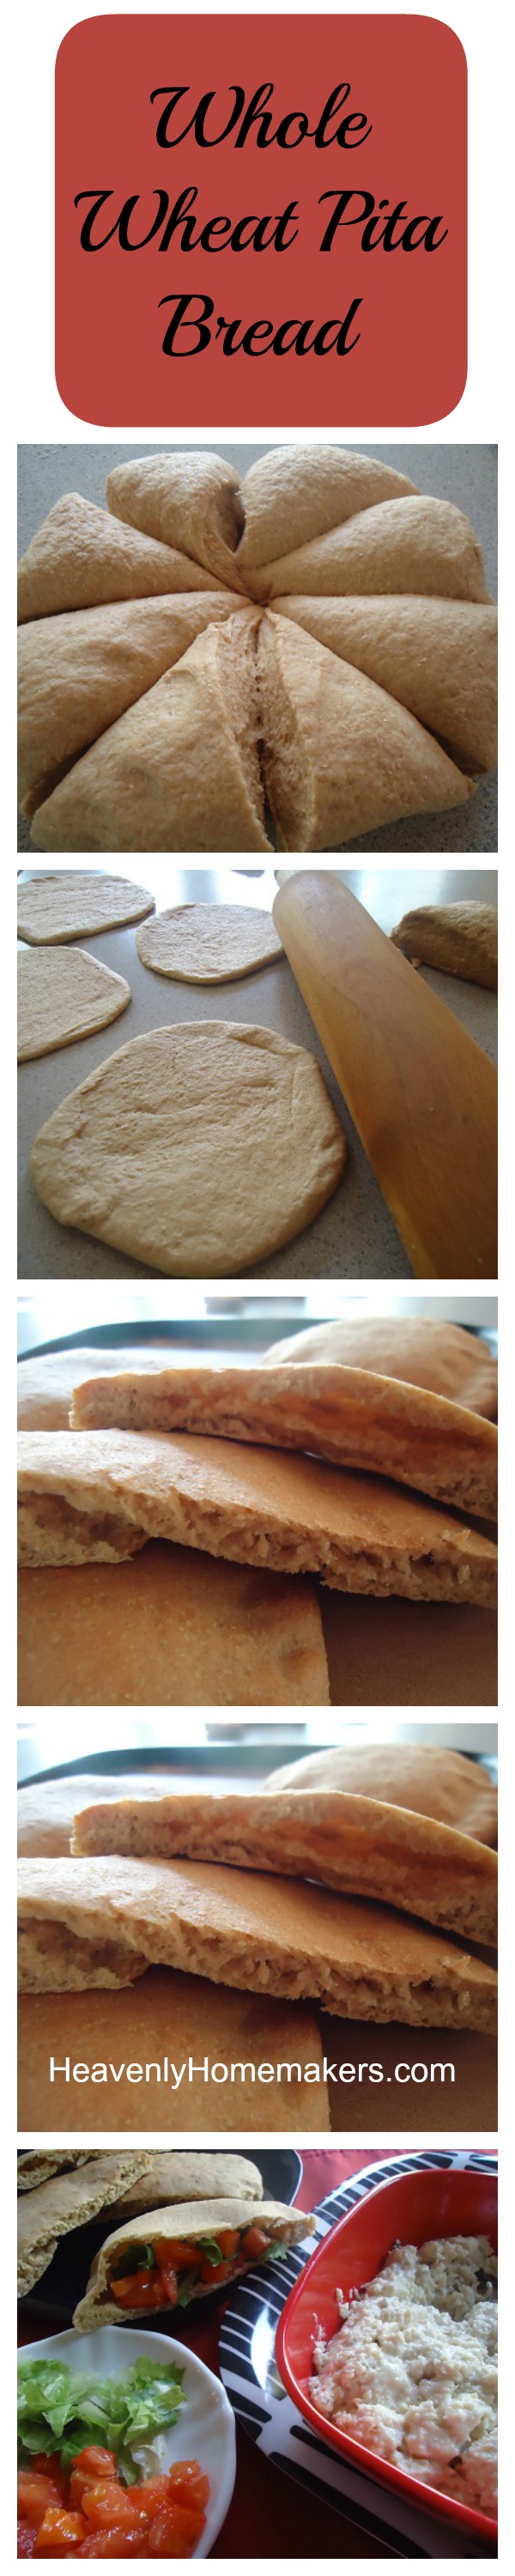
Whole Wheat Pita Bread
- 3 cups whole wheat flour (I use freshly ground whole wheat from hard white wheat)
- 1½ teaspoons yeast
- 1 teaspoon sea salt
- 2 Tablespoons honey
- 1 Tablespoon olive oil
- 1 cup warm water
- Stir together flour, yeast, and sea salt.
- Add honey, oil, and water, stirring until a nice dough forms.
- Knead the dough on a well floured surface for 4-5 minutes. (In other words: Mix dry ingredients. Add liquid ingredients. Stir well. Knead.) See? Easy.
- Place dough back into the bowl, cover, and allow dough to rest and rise for about an hour.
- Pull dough out of the bowl.
- Knead for about 30 seconds.
- Cut dough into eight equal parts.
- Roll each into a circle, about six or seven inches in diameter.
- Place circles directly onto a baking sheet after rolling.
- I baked mine on a well seasoned baking stone, so didn't find that I needed to grease my pan, but feel free to grease yours if you need to.
- Allow the dough circles to rest/rise on the baking sheet while you heat your oven to 500°.
- Place baking sheet of pita circles into hot oven.
- Bake for 5-8 minutes - just long enough for them to puff up and brown slightly.
- Allow pitas to cool, slice in half, and serve as desired.


I made Chicken Salad for ours. So delicious!

Don’t ever let anyone tell you making pita bread is hard. And how much do these cost in the store, anyway? I’m pretty sure making these is huge money saver (not to mention they are surely much healthier).

these look soooo good! thanks for the recipe!
fun! Think I might try to make these.
Wow that does look easy. I will have to try this. I have a chicken salad recipe I make but I just buy the sandwich thin buns to put it on. This will be even better. I made 6 quarts from your homemade apple pie filling recipe today. Its was so good.
It does look easy! We will have to try making these.
Oh, I’m so glad you posted this…Can’t wait to try your pita recipe…
So happy to try it!
thanks for the recipe, we love pitas at our house
We like the homemade pitas. We found they got crumbly after a day or two, I’ll have to pull out my recipe to compare, but you probably don’t have to deal with leftovers…
Those look absolutely delicious! Thanks so much for the recipe! I love how we all benefit from your challenges…we get something accomplished and then are rewarded by you with great recipes! Thanks!
My kids love pita bread so we’ll have to try this….and try grain grinding again in the blendtec
I’m going to have to try these. They look fun and easy!
I am going to try these! I have tried 2 new recipes This week!
We did coconut flour crackers! Very good!
I’m planning on doing some baking today, I will try
these look delicious! I’ve made pita bread before, but not 100% whole wheat.
My “try something new” was grilled zucchini. I’ve eaten a lot of zucchini this summer, but never grilled. So I sliced what I think is our last zucchini and grilled it with olive oil, salt, and pepper. It was tasty! I will do that again. It would probably be great with hummus and pita…
Those pitas look so good. We used to make them but havent in a couple years. Your post has resparked my interest in pitas.
Thanks
I made pita last week tp go with a lamb roast. Dh made lamb curry the next day and we called it naan for that meal.
This week I made baked pumpkin donuts. Not that bad – the family loves them… me, not so much!
I tried whole wheat cake donuts this week.Turned out to be great,..Kids and hub could not tell the difference apart.
Those look delicious!!!!
Your pita will puff better if you slide them onto a pre-heated stone.
Amber,
That is what I was wondering. I was told never to place the stone in a hot oven but to pre-heat it so it won’t break.
It depends on your stone. I have a pampered chef stone which does not require pre heating. Just follow the directions for your stone :)
Yes, it depends on the stone. Traditionally pita is baked on a hearth oven. The radient heat from the hot surface causes the dough to rise very quickly (before the yeast dies).
These look so good! I wish I could eat them right now!
I tried juicing without a juicer… and it worked! I linked to it above. Thanks for the inspiration you always provide.
I wonder if there is any way to make these without the yeast. Probably not, but I am going to put some thought into it. I tried letting my 10 yr old daughter make the fried rice w/o much direction from me and hers came out better then mine. :)
We love pitas and make them year round. Only in the summer, we cook them on the grill so I don’t have to heat up my house…our West Texas summers couldn’t take a 500* oven. It would make inside as hot as outside.
Wow, those pitas look good! I will have to try that recipe soon. I was industrious this week and tried a whole bunch of new things. I started a sourdough starter this past Saturday and made some fresh bread from it this morning. I made my own sausage using your recipe and mixed it into some breakfast burritos with homemade tortillas from your tortilla cookbook, made your peanut butter pancake recipe and froze them for easy breakfasts, and started using coconut oil in my recipes. We are just starting our healthy whole foods journey and are loving it. My husband and kids are raving about the food and devouring it and I feel so much better and am starting to enjoy cooking again. Thank you so much for sharing your knowledge and time with us!
I am going to try these this weekend. I recently made crackers for the first time and it was so easy! Don’t know why I hadn’t tried before.
YUMMY!!! I can’t wait to try these … I’ve been watching for your recipe since early this morning ;)
Thank you Laura! I have been looking forward to this. Question: do you use a very light touch as you roll the dough? When I gave up on pita a few years ago, my trial and error proved that using a rolling pin smashed the dough so much that it would not puff well. Maybe your recipe is just better though! :) I’m looking forward to trying this.
I didn’t know my oven could get that hot. This may not be a good recipe for summers. But it may help out in the winter.
I had no idea pita bread was so easy to make!!
I’m making this as soon as my grain mill gets here.
YAY! YAY! YAY! I am so excited about your pita recipe!!!!! :) When you posted earlier this week about giving the recipe out I was stoked and now I am doing the happy dance! We have just started using a lot of pitas, and my kids love them!!!! :) So thank you, thank you, thank you for this lovely, easy recipe!!!!
Oh. my. goodness. I’ve just ground a million pounds of wheat to bake into bread. (Actually it was somewhere between 5 and 10, just seems like a million) I’ve got rye bread rising and am starting the batch of wheat soon, and need to get our Friday night pizza crust going. I wonder, can I add this in there too? Because this looks GOOD and EASY. Thank you!
I made pita bread a few years ago and it was difficult and extremely sticky…I have been wanting to try it again in a WW variety, thank you for posting, I will definitely be trying this sometime this month.
This sounds good. I just bought your cookbook deal yesterday for all the healthy recipes. I am getting ready to start a real food program myself. The main difference from what you do is that only sprouted wheat can be used. But you use it one for one by measurement so I ought to be able to do your recipes with the sprouted wheat. I was wondering if you have ever tried sprouted wheat? Thanks for your continues inspirations.
Can’t wait to try this recipe!
Thank you, thank you! Can’t wait to make these. Even the healthiest ones in the store have cal. propionate (sp?) in them and aren’t good for you.
I tried making squash ravioli a couple days ago and finally got around to trying it. It was tasty, but I think next time I will roll out the dough thinner because my ravioli pasta was very thick. If only I had a pasta maker! But, it was great and works well for busy days because I can freeze it and boil them in about 5 minutes.
Thank you for the recipe. Been wanting to make pitas but was not worth the effort and time with the recipes I’ve seen. This is definitely doable. Thank you!
Yum! Definitely need to try this!
I love pita’s and these look so good, thanks Laura for inspiring me to eat healthier and tastier foods!
I’ve started up my sourdough again because my husband has to eat a low GI diet, so does this work with sourdough? He would LOVE to be able to have pita sandwiches a few days a week.
I’ve tried pita bread before and it was hard and they didn’t turn out so well. I’ll try again! Em
I look forward to trying this recipe! Thanks, Laura. They will be a great addition to our school lunches! Plenty of good fats and calories for my kids’ growing brains!:)
I tried your homemade noodles recipe in your chicken noodle soup recipe. Don’t know why I’ve never made homemade noodles before, they were so delicious, simple, and easy!!!
These look really nice. Have you tried or do you know of a nice GF version? I have food allergies in our house and wheat is a big one. But for travel foods on trips and such these would be super easy to make.
No, I’m sorry I have no idea how to make a GF version. Have you tried an online search to see what you could come up with?
Here is an awsome website for some. She has a lot of great stuff!
Even a yeast free pita bread.
http://glutenfreeonashoestring.com/shameless-pita-bares-all/
I love it..
I have the recipe rising in the microwave.
simply boil one coffee cup of water , quickly put the bowl of bread to rise inside , set timer for 60 min .
ALSO add a T or more of oil to bowl, roll bread around before rising .
Yum ..
thanks SO much for the easy recipe .
I have tried twice to make pita bread before. It did not “puff up” either time. I’m hoping this recipe means the third time’s the charm! :)
I’ve wanted to try pita bread before but it always seemed intimidating. Thanks for sharing this recipe.
Those look soooo good!
yummy! can’t wait to give it a shot
Thanks for the recipe! This looks great!
Laura, Yuuuum to your pictures. Thanks! I’ll be doing these pronto.
Love homemade pita bread! I’ve been making it for a while now…so easy:
http://turn2thesimple.blogspot.com/2011/09/pita-bread.html
I’ve even been in a hurry and didn’t let it rise for an hour and it still worked!
I never knew you could make pita bread homemade!!I have to try this!
These look great. I am sure they would make great pita chips, too!
I’ve always been scared to make pita bread, can’t wait to try these. It’s on my list!!
Can’t wait to try these!
Thanks for making this look easy. I tried to make them once and there were good, but putsy. And didn’t get the pocket very well. This sounds totally doable!
This is something I will definitely make. You made it sound so easy!! I Zipped it into ZipList!!
I’m glad they turned out for you!
I tried your recipe for whole wheat crackers today. I used garlic salt instead of the reg. salt, added a couple Tbsp. of Parmesan cheese, and
some fresh snipped rosemary. I sprinkled the crackers with sea salt before baking, too. They turned out great!
Her cheese crackers are yummy also! :)
We are definately trying these – we, too, grind our own wheat – so am happy to hear they work well with freshly ground wheat. Always looking for a cheaper, healthier, organic substitute for store bought breads.
ooooooh! YUM! I can’t wait to try these! … just need that chicken salad recipe now!
I wanna make these!:). Thanks!
My new try for this week is trying to make a German jam my Oma made. I finally found the quetsche plums to begin making the jam. We loved this so much growing up that when she was able to include some in the packages she sent, we would call it black gold…it was that precious to us. I think I’ve got the recipe down and now I can pass on these memories for my own children.
YUM! Chicken salad in pita bread!
Looks so yummy and easy to make. Thanks!
Hmm very interesting! I’m curious of the flavor, and how to incorporate more! I will definitely give it a try sometime!
Thanks for inspiring me!
TIP!!! If you let your stone preheat on the bottom rack of the oven while you’re rolling out your pitas, you’ll get a pretty good pocket almost every time. This will work equally well with good old fashioned cookie sheet:) You’ll flip your pitas after about 2 minutes though and only let them cook for about a total of 3-4 minutes. DOESN’T TAKE LONG!!! I love it! I’ll have to give this recipe a whirl…we make gyros pretty regularly around here..YUM!
I tried your recipe tonight for gyros. I made a few minor changes based on my experience of making pitas before. After the dough rose, I pinched the dough into 8 balls and placed them on a lightly floured plate, covered ’em back up and let them rise for about 10 more minutes while I preheated my cookie sheet on the bottom rack of the oven at 450. Then after rolling, I baked them on the bottom rack just until they puffed up like little balloons, then flipped ’em and baked about 1 minute more. Beautiful huge pockets! So delicious! Your recipe cuts out about 2 hours of rising time that my original tried and true requires:) Thanks again for another winner!
Great post! Sounds easy enough!
I am definitely trying this recipe. Thanks for sharing. Just made some deliciously roasted okra and sweet potato fries. Yum!
Now I definitely have to try these.
Looks like these are next. We made te leap and completely switched to organic whole wheat flour. Right now we are using flour from a hard red wheat. I don’t have a mill (yet) and the only organic brand available in my small town is that kind. So far we’ve made waffles, bread, cookies and a new thing for us, TORTILLAS, with this flour. We have learned that the food IN and ON these things is what should be giving it the flavor. I can’t believe how much sugar is in store bought breads! We can tell the difference for sure. :)
Salt as well. We looked at bread this week that has 900mg of salt. Loaves of heart disease and diabetic.
Thank you! I made these tonight and I am so excited to pull them out of the oven! Yummy.
Thank you! I made these tonight and I am so excited to pull them out of the oven! Yummy.
Can’t wait to try this recipe.
These look so good! Do the liquid ingredients need to be at a certain temperature? Is there any need to proof the yeast?
I can’t wait to try this.
WAHOO! I’ve been checking out pita recipes and they DO all seem too complicated. This sounds perfect. Thank you!!
Thanks for the recipe. I was going to buy some at the store today, but I forgot. This does look easy :)
I will be trying these!
” As if trying to keep my desk cleaned off isn’t difficult enough.”
I love you, I love you, I love you!!!! I’m going to read your while site just for saying that. My hero!!
And the recipe looks delish! We always eat our pitas warm, because the vacuum-packed storebought ones don’t taste like anything when they’re cold. These ones might be yummie though!
I can’t wait to try this!! This will be great to send for lunches!!
am definitely trying these
Thank you so much for taking the time to perfect this recipe. I can’t wait to try it! My kids aren’t big bread eaters, but do like sandwiches, so thank you!
Pitas and hummus (made with organic chick peas and organic tahini no less!) is a favorite lunch here. Can’t wait to try these. I tried making my own once and it was so labour intensive I gave up. Can’t wait to try again.
Made these last night and packed them with pizza toppings. everyone loved! Just make sure they really puff up, or you will not be able to make it a pocket.
Thanks for the recipe….next on my list to try.
I can’t wait to make these! Especially with chicken salad. Sounds too good to be true!
So glad you posted this recipe! I’ve been looking for a pita bread recipe but I won’t be looking anymore!
These look easy enough, even for me! I have loved all your recipes that I’ve tried so far. You rock!
I made these today. For some reason my dough was kind of dry and stiff. I added a little more warm water but they still didn’t look at light as yours. Some of them didn’t form a bubble in the oven before they turned brown.
Thanks for sharing the recipe. I think that I will start mine in my bread machine on the dough setting.
This recipe looks good–I will have to try it. I didn’t get to make mayonnaise but I am trying an oven roasted tomato sauce and a new pizza dough recipe.
I made these today. WE will be having them for lunch tomorrow. Very excited to try them.
Today I made my own pizza dough and mozzarella cheese! I had already made pesto and tomato sauce so we had a make-your-own pizza night that was pretty amazing!
I tried the pigs in a blanket recipe on here, and they turned out really yummy!! I have one son who does not like hot dogs, so I made a few with just cheese in the middle. They were a hit! Can’t wait to try this pita bread recipe.
Wow! Did not know pita bread was so easy to make! Can’t wait to try it-plus the store stuff is always so dry, this looks so much fresher!
Didn’t even think about being able to make it,but I am excited. It is on my bucket list for the week. Thank you!!
These do look great, sending recipe to my daughter to make….as I probably will not….she is in to the wheat products, I am not so much…..maybe later :)
Yum, I will definitely be trying these! Looks like they would freeze well too, for easy & quick lunches! :)
Thank you so much for sharing this. In the kitchen now making it.
Tried to make these and they were a total flop! :( They were very tough to roll out and didn’t poof in the oven at all, I had to throw them away, they were like hockey pucks :(
Love all your other recipes though!! :)
Sometimes, homemade pita bread does that. The best thing to do is to grab a brown paper bag, put your pitas in it as soon as you pull them out of the oven, and let them steam in the bag for several minutes. They WILL soften up.
These were great! The dough also worked great to make some mini pizzas in the oven. I just let the dough sit for about 30 to rise some and then rolled the dough out and put about two pizzas per cookie sheet. I cooked them for about 15 minutes at 450 and everyone loved them. This was really fast and great since I work full time and have two little kids and a husband to feed :)
I have been trying to eat more coconut, so I remade my favorite cookies into a coconut chocolate chip cookie! It turned out better using coconut oil instead of butter, a big plus!
How would I soak these?
Looks absolutely delicious! Chicken salad is always great in pitas!
Can’t wait to try these. And the chicken salad! Yummy!
About how many pitas does this make?
One recipe makes 8 round pita breads, which cut in half makes 16 pockets. :)
Made these this morning. The dough was wonderful, but when I baked them…500 for 5 minutes they burned and so I lowered the stove to 400 for 5 minutes. They didn’t pocket, but they will be good for personal pan pizzas. : ) I’ll try again, maybe they will pocket next time. : )
Try 500 degrees at 3 minutes, no more, no less…Any longer than 3 minutes and they will burn. If you put it to 400 though, they won’t poof.
tried once half turned out, was a while ago will try again, looks so easy.
I made these last week and my family loved them! I used the chicken quesadilla filling recipe you have to go in them and they were delicious. Next week I am planning on using the new chicken salad recipe you posted today. Thanks so much for being a blessing to our family with all of your recipe posts and encouraging blogs. I am praying for you and your family today! Have a great weekend Laura! :)
This is the first time that I am commenting about a recipe. I made these last week and this was the easiest bread recipe. They puffed up well and bake really fast. Will surely make them again. Thanks.
So I think I’m rolling-impaired. Do you have any tips for getting it to roll into nice pretty circles? I started with a ball and tried to roll from the center out, evenly all the way around. Mine look more like pumpkins! But I guess that’s ok for this time of year! :-)
Hello Katie. Could you roll, turn dough a little, roll, turn dough a little? I’m going to try this recipe
I can try that next time! Thanks! This recipe turned out great for me, even with my misshapes!
Just saw this recipe mentioned of=n a friend’s facebook. She linked to the recipe…sounds delicious. We are making homemade hummus for school this week, so homemade pita is a perfect fit. Sounds easy enough for little helpers-if you know what I mean!
Hi Laura!
First of all, I wanted to say you are my favorite food blog! I love everything I’ve tried and am so happy I found you about 1 year ago. I wanted to ask a question about the pita pockets. I just tried to make them and I followed the recipe exactly. But, they did not puff at all. I know my yeast is good because I also made my regular bread earlier today and it was fine. They also didn’t rise before I split them in 8 equal pieces. We’re still going to eat them. They’ll just be like thick tortillas. :-) I want to try again but was wondering if you had any suggestions. I might try adding more yeast next time, just to see. Thanks again.
Julie–mom to almost 7 JBZ’s
Hmmm, I am not sure why that would be. Laura does use fresh ground wheat so it is possible that the texture is different, making hers easier to rise…
We’ve made this recipe twice. Both times, I get less than 10% puffing. But our family loves the “flat” bread anyway. Not sure what the problem is, but I’ll keep making the recipe…..
Hey love your blog and all your healthy choices:-) Tried this and it was flat a well:-( Next time I think I’ll put yeast, warm water, sugar and let out rise and than mix all together. Won’t try it out right away cause I made to batches today. Kathleen or Julie you could try that or pizza is good with these:-) Mom of go four boys.
SO much better than store bought pita bread!
Waiting for Laura to respond before I make this…and my daughter wanted to try it too….she is all about eating healthy and I want her to be happy with this recipe when she trys it… so Laura can you please get back with us and let us know why the ones who made it , their’s did not rise like your’s did ? Thanks
Couldn’t wait did a third batch mixing yeast, warm water, and honey let you know how it tureens out rising s as we speak. My were flat manage to cut in half for pita somehow amazing! Hope the next batch turns out looking like hers.
I really don’t know why some would rise and some would remain flat. I’m still pretty new at making pitas too! (How’s that for not at all helpful?) ;)
Maybe it has to do with the type of yeast they bought? Rapid rise vs normal active?
I think the reason people are having a hard time with this is that there is not
enough yeast in the recipe. I’m going to double the yeast, then try the recipe. Sounds great!
I’m also going to use coconut oil. Thanks!
Thanks Kali,
Did you use the same flour Laura uses ? I noticed she uses whole wheat flour ( from freshly ground whole wheat from hard white wheat ) this could make a difference…..haven’t seen any of that in my area…she must order it somewhere, and I wonder does she ground it herself or buy it that way ???? Maybe she will respond and let us know….
Keep us posted on your third batch you’re making :)
Sorry for the delay. My inbox is overloaded with questions and I have a huge struggle keeping up. Thanks for your patience!
Hey Mona, I just went back and read her flour as well wondering if that does make a difference. I don’t know what my is called my dad gives it to me? Hers looks more white though. They rose a bit more soaking it but not as many pocket like as hers. Supper yummy though. Like I did make a chicken Caesar pita with first batch and it was amazing! Thinking it might be her wheat I’ll have to check that out will be hard to buy when I get it for free.
That sound really good!
I made these today using 1/2 whole wheat and 1/2 unbleached all purpose; they were a HUGE success. My fifteen year old daughter does not like pita pockets, so she cautiously tried one, and the next thing I knew, I was ‘hiding’ them so they could be used for our pulled pork sandwiches. When she suggested I stop buying bread from the store and just make up batches of the pockets, I knew I had struck gold, since it is my goal for 2013 to get away from the store-bought breads. Thank you so much!!!!!!!!!!!!!
Made these this morning for lunch! So quick and so easy….and SO yummy! Wow! So excited to be able to make my own pita bread!
Just tried this recipe but instead i switched the type of flour but thanks so much I have my catering exam in a few days and this recipe is perfect, it tasted delicious and it was so easy ;D thanks :)
I made another batch! They are SO good! The husband gave rave reviews…and he’s a no wheat flour ever kind of a guy. We stuffed them with Greek tacos and feta cheese! They are just perfect. I also thought about stuffing them with a Runza filling instead of making the traditional Runza.
Someone was asking why some did not rise. My first batch I divided the dough into 10 parts instead of 8 and I noticed the ones that I really squished flat when i rolled them out towards the edges did not rise around the edges. Maybe because of unevenness? My 2nd batch rose great and they are perfect (I stuck to the 8 parts). I also used regular whole wheat flour from the store. We get the brand that says Montana in it. Also, after mine puff up, they do de-puff after a bit. When we heat them for serving, we just pop them in a toaster oven and they puff up again.
i just started milling our grains. im trying different recipes and this one was a keeper. as a family of 8 we all loved this pita bread.our kids 12,11,9,8,5,and 3 all loved it and they wanted more im goign to have to try a double batch. glad i have a double oven. this recipe was easy and delicous
Omg! I made these for the first time in my life!!! Awesome. I adjusted the recipe like one of the people that left comments. I used half wheat/half all purp flour. Let it rise in warm spot and baked at 450(i know my oven would burn them at 500. Pockets are beautiful! Thx so much.
I made these with white flour (I know! but I’m out of wheat and at least it’s preservative free :) ) and they puffed up great. One of my eight did some weird stuff though, and the part that didn’t puff up was rolled a good bit thinner than the rest of it. Maybe you have to not roll them out too thin? Anyway, these are super yummy and were ready faster than a whole loaf of bread would be. Thanks so much for the recipe!
I made these and they were so good. However, I noticed that only a couple of mine puffed up fully and were the only ones we could use as true “pockets.” Did I do something wrong???
I don’t think so. Mine don’t all puff up like they are supposed to either. :)
How does your pizza stone hold up to being put into such a hot oven? I always preheat the oven with the stone in, I have had one break on me after being put in a hot oven right from the countertop.
I’ve never had any trouble, but you may feel more comfortable using a metal pan. :)
Thank you for the recipe! I’m a disaster in the kitchen, and even I could make them. They’re wonderful! Not sure the best way to store these though?
I freeze mine in one layer on a cookie sheet then put them in a ziplock bag. Just put one in the toaster for a few seconds to thaw and soften it. You don’t want to toast it to it will be crunchy
I have made these a few times. I have found that they puff better if my stone is hot. I also move my oven rack to the second highest position. It seems like putting them closer to the heat source helps them puff better. I just finished a batched, and they all puffed, though the one with little finger prints in the dough came out a little wonky :)
I don’t usually leave replies for recipes I try, but I am so impressed with this one! This recipe is so stinking easy, and the product is fantastic! These are infinitely superior to store bought pitas, not to mention extremely cost-effective and more nutritious. Thank you very much for sharing! I will be making these again and again.
Should i use Rapid yeast or Active yeast instant yeast?
I use active rise, but I think either one would work!
Thanks for sharing. I love to see recipes that can be put. in. simple. terms. Usually I am a last minute whats for dinner if I am busy but always love it to be homemade. I am going to make and stuff with grilled chx from last night and a black bean black rice aspargus from the garden bleu cheese oil red bell pepper tomato salad leftovers. yum will post an outcome. thanks again for the blog….JG
Okay, I did a google search on how to make these, and you know how about a million recipes come up? Then you need to weed through, and it is frustrating, right?
Not today, because “Heavenly Homemakers” came up as one of the hits, and I looked no further. I not only love your recipes, I love the sheer entertainment of them. So even if they weren’t awesome just-what-I-was-looking-for recipes, I’d check them out because I feel happy when I read your posts. :)
That is all.
I made these and they are incredible! Thank you so much for sharing. :)
I had to add a lot more water but they turned out great! Will make them again. Thanks for the recipe.
Fabulous recipe…used these to make Gyros. Yum!! Mine didn’t all puff up, but I was able to slice them in half and then use my long serrated bread knife to separate the bread and make the pockets. Will definitely be making these again!!
Laura, Wow. I cannot cook, I cannot bake, so deciding to attempt making Pita Bread seemed rather silly. You said “Pita Bread is EASY to make!” That, I interpreted as “So, Pita Bread is actually really difficult to make and I am wasting my time…” I rushed off to attempt your recipe, if only to prove, yet again, that I cannot bake, and here is the problem….The Pita Bread was so delicious that the first batch I made, did not make it into the fridge. I am not crazy about wholewheat Pita so there is never the temptation to over-indulge and no way I would eat them on their own…Now I have to control my intake. Thank you.
Maria
Ha, love this!
Success! We love them! Except I accidentally burned the last few…
I just made these because my husband and I will be traveling tomorrow and I wanted to take a healthy lunch along. This was the first time I used freshly ground hard white wheat flour and these turned out amazing!! Thanks for the awesome recipe! :)
Also, I had no problems with mine not puffing up-only one didn’t puff up very well but I was able to just cut an opening in it for the pocket. :)
I made these again last night to take with some soup to some friends who just adopted from Bulgaria! Yes…they are that good. I was concerned about my PC stone breaking, since it’s heat safe to 450. So, at 450, I baked them for a little over 5 min. They all puffed! And, I found the smaller ones puffed better than the larger ones. I do think a key to puffing up is to not roll them super flat and keep em more around the 5-6 in. range. I rolled mine to about 1/4 high. (P.S. My friends thought they were great! :)
Do you think I could soak the flour with the water, oil and some ACV overnight and still use this recipe?
Hmm, I’m not sure about soaking it (plus off the top of my head, I’m not sure what ACV stands for!). :0
Delicious! I’ve been making these weekly now for the past three weeks. I used two cups whole wheat and one cup white because I wanted them a little less heavy. I only have a countertop toaster/broiler oven. First couple times I tried, only the first one would puff. But through experimenting I figured that if I let the oven reheat for three minutes between each, the bread will puff. Great with any filling and also as pizza! I just tried it with a healthy chicken salad with yogurt and tahini… Amazing. Thanks for this recipe. It’s definitely a keeper!
Thank you so much for this recipe. I spent a lot of time in Cyprus several years ago and pita bread became a staple in my diet. When I turned to clean eating the ingredients in whole wheat pitas made my head swim! I try to make these every 2 weeks but I make 12 rather than 8. I live alone, so I freeze about 2/3 of them and just pop one in the toaster when needed. Just a few seconds thaws and softens it perfectly. I fill it with chopped tomatoes, cucumbers,shredded Romain lettuce and grilled meat…chicken, pork or lamb with a dollop of home made yogurt and it transports me to the beach in Cyprus.
hi
is that 500 Celsius or Fahrenheit ?
Fahrenheit. :)
thanks :)
A suggestion for puffing problems I saw for a different pita recipe is to turn the uncooked pitas over JUST before placing them in the preheated oven.
Instead of a rolling pin, I used my cast iron tortilla press. It was quick and easy and my young daughter was able to help make them. Thanks for the recipe!
Just finished making these for tonight’s chicken gyros and hummus! Used half white and half wheat flour and kneaded it all in my Kitchenaid Mixer with the dough hook. Simple and came out perfectly. Thank you!
would love emails from your site
Oh my gosh. I came home from a busy weekend and made these in between laundry changing the kitty litter and putting groceries away. They came out perfect! I even made some homemade hummus to go with them. Yummy!
I am about to put them in the oven now! So easy! I would love someone’s hummus recipe. I haven’t been able to make it taste as good as store bought.
When I’ve made these I end up with a very thick bottom layer and a very thin flimsy top… Sometimes they don’t puff up at all. Lol Can someone please tell me where I’ve gone wrong?
Mine do that sometimes too. The best I can figure is that they maybe need a little more rising time?
The trick is to flip over the breads right before you put them in the oven. I roll them out, let them sit for 10 min., flip them over when I put them on the pans. Try it!
Can I use whole wheat mflour? How long should I let it set before placing it in the oven? Can I reduce the salt? Thank you!
Yes, whole wheat flour is great in this recipe. Let them sit on the pan the whole time your oven is warming to 500. Reducing the salt will work just fine!
Made these tonight and am definitely pleased with the result. I think I just need to roll them out a bit more as they were pretty thick compared to a normal store bought pita. Will be making garlic hummus tomorrow to enjoy these with.
These look easy and I’m plannin on tryin…but does anyone know how to make pita chips out of these? We love pita chips and would like to be able to know exactly everything that’s in them :)
Just finished making these and they are still steaming. They puffed up nicely and the one I could not resist eating right off the hot baking pan was DELICIOUS. Thanks for a recipe I’m sure to keep and use again!
thank you, thank you!! This is exactly what I was looking for (easy, and uses freshly ground wheat!)
Oh, thank you! I just made these with my 4-year-old while the two little ones napped. So easy! So good! My husband will be impressed. We’re having them with beef kefta meatballs and a cucumber-yogurt raita.
These turned out awesome. Had some with tuna salad and hummus. Mmm Thanks so much!
Pita chips are just cut the cooked pita rounds like a pie to make triangles. Lay triangles on a cookie sheet and bake at 350 for oh say 10 min or so, flip them over and oh 5 minutes more? Done!
I’ve made these in the past am am making them again right now. Thank you so much for sharing. These are my go to recipe!