Heavenly Homemakers

Encouraging women in homemaking, healthy eating and parenting

  • Home
    • About
    • FAQs
  • Recipes
    • Bread and Breakfast
    • Condiments
    • Dairy
    • Main Dishes
    • Side Dishes and Snacks
    • Desserts
    • Gluten Free
    • Instant Pot
    • Crock Pot
    • Heavenly Homemaker’s Weekly Menus
  • Homemaking
    • Real Food Sources
  • Store
  • Contact
    • Advertise
    • Disclosure
    • Privacy Policy
  • Simple Meals
  • Club Members!

How to Finish Your Homemade Vanilla Extract

July 10, 2014 by Laura 93 Comments

This post may contain affiliate links. For more information, please see our disclosure policy.

How To Finish Your Vanilla Extract

I’ve talked about making Homemade Vanilla Extract just a little tiny bit on this site. You’ve seen:

  • How to Make Homemade Vanilla
  • Where to Buy Vanilla Beans
  • Where to buy Cute Labels for Your Homemade Vanilla Bottles
  • What to Make with your Vanilla Extract
  • WHY You Should Use Homemade Vanilla Extract.

Just in case you need MORE reasons to make your own Vanilla Extract, here’s a post about All the Nasty Stuff Found in Most Commercial Vanilla Extracts.

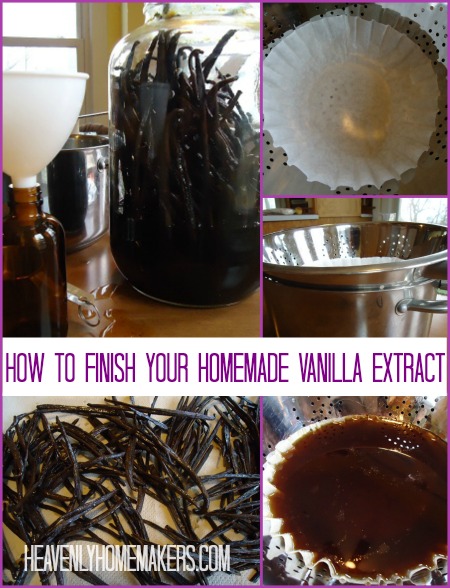
But for some reason, I never shared with you how to finish off and bottle your homemade vanilla extract. Sometimes I forget important details, such as the names of my children and telling you how to finish off your homemade vanilla. What’s his name – my youngest son – helped me bottle some vanilla last week and we took pictures. Finally. (Malachi…his name is Malachi.)

Once your vanilla beans  have been sitting in the vodka (or other alcohol of choice) for 4-6 months, it’s strong and ready to be bottled. Begin by lining a colander with a coffee filter or thin tea towel.

Place lined colander in a pot to catch the vanilla. If you don’t, you will have excellent quality homemade vanilla extract running down all over your kitchen table and floors. Your kitchen will smell great for months, but that will only be a long, sad reminder of the wasted vanilla. Put the colander in a pot.

Pour contents of your jar into the colander so that the coffee filter can strain all of the tiny vanilla specks out. The vanilla specks won’t hurt anything, but it’s nice to have speck-less vanilla extract.

Use a funnel to bottle up the strained vanilla. I have found amber bottles (recommended) Mountain Rose Herbs.

I, also, love these pretty labels! They are customizable, and there are several designs to choose from!

Lay your used vanilla beans on a cookie sheet lined with paper towels to dry. You can then put them into a container of sugar for 4-6 months which will turn that sugar into Vanilla Sugar!

Finally, FINALLY I have shown you how to finish up your vanilla. And now, if I can figure out how to call my children by the correct names without running down the list of all four boys before I get to the right one, I’d be all set.

This post was originally published November 28, 2010.

Heavenly Homemaker's Club Members: Access your homepage and all your fantastic resources here! Not a member yet? Please join us!

Hello From Church Camp!

July 9, 2014 by Laura 11 Comments

This post may contain affiliate links. For more information, please see our disclosure policy.

It’s been almost humorous how difficult it’s been to get online while I’m out at church camp with my family! I’ve been too busy to write anyway, but shucks, I’ve missed hanging out here with you. :)

Would you believe the one other time I finally got internet access, my laptop started acting up? I almost cried, but that seemed silly. So I took a nap. I needed that more than anything. (I’m on a borrowed laptop right now. Internet is slow, but it’s working…at the moment. I’m typing quickly so as to hopefully not lose my chance to touch base with you.)

Matt and I have been helping in the kitchen this week, assisting the amazing head cook as we feed around 140 people three meals a day. It has been so much fun – and super exhausting too. I am shocked that so many of my muscles ache from standing all day, lifting heavy pans, and in general working harder physically than I have in a long time. I feel rather wimpy, but I hear I’m normal – at least when it comes to having achy back/legs/arms/feet/shoulders when cooking all day a camp. Kudos to those of you who do this type of work all the time. 

It’s possible that I’m also a little bit sore from playing a game of Ultimate Soccer with all the campers a few nights ago. I’m proud of my bruises, and I still officially stink at kicking a soccer ball – but it sure was a load of fun. I thought you might like to know that while I completely whiffed the ball (missed it entirely. twice. while everyone was watching), and wasn’t fast enough to get to the ball many times over (but who’s counting?), I actually scored a goal for my team. You may have heard me scream with excitement. I think my boys were proud…and very shocked. Heh.

Speaking of soccer, you know Matt must be dedicated to serving this week at camp since this meant he missed being able to watch the semi-final World Cup games. We did look up the game scores on our phones. Dude!! What happened to Brasil? 

Well, that is the end of my scattered thoughts for the evening. Yay for finding a working computer and an hour of online access – at the same time. Hopefully I’ll be able to check in with you over the weekend.

Now you tell me about what you’ve been up to this week. I may not be able to get to a computer much, but I can read your comments through the email on my phone. I’ll welcome the fun breaks to read about what you’ve been doing!


Heavenly Homemaker's Club Members: Access your homepage and all your fantastic resources here! Not a member yet? Please join us!

How to Warm Up Food Without a Microwave

July 8, 2014 by Laura 158 Comments

This post may contain affiliate links. For more information, please see our disclosure policy.

Our family stopped using a microwave about six years ago when we began our healthy eating journey. We still have a microwave, because it is a permanent fixture above my stove and would be a pain to take down. Guests do use it occasionally, which means that I should probably actually clean it every once in a while. But in general, I’ve pretty much forgotten that it exists.

Why do we not use a microwave?

I’d like to write an entire post about why you may want to consider avoiding the use of a microwave oven. But I’m not a girl who uses big words or who can write informative sentences about the dangers of microwaves, imparting knowledge like, “The apparent additional energy exhibited by the luminescent bacteria was merely an extra confirmation.” Shoot, not only can I not write a sentence like that, I can’t even read one and come away feeling like I have an actual working brain in my head. Therefore, if you’d like to read all the big words and reasons for avoiding a microwave, I encourage you to check out all of the helpful information in this article.

Otherwise, in Laura’s simple and non-big-word language:  We don’t use a microwave because we think that it makes our food yucky.

The question I receive often then is:  How do you warm up leftovers if you don’t have a microwave?

Easy. I warm up our food on either the stove-top, in our oven, or in our toaster oven.

Pardon the fairly ugly picture, but really, how cute can leftovers in a saucepan actually be?! ;)

I usually add just a shot of water to the saucepan with our leftovers to keep the food from sticking. I have also found that it is a good idea to keep the heat at a medium setting and to stir often. If I’m rewarming Creamy Mac and Cheese or something else milk based, instead of adding a shot of water, I will add a shot of milk, which keeps the food creamy!

To warm up Pizza, Taco Corn Fritters, Popcorn Chicken, or Burritos and such, I’ll use our oven or toaster oven. We LOVE our toaster oven! We pop the food in, put it on “toast” or “bake” depending on what we want, walk away and do something else for a few minutes, then our food is perfect.

toaster oven

While a microwave might take one minute to warm up your food, I’d say the stovetop takes about two minutes. A toaster oven might take five. Those few extra minutes really don’t hurt my feelings very much. It’s not so hard to wait. My food tastes better rewarmed this way, plus I don’t have to worry about it losing it’s nutritional quality. Those are a few extra minutes well spent.

What are your thoughts about using a microwave? How do you warm up leftovers?

This post was originally published February 28, 2012.

Heavenly Homemaker's Club Members: Access your homepage and all your fantastic resources here! Not a member yet? Please join us!

How to Grind Flour in a Grain Mill

July 6, 2014 by Laura 56 Comments

This post may contain affiliate links. For more information, please see our disclosure policy.

Wanna see how easy it is to
grind wheat into flour in a Nutrimill?
——————————————-

I’ve talked about how I love freshly ground flour and about how I love my nutrimill. You’ve all helped me share about great sources for organic or chemical free grains. I’ve even written a letter to your husbands trying to convince them that getting you a grain mill is a fabulous idea.

But I’ve never taken the time to show you how a grain mill works. Is it hard to run? Does it take a lot of time? Do you work up a sweat using it?

The answer to all three questions is a definite no!

So many people have mentioned to me things like “I don’t know how you have time to grind your own flour. I barely have time to cook, much less make the flour for my baked goods.”

You’re welcome to continue to think that because I grind my own flour, I am a modern day wonder woman. Or, you can watch this video clip and learn the truth…

Did you see that? I put in the wheat, turned on the machine…and then I walked away and made lunch and did some dishes. Then I came back and had freshly ground flour. It doesn’t get any easier than that. And wow, this flour tastes more delicious than any you’ve ever had (in my opinion)!

How to Grind Flour in a Grain Mill! #grainmill #grindflour #wholewheatflour

Check out the wonderful Nutrimill here!

This post was originally published June 1, 2010.

Heavenly Homemaker's Club Members: Access your homepage and all your fantastic resources here! Not a member yet? Please join us!

Lasagna Casserole…On the Stovetop

July 6, 2014 by Laura 19 Comments

This post may contain affiliate links. For more information, please see our disclosure policy.

I mentioned here that I’m trying to avoid the oven during these hot summer days. Later this week, I’ll be making Lasagna Casserole, which is one of our family’s favorite recipes (and one of mine because it’s so easy).

Cook Your Casserole on the Stovetop

Yum

But, I don’t want to bake it in the oven right now. It’s just too hot.

For recipes like this, I “bake” them on the stove top. Just follow the recipe as normal, but then leave it in the pot on the stove. Sprinkle cheese over the top and put the lid on. Let it sit and simmer for a few minutes until the cheese is all melty all over the place, then serve.

This method also works for Cheesy Beef and Rice and Pizza Casserole – and probably a bunch of other casserole recipes you have that are all pre-cooked and then baked for a few minutes.

This summer, skip the oven. Use the stovetop. Unless of course you like sweating profusely and passing out. I’ll use my oven when I absolutely have to. In the meantime, when I can, I’ll stick to my stove-top.

This post was originally published on June 29, 2009.

Heavenly Homemaker's Club Members: Access your homepage and all your fantastic resources here! Not a member yet? Please join us!

Orange Creamsicle Recipe

July 4, 2014 by Laura 4 Comments

This post may contain affiliate links. For more information, please see our disclosure policy.

Did you like the Strawberry Creamsicle recipe I shared? How about an Orange Creamsicle recipe to add some variety? For that matter, you can sub just about any fruit you like to make creamsicles. Such a refreshing treat!

It’s worth your small investment to get a box of small 3-ounce cups and a package of popsicle sticks. These truly are so easy to make and everyone at my house loves them!

Make them with a little maple syrup, or with stevia if your family likes it. (Stevia is an herb that is naturally sweet – not artificial, not a sugar – perfect! However, if you use too much, it can have a bitter aftertaste. You have to get used to how much to use to make it sweet enough without overusing it!)

Orange Creamsicle Recipe

Orange Creamsicle Recipe
 
Save Print
Author: Laura
Serves: 12
Ingredients
  • 2 cups whole milk
  • ½ cup orange juice concentrate
  • 1 Tablespoon real maple syrup (or about 10 drops liquid stevia)
  • 1 teaspoon vanilla extract
Instructions
  1. Blend all ingredients in a food processor or blender until smooth and creamy.
  2. Pour mixture into popsicle molds or 3-ounce cups.
  3. If using 3-ounce cups, place a popsicle stick into the middle of each after these have been in the freezer for about 30 minutes.
  4. Freeze for about 2 hours before serving. Makes about 12 small creamsicles.
3.4.3177


Orange Creamsicles


Other variations:

Use a mixture of berries (like raspberries, blueberries, and strawberries) for these. Use different varieties of 100% juice – any of your favorites. Use whipping cream instead of milk to make them even more rich and creamy. Make them in popsicle molds instead of with cups and popsicle sticks.

What else can you think of to make these delicious?

Heavenly Homemaker's Club Members: Access your homepage and all your fantastic resources here! Not a member yet? Please join us!

How I Will Blog and Be Away From Home At the Same Time

July 4, 2014 by Laura 9 Comments

This post may contain affiliate links. For more information, please see our disclosure policy.

During the next two and a half weeks, I will be making a quick trip for the 4th of July, then I’ll be out at our church camp with my family. There is wireless internet at the camp, so we’ll be packing up the laptop to keep up with work as we can.

nyc

However, internet can be a little tricky there. Plus, I plan to spend time with campers and other staff while I’m there instead of working on my computer for several hours each day like I try to do at home.

Here’s what you can expect here during the next two and a half weeks:

  • New posts now and then.  I’ll try to check in here when I can, because two weeks is a long time to be gone and I’ll just miss you all too much if I stay away that whole time.
  • Gratituesday as normal – hopefully. At the very least, I hope to get online to share how God is working in my life and to praise Him with you on Gratituesday. If my schedule at camp just doesn’t allow this, or if the internet doesn’t cooperate, we’ll all just be grateful on our own. :)
  • Older posts re-posted each day.  To date, I have written 3,650 posts for this website. I bet there are a few you’ve missed here and there, eh? I’ve picked out some that I think will benefit you to read (or re-read), and scheduled them to pop up throughout the next two weeks. It’ll be a fun blast from the past!

How can you pray for me?

Oh hey, thanks for asking. :)  This summer has been great so far, and also very, very full. I’m a little tired already as I head into these weeks away from home. I’d love prayer for energy. But mostly, I need prayer to be fully surrendered to letting God work. I want the people I’m with to see Jesus shining through me, not myself shining through me. I struggle with this. But God is biggest, and He has already won the victory over this battle in my life. How very gracious of Him to continue working this out in me.

I’ll be praying for you too.

You are all an important part of my life, and I appreciate you. I want you to know that I pray for you, and will continue to pray while I am away. Thank you for being a blessing in my life!

Heavenly Homemaker's Club Members: Access your homepage and all your fantastic resources here! Not a member yet? Please join us!

NuNaturals Stevia Package Giveaway – Open Worldwide!

July 3, 2014 by Laura 319 Comments

This post may contain affiliate links. For more information, please see our disclosure policy.

Rarely am I able to offer giveaways to readers outside the U.S. I’m super excited that NuNaturals is making it possible that any of you can win one of these packages!

We’ve had some nice chats around here recently about stevia. I’ve concluded that my family will continue to enjoy stevia as a healthy sweetener option from time to time.

NuStevia Cocoa Syrup

If you’ve tried stevia and found it to be bitter, it could be one of two things:  You could be using too much, or you might not have found a brand that tastes good. NuNaturals is the first brand of stevia I found that tasted good to me. But even with NuNaturals, a little goes a long way. That’s the beauty though. A bottle of stevia lasts a long time, because we need just a few drops to sweeten an entire blender full of smoothie, milkshake, or other treat.

I’m excited that NuNaturals has put together a pretty sweet (ha, get it?) prize package for this giveaway.

NuStevia 50 Packets Top Angle

Four different winners will each receive:

  • 1 bottle of Vanilla Stevia Liquid
  • 1 bottle of Lemon Flavor Stevia Liquid
  • A 50 packet box of our NuStevia White Stevia Powder Packets
  • 1 bottle their new cocoa syrup
  • A FREE BONUS PRODUCT!

Leave a comment on this post for a chance to win.  For an additional entry, like NuNaturals on Facebook, then leave an additional comment here. I’ll draw four random winners on Wednesday, July 9. Be watching for a post stating the winners as you will be responsible for contacting me if your name is chosen.

Want a discount at the NuNaturals website? Use the code BLG1214 to receive a 15% discount on your entire order. This discount remains effective until December 31, 2014. You’ll also receive free shipping in the continental U.S. on orders over $35 (after discount).


Heavenly Homemaker's Club Members: Access your homepage and all your fantastic resources here! Not a member yet? Please join us!

Breaking Free of Sugar Addiction — Should We Be Eating Stevia?

July 1, 2014 by Laura 50 Comments

This post may contain affiliate links. For more information, please see our disclosure policy.

For every positive piece of information we can find about a product, we can typically find a negative piece of information to go along with it:  Butter is bad. Butter is good. We all need to drink milk. We should all stay away from dairy products. Eat only organics. Organics don’t matter. Eat brown rice. Brown rice may be a source of toxic arsenic.

Pardon me while I go bang my head against the wall. (Although I read once that doing so may not be good for my health.)

Because there is so much conflicting information out there, my conviction is to stick with eating a balanced variety of food that is food. Food that has been around forever. Food that provides needed nutrients to keep me healthy and strong. Meat, fruits, vegetables, whole grains, whole dairy, eggs, nuts, beans…my body needs them all.

Breaking Free of Sugar Addiction

But then there’s sugar.

Should we be eating sugar? And if so, in what form? Artificial sweeteners are not real – which is, in fact, the reason they are called artificial – so we should not be putting them into our bodies. White sugar is completely empty. High fructose corn syrup is highly processed and toxic. So instead, shouldn’t we stick with sugar in its whole form: honey, real maple syrup, dehydrated cane sugar (sucanat)?

Yes, if you’re going to eat sugar, that’s my recommendation. Those are real. Our bodies recognize them and utilize them. But here’s the bigger “thing,” along with my confession to you:

Sugar – in any form – whether it is all natural, whole, or straight out of a bee hive – is still sugar.  Our bodies handle these better than processed white sugar and high fructose corn syrup, for sure. But don’t think that since you’re eating cake made from sucanat you can go ahead and eat half the cake. You’ll still get sugar overload.

I know this. I’ve lived this.

I’ve been addicted to sugar my whole life. I hate to think how much sugar I’ve put into my body. When people tell me, sheepishly, how much they love sugar and have a hard time giving it up, I so totally get it. I’ve been right there with you, loving sugar, eating too much sugar, sneaking extra bites of sugar-filled goodies – all in the name of “I’m eating healthier treats so this can’t possibly be too terribly bad for me.”

My body has not been like, “Oh, thank goodness all this sugar you’re feeding me is in its natural form.” No way. Instead, my body has been like, “Mmmm, sugar. Give me more. Sorry you feel crummy and catch colds frequently. Now about that sugar. Weren’t you going to feed me more? I’ll take it in chocolate form. Or butterscotch. Why are we even still having this conversation? Give me sugar!”

Let’s Learn Moderation

Our bodies do need sugar to function properly. Yay! Bring on the cheesecake.

Hmmm, well actually, our bodies don’t need that much sugar. Plus it prefers sugar from fruit, vegetables, and other carbs like potatoes and grains. Cheesecake? It’s an awesome and fun treat sometimes. Enjoy!!! But keep it a treat and keep it occasional. You’ll enjoy it so much more this way.

Do you struggle with eating sugar in moderation?  Oh how I know how you feel.  Don’t feel guilt. Don’t feel stupid. Don’t give up and eat a quart of ice cream. God knows what you need, what your struggles are, and what you desire. He’ll help you break free from this. Don’t make it a “thing.” That will just make you worried and frustrated. Let God help you with this one. That’s the one and only way I know how to beat the addiction.

So What About Stevia?

Should We Be Eating Stevia

I’ve recently been experimenting with liquid stevia. Stevia is an herb, which is naturally sweet. It is not a sugar, nor is it an artificial sweetener. It takes a teeny-tiny bit of stevia to provide just the right sweetness, compared to the amount of sugar/honey/maple syrup/sucanat it takes to provide sweetness.

Sounds great, right? Yep, and I’ve been excited about using it as a way to cut down on sugar.

But guess what? There’s controversy about stevia. (Surprise, surprise.)  Is it really good for you? Does eating it cause side effects?

I spent several hours recently doing more research on stevia. I went to some of my most trusted sources. I went to random sources I’ve never heard of. I did internet searches. I read article after article. My findings?

Most say that stevia is safe and healthy. Some people are allergic to stevia. (Some people are allergic to cats.)  Highly refined stevia can cause digestive issues. (As does most anything that is highly refined.)  Stevia in its whole form has not been approved for consumption by the FDA. (Though they have approved pesticides, aspartame, and Captain Crunch as a part of this balanced breakfast.)

Then there are the forums I found that talk about stevia being used as birth control. These claims caused me to spend considerable time researching. I only found a few articles on this topic, and while it seemed that the authors had done their research, none of them were from sources I’ve heard of. Based on what I read, I believe you would have to consume a LOT of stevia for it to effect your fertility.

My Conclusions About Stevia

I tend to stick with my trusted resources (Mercola, Fallon, Price) who tell me that stevia is an okay food when it is in its whole form. Much of the other information I found was in forums or not backed by research.

Some countries have been consuming stevia for centuries. Japan has been using it as a sweetener since the 1970’s. According to Price, “In all this time, there have never been any reports of toxicity or adverse reactions to its usage.” I found that article to be very helpful, especially given how many years of research and study went into Price’s findings.

Stevia should not be eaten in excess, because that is not the purpose of stevia. Those who have been consuming stevia for years and years have not been gorging on it. They use it as it should be used – in very small amounts.

After all my hours of research, I’ve concluded that I will keep eating it occasionally. Stevia gives me a nice option as a sweetener when I want to avoid sugar. I encourage you to do your own research and seek your own conviction. You can certainly take stevia or leave it. It’s not like we’re talking about vegetables, which are not an optional food choice for optimum health. Stevia isn’t a health food that we all need in order to thrive, right? It’s simply a real food sweetening option.

Here is What I Really Want You To Hear Me Saying Today:

Desserts, treats, and sweets? Whether we’re adding table sugar, sucanat, honey, real maple syrup, or yep, even stevia – these should never be our main food focus. I think we get all wrapped up in figuring out how to sweeten our drinks and desserts in a healthy way, when the bottom line is that we should not be eating or drinking many sweets anyway.  I’ll continue to use a tiny bit of stevia in my Chocolate Whipped Cream. I’ll drizzle a few drops of real maple syrup on my Whole Wheat Waffles. I’ll add a touch of honey or sucanat to my homemade muffins. These are all real food, real good options as a part of my balanced, whole food diet.

But none of those foods are going to be my main food focus.  Desserts, no matter how I sweeten them, will remain a treat. Fruits, vegetables, meats, good fats, eggs, whole dairy, nuts, beans, and a few whole grains will continue to be my focus – in balance and for wholesome nourishment.

Balance, Balance, Balance

That’s the key word, right? Balance. Try not to let all the contradictory information out there baffle our minds. If we do, we’ll all just feel like banging our heads against the wall. (Which is, if you recall, not a healthy option according to all the experts.)

Let’s continue to enjoy the gift of food variety, and focus on giving our bodies balanced nourishment. Sound like a plan?

Where are you in your journey to cut down on sugar? Have you tried and do you like stevia?

Heavenly Homemaker's Club Members: Access your homepage and all your fantastic resources here! Not a member yet? Please join us!

Gratituesday: My “New” Office

June 30, 2014 by Laura 10 Comments

This post may contain affiliate links. For more information, please see our disclosure policy.

gratituesday[2]

Want to see my desk? Think twice before you answer that. It’s not nearly as exciting as you might think. Plus is likely much messier than you imagined it to be.

See, for years now, my “desk” has been a card table, topped with a tablecloth since the top of the table was all torn up. Am I professional or what? It worked to hold my computer…and as you can see from the scary picture below, it also held piles of messy paperwork.

office 1

The piles of papers and notebooks were kinda, sorta organized. But woe to the person who put a non-heavenlyhomemaker piece of paper down on my desk. It would quickly get buried and lost in my mess.

Finally, a few weeks ago, Matt suggested it was time to get me a real desk. Not only would that be much more practical for my work, it would free up our card table to be used for gaming and to fold laundry in the upstairs hallway. Sounded good to me!

Ladies and…well, are there any gentlemen reading this? Introducing my new work space:

office2

It’s just a simple black desk, but it has a drawer and a cabinet to house my junk files and paperwork. You’ll notice that my desk is placed right in front of a closet door. Who does that? Yeah, we do. It’s the only placement option in our guest room/office right now. Someday maybe we’ll rearrange, but we rarely use that closet, so for now it works.

How long until this desk is covered with papers? Here’s hoping I’ll keep it under control for at least a few days. :)

This Gratituesday, I’m thankful for my office upgrade. What are you thankful for?

Heavenly Homemaker's Club Members: Access your homepage and all your fantastic resources here! Not a member yet? Please join us!
« Previous Page
Next Page »

Join Our Community!

 Facebook Twitter E-mail Instagram Pinterest

Popular Posts

~ Will All of the Real Moms Please Stand Up?
~ Easy! Stir-and-Pour Whole Wheat Bread
~ How to Make Gatorade
~ 31 Real Food Breakfast Ideas
~ Dear Teenage Girls...
~ When Mom Takes a Step Back
~ The Inexpensive Health Insurance We Love!
~ Let's Talk Real Food Grocery Budgets

Check out our latest posts!

  • Big Family Food and Fun: June 14-20, 2026
  • Big Family Food and Fun: June 7-13, 2026
  • Big Family Food and Fun: May 31-June 6, 2026
  • Big Family Food and Fun: May 24-30, 2026
  • Free 7-Day Summer Menu Plan
Home  ~  Simple Meals  ~  Club Membership  ~  Shop  ~  Privacy Policy  ~  Disclosure  ~ Contact

Copyright © 2026 · Beautiful Pro Theme on Genesis Framework · WordPress · Log in