Heavenly Homemakers

Encouraging women in homemaking, healthy eating and parenting

  • Home
    • About
    • FAQs
  • Recipes
    • Bread and Breakfast
    • Condiments
    • Dairy
    • Main Dishes
    • Side Dishes and Snacks
    • Desserts
    • Gluten Free
    • Instant Pot
    • Crock Pot
    • Heavenly Homemaker’s Weekly Menus
  • Homemaking
    • Real Food Sources
  • Store
  • Contact
    • Advertise
    • Disclosure
    • Privacy Policy
  • Simple Meals
  • Club Members!

High Five Recipe: Creamy Mac and Cheese

April 27, 2009 by Laura 251 Comments

This post may contain affiliate links. For more information, please see our disclosure policy.

High Five Recipes 2

I’ve been searching my whole life (give or take) for a good homemade mac and cheese recipe. The recipes I’ve come up with in the past are decent….but not great.

A couple of months ago, a friend told me how she makes it. I adapted it a bit and now we can’t seem to get enough! It is THE creamiest mac and cheese ever.

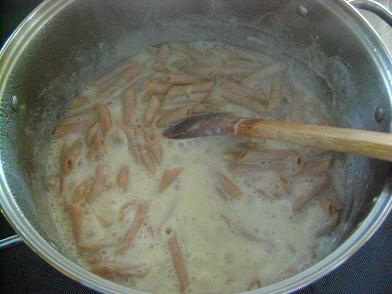
Here’s the secret:  Cook your pasta in MILK instead of water. The milk makes it super creamy. The starch from the pasta thickens the milk into a sauce. Add your cheese after the pasta is finished cooking.

macandcheese3sm.JPG

Uh-huh…comfort food at it’s best.

Creamy Mac and CheeseYum

5.0 from 1 reviews
High Five Recipe: Creamy Mac and Cheese
 
Save Print
Author: Laura
Ingredients
  • 2½ cups whole wheat pasta
  • 3 cups whole milk
  • ½ t. sea salt
  • 1 cup shredded cheese (I use white cheddar)
Instructions
  1. Mix pasta, milk and salt in a large sauce pan.
  2. Cook over medium-high heat STIRRING ALMOST CONSTANTLY until the pasta is tender (10-15 minutes).
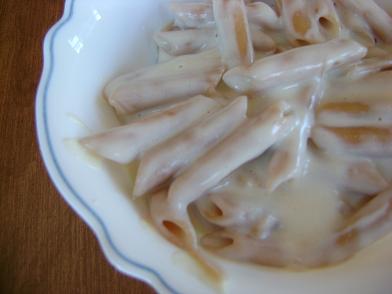
  3. Remove from heat. (IMPORTANT!)
  4. Add cheese and stir until melted.
  5. Serve immediately.
3.4.3177

Be very sure to remove this from the heat before you stir in the cheese. Otherwise you’ll have a gritty mess. :)

macandcheesesm.JPG

You can use any shape of pasta you want. I have found that elbow noodles cook quite a bit faster so I use those when I need a quick lunch.

Every time I make this, we can not believe how creamy and delicious it is. My lifelong search for awesome homemade macaroni and cheese has come to an end. We should have some sort of mac and cheese ceremony.

The Creamiest Mac and Cheese


If you haven’t ever tried cooking your pasta in your milk, you must do this! You can enjoy it for an easy meal as is. Or you can use this base recipe to make:

  • Easy Tuna Casserole
  • Cheeseburger Macaroni
  • Three Cheese Garlic Chicken Pasta
  • Baked Three Cheese Chicken Pasta

Life as you know it just got better. Serve any of these with a salad and some steamed veggies. It’s amazing!

Heavenly Homemaker's Club Members: Access your homepage and all your fantastic resources here! Not a member yet? Please join us!

Gratituesday: Successful Clothing Giveaway

April 27, 2009 by Laura 8 Comments

This post may contain affiliate links. For more information, please see our disclosure policy.

gratituesdayspring5.jpg

I had something else planned to write about this Gratituesday, but I can’t stop thinking about the excitement of the weekend, so I’ve gotta shout about this instead. (I love having the problem of having SO many things to be thankful for that I just can’t decide what to share!)

Hopefully you read about the Clothing Exchange my friend organizes at our church twice a year. If you didn’t have a chance to read it, please go do that. I have always loved the idea of this Clothing Exchange, but after this weekend I’m even more excited about it and convinced that this is one of the most beautiful ways a church can reach out to a community.

I was only able to help sort and organize the clothes for tiny snatches of time because I had one boy at home with a fever and another boy with a double ear infection. Then on the day of the actual clothing exchange, we had soccer games so I could only help for a little while.

But…I hope I can capture the joy of this ministry for you with my words. The Clothing Exchange (which I really should be calling a Clothing Giveaway because the clothes were really just set out on tables for people to come and just take what they needed)…began at 8:00 on Saturday morning. When I arrived at 8:02, the parking lot was completely full and there were cars lined up on the street. I walked into the room filled with clothes and already over 50 people were there finding clothes for their families.

I took a few moments to get my emotions under control because there is something very touching about seeing our church building being used to meet the needs of others. Then I spent the next part of the morning handing out sacks as people walked in…and helping people get to their cars with their arms full of clothes…and my favorite part:  holding babies so mamas could “shop”. 

Oh, and the smiles. Yes, that was my favorite, favorite part.

Our prayer now is that the people that entered our building Saturday morning left with more than clothes. We pray that they felt our love for them…and that maybe those that don’t know Jesus saw something in our eyes that will make them search for the One they’re missing. 
———————————————

What are you grateful for? Read the details here, write about it on your blog, then come link up with us! If you don’t have a blog, leave a comment letting us know what you’re grateful for!

[blenza_autolink code]

Heavenly Homemaker's Club Members: Access your homepage and all your fantastic resources here! Not a member yet? Please join us!

Menu Plan for the Week

April 26, 2009 by Laura 11 Comments

This post may contain affiliate links. For more information, please see our disclosure policy.

Well…if I didn’t have ideas for cooking with beans before…I do now! Thank you so much! I can’t wait to start trying some of your recipe suggestions! 

Last week Donna asked if I would show a picture of my lamb chops. Hey…if you want to see my lamb chops…I can show you my lamb chops.

lambchops1sm.JPG
See how cute they are? They are super tiny. 
Six chops fit into my skillet.

lambchops2sm.JPG
I just brown them slowly and sprinkle on some onion salt.
Lamb chops are some of the most delicious things on the planet.

Here’s our menu for the week: 

Sunday, April 26
Applesauce bread, bananas
Potluck – take “angeled eggs“, frosted fudge brownies
Nachos

Monday, April 27
Whole wheat waffles, milk
Salmon patties, strawberry-peach slushies
BBQ chicken, baked beans, creamy cole slaw 

Tuesday, April 28
Scrambled egg sandwiches, clementines
Creamy mac and cheese, steamed carrots
Italian roast wraps, kefir fruit smoothies

Wednesday, April 29
French toast
Popcorn chicken, ranch potato wedges, fresh pineapple
Tuna casserole, peas

Thursday, April 30
Crepes with jelly
Tacos, fruit
Roasted chicken with potatoes and carrots

Friday, May 1
Orange muffins, applesauce
Pizza casserole, tossed salad
Lamb-burgers, homemade onion rings

Saturday, May 2
Peanut butter honey toast, pears
Bean and rice bowls
Steak, baked potatoes, green beans

Be sure to join us this week for the Spring Giveaway Carnival!!!!!  The post will go up at 8:00 CST Monday morning!

And…just so you know, we will still have Gratituesday as normal this week. The only difference is that the Spring Giveaway Carnival Mr. Linky will remain at the top of my blog all week. Please remember to scroll down for the Gratituesday post and for all new posts this week!
————————————————–

Visit Organizing Junkie for more menu planning inspiration!

Heavenly Homemaker's Club Members: Access your homepage and all your fantastic resources here! Not a member yet? Please join us!

Make a May Day Basket…bzzzt!

April 23, 2009 by Laura 13 Comments

This post may contain affiliate links. For more information, please see our disclosure policy.

Last year, some friends of ours dropped off these fun May Baskets at our door. I declared them the cutest May Baskets I’d ever seen! The boys loved them!

beemaybasketssm.JPG

May Day (May 1) is only a week away…so I just had to share these with you! Beecause these baskets are really beeautiful. (Sorry…you know I couldn’t write an entire post without some sort of silliness.)

Here’s what you need to make them:

  • black, yellow and light blue construction paper
  • glue stick
  • elmer’s glue
  • googly eyes
  • white pom-poms
  • black pipe cleaners
  • pencil
  • stapler

What to do:

Use elmers glue to fasten googly eyes to pom-poms. Allow glue to dry.

beemaybasket11sm.JPG

Cut black paper into a 9×9 inch square. 

beemaybasket6.jpg

Cut off one corner into a curve.

beemaybasket7sm.JPG

Fold paper into a cone and staple ends in place.

beemaybasket10sm.JPG

Tear yellow paper into strips. Glue them as stripes onto the black construction paper cone.

beemaybasket8sm.JPG

Curve ends of pipecleaner around a pencil, fold pipecleaner in half, then fasten with stapler as antennae onto “bee”.

beemaybaskets14m.JPG

Cut a “heart” out of yellow paper for face, and a smile out of black paper for smile. Glue eyes and mouth onto face. Glue face to the rounded corner of the black paper, covering the staple used to attach the antennae.

beemaybaskets13sm.JPG

You’ll find the pattern for the wings here. Trace it onto blue paper, then cut it out and staple it onto the back of the bee.

beemaybasket3sm.JPG

Fill “bee basket” with popcorn and other fun goodies.

Deliver them to your friends on May Day!

Aren’t these the most beecoming May Baskets you’ve ever seen?

Do you usually make and deliver May Baskets?  Or, have you been the recipient of May Baskets before?

I really and truly think that it is one of my boys’ favorite “holidays”! 
—————————————————–

For more Frugal Fun…visit Life as Mom!

Heavenly Homemaker's Club Members: Access your homepage and all your fantastic resources here! Not a member yet? Please join us!

The Dream

April 22, 2009 by Laura 32 Comments

This post may contain affiliate links. For more information, please see our disclosure policy.

My mom died of ALS 4 1/2 years ago. 

Last night I dreamed that I had my mom back. Not forever…just for a weekend. And in my dream I knew that.

I started out simply elated in my dream. She was completely healthy again and looked really, really pretty just sitting on my couch.

I was flitting and jumping around…only occasionally stopping for a second to let her talk. I was catching her up on all the things she’d missed out on over the past 4 1/2 years. There was SO MUCH to tell her! I got out pictures and showed her Malachi’s birth and all the boys and how much they’d grown.

Somehow in my dream, I had her all to myself for the whole weekend. There were no interruptions and I didn’t have to share her with anyone. It was incredible.

And then…suddenly the weekend was almost over. The reality of that hit me and all I could do was throw my head into her lap and sob. I couldn’t even talk anymore to tell her all the things I wanted to tell her about how much I’d missed her. I couldn’t even ask her all the questions I’ve been wanting to ask her about how much spice to put into a certain recipe or about how old I was when I first started doing certain things. 

All I could do was sob.

My dream ended there. I woke up crying and couldn’t stop. So I got up and tried to put my thoughts into words.

I tend to think about her more this time of year. Her birthday is coming up in May…and well…so is Mother’s Day. 

I miss her. 

But now that I’m awake enough to think a little more clearly…I wouldn’t wish her back to this earth. Not even so that I could have her all to myself for a weekend. Not even so that she could see my precious boys and see how big and smart and handsome and amazing they are. Not even so that I could once more throw my head onto her lap and let her hold me while I cry.

She’s in the perfect place. 

Knowing that is enough to stop my tears. 

Or at least change them to tears of joy.

Heavenly Homemaker's Club Members: Access your homepage and all your fantastic resources here! Not a member yet? Please join us!

Gardening 101: Planting Potatoes in a Container

April 21, 2009 by Laura 146 Comments

This post may contain affiliate links. For more information, please see our disclosure policy.

If you have limited garden space…planting your potatoes in a container is a fun option. I’ll be planting potatoes both in my garden and in a container, just so that we can have as many potatoes as possible!

There are a variety of ways to plant potatoes in a container. For me, the easiest way is to use an old rubbermaid garbage container. (Hint:  remove garbage first.)

potatoescontainer5sm1.JPG potatoescontainer3sm1.JPG

Here are the simple steps:

  1. Poke or drill several holes in bottom of garbage can.
  2. Scoop about one foot of soil into the container.
  3. Push five whole seed potatoes into the soil, spread apart evenly.
  4. Make sure the potatoes are completely covered by about two inches of soil.
  5. Water the seed potatoes.
  6. Sit patiently and wait for them to grow. You may want to take up knitting.
  7. Once the plants have grown to 7-8 inches in height…scoop more soil into the container. The soil level should be about three inches from the top of the plants.
  8. Water the plants as needed. As soon as the plants begin to flower, be sure to water generously and consistently.
  9. Each time the plants reach 7-8 inches above the soil level, scoop more soil into the container, maintaining the soil at three inches from the top of the plants.
  10. At the end of the summer, dump out the contents of your container (which will, by that time, weigh approximately 368.4 pounds). Dig all around the dumped out soil and gather potatoes. 
  11. Jump and cheer each time you find a potato. Have an “I found the biggest potato, neener, neener, neener” competition. 
  12. Go make mashed potatoes.

Don’t ask me how many potatoes you’ll be able to grow using this method. I’ve read that you can grow several pounds of them. Last year when I first tried doing this, I didn’t do a very good job of continuing to fill my container with soil like I was supposed to…therefore I didn’t have a very high yield. This year…I’m planning to do better!

By the way, with the exception of poking the holes in my container (because I had done that already last year)…this process took only ten minutes. That included digging up soil, planting, watering…and yes…stopping to take a few picture. (Wonder what my neighbors were thinking? Weird lady. Takes pictures of her dirt and trash cans.  Weird, weird lady.)

A few more things you might be wondering about…

How should I poke holes in my container?  Well…I had the kids stand back while I went to town with a pitch fork. But a much safer and more effective way is to use a drill.

What kind of soil should I put into my container?  I dug up some good soil from the compost area in our backyard. You can use packaged soil from the store…but keep in mind that you’ll need quite a bit. I remember being surprised last year with how many bags of soil it took.

Does my container need to have the left-side handle missing?  No. Your potaoes will grow just fine in a container that has both handles attached.

potatoescontainer2sm.JPG

Will you show us updates on your blog as your potato plants grow? Absolutely! 

Will I get dirt under my fingernails?  Yes. When you push the seed potatoes under the soil, you will get dirty. But don’t worry. It will feel good. You’ll feel like a good farmer. You’ll feel like you’re working hard to feed your family. You’ll feel like you accomplished oodles of work because you got dirty. (Don’t tell anyone it took ten minutes.)

potatoescontainer4sm.JPG

Oh…be proud of those dirty fingernails! See…I was so proud of mine I took a picture for you. (Weird, weird lady)

Do any of you have experience planting potatoes in a container? Any of you planning to give it a try this year? Anybody want to send me a picture of your dirty fingernails?

Heavenly Homemaker's Club Members: Access your homepage and all your fantastic resources here! Not a member yet? Please join us!

Gratituesday: The Perfect Day

April 20, 2009 by Laura 19 Comments

This post may contain affiliate links. For more information, please see our disclosure policy.

gratituesdayspring3.jpg

Have you ever had one of those days? A day that ends up being perfect and wonderful from morning to night?

Saturday was a day like that.

Matt was home all day. The weather was perfect and gorgeous. It was just one of those days. The kind that makes you sigh and smile with contentment and gratitude.

You know something that makes me really happy? Seeing all my men work hard. I love it. I love watching Matt work…and the boys working beside him. We spent a good part of Saturday afternoon working outside together getting our garden plots ready and planting potatoes….picking up leaves and sticks…cleaning up the yard.

We were all a delightful picture of filth by the end of the day. Ah…good and filthy…you’ve gotta love it.

justusandeliassm1.JPG

There may have been a brotherly squabble or two during the day…but I seem to have blocked it out of my mind.

eliasandasasm.JPG

Mostly there was a lot of teamwork and cooperation.

malachism.JPG

Malachi was trying to scoop grass clippings with a shovel twice his height. He finally laid it down and started putting the grass onto the shovel with his hand.

steakdinnersm.JPG

We ended the evening with juicy grilled steaks that we were able to eat outside at our picnic table. Then we played a couple innings of baseball. I hit a homerun…and ran around the bases without smacking into a pole…catching my hair in tree branches or falling on my face. Ah, the perfect ending to a perfect day. :)
——————————————

What are you grateful for? Read the details here, write about it on your blog, then come link up with us! If you don’t have a blog, leave a comment letting us know what you’re grateful for!

[blenza_autolink code]

Heavenly Homemaker's Club Members: Access your homepage and all your fantastic resources here! Not a member yet? Please join us!

Slow Down Already

April 20, 2009 by Laura 16 Comments

This post may contain affiliate links. For more information, please see our disclosure policy.

This is what I have to tell myself too often:  “Laura…Slow Down!” (Yes, I talk to myself.)

Especially when I get in the kitchen. What can I say? I like to be efficient. I don’t measure ingredients. I often don’t close cabinet doors. I usually stir together three recipes at one time. 

All of this is fine…but it can get me into trouble. Sometimes slowing down and taking the extra two seconds to close a cabinet door (so that my tall husband doesn’t crack his head on it when he walks by) is a good thing.

So here’s what I did last week. I’m only telling you this out of the kindness of my heart and so that you can be sure and avoid the same trouble. Really…I’m not telling you this so that I will feel ridiculous all over the internet. Why in the world would I do that to myself?

Anyway….last week I was making breakfast cake. I had been a good mama and soaked the grains overnight. I was getting an early start in the morning so that I could have the cake ready for Matt to eat before he needed to leave for work. I was doing everything right.

I put all of the ingredients into my food processor, because I find it so much easier for my food processor to stir together my soaked grain recipes. Otherwise my arm muscles rebel against all the stirring.

Yet that particular morning, even my food processor was having a hard time breaking up all the big clumps of soaked flour and oats. “I’ll just push some of it down with a wooden spoon,” I thought to myself.

Yeah, you know where this is going don’t you?

Instead of turning off the food processor like a good girl…I “efficiently” poked the wooden spoon down into the thing while it was running. Hey, I was being careful. I know what can happen to wooden spoons when they meet up with a fast moving blade.

And then what I knew could happen…did happen. Duh.

brokenspoonsm.JPG

Ooh, I was so mad at myself. I broke my favorite wooden spoon. AND…I had to throw out the entire batch of breakfast cake. Do you know how many wasted ingredients that is? Butter…raw honey….farm fresh eggs…organic grains… sob

Oh, and then I had no breakfast for my family. sob

However, I figured I’d prefer to have no breakfast for my family rather than having to rush a little boy to the emergency room with a splinter in his esophagus. At least I made that decision correctly that morning.

So, my kitchen tip for you today is this:  Don’t put wooden spoons into a running food processor. 

Oh, thank you, Laura.

You’re very welcome.
—————————————————–

This post is linked to Kitchen Tip Tuesdays.

Heavenly Homemaker's Club Members: Access your homepage and all your fantastic resources here! Not a member yet? Please join us!

Menu Plan for the Week

April 19, 2009 by Laura 6 Comments

This post may contain affiliate links. For more information, please see our disclosure policy.

Okay ladies. Your comments on this post had me cracking up ALL weekend long. I never knew so many of you had gas. Or wished you had gas. Or used to have gas. If you didn’t read this post…and read through all of the comments…you HAVE to. I was laughing at the screen everytime I sat down. You guys are great! 

We had SUCH a wonderful weekend working together on our garden!! I’ll tell you more on Gratituesday. 

We’ll be at the soccer field almost every evening this week, as well as Saturday morning. This is such a great time of year! 

Here’s our menu for the week:

Sunday, April 19
Oatmeal, fruit
Grilled chicken sandwiches on homemade buns, baked beans, cream cheese corn, angeled eggs, tossed salad, fudge brownies with frosting (some friends came over and joined us!)
PB&J, apples, milk

Monday, April 20

Puffy Pancakes (new recipe sent to me by Barbara)
Chicken quesadillas, strawberry-peach slushies, creamy cole slaw
BBQ meatballs, cheesy mashed potatoes, green beans

Tuesday, April 21
Baked oatmeal, scrambled eggs, oranges
Shrimp pasta salad, cottage cheese and peaches
Cheesy beef and rice, steamed carrots

Wednesday, April 22
Sweet potato streusel muffins, bananas
Cheeseburger macaroni, peas
Lamb chops, baked potatoes, tossed salad

Thursday, April 23
Honey whole wheat bagels, applesauce
Chicken fajitas, fresh pineapple
Grilled cheese sandwiches, tomato soup, raw veggies

Friday, April 24
Giant breakfast cookies, pears
Bagel pizzas, cantaloupe
Homemade chicken nuggets and fries, carrot sticks

Saturday, April 25
Fried eggs on toast, clementines
Leftovers
Sourdough pancakes, turkey sausage

Here are a few great things going on that you don’t want to miss:

  • The Virtual Great American Bake Sale is still going on. Go support this great cause!
  • I’ve got a giveaway going on here on my review blog. Don’t miss it!
  • Next week (Apr. 27-May 1) is the Springtime Giveaway Carnival. Make your plans now to join the fun!

Hope you’re having a lovely spring! Did you do anything fun or productive this weekend?
————————————————-

Visit Organizing Junkie for more menu planning inspiration.

Heavenly Homemaker's Club Members: Access your homepage and all your fantastic resources here! Not a member yet? Please join us!

Feeding the Family: Hey, Mr. Produce Man!

April 16, 2009 by Laura 12 Comments

This post may contain affiliate links. For more information, please see our disclosure policy.

I’ve shared how I order many of my groceries through health food coops and buy many organic foods from local farmers. And I’ve heard from many of you that you just don’t have many of these resources available where you live.

Here’s another great way I have been able purchase organic foods at bulk or discounted rates:  I talk to my grocery store managers.

Most store managers are happy to order you boxes of food. And they’ll usually sell it to you for less than the shelf price. You know why?  Because when you order a case of something…they know the entire case is going to walk out of the store. It won’t go bad while it’s waiting to be sold and have to be thrown out.  And he won’t have to pay anyone to put it on the shelf. Everyone wins!

I can now call my local grocery store’s produce manager (who knows me now on a first name basis) and order cases of organic apples and carrots and mushrooms and broccoli…and many other items. If it is available to him, he’ll order it for me. When I order on a Monday, it comes in on Wednesday. Talk about instant gratification!

grandcentralordersm.JPG

I paid just over a dollar per pound on these organic Fuji apples. The price of the non-organic Fuji apples for sale in the store? 99 cents a pound. I’d say I got a pretty good deal.

Now, our family can generally go through all 36 pounds of apples before they go bad…but sometimes I ask around to see if any of my friends want a nice bag or two of organic apples. Sometimes…we even coordinate and buy bulk produce every couple of weeks, then just split the cases. If you don’t think your family could tackle a whole case of produce…split it with your friends! 

What do you think? Have you ever tried this idea?  I think it’s a wonderful option for those of you who have limited health food resources! Be brave…give it a try!
—————————————–

This post is linked to Frugal Friday.

Heavenly Homemaker's Club Members: Access your homepage and all your fantastic resources here! Not a member yet? Please join us!
« Previous Page
Next Page »

Join Our Community!

 Facebook Twitter E-mail Instagram Pinterest

Popular Posts

~ Will All of the Real Moms Please Stand Up?
~ Easy! Stir-and-Pour Whole Wheat Bread
~ How to Make Gatorade
~ 31 Real Food Breakfast Ideas
~ Dear Teenage Girls...
~ When Mom Takes a Step Back
~ The Inexpensive Health Insurance We Love!
~ Let's Talk Real Food Grocery Budgets

Check out our latest posts!

  • Big Family Food and Fun: June 21-27, 2026
  • Big Family Food and Fun: June 14-20, 2026
  • Big Family Food and Fun: June 7-13, 2026
  • Big Family Food and Fun: May 31-June 6, 2026
  • Big Family Food and Fun: May 24-30, 2026
Home  ~  Simple Meals  ~  Club Membership  ~  Shop  ~  Privacy Policy  ~  Disclosure  ~ Contact

Copyright © 2026 · Beautiful Pro Theme on Genesis Framework · WordPress · Log in