Heavenly Homemakers

Encouraging women in homemaking, healthy eating and parenting

  • Home
    • About
    • FAQs
  • Recipes
    • Bread and Breakfast
    • Condiments
    • Dairy
    • Main Dishes
    • Side Dishes and Snacks
    • Desserts
    • Gluten Free
    • Instant Pot
    • Crock Pot
    • Heavenly Homemaker’s Weekly Menus
  • Homemaking
    • Real Food Sources
  • Store
  • Contact
    • Advertise
    • Disclosure
    • Privacy Policy
  • Simple Meals
  • Club Members!

Nutella Oat Breakfast Bars

January 20, 2026 by Laura 9 Comments

This post may contain affiliate links. For more information, please see our disclosure policy.

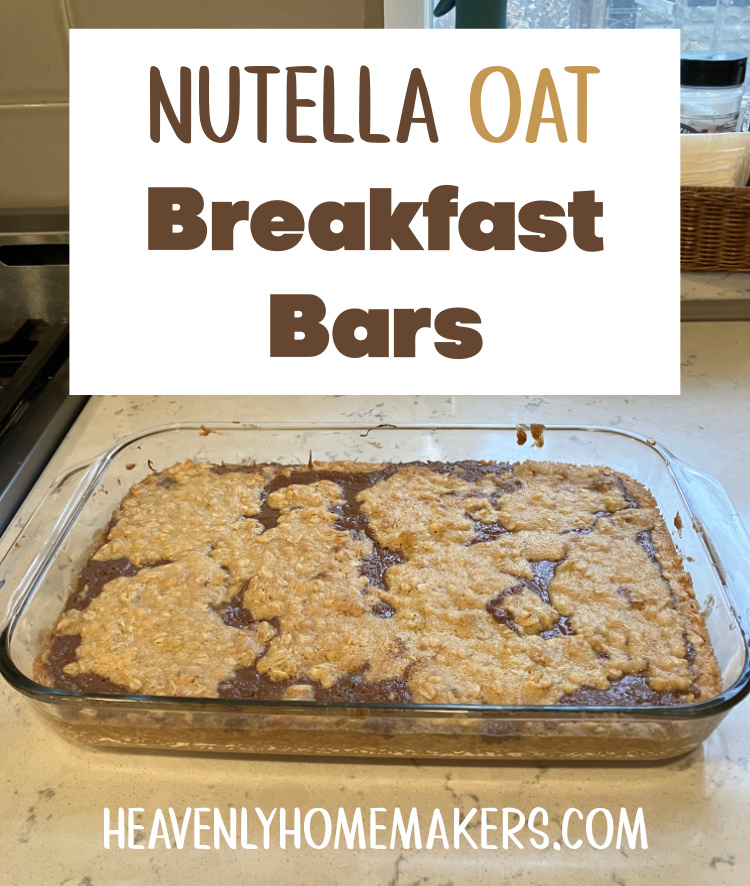
You’re going to want to make these Nutella Oat Breakfast Bars right away!

Many sweet years ago, you may recall that I created this Raspberry Oat Bars recipe. That recipe was a staple at our house when our big boys were little boys and then teenage boys. Any time I baked them, I switched out the raspberry jam with apricot jam or whatever jam we had in the house at the time, and we had a delightful time eating these bars as we all learned to love coffee.

Yes. These bars with coffee? The best.

Now here we are with those boys all grown up being adulty, and we’ve got a second set of kids who pretend to like coffee (what??! when have they had it?) and don’t like seeds in their jam. Raspberry Oat Bars are a no-go for them at this point. But no worries. I figured out a way to expand our Breakfast Food List that Doesn’t Make People Scream and Throw Food on the Floor.

Maybe.

Someone is still likely to throw these on the floor. But not because of raspberry seeds.

Anyway. Nutella. Spread a jar of nutella in the middle of these bars and the entire pan will be eaten very quickly. I still like these with coffee. Our little kids highly recommend them with milk.

Nutella Oat Breakfast BarsYum

Nutella Oat Breakfast Bars
 
Save Print
Author: Laura
Serves: 24 bars
Ingredients
  • 3 cups whole wheat flour
  • 3 cups rolled oats
  • 1 cup brown sugar
  • ½ teaspoon baking powder
  • ¼ teaspoon sea salt
  • 2 cups melted butter (4 sticks)
  • 12-ounce container of Nutella
Instructions
  1. Mix together flour, oats, brown sugar, baking powder, and salt.
  2. Stir in melted butter until the mixture resembles crumbs.
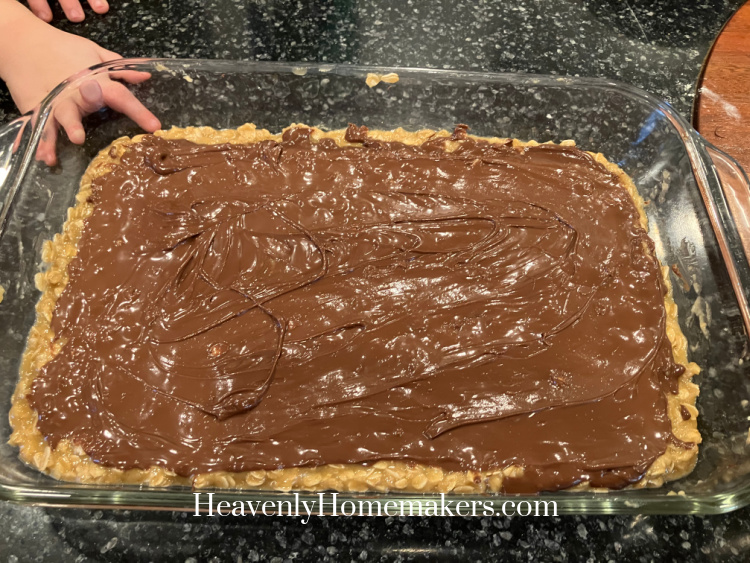
  3. Press half of the mixture into the bottom of a 9x13 inch baking pan.
  4. Spread nutella over the top.
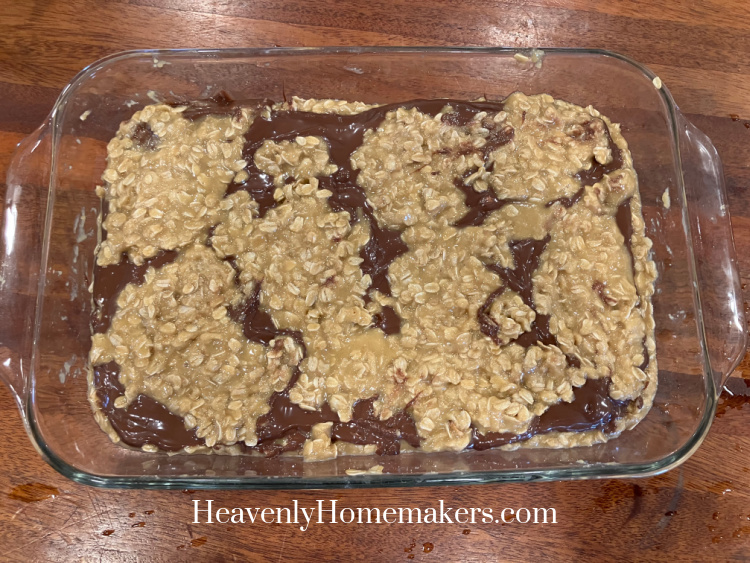
  5. Sprinkle remaining oat mixture on top of the nutella layer, pressing down lightly to cover.
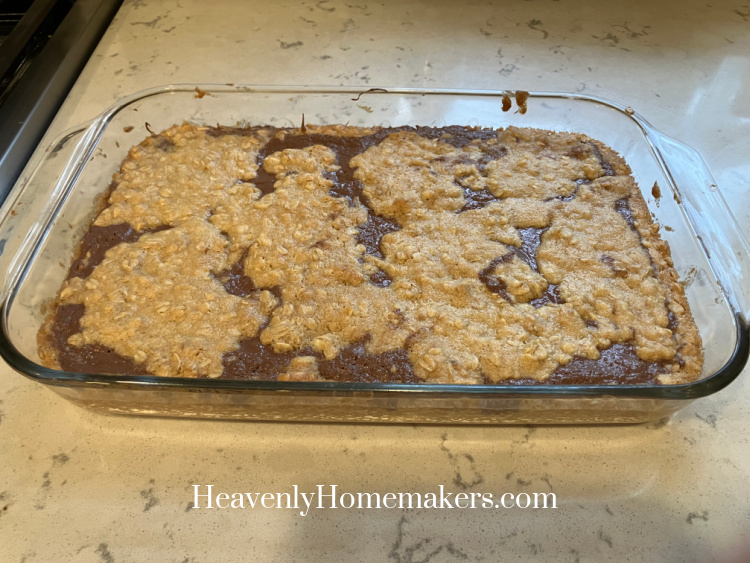
  6. Bake in a 350° oven for 30 minutes or until lightly browned.
3.5.3251

First layer down…

Nutella over the top.

Second oat layer sprinkled on…

Baked to perfection.

Tip 1: The Aldi Nutella knock-off is perfect in this recipe.

Tip 2: Use more or less Nutella as desired.

Tip 3: We already talked about the milk and the coffee. Grab a cup.

Heavenly Homemaker's Club Members: Access your homepage and all your fantastic resources here! Not a member yet? Please join us!

Easy Chocolate Protein Mousse

March 6, 2025 by Laura 2 Comments

This post may contain affiliate links. For more information, please see our disclosure policy.

Wait until you try this Easy Chocolate Protein Mousse!

All it takes to make this Easy Chocolate Protein Mousse is four ingredients and a blender. Plus maybe five minutes of your time.

I decided that this is a perfect breakfast for our family, and none of my kids are arguing about it. When the ingredients consist of cottage cheese, honey, cocoa, and vanilla – why wouldn’t we declare it to be a great breakfast?!

Easy Chocolate Protein MousseYum

Chocolate Protein Mousse
 
Save Print
Author: Laura
Serves: 6-8 servings
Ingredients
  • 3 cups 4% milk fat cottage cheese
  • ¼ cup honey
  • ⅓ cup unsweetened cocoa powder
  • ½ teaspoon vanilla extract (optional)
Instructions
  1. Blend ingredients together until smooth.
  2. Serve!
3.5.3251

Heavenly Homemaker's Club Members: Access your homepage and all your fantastic resources here! Not a member yet? Please join us!

Cheater Cheater Pumpkin Eaters – Chocolate or Vanilla

November 28, 2023 by Laura 2 Comments

This post may contain affiliate links. For more information, please see our disclosure policy.

I have discovered a new idea and I’ve decided to call these: Cheater Cheater Pumpkin Eaters.

I didn’t actually invent this recipe. I happened upon it whilst scrolling Facebook and an ad popped up for Weight Watchers recipes. I don’t care about counting WW points, but I do like the idea of adding pumpkin to goodies. Any opportunity to add nourishment to food – I’m all in.

I was also very attracted to the idea of a two-ingredient recipe. It’s just a cake mix and a can of pumpkin. Easy and includes a vegetable? Yes please.

Now, I didn’t used to buy cake mixes. Those most certainly include ingredients that aren’t great. But alas, here I am, ignoring the ingredient list and paying $0.98 for a box of convenience. Then I add a huge wad of spinach to the cake, declaring that I am somehow still winning the war on food. Can we also  occasionally add an entire can of pumpkin to such a mix? Yes, we can. So now we can cringe as we buy cake mix, then smile as we add spinach or pumpkin.

And if I’m lucky, I might also have time to take a shower. Seriously, I have so many reasons to buy cake mix now. Here are my youngest 5 reasons. Plus Malachi, who is quite low maintenance but does also like to eat.

Why did I decide to name them Cheater Cheater Pumpkin Eaters? Two reasons:

  1. Buying a cake mix is sort of cheating, making us sort of cheaters, but again, we like to shower sometimes and this is how we are surviving right now.
  2. These treats are some kind of cross between a cupcake and a muffin. They are too sugary to really be a muffin but too pumpkin-y to really be a cupcake. I couldn’t land on what to call them. A muffcake? Perhaps. But then Cheater Cheater Pumpkin Eaters came to mind and I decided I liked it.

Is it possible I spend too much time reading nursery rhymes? Nah.

Cheater Cheater Pumpkin Eaters – Chocolate or VanillaYum

Cheater Cheater Pumpkin Eaters - Chocolate or Vanilla
 
Save Print
Author: Laura
Serves: 12
Ingredients
  • 1 cake mix, chocolate or vanilla
  • 15-ounce can pumpkin
  • ½ cup water
  • ½ teaspoon cinnamon if you'd like!
Instructions
  1. Mix ingredients together until smooth.
  2. Scoop into 12 paper-lined muffin tins (you'll fill them a little bit more full than a typical cupcake or muffin).
  3. Bake in a 350 degree oven for 22-25 minutes or until a toothpick inserted into the middle comes out clean.
3.5.3251

You can add chocolate chips, but I skip that because I don’t want to add extra sugar. Also have you seen what happens when toddlers eat melted chocolate chips? Oy, so messy.

And there you have it, friends. Cheater Cheater Pumpkin Eaters are fun and easy to make. The pumpkin makes these moist and pumpkin is a superfood. Ha. I declare these to be a win.

Heavenly Homemaker's Club Members: Access your homepage and all your fantastic resources here! Not a member yet? Please join us!

Easy Meatballs with Sweet Sauce (Freezer Friendly)

March 26, 2023 by Laura 2 Comments

This post may contain affiliate links. For more information, please see our disclosure policy.

Ready to make these Easy Meatballs with Sweet Sauce?

This is a favorite recipe from our newlywed days. I’d given up on making them for a couple of reasons:

  1. Meatballs aren’t Matt’s favorite.
  2. I don’t have time to scoop out cute balls of meat anymore.

So I’ve been cheating and buying frozen meatballs at Costco. The kids LOVE those. But Matt (who doesn’t love meatballs anyway) and I (one who does love meatballs but NOT the frozen packaged kind) couldn’t stand it anymore. We would either go meatball-less, or I’d find a few extra minutes to make them myself.

Ah, and I suppose there is a third reason I haven’t been making meatballs as of late:

3. Ground beef has gotten pretty expensive.

We’ve been opting for more chicken and pork and less beef these days. Meatballs weren’t making the cut when it came to inexpensive meals we could make for our large family.

But doggonit, I was hungry for meatballs. The real kind. The good kind. And after the packaged variety, even Matt welcomed the homemade variety.

I’d “splurged” on some of the good ground beef one day at Costco, and I decided to use all six pounds of it to make these meatballs. This gave us three wonderful meals!! I baked two pounds the night I made them, then I froze the remaining 4 pounds of pre-made (unbaked) meatballs to thaw and bake another day. Wonderful!

This meal is a huge hit with our family, and having these meatballs premade in the freezer is a huge time saver!

Easy Meatballs with Sweet SauceYum

Easy Meatballs with Sweet Sauce
 
Save Print
Author: Laura
Ingredients
  • 2-pounds ground beef
  • 3 Tablespoons minced onion
  • ½ teaspoons garlic powder
  • ¼ teaspoon sea salt
  • ½ cup milk
  • 2 eggs
  • 4 Tablespoons rolled oats
  • Sauce for Meatballs
  • ¾ cup ketchup
  • 2 Tablespoons minced onion
  • ¼ teaspoons garlic powder
  • 1 teaspoon liquid smoke
  • 2 Tablespoons brown sugar, molasses or honey
Instructions
  1. Mix first seven ingredients together thoroughly.
  2. Form into 1½ inch balls and place side by side in a 9x13 inch glass casserole dish.
  3. Stir sauce ingredients together in a small bowl, then spread over each meatball.
  4. Bake uncovered in at 350 degrees for one hour.
3.5.3251

NOTE: I estimated our meal cost a total of around $22.00, which fed 4 adults and 7 kids that night, plus we had some leftovers. So a little over $2.00/person, even with “expensive” ground beef. Not bad! :)

Heavenly Homemaker's Club Members: Access your homepage and all your fantastic resources here! Not a member yet? Please join us!

The Easiest No-Bake Cheesecake

March 19, 2023 by Laura 5 Comments

This post may contain affiliate links. For more information, please see our disclosure policy.

Ready for the Easiest No-Bake Cheesecake recipe?

This cheesecake is always a hit when I serve it and since it’s so easy to make, I can serve it to guests often.

Ingredient Info

I buy cream cheese at Aldi by the case because it is a great price for great cream cheese (not all off-brand cream cheese is good). So there’s my cream cheese recommendation. :)

Meanwhile, I have learned the hard way that higher-quality whipping cream does not work as well in this recipe. :(  When I used Horizon Organic Whipping Cream, I couldn’t get this mixture to thicken and set up. But when I used regular whipping cream from Walmart, it worked like a charm. So there you go. For this recipe, use low-quality whipping cream. Ugh, who even am I anyway??

The Easiest No-Bake CheesecakeYum

The Easiest No-Bake Cheescake
 
Save Print
Author: Laura
Serves: 15
Ingredients
  • 2 sleeves honey graham crackers
  • 2 sticks butter
  • 2 8-ounce packages cream cheese, softened
  • 1 cup raw sugar
  • 1 cup heavy whipping cream
  • 1 teaspoon vanilla
Instructions
  1. In a gallon sized Ziploc bag, crush graham crackers with a rolling pin.
  2. Melt butter in a small saucepan.
  3. Pour crushed graham crackers and melted butter into a 9 x 13 inch pan.
  4. Stir ingredients together and pat it down to create crust. Set aside.
  5. In a high power blender or using a hand mixer, blend together cream cheese, sugar, whipping cream and vanilla until mixture is combined and thick.
  6. Smooth mixture over the crust. Chill for at least two hours before serving.
3.5.3251

This cheesecake is great as-is, but you can also add fresh berries to make it fancier. Or, you can top it with candy bars for a fun treat! (One week, I had a package of a variety of candy bars that I wanted to get rid of so I used them up for a college student lunch. It was a huge hit!)

If you study the above picture, you’ll see that on the left, I used the cheapo whipping cream that actually thickened. On the right, I used good whipping cream and the mixture remained runny. I served it to our guests anyway and it all tasted great. But now you can see what I was talking about regarding whipping cream above. :)

Heavenly Homemaker's Club Members: Access your homepage and all your fantastic resources here! Not a member yet? Please join us!

Moist Chocolate Muffins (With Hidden Spinach, ha)

September 13, 2022 by Laura 7 Comments

This post may contain affiliate links. For more information, please see our disclosure policy.

These Moist Chocolate Muffins are truly made moist because of spinach. And yes, it’s like a new obsession with me, apparently.

What’s an obsession? Oh, just that I keep blending spinach into my chocolate baked goods because guess what? NO ONE CAN TELL. It adds nourishment, and as an added bonus, it is making all of our chocolate baked goods extra moist. True story.

See, it’s chocolate cake. With spinach. And it’s awesome.

Read these to learn more and to join the craze:

  • Add spinach to cake mix
  • Add spinach to Pumpkin Chocolate Cake
  • Add veggies to everything you can possibly think of
  • Add spinach to cake and bake it in a crock pot

And now, we are adding spinach to our Chocolate Muffins. It changes nothing about the taste of the muffins. It only makes them moist and easy to eat. Alrighty-then. Why have we not been doing this all along?

Moist Chocolate MuffinsYum

Moist Chocolate Muffins (With Hidden Spinach, ha)
 
Save Print
Author: Laura
Serves: 24
Ingredients
  • ½ cup melted coconut oil
  • 1 cup milk
  • ½ cup sour cream
  • 2 eggs
  • 3ish handfuls of fresh spinach
  • ½ - ⅔ cup brown sugar or sucanat
  • ½ cup unsweetened cocoa powder
  • 3 cups whole grain flour
  • 1¼ teaspoon baking powder
  • 1 teaspoon sea salt
Instructions
  1. Place all ingredients into a high power blender, beginning with liquids.
  2. Cover blender and blend on high until the spinach is pureed and all ingredients are thoroughly mixed.
  3. Pour into 24 prepared muffin tins.
  4. Bake in a 400 degree oven for 20-24 minutes or until a toothpick inserted in the middle of a muffin comes out clean.
3.5.3251


Can you make these muffins without a blender? Yes. But make sure you puree the spinach with the liquids first so that it isn’t chunky in your muffins.

When I mix all of my ingredients together in my Blendtec, I find that the spinach is no longer recognizable and simply adds moisture to the batter! Plus it makes the mixing part of this recipe super easy!

NOTE: I bake for a large family so this recipe is the double version. Cut ingredients in half if you only want to make a regular 12-muffin batch!

Heavenly Homemaker's Club Members: Access your homepage and all your fantastic resources here! Not a member yet? Please join us!

Simple Snack Recipe: 5 Minute Mousse

June 15, 2022 by Laura Leave a Comment

This post may contain affiliate links. For more information, please see our disclosure policy.

We all need this 5 Minute Mousse in our lives. I bet after we’ve made it a dozen times, we can knock our record down to make it in just 4 minutes, yes?

I used to make this all the time when I was young and only had two kids. Then I forgot about it as other fun recipes became more prominent. Also, I have a few more than two kids now.

I recently dug this recipe out again and wow is it a hit with our current tribe!

Here’s a fun photo our almost daughter-in-law snapped one day of me surrounded by five of our current ten kids. Life is a party, and that party calls for 5 Minute Mousse!

5 Minute MousseYum

Simple Snack Recipe: 5 Minute Mousse
 
Save Print
Author: Laura
Serves: 6
Ingredients
  • 2 cups heavy whipping cream
  • 3 Tablespoons unsweetened cocoa powder
  • ¼ cup sugar or honey
  • 1 teaspoon vanilla
Instructions
  1. Whip all ingredients together in a high power blender or with a hand mixer until thick and smooth.
  2. Chill for at least one hour before serving.
3.5.3251


Usually, I don’t take the time to scoop this into individual serving dishes before I put it into the fridge to chill. I’ve found that a large pyrex bowl with a lid works best. Then I scoop the mousse into small bowls and hand them out.

This dessert is brought to you by the mom who now needs to offer dessert every night.

Why? Because we’ve found that our six and eight-year-olds need some special incentives to eat healthy foods. “No veggies equals no dessert.” They also need reinforcement to be sweet. “If you aren’t sweet you don’t get sweets.”

So I’ve been coming up with desserts a little more regularly to help us as we train this new set of kids. :)

And of course, I add spinach to our cake, so they get to earn their cake and it comes with a full-on salad. That’s a mom-win! :)

Heavenly Homemaker's Club Members: Access your homepage and all your fantastic resources here! Not a member yet? Please join us!

The Easiest Spicy Ham and Potato Soup (Crock Pot Recipe)

February 16, 2022 by Laura 3 Comments

This post may contain affiliate links. For more information, please see our disclosure policy.

I wanted to call this easy Spicy Ham and Potato Soup “Dump Soup.” But that didn’t sound appealing. So I took out the “dump” – good call, right? Still, you should know that all we have to do to make this soup is “dump” the ingredients into the crockpot. SO EASY.

Yum

This Spicy Ham and Potato Soup is basically this soup remade. I cut out some steps and made it in the crockpot. You’ll love how much easier the revisions make this recipe!

Also, you should know that I’m obsessed with this soup. I almost never eat seconds of any meal. But when I make this soup, I eat thirds. Aren’t you proud?

The Easiest Spicy Ham and Potato Soup (Crock Pot Recipe)

5.0 from 1 reviews
The Easiest Spicy Ham and Potato Soup (Crock Pot Recipe)
 
Save Print
Author: Laura
Serves: 4-6
Ingredients
  • 8-ounces cream cheese
  • 16-ounces pepper jack cheese
  • ¾ cup sour cream
  • 1 cup half-and-half or whole milk
  • 10-ounce can Rotel (diced tomatoes and green chilies)
  • 1 pound ham, diced or cut into small bites
  • 3-4 cups frozen hashbrown potatoes
  • 32-ounces chicken, beef, or vegetable broth
Instructions
  1. Put all ingredients into a crock pot.
  2. Cook on low for 8 hours or on high for 4 hours.
  3. Occasionally, stir the soup to help distribute the cheeses.
  4. Just before serving, use a whisk to smooth the melted cheese.
3.5.3251

I love eating this soup just as it is. Some in my family love to added shredded cheese and fritos. The pepper jack cheese in this soup gives it a nice, spicy kick that is so amazing!

If you make this soup with frozen hashbrowns (I like Mr. Dells brand as it contains only potatoes) it is extra easy to put together!

Heavenly Homemaker's Club Members: Access your homepage and all your fantastic resources here! Not a member yet? Please join us!

EASIEST Bean and Cheese Quesadillas Our Family Loves

January 12, 2022 by Laura 5 Comments

This post may contain affiliate links. For more information, please see our disclosure policy.

Our family loves these Bean and Cheese Quesadillas even though they thought they wouldn’t!

This idea is not new or innovative. No one will actually be very impressed. But it is still worth sharing because we all need to be reminded from time to time of the best and easiest lunch or snack ideas!

We’ve always been a simple cheese quesadilla family.

Cheese quesadillas are no-brainers. Tortillas. Cheese. Melted together. In a skillet. That is all. Cut them into triangles. Dip them in salsa. Serve them with fruit. This is lunch.

But in an effort to figure out:

  • how to get my toddlers to eat more protein
  • what other soft foods our barely-has-any-teeth- 1-year-old baby can gum
  • more ideas for easy lunches, suppers, or snacks our whole family will like
  • inexpensive ways to feed our army of children

I decided to open a can of refried beans to smear on our tortillas when I made quesadillas one evening.

Yeah. Wow. I opened a can. It’s so easy I’m wondering why this hasn’t always been my go-to meal idea?? We can always wonder about this.

How my kids first respondedYum

When my kids asked what we were eating for dinner and I said “Bean and Cheese Quesadillas” my 6-year-old said, “Ok, but can you make mine with just cheese and no beans please?” And then my 17-year-old asked the very same thing. Because change is hard? Beans are hard? We don’t know. The bean version just didn’t sound good to them.

Fair enough. But I told them that I wanted to eat the bean version first and then if they really didn’t like it, I’d make them a plain cheese version.

Man, this story is not that exciting. Laura told her kids she was putting beans in their quesadillas. They were nervous. She made them try anyway. Thank you for sharing.

How my kids liked the Bean and Cheese Quesadillas after trying them

Well, I couldn’t keep up. I stood at the skillet and kept making quesadillas until the entire package of tortillas was gone. I cut the quesadillas into triangles and kept throwing them onto plates. I cut the babys’ quesadillas into tiny bites and kept throwing them onto the high chairs.

The 6-year-old forgot about the beans. She just ate her first quesadilla triangle and asked for another. And then another. And then another. So there you have it.

The 17-year-old? Same story. He ate his fair share and was like, “Wow Mom. These are actually good.”

Meanwhile, the 8-year-old, the 2-year-old, the 1.5-year-old, and the nearly-toothless 1-year-old ate and ate and ate.

I served the quesadillas with these smoothies, therefore we also loaded up on greens and fruit:

Bean and Cheese Quesadillas are a WINNER!

But you probably already knew that. This is old news. Everyone already makes these. Laura is 24 years behind.

Just in case, here’s how to make these:

5.0 from 1 reviews
EASIEST Bean and Cheese Quesadillas Our Family Loves
 
Save Print
Author: Laura
Ingredients
  • Whole Grain Tortillas
  • Shredded Cheese
  • Can of Refried Beans
Instructions
  1. Smear beans on a tortilla.
  2. Sprinkle shredded cheese on top.
  3. Top it with another tortilla to make a "sandwich."
  4. Heat it on low in a skillet until the cheese is melted, turning from time to time to heat both sides.
  5. Cut the quesadilla into trianges and serve as-is or with salsa, sour cream, and/or guacamole.
3.5.3251

Add Bean and Cheese Quesadillas to your go-to fast meal idea list!


Heavenly Homemaker's Club Members: Access your homepage and all your fantastic resources here! Not a member yet? Please join us!

What to do with All the Zucchini

August 27, 2021 by Tasha Hackett Leave a Comment

This post may contain affiliate links. For more information, please see our disclosure policy.

Trying to figure out what to do with all the zucchini?

what to do with all the zucchini

Yum

It’s zucchini season! I didn’t grow any this year. Sad. But other people did and around this time each year people are giving them away because when a zucchini plant does well, it does well. And when it doesn’t, we all curse the vine-borer grubs in unison and praise God for grocery stores and our friends who somehow fought off the nefarious and disgusting grubs. Ah-hem. Back to the yummy part.

What to do with all the zucchini?

Zucchini might be one of our favorite versatile vegetables. Here’s what I do with it:

  1. Chop it up and pan fry with salt and pepper and other stuff to make a quick skillet dinner: a.) garlic, onions, mushrooms, shrimp. b) garlic, onions, beef, cabbage. c.) garlic, onions, tomatoes, parmesan cheese. You get the idea: cook it and eat it for dinner with some meat and garlic and onions.
  2. Shred (or use the food processor to chop) and bake it into muffins, brownies, pancakes, waffles, breads, etc. Some people freeze the shredded zucchini to use for later. I have done this and I NEVER have good luck with it later. It gets all weepy and soggy and then I get weepy and never use it. Best of luck to you if you decide to freeze it. I’d rather bake the bread and freeze that instead.
  3. Cut in half, scrape out the middle and make pizza boats. (Broil, then melt on your pizza toppings. Dip in pizza sauce.)
  4. Slice in half, or chop, and roast, broil, or grill with oil, salt, and pepper and just eat it!
  5. Use a zoodle thingy and make noodles. Easy Alfredo and shrimp used to be my favorite with this.
  6. Have I ever been tired of zucchini? No, I have not.
  7. This is my announcement: I will take your extra zucchini.

Don’t let all the zucchini go to waste, let’s start baking!

Of course, Laura already put together many of her favorite zucchini recipes, but that was ages ago and you may have forgotten about it. Click through some of those recipes or search “zucchini” on this site for more great ideas.

Are you a zucchini lover like me? I used to only be a zucchini bread (which is usually cake, let’s not kid ourselves) kind of girl. But then I grew up and realized that as a vegetable it can take on the flavor of butter and garlic and I do so love butter and garlic. Here are some great recipes for you to try as the zucchini crop comes in.

Simple Oven-Baked Pizza Nachos

Finely chopped and baked over the nachos is a great way to sneak more veggies into this meal.

Last Minute Stir-Fry

Frozen chopped zucchini will be a little soggier than fresh, but it holds up better than shredded, OR just add a few fresh ones to your frozen veggie bags.

Zucchini Waffles

This is a pumpkin recipe. I know. You can sub one squash for the other. It will be fine. Really. Many popular baked zucchini recipes have so much sugar in them they may as well be cake… try a less-sugar option and top with just a few drops of maple syrup, honey, or nut butter.

Have zucchini for breakfast!

Why have we decided that most vegetables are for lunch and dinner? Here’s a quick breakfast that I’ve made many times already this summer: In a hot skillet I melt butter, fry up a chopped summer squash (yellow or green), add in a can of chicken (because it’s breakfast and people are hungry for the food), salt and pepper and (here’s the secret ingredient), a tablespoon or so of lemon juice. You must not forget the lemon juice. Once the chicken is warmed and the lemon juice has sizzled for a few seconds, we eat and dance and go about our day warm and well-fed.

In hindsight, I will need to make that one into an actual recipe post for you. You will need to be reminded of it again because it is so delicious.

Do tell, what is your favorite way to eat this amazing and versatile vegetable?


book cover of bluebird on the prairie Tasha Hackett is a friend of Laura and author of Bluebird on the Prairie, a historical romance set in an 1879 Nebraska town. Zeke has his sights set for California, but Eloise prefers the quiet safety of her home. Is it possible they’re both searching for the same things? Find this heart-warming romance wherever books are sold.

To find out more about Tasha and her world of historical fiction, connect with her at www.TashaHackett.com.

Heavenly Homemaker's Club Members: Access your homepage and all your fantastic resources here! Not a member yet? Please join us!
Next Page »

Join Our Community!

 Facebook Twitter E-mail Instagram Pinterest

Popular Posts

~ Will All of the Real Moms Please Stand Up?
~ Easy! Stir-and-Pour Whole Wheat Bread
~ How to Make Gatorade
~ 31 Real Food Breakfast Ideas
~ Dear Teenage Girls...
~ When Mom Takes a Step Back
~ The Inexpensive Health Insurance We Love!
~ Let's Talk Real Food Grocery Budgets

Check out our latest posts!

  • Big Family Food and Fun: March 1-7, 2026
  • The Best Parts of Life that Help Me Feel Human
  • Sometimes I Forget My “WHY”
  • Big Family Food and Fun: February 22-28, 2026
  • Big Family Food and Fun: February 15-21, 2026
Home  ~  Simple Meals  ~  Club Membership  ~  Shop  ~  Privacy Policy  ~  Disclosure  ~ Contact

Copyright © 2026 · Beautiful Pro Theme on Genesis Framework · WordPress · Log in