Heavenly Homemakers

Encouraging women in homemaking, healthy eating and parenting

  • Home
    • About
    • FAQs
  • Recipes
    • Bread and Breakfast
    • Condiments
    • Dairy
    • Main Dishes
    • Side Dishes and Snacks
    • Desserts
    • Gluten Free
    • Instant Pot
    • Crock Pot
    • Heavenly Homemaker’s Weekly Menus
  • Homemaking
    • Real Food Sources
  • Store
  • Contact
    • Advertise
    • Disclosure
    • Privacy Policy
  • Simple Meals
  • Club Members!

A Week of Apples

October 16, 2011 by Laura 50 Comments

This post may contain affiliate links. For more information, please see our disclosure policy.

I have a grand total of 110 pounds of apples in my kitchen right now. You know what this means don’t you? Yes, it means that by the end of this week my fingers are going to look brown and dirty. And they’ll stay that way for about two weeks until the brown wears off. It’ll be really cute and not at all embarrassing (as long as I keep my hands stuffed into my pockets while out in public).

Oh, and if I don’t wear an apron while I’m working with all of these apples, the front of my shirt will also be covered in brown splatter stains, which will never come out. I learned this the hard way a few years ago when I made applesauce all day, while wearing a cute Disney shirt, before going to a soccer game. I completed the task of making applesauce, ran it through the water bath process to can it and put the jars away in my pantry. I didn’t look down at my shirt until I was at the soccer game that night cheering for my boys. It was then that I noticed that Eeyore was completely covered in ugly brown specks. (Of course, it had to be Eeyore.)  I was by far the most pitiful looking mother out at the soccer field that day. Of all days to leave my jacket at home.

So now you know:  While you peel, core, slice and chop apples – the juice will spit and splatter everywhere. If you work on 110 pounds of apples, everything around you, including every crevice on your hands, will turn brown for days. There’s not much you can do about this, so just embrace the fact that you’ll look like you’ve been working under the hood of your car. To avoid answering any difficult-to-answer questions from the powers that be, remove all school papers, bills, library books, and photos before proceeding. And for the love of Eeyore, please wear an apron.

My 110 pounds of apples await, and I guess it goes without saying that my apron is ready for action. Here’s what I’m looking at doing this week:

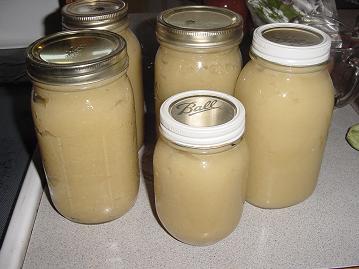
I’ll start by making and canning as many jars of Applesauce as I can make before I get sick of making applesauce. I will probably be using a slightly different method than the one described here, so I’ll give an update on that sometime during the week.

applesauce11sm.JPG

If, in fact, I still have a few pounds of apples left after making applesauce, I hope to then make a few Mini Apple Pies. These are great to have in the freezer for a quick breakfast or dessert.

miniapplepies7sm

I may also can a few jars of Apple Pie Filling. This is great to have on hand to when throwing together a quick apple crisp or of course, to make a big apple pie. Here’s my Whole Wheat Pie Crust recipe if you’re interested.

Malachi_apple_pie_1

I may also use my Excalibur Food Dehydrator and make Apple Fruit Leather and/or dried apple rings. When you have 110 pounds of apples, you can just keep going with the apple preserving until you’ve got a wide variety of apple goodies, or until you faint onto the floor of your kitchen – whichever comes first. Don’t worry – I plan to get my boys busy helping me with these projects this week. They are great applesauce makers.

We also plan to simply eat a bunch of these apples. I love having so many apples on hand for snacks. If you haven’t tried making Caramel Apple Dip, I highly recommend it. It’s one of my favorite ways to eat apples.

Throughout the week, I’ll be snapping pictures and sharing my apple preserving progress. Prepare to get sticky around here. I might even experiment with Apple Butter like several of you requested last week!

What is your favorite way to eat apples? Ever ruined an Eeyore shirt with apple spatters? This is why aprons were invented.


Heavenly Homemaker's Club Members: Access your homepage and all your fantastic resources here! Not a member yet? Please join us!

Gluten Free Peanut Butter Honey Balls

April 6, 2011 by Laura 76 Comments

This post may contain affiliate links. For more information, please see our disclosure policy.

Yum

If you haven’t made this Peanut Butter Honey Fudge…you are missing out on one of the easiest treats ever! For a little variation this time, I decided to roll some of the squares into balls. 

It may be fun to roll these balls in coconut flakes too!

Okay…Peanut Butter Honey Fudge – you have to try it! Three ingredients, that’s it! Peanut butter, honey and chocolate chips.  Find the recipe here!

Heavenly Homemaker's Club Members: Access your homepage and all your fantastic resources here! Not a member yet? Please join us!

Healthy Strawberry Shortcake

June 10, 2010 by Laura 67 Comments

This post may contain affiliate links. For more information, please see our disclosure policy.

When fresh strawberries are in season, nothing much tastes better than Strawberry Shortcake. This variation of Strawberry Shortcake is lightly sweetened with honey and made with whole wheat flour. We had the entire cake eaten up in just a few minutes!

strawberry_shortcake_2

Yum

 Strawberry Shortcake

1 1/3 cups whole wheat flour (I use freshly ground whole wheat)
1 teaspoon baking powder
2 eggs
1/2 cup honey
1/3 cup oil (I use coconut oil)
1 teaspoon vanilla extract
1/2 cup milk

4-5 cups of fresh, sliced strawberries
Whipped cream (fresh cream whipped to form soft peaks, with a bit of stevia added for sweetness)

Mix together flour and baking powder. Add in eggs, honey, oil, vanilla and milk. Stir well (or mix well with hand mixer). Pour into a well buttered 8×8 inch baking pan. Bake at 350° for 20-25 minutes.

Allow cake to cool completely. Top with fresh strawberries and whipped cream. (9 servings)

Strawberry Shortcake with Whole Wheat and Honey

If you’d like more ideas for what to do with all the fresh strawberries that are in season right now, you may want to take a look at this fun recipe list!

Heavenly Homemaker's Club Members: Access your homepage and all your fantastic resources here! Not a member yet? Please join us!

Whole Wheat Banana Bread and Muffins

May 19, 2010 by Laura 107 Comments

This post may contain affiliate links. For more information, please see our disclosure policy.

banana_bread

Did I ever tell you about the time I almost forgot to put the bananas into my banana bread?

I have these finer moments in my kitchen from time to time. They mostly happen while I’m trying to cook and talk simultaneously. If I’m talking on the phone while mixing up a recipe, I tend to leave out key ingredients. Or add the same ingredient twice.  It’s ridiculous.  I think it’s crazy that I can usually multi-task quite well…but I can barely have a conversation with someone while I cook. Duh. Just be glad I type these posts after I’m finished cooking. Otherwise, these recipes would just be plain scary.

And so, because I care too much not to share, here’s a handy baking tip:  When making Banana Bread or Muffins, be sure to add the bananas. The final product tastes much better this way. I’m nothing if not helpful.

Whole Wheat Banana Bread and MuffinsYum

1 3/4 cups whole wheat flour (I use freshly ground flour from hard white wheat)
1 teaspoon baking powder
1/2 teaspoon baking soda
1/4 teaspoon sea salt
1 cup mashed over-ripe bananas (about 2-3 bananas)
1/3 cup honey
1/4 cup melted butter
2 eggs

Stir together flour, baking powder, baking soda and salt. In a separate bowl, mash bananas, or puree them in a blender. Mix mashed bananas, honey, melted butter and eggs into flour mixture.

For Bread:  Spread batter into a well buttered bread pan. Bake in a 350° oven for 50-60 minutes or until a toothpick inserted into the middle comes out clean.

For Muffins:  Spoon batter into 12 buttered or paper lined muffin tins. Bake in a 400° oven for 20 minutes.

Speaking of finer moments in my kitchen…did I ever tell you about the time I made a lovely lasagna ahead of time so that I would be all ready for my company that night? Because, you see, it’s great to be prepared when you’re having company. Oh, and it also helps to get the lasagna out of the fridge and BAKE IT at dinner time. Being prepared doesn’t help at all if you don’t actually bake your lasagna. Yeah, dinner was a little late that night.

Heavenly Homemaker's Club Members: Access your homepage and all your fantastic resources here! Not a member yet? Please join us!

Healthy Celebrations: Double Lemon Cupcakes (a guest post!)

May 11, 2010 by Laura 13 Comments

This post may contain affiliate links. For more information, please see our disclosure policy.

healthy_celebrations_med

Yum

Please join me in welcoming Holly, who is guest posting today to share her awesome Double Lemon Cupcake recipe with us! I can’t wait to give these a try!
—————————————————–

Hello Heavenly Homemakers readers! My name is Holly. I am a Christian, a military wife and momma to an 18 month old son, and I am really excited to be sharing a recipe (or three) with you. The past year I have been learning about traditional foods; I have reinvented how I shop, cook, eat, and feel about food. The most recent milestone in this journey was birthday cake. Remember when Laura asked us to choose between chocolate and vanilla? Well, to celebrate my 24th birthday I chose option C.  

I wanted  a birthday dessert that satisfied my emotional desire for cake, but also fulfilled my sensible need to eat wholesomely. I knew that if I did not satisfy both halves I would be left either feeling like a whole wheat martyr or a big sugar-filled failure. Yuck. Blessedly, I found a happy medium with these  sweet and tangy cupcakes. 

lemon_cupcakes_6

Let me just say that I am normally very relaxed baker, I never sift. I fudge the temperatures and can be lazy with the mixing. But for this recipe, if I say sift I do mean sift. The same goes for temperatures and times. It may seem fussy for some of you, but the results are rewarding. 

Double Lemon Cupcakes


3 c whole wheat flour
1 tbsp baking powder
½  tsp sea salt
1 c butter, room temperature
1 c orange blossom honey
4 large eggs, room temperature
the zest of 3 lemons (I recommend organic because you are consuming the peel), plus 2 tbsp lemon juice
1 tsp vanilla extract
1 c buttermilk 

Preheat oven to 325° F. Butter and flour the inside of two round cake pans or two dozen muffin tins. Zest the lemons (just the yellow part, try to avoid the white pith because it is bitter), you want this to be very fine. Sift the dry ingredients together and set aside. Add the lemon juice to the buttermilk. 

Cream the butter and the honey until they are nice and fluffy. Add the eggs one at a time, until well mixed in. Add the zest and vanilla. Add the flour and buttermilk in three parts. Beat until just combined. Pour the batter into the prepped pans and bake until golden brown and they pass the toothpick test, 30-35 minutes for a cake, 25 minutes for cupcakes. 

lemon_cupcakes_2

While the cakes are baking, mix up a nice batch of… 

Lemon Curd   

8 large egg yolks
Finely grated zest of 2 lemons
½  c plus 2 tbsp lemon juice (about 3-4 lemons)
½ c orange blossom honey
teeny pinch of salt, about 1/8 tsp
¾ c unsalted butter (10 tbsp or 1 ¼ sticks) cold, cut in pieces  

Wisk together all ingredients except butter and salt in a medium saucepan. Cook over medium-high heat, stirring constantly with a wooden spoon. When the mixture registers 160° F on an instant-read thermometer and is thick enough to coat the back of the spoon, remove from heat. This should take about 8-10 minutes. If you don’t have a thermometer, just do what I did and use good quality eggs. 

Remove pan from heat and add salt and butter, one piece at a time, stirring until smooth after each addition. Strain through a sieve. It is normal for small bits of cooked egg to strain out, don’t worry you did it right. :) Cover this with plastic wrap and let it cool in the fridge at least one hour.

lemon_cupcakes_3  

Fill your cupcakes with lemon curd. You can use a pastry bag and large tip, or poke a hole with the wrong end of a wooden spoon and use a plastic baggie with a corner snipped off. Spread extra curd on top of the cupcake. If you’re making a cake, spread the lemon curd between the two layers. Then whip up your frosting. 

Soft and Fluffy Frosting

8 egg whites
¾ c orange blossom honey
1 tsp vanilla extract. 

Combine egg whites and honey in a large heat-proof mixing bowl (or the bowl for your stand mixer if you have one and it’s heat-proof) set over a pan of simmering water. Wisk rapidly for two minutes  Make sure your water does not boil! You will end up with scrambled egg frosting and it will be gross. Cook this until it reaches 160° F on an instant-read thermometer (or if like me you don’t have one, use good eggs and cook for two minutes). Remove from the heat and beat on your mixer’s highest speed for  until soft and fluffy, about 7-9 minutes. Beat in the vanilla. Use this frosting immediately. 

lemon_cupcakes_4

I used (some of the) leftover curd to decorate the tops of some of the cupcakes. Or you could eat it with a spoon and not tell anyone there were leftovers. I won’t look. 

lemon_cupcakes

Thanks Laura for letting me share my recipes with you and your readers!

Holly wanted me to be sure to let you know that the curd will keep in the fridge about 3 days, but it is best served in the first 24-36 hours, and the frosting should be used immediately after it’s made, because it will start to deflate after a few hours. It’s still edible for several days, but the quality goes down after 6-8 hours.
——————————————————-

This post is linked to Works for me Wednesday.

Heavenly Homemaker's Club Members: Access your homepage and all your fantastic resources here! Not a member yet? Please join us!

The Most Nutritious Sweeteners

April 12, 2010 by Laura 201 Comments

This post may contain affiliate links. For more information, please see our disclosure policy.

honey

Raise your hand if you ever feel overwhelmed and confused about which sweeteners/sugars are the best to use in your treats?

Uh-huh…me too. There are dozens of different sweeteners out there and all kinds of  arguments trying to convince you to eat one over the other.

While I’m certainly no sweetener expert (although I do consider myself an expert taste tester of all things sweet and sweeter), I will share with you what I’ve learned through the past few years of researching.

Better Sweeteners (in no particular order)

Sucanat/Rapadura – “Dehydrated Cane Sugar Juice”

This is by far my favorite sugar to bake with. It is processed in the traditional way that people of India have used for thousands of years and leaves most of the minerals intact. It substitutes one for one in recipes that call for sugar and has a delicious, rich flavor.

Rapadura is a brand name for Sucanat, so in general I find that Sucanat costs a bit less. Be very careful to buy Organic Sucanat however, as some ‘regular sucanat’ brands I’ve seen are NOT dehydrated cane sugar juice…but some form of processed sugar with molasses added back in making it MUCH less nutritious.

Raw Honey

If you can find raw honey from a local bee keeper, go for it! Raw honey (honey that has not been heated over 117° to kill healthy bacteria) contains many nutrients and digestive enzymes.

Raw honey is a wonderful addition to buttered toast or granola. Honey is also wonderful to bake with (although then of course, it won’t be raw anymore). If a recipe calls for one cup of sugar, I usually substitute 1/2-2/3 cup of honey.

Real Maple Syrup, Grade B

Mmm…I love maple syrup! I never bake with it, but find it works wonderfully in liquid recipes like Strawberry Milkshakes, Smoothies, Warm Vanilla Soother, Creamy Orange Cooler, etc. Oh, and it’s great on Pancakes and Waffles too!

Because real maple syrup is kinda pricey, I am the designated syrup pourer on pancakes…otherwise we’d have a lot of this “Liquid Gold” wasted all over our pancake plates.

Organic Grade B Maple Syrup is better than Grade A as more nutrients are present. Plus, non-organic maple syrups may contain formaldehyde or other synthetic defoamers.

“Mom, can I please have some more formaldehyde on my pancake?” I don’t think so.

Molasses

Molasses is the “waste product” that comes from the production of refined sugar. It is rich in many minerals. I don’t use molasses much for baking, except in recipes such as Molasses Cookies. Mmm!

————————————————
This is by no means an exhaustive list of “healthy sugars”…these are simply my favorites and the sugars I’m most familiar with. Feel free to add your suggestions in the comments section if you have researched and know of a great sugar to try!
————————————————

Sweeteners to Avoid

Refined Sugars

Unfortunately even many organic sugars (turbinado, raw, natural) are quite refined and contain very few nutrients. I use these occasionally because AT LEAST they are (unbleached, organic, a little less refined) and better than…

White Sugar

This sugar is so refined that there are no nutrients left in it whatsoever. It is also usually bleached to make it prettier. Because it is not sugar in its whole form…it has a dramatic effect on blood sugar levels in the body. I can actually feel the effect white sugar has on my body (can you?!).

But, if you have a choice between the two, choose regular sugar over…

High Fructose Corn Syrup

Dr. Mercola can explain why High Fructose Corn Syrup should be avoided way better than I can! Read his professional information on the subject…

Agave Nectar

While I used to believe that Agave Nectar was a healthy substitute for sugar, it seems I should have done my homework more thoroughly. Agave Nectar should usually be avoided as apparently, it is almost worse than High Fructose Corn Syrup.

By the way, I think I’ve changed any recipes I have here on my site that included agave nectar as an ingredient…but in case you find it anywhere, please let me know so I can edit it!

Artificial Sweeteners

Ooh, I can’t say enough about fake sugar!!! Please don’t make the mistake of believing that you are eating/drinking healthier if you avoid sugar but use aspertame, splenda, or whatever the latest “fake sugar” is out there. They are worse than good ol’ refined sugar and can cause so many long term health problems. I have reasons to be passionate about this subject…so if you want to picture me down on the floor grabbing your feet begging you to avoid these…that truly is what I’m doing right now. You can read more information about aspertame here. I believe these testimonials may say more than I ever could.

I’d love for you to share your experiences, thoughts on this subject, and favorite sugar choices with us!

Heavenly Homemaker's Club Members: Access your homepage and all your fantastic resources here! Not a member yet? Please join us!

Homemade Chewy Granola Bars (without corn syrup!)

March 25, 2010 by Laura 420 Comments

This post may contain affiliate links. For more information, please see our disclosure policy.

Chewy Granola Bars. No corn syrup. Easy recipe. Grab-and-go snack option. Fantastic.

Chewy Granola Bars - No Corn Syrup

Every homemade chewy granola bar recipe I’ve ever seen includes corn syrup and/or marshmallow cream (not ingredients we feel okay about eating or feeding my family). Even most pre-made granola bars I have seen at the store (even the organic ones) have ingredients I don’t like feeding my family.

I finally figured out a chewy granola bar recipe that we like! It’s easy and includes all natural sweeteners and ingredients! These bars are way cheaper than store bought granola bars! Plus you can customize it according to your family’s taste and allergies! They can be easily wrapped individually to take in the car or packed in a lunch!

Homemade Chewy Granola BarsYum

5.0 from 2 reviews
Homemade Chewy Granola Bars (without corn syrup!)
 
Save Print
Author: Laura
Ingredients
  • ½ cup peanut butter or sunbutter
  • ⅓ cup honey
  • ¼ cup coconut oil (or another oil of your choice)
  • 1 cup oats
  • 1 cup total of any combination of: sesame seeds, coconut flakes, sunflower seeds, dried fruit, mini chocolate chips
Instructions
  1. In a medium sized saucepan, melt together peanut butter, honey and coconut oil.
  2. Remove from heat and add one cup of oats.
  3. Choose your favorite combination of coconut flakes, sesame seeds, sunflower seeds, dried fruit and mini chocolate chips, to equal a total of ONE CUP. (I just got out my one cup measuring cup and poured in the ingredients until the cup was full.)
  4. Pour in and stir well.
  5. Spread mixture into a 8x8 or 9x4 pan.
  6. Chill for two hours, then cut into bars.
3.4.3177

granola_bars_1

granola_bars_2

granola_bars_3

Wrap in plastic wrap for a quick grab and go snack!

granola_bars_4

Many have said that these taste similar to the oldie-but-goodie No Bake Cookie recipe we’re all familiar with. How fun that these are quite a bit healthier!

I’ve found that these keep best in the fridge as they get a little bit too soft if left out for too long. What a perfect grab-and-go snack!

Heavenly Homemaker's Club Members: Access your homepage and all your fantastic resources here! Not a member yet? Please join us!

High Five Recipes: Peanut Butter Honey Fudge

March 16, 2009 by Laura 74 Comments

This post may contain affiliate links. For more information, please see our disclosure policy.

High Five Recipes 2

You know me…I love me some fudge. This is by far the easiest fudge I have ever made.  And the healthiest.

Peanut Butter Honey Fudge

Peanut Butter Honey FudgeYum

1 cup natural peanut butter (creamy or crunchy)
3/4 cup honey
1/2 cup milk chocolate chips

Combine all ingredients in a small saucepan. Cook and stir over low heat until the chocolate chips are melted and blended in (about 30 seconds).

Spread fudge into an 8×8 inch pan. Refrigerate until solid. Cut into 1 inch squares.
————————————

Now, you might be thinking…3/4 cup of honey?! That’s going to take up a lot of my honey! (Yes, Pooh Bear, you’re right.)

But you cut this fudge into little squares, and it really does go a long way. OOh, and it’s so simple and yummy! (So sorry all you peanut allergy friends out there!)

This is a super simple dessert to throw together real quickly to take somewhere…no baking involved. Hardly any time involved. Very little mess involved.

Oh, and you’ve gotta love a High Five Recipe with only THREE ingredients!! :)

Heavenly Homemaker's Club Members: Access your homepage and all your fantastic resources here! Not a member yet? Please join us!
« Previous Page

Join Our Community!

 Facebook Twitter E-mail Instagram Pinterest

Popular Posts

~ Will All of the Real Moms Please Stand Up?
~ Easy! Stir-and-Pour Whole Wheat Bread
~ How to Make Gatorade
~ 31 Real Food Breakfast Ideas
~ Dear Teenage Girls...
~ When Mom Takes a Step Back
~ The Inexpensive Health Insurance We Love!
~ Let's Talk Real Food Grocery Budgets

Check out our latest posts!

  • Big Family Food and Fun: May 31-June 6, 2026
  • Big Family Food and Fun: May 24-30, 2026
  • Free 7-Day Summer Menu Plan
  • Big Family Food and Fun: May 17-23, 2026
  • Easy Side Dishes for Summer
Home  ~  Simple Meals  ~  Club Membership  ~  Shop  ~  Privacy Policy  ~  Disclosure  ~ Contact

Copyright © 2026 · Beautiful Pro Theme on Genesis Framework · WordPress · Log in