Heavenly Homemakers

Encouraging women in homemaking, healthy eating and parenting

  • Home
    • About
    • FAQs
  • Recipes
    • Bread and Breakfast
    • Condiments
    • Dairy
    • Main Dishes
    • Side Dishes and Snacks
    • Desserts
    • Gluten Free
    • Instant Pot
    • Crock Pot
    • Heavenly Homemaker’s Weekly Menus
  • Homemaking
    • Real Food Sources
  • Store
  • Contact
    • Advertise
    • Disclosure
    • Privacy Policy
  • Simple Meals
  • Club Members!

Buttermilk Whole Wheat Chocolate Cake

October 28, 2010 by Laura 117 Comments

This post may contain affiliate links. For more information, please see our disclosure policy.

Say, would you like a little chocolate cake with that chocolate fudge frosting? :)

This recipe is great because you can soak the flour to break down the phytates if you want. Or if you don’t, that’s okay too. 

Buttermilk Whole Wheat Chocolate CakeYum

2 cups whole wheat flour
1 1/3 cups sucanat
1/3 cup cocoa powder
1 teaspoon baking powder
1/2 teaspoon baking soda
3 eggs
1/3 cup melted coconut oil or melted butter
1 1/3 cups buttermilk
Chocolate Fudge Frosting

If you choose to soak your flour, mix the 2 cups of whole wheat flour with the 1 1/3 cups buttermilk. Cover and allow this mixture to soak overnight on the countertop. Add remaining ingredients (everything but the frosting, that is) and bake as directed.

Otherwise…

Mix dry ingredients together in a large mixing bowl. Add eggs, oil or butter and buttermilk. Mix with beaters until batter is smooth and well mixed.

Work very hard to avoid grabbing a spoon and eating the entire batter directly out of the bowl before it has been baked. 

Butter two round cake pans or one 9×13 inch cake pan.

Bake round cakes at 350° for 25-30 or a 9×13 inch cake for 35-40 minutes. OR, leave the cakes in the oven until a toothpick poked in the middle comes out clean. Every oven is different, right?

Allow the cakes to cool completely before removing them from the pans. I used a butter knife to loosen the edges from the sides of the pan. Place the cakes on plates.

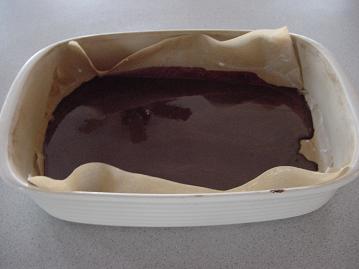
Did I forget to mention that you would need some of this Chocolate Fudge Frosting? Oh yes, you DO need a batch of this Chocolate Fudge Frosting. Plop a nice amount of frosting on one cake and spread it around well.

Like this…

Carefully place the other layer of cake on top of the frosted layer.

Oh look…it’s a chocolate fudge sandwich!!

Plop another nice amount of frosting on top of the second layer. Carefully spread the frosting over the top and sides. This step is not very easy for me and I’m usually messy and have to lick my fingers. Bummer.

All done.

Ah, a slice of chocolate heaven…

I will work (sometime within the coming months) to come up with a white cake and white frosting. However, when you’re using whole wheat flour and sucanat, the results are not going to be white. Anyone up for a Tan Cake?  Mmm, sounds good to me!

Get ready to share YOUR recipes Friday!!! Can’t wait to see what you’re going to share!!!

Heavenly Homemaker's Club Members: Access your homepage and all your fantastic resources here! Not a member yet? Please join us!

Chocolate Fudge Frosting – the Healthier Way!

October 28, 2010 by Laura 112 Comments

This post may contain affiliate links. For more information, please see our disclosure policy.

I won’t take up space talking about the loveliness of this recipe because well…it’s CHOCOLATE FUDGE FROSTING. Even if I thought of some cute words to write, you would likely be saying, “Yada, yada…show us the recipe!!!!!!!!!!!!!!!!!” And so…without further ado or ANY ado…here is the fudge frosting recipe made with homemade powdered sugar from sucanat I’ve been promising you…

Chocolate Fudge FrostingYum

1/2 cup butter
1/3 cup water
1/2 teaspoon vanilla extract
1/3 cup cocoa powder
4 (+) cups of powdered sugar (I suggest either making your own powdered sugar from sucanat, or using an unbleached powdered sugar)

Melt butter in a saucepan. Add water to the butter and bring it to a boil. Pour the boiling butter/water into a bowl with the cocoa and powdered sugar. Add vanilla and mix with beaters until thoroughly combined. Add a little more powdered sugar if the frosting is too runny, but keep in mind that it does thicken up just a little bit as it cools.

This recipe makes enough frosting for a two-layer cake or for a big sheet cake or for a nice thick layer of frosting on brownies or a 9×13 inch cake. Actually, it’s almost too much frosting for the brownies and 9×13 inch cake, so save some of it in your fridge and put the leftovers on homemade donuts another time. :)

Here’s our Buttermilk Chocolate Cake recipe! :)


Heavenly Homemaker's Club Members: Access your homepage and all your fantastic resources here! Not a member yet? Please join us!

Healthy Fruit Crisp

September 28, 2010 by Laura 96 Comments

This post may contain affiliate links. For more information, please see our disclosure policy.

I think that making a fruit crisp is one of the easiest desserts to make. But that may be because of a little short-cut I like to take.  Hey, I’m all for making special treats and doing it the lazy easy way.

Here’s my trick:  You know how a fruit crisp has a “crumb topping”? All the recipes I’ve seen say to “add all the dry ingredients together” then “cut in the butter until the mixture resembles course crumbs”. I am REALLY not a fan of “cutting in the butter” in any recipe. It takes extra effort and makes an extra mess and now that I am all grown up and not in Home-Ec class anymore, I have become a butter cutter inner rebel. I believe we should all take a stand against things we feel strongly about. And so, I hereby stand firm on my belief and I refuse to cut in butter.

I hope you can still respect me after that confession. If you still choose to cut in your butter, we can still be friends.

As a replacement (aka lazy) option to cutting the butter into the dry ingredients in a fruit crisp, I have chosen to simply MELT the butter and stir it into the oat and flour mixture. I KNOW. And check it out…I have still made crumbs:

I love this fruit crisp recipe because you can use any fruit you want. This time, I made peach fruit crisp because it just so happens that I got to go pick some lovely peaches at my friend Kim’s house. Depending on the kind of fruit you use, you may want to add more sucanat (sugar), but I’ll leave that up to you!

Healthy Fruit CrispYum

5 cups sliced fruit (apples, peaches, pears, cherries, blueberries or a combination of all)
2 Tablespoons sucanat or brown sugar

Stir the fruit together with the sucanat and place in a small baking dish (8×8 inch).

Make your Crumb Topping…

1/2 cup rolled oats
1/3 cup sucanat or brown sugar
1/4 cup whole wheat flour
1/4 teaspoon cinnamon (optional)
1/4 cup butter (MELTED, for Pete’s sake)
1/4 cup chopped nuts or coconut flakes (also optional)

Mix together oats, sucanat, flour and cinnamon. Stir in melted butter and joy upon joy, it creates crumbs with little to no effort. Add nuts or coconut flakes.

Sprinkle crumb topping over fruit. Bake in a 375° for 30-35 minutes or until fruit is tender and topping is golden brown.

Easy_Fruit_Crisp

If you’ve made and canned Apple Pie Filling, just dump it into your baking dish, sprinkle on your crumb topping and bake. SO easy!

I just have to know…are you a butter cutter inner, or a butter cutter inner rebel like me? Never thought about it before? Yeah, I figured I was the weird one with butter cutter inner issues.

Heavenly Homemaker's Club Members: Access your homepage and all your fantastic resources here! Not a member yet? Please join us!

Switching “from White to Brown”

September 26, 2010 by Laura 40 Comments

This post may contain affiliate links. For more information, please see our disclosure policy.

simplesteps

In last week’s podcast I mentioned that another great step to make in your journey toward healthy eating is to make the switch “from white to brown”.

And what, you ask, does it mean to switch “from white to brown”? In three major areas, I would suggest starting to move away from refined, highly processed, nutrient void ingredients…and instead choose unrefined, unprocessed, nutrient filled ingredients. These three major areas would be:  Rice, Sugar and Grain. 

Yeah, because guess what?! White flour, white sugar and white rice have pretty much NO nutritional value. When we eat them, they fill our bellies…and that’s about it. Our body really can’t do anything with them since the nutrients have been stripped out of them…which is why they are called “empty calories”. In fact, because our bodies crave nutrients in order to function properly, these “white ingredients” can also be “negative calories” – as in the nutrients stored as reserves in our bodies are then sucked out to help our body function, leaving our reserves depleted. And then what often happens with the white stuff? It turns to fat.  Well, no wonder. It’s bored and has nothing else to do.

In addition, once our bodies are depleted of nutrients, we are much more likely to get sick. Did I mention that eating these nutrient void ingredients can even cause depression? OUR BODIES NEED NUTRIENTS!!!

Now that I’ve made this suggestion…I am also going to reassure you that it really is okay to take one step at a time as you start replacing white ingredients with brown ingredients in your kitchen. This switch “from white to brown” takes a little effort. It may take a while to adjust your family’s taste buds. You also may find that it adds a little more expense. (Remember though that you are investing in REAL whole food – an investment in your health and the health of your family that is well worth the cost and effort!)

But I believe in the end, you will LOVE making this switch. 

Want to know a little secret? Brown ingredients actually have flavor!! It’s amazing what nutrients will do to food – it makes them taste good!! Go figure. :)

Here are some tips to help you transition “from white to brown”:

  • Make the switch gradually. You can make a mixture of white rice and brown rice to help get your family used to it. You can do the same with white flour and whole wheat…white sugar and sucanat. Mix it up a bit…literally.
  • Read through the suggestions about the sugars I recommend here.  There are several different “healthy sugars” that make fantastic treats!
  • Try to find whole wheat flour made from hard (or soft) WHITE wheat. White wheat is a variety of grain that has the same nutrition as red wheat…but white wheat makes a lighter, fluffier flour that is not as hard to get accustomed to. We love hard white wheat at our house. And…I know I’m telling you to switch from white to brown and white wheat is white…but really…white wheat makes brown flour. Really it does. :)
  • Cook your brown rice in chicken broth to make it taste awesome – yum! (I’ll try to post a tutorial on how to easily cook brown rice sometime soon.)
  • Whole wheat pasta really is tasty! Our favorite whole wheat spaghetti is bionaturae. This brand works great for my Creamy Mac and Cheese recipe!

 I’d love for all of you to pipe in and share your tricks for making the switch from white to brown! What works for you and your family? What have been some of your biggest challenges in making the switch?


Heavenly Homemaker's Club Members: Access your homepage and all your fantastic resources here! Not a member yet? Please join us!

The Most Nutritious Sweeteners

April 12, 2010 by Laura 201 Comments

This post may contain affiliate links. For more information, please see our disclosure policy.

honey

Raise your hand if you ever feel overwhelmed and confused about which sweeteners/sugars are the best to use in your treats?

Uh-huh…me too. There are dozens of different sweeteners out there and all kinds of  arguments trying to convince you to eat one over the other.

While I’m certainly no sweetener expert (although I do consider myself an expert taste tester of all things sweet and sweeter), I will share with you what I’ve learned through the past few years of researching.

Better Sweeteners (in no particular order)

Sucanat/Rapadura – “Dehydrated Cane Sugar Juice”

This is by far my favorite sugar to bake with. It is processed in the traditional way that people of India have used for thousands of years and leaves most of the minerals intact. It substitutes one for one in recipes that call for sugar and has a delicious, rich flavor.

Rapadura is a brand name for Sucanat, so in general I find that Sucanat costs a bit less. Be very careful to buy Organic Sucanat however, as some ‘regular sucanat’ brands I’ve seen are NOT dehydrated cane sugar juice…but some form of processed sugar with molasses added back in making it MUCH less nutritious.

Raw Honey

If you can find raw honey from a local bee keeper, go for it! Raw honey (honey that has not been heated over 117° to kill healthy bacteria) contains many nutrients and digestive enzymes.

Raw honey is a wonderful addition to buttered toast or granola. Honey is also wonderful to bake with (although then of course, it won’t be raw anymore). If a recipe calls for one cup of sugar, I usually substitute 1/2-2/3 cup of honey.

Real Maple Syrup, Grade B

Mmm…I love maple syrup! I never bake with it, but find it works wonderfully in liquid recipes like Strawberry Milkshakes, Smoothies, Warm Vanilla Soother, Creamy Orange Cooler, etc. Oh, and it’s great on Pancakes and Waffles too!

Because real maple syrup is kinda pricey, I am the designated syrup pourer on pancakes…otherwise we’d have a lot of this “Liquid Gold” wasted all over our pancake plates.

Organic Grade B Maple Syrup is better than Grade A as more nutrients are present. Plus, non-organic maple syrups may contain formaldehyde or other synthetic defoamers.

“Mom, can I please have some more formaldehyde on my pancake?” I don’t think so.

Molasses

Molasses is the “waste product” that comes from the production of refined sugar. It is rich in many minerals. I don’t use molasses much for baking, except in recipes such as Molasses Cookies. Mmm!

————————————————
This is by no means an exhaustive list of “healthy sugars”…these are simply my favorites and the sugars I’m most familiar with. Feel free to add your suggestions in the comments section if you have researched and know of a great sugar to try!
————————————————

Sweeteners to Avoid

Refined Sugars

Unfortunately even many organic sugars (turbinado, raw, natural) are quite refined and contain very few nutrients. I use these occasionally because AT LEAST they are (unbleached, organic, a little less refined) and better than…

White Sugar

This sugar is so refined that there are no nutrients left in it whatsoever. It is also usually bleached to make it prettier. Because it is not sugar in its whole form…it has a dramatic effect on blood sugar levels in the body. I can actually feel the effect white sugar has on my body (can you?!).

But, if you have a choice between the two, choose regular sugar over…

High Fructose Corn Syrup

Dr. Mercola can explain why High Fructose Corn Syrup should be avoided way better than I can! Read his professional information on the subject…

Agave Nectar

While I used to believe that Agave Nectar was a healthy substitute for sugar, it seems I should have done my homework more thoroughly. Agave Nectar should usually be avoided as apparently, it is almost worse than High Fructose Corn Syrup.

By the way, I think I’ve changed any recipes I have here on my site that included agave nectar as an ingredient…but in case you find it anywhere, please let me know so I can edit it!

Artificial Sweeteners

Ooh, I can’t say enough about fake sugar!!! Please don’t make the mistake of believing that you are eating/drinking healthier if you avoid sugar but use aspertame, splenda, or whatever the latest “fake sugar” is out there. They are worse than good ol’ refined sugar and can cause so many long term health problems. I have reasons to be passionate about this subject…so if you want to picture me down on the floor grabbing your feet begging you to avoid these…that truly is what I’m doing right now. You can read more information about aspertame here. I believe these testimonials may say more than I ever could.

I’d love for you to share your experiences, thoughts on this subject, and favorite sugar choices with us!

Heavenly Homemaker's Club Members: Access your homepage and all your fantastic resources here! Not a member yet? Please join us!

Making Homemade Chocolate Chips…In Detail

July 13, 2009 by Laura 357 Comments

This post may contain affiliate links. For more information, please see our disclosure policy.

I posted about making homemade chocolate chips a long time ago. Since that time, I’ve received several emails asking for more help and detail about how this works. It seems that many of you who tried the recipe are having trouble getting everything to melt and dissolve and mix like it should.

In light of your chocolate chip frustration…I decided to do a more thorough tutorial about how I make chocolate chips. The words Chocolate and frustration should never be in the same sentence together. Ever.

You can use coconut oil or butter to make your chips. I used butter this time because I’m almost out of coconut oil. Butter doesn’t quite work as well as coconut oil. They tend to be softer with butter…but still oh so good. Especially when you put them in these Chocolate Chip Brownies.

Here again is the recipe:

Homemade Chocolate ChipsYum

1/2 cup cocoa powder
1/2 cup rapadura or sucanat (you can use white sugar if you want)
1 cup coconut oil or butter
1 teaspoon vanilla extract  (homemade vanilla extract if you have it!)

Begin by placing the cocoa, sucanat and butter (or coconut oil) into a quart sized jar. 

chocolatechiptutorial1sm

Fill a small saucepan with two or three inches of water. Place the jar into the saucepan/water. Turn the heat on medium/high to begin melting the butter.

chocolatechiptutorial2sm

Stir often. After five minutes, my mixture looked like this:

chocolatechiptutorial3sm

After ten minutes, my mixture looked like this:

chocolatechiptutorial4sm

It took a total of thirteen minutes for the butter to completely melt. I then pulled it out of the water, added the vanilla and stirred well.

The mixture in my jar looked and smelled SO GOOD that I wanted to drink it. But I didn’t.  That would have made quite a mustache. 

chocolatechiptutorial5sm

Pour the mixture into a 9×13 inch pan covered with parchment paper. Spread it as evenly as you can. 

As you can hopefully tell from the following picture, I still have a little sucanat that refused to completely dissove. Can you see the bits of chunkyness? That’s been one of the questions I’ve received from several of you. But…the little bits of chunkyness don’t hurt anything. My chocolate chips tasted just fine!

You like how the ceiling fan is reflecting in the chocolate? 
I’m just trying to show off my terrible photography skills.

Place your pan into the refrigerator for 1-2 hours so that the chocolate can harden. Remove it from the parchment paper and break it into chunks. Store in refrigerator in an airtight container (unless you and your family eat them all first).

Just a note:  These chocolate chips taste wonderful in Homemade Chocolate Chip Cookies, but keep in mind that they are very pure and therefore tend to melt and get runny while baking. Chocolate Chip Cookies with homemade chocolate chips taste wonderful, but might look a little bit funny. No matter, ugly cookies taste good too. :)  I recommend eating these chocolate chips plain, mixed with peanuts or in trail mix, in Chocolate Chip Brownies or in Chocolate Chocolate Chip Muffins.

And now, I do believe I need to use my freshly made chocolate chips to bake brownies. After I eat some green beans and broccoli of course…

Heavenly Homemaker's Club Members: Access your homepage and all your fantastic resources here! Not a member yet? Please join us!

Healthy Treat for Today: Whole Wheat Donuts

March 18, 2008 by Laura 97 Comments

This post may contain affiliate links. For more information, please see our disclosure policy.


My dad…whom my boys call, Papa, is famous around here for buying us donuts when he comes to town. It’s become a big deal…one that the boys won’t let Papa forget about. (“Hi Papa…did you bring us donuts?…oh, and we’re also glad you’re here…”)

One Saturday morning…I decided to make homemade (and healthier) donuts for the family. I got up early…ground wheat into flour…mixed up the dough, rolled them out, fried them up…and made a special hot fudge sauce to drizzle over them. I put them on a pretty platter…poured glasses of fresh milk…and called the boys down for breakfast.

I cheerfully and excitedly greeted them with flour on my face and my hair all frazzled from all the work of making these fresh off the stove donuts…

And my three year old lit up and said, “Oh!! Did Papa make us DONUTS?!”

Huh. I go to all this trouble…and Papa gets all the credit. 

sigh  :)

Well, they liked my donuts just as much Papa’s…and I loved that these were a pretty healthy treat!

(Papa really got a big kick out of that story, of course..)

I hope you’ll get a big kick out of this recipe!

Whole Wheat Cake Donuts (or should I call them, “Papa’s Special”?)!Yum

3 ¼ cup whole wheat flour
2 t. baking powder
½ t. cinnamon
¼ t. salt
¼ t. nutmeg
2/3 cup rapadura (dehydrated cane sugar juice) or sucanat
2 eggs
1 t. vanilla
2/3 cup milk
1/4 cup melted butter
Oil for frying (I use palm shortening or coconut oil)

Mix dry ingredients in a large mixing bowl. Stir in eggs, vanilla, milk and melted butter. Knead dough a few minutes to make sure all ingredients are mixed thoroughly.
On a floured surface, roll dough to ½ inch thickness. Cut with donut cutter, or biscuit cutter. Heat oil in skillet or electric skillet…enough to cover the bottom of the skillet about ¼ inch. Place donuts into the hot oil to fry for 2-3 minutes on each side. Remove from skillet and place on a paper towel lined plate. Sprinkle a mixture of rapadura and cinnamon, or sprinkle organic powdered sugar over the hot donuts. 

donutssm1.JPG

Yum! Anytime I want a special breakfast treat for my family…these donuts work for me!

Heavenly Homemaker's Club Members: Access your homepage and all your fantastic resources here! Not a member yet? Please join us!

Healthy Treat for Today: Trail Mix With HOMEMADE CHOCOLATE CHIPS

February 22, 2008 by Laura 29 Comments

This post may contain affiliate links. For more information, please see our disclosure policy.

Who knew? 

You can make your very own chocolate chips!!

Okay, well, I’m actually not clever enough to make them into the shape of chocolate chips…so maybe we’d better call them chocolate chunks.

Chip…Chunk…whatever. How cool are WE to know how to make our very own Chocolate Chiunpks?

I’ve had this recipe for a while, but hadn’t really thought about making it. Then I saw it on another post and was reminded! I’m SO glad for the reminder!

The recipe comes from my FAVORITE nutrition book:  Nourishing Traditions. 

I adapted it just a bit because it had a pretty bitter chocolate taste…and you may need to adapt it more, depending on how bitter you like your chocolate. 

Also, depending on the quality of coconut oil you use, you may or may not have a
coconut-y taste in your chips. I LIKE it with the coconut taste. 

Okay…so are you ready?!?! 

Homemade Chocolate ChipsYum

1/2 cup cocoa powder
1/2 cup rapadura or sucanat
1 cup coconut oil
1 T. vanilla

Mix ingredients in a glass container and set in simmering water until melted. Mix together well. 
chocchips1sm.JPG
(Anybody wanna know what I was doing at exactly 2:04 yesterday?)
(uh, see…you can see my clock there, behind the melting chocolate chip mixture.)

Spread mixture on a piece of buttered parchment paper and allow to cool in the refrigerater. 
chocchips2sm.JPG

When hardened, remove parchment paper and break into chunks. Store in refrigerator in an airtight container.
chochips3sm.JPG

Aren’t they beautiful? Mmmmm-mmmm. (See a more thorough chocolate chip making tutorial here!)

Now…for the Trail Mix part…

1/2 cup pecans
1/2 cup cashews
1/2 cup peanuts
1/2 cup raisins
1/2 cup dried apricots, cut into pieces
1/3 cup homemade chocolate chips

Mix it all together and store in an airtight container in the refrigerator…if it makes it that far!

Come back tomorrow for a recipe for whole wheat, rapadura Chocolate Chiumpk Cookies!

(And let me know if you can figure out how to pronounce that.)  :)

Heavenly Homemaker's Club Members: Access your homepage and all your fantastic resources here! Not a member yet? Please join us!
« Previous Page

Join Our Community!

 Facebook Twitter E-mail Instagram Pinterest

Popular Posts

~ Will All of the Real Moms Please Stand Up?
~ Easy! Stir-and-Pour Whole Wheat Bread
~ How to Make Gatorade
~ 31 Real Food Breakfast Ideas
~ Dear Teenage Girls...
~ When Mom Takes a Step Back
~ The Inexpensive Health Insurance We Love!
~ Let's Talk Real Food Grocery Budgets

Check out our latest posts!

  • Big Family Food and Fun: May 31-June 6, 2026
  • Big Family Food and Fun: May 24-30, 2026
  • Free 7-Day Summer Menu Plan
  • Big Family Food and Fun: May 17-23, 2026
  • Easy Side Dishes for Summer
Home  ~  Simple Meals  ~  Club Membership  ~  Shop  ~  Privacy Policy  ~  Disclosure  ~ Contact

Copyright © 2026 · Beautiful Pro Theme on Genesis Framework · WordPress · Log in