Heavenly Homemakers

Encouraging women in homemaking, healthy eating and parenting

  • Home
    • About
    • FAQs
  • Recipes
    • Bread and Breakfast
    • Condiments
    • Dairy
    • Main Dishes
    • Side Dishes and Snacks
    • Desserts
    • Gluten Free
    • Instant Pot
    • Crock Pot
    • Heavenly Homemaker’s Weekly Menus
  • Homemaking
    • Real Food Sources
  • Store
  • Contact
    • Advertise
    • Disclosure
    • Privacy Policy
  • Simple Meals
  • Club Members!

WooHoo…Summer With the Kids!

June 3, 2008 by Laura 20 Comments

This post may contain affiliate links. For more information, please see our disclosure policy.

I LOVE using summer time around here to work on fun projects that we just don’t seem to have as much time for during the school year. AND…I think summer time is a great time to focus hard on godly character training with the kids. (Yes…by summer’s end…I plan to rid my children’s hearts completely of all selfishness and pride and lazyness and…*ahem*…well…we’ll be working on it anyway…)  :)

Seriously, there are all kinds of fun things to do with the kids during the summer time…and my kids are rarely bored. (If nothing else…we have a pretty big garden with endless weeds. And dirty toilets. And dirty dishes.)

My boys LOVE the summer library reading program in our town…therefore they are inspired to read like crazy all summer long!

Matt is great at assigning the boys outdoor projects…and they love doing these jobs with and for their dad! It is amazing how much help they can be with yard work, hauling stuff, cleaning up wood and sticks, etc. I LOVE watching them work with their daddy!

Inside the house, the boys and I have fun making up new recipes and cooking together. And we play tons of games of Skip-bo. And War. And Old Maid. And Crazy Eights. And we make up our own card games. 

As the summer progresses…and we work on fun projects and activities together…I’ll be sure to share the ideas with you! Here’s one idea to start off the summer:

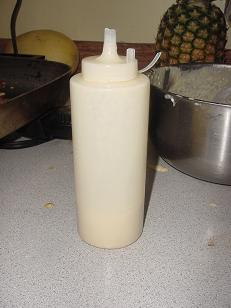
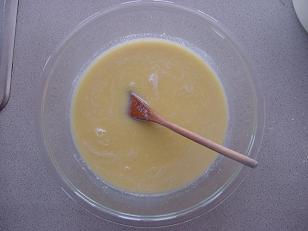
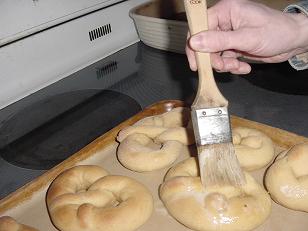
This week one of our kitchen projects was making cool shaped pancakes. Using this whole wheat pancake recipe with a couple of extra tablespoons of milk stirred into the batter…we filled a ketchup-like container with pancake batter and started getting creative with pancake shapes and letters.

pancakemakersm.JPG

This little tool didn’t make it quite as easy as I was hoping it would when I first read the idea…but it was really fun to experiment and play with! (And of course the pancakes tasted good no matter what they ended up looking like!)

justuspancakesm.JPG
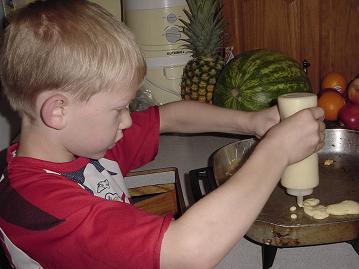
Here, Justus is working on a “J” for Justus.

asapancakessm.JPG
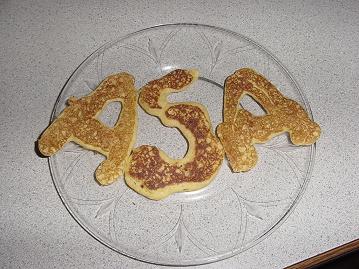
Here’s Asa’s name (And by the way…in case any of the rest of you are wondering ~I’ve been emailed with this question~ Asa’s name is pronounced:  “ACE-uh”.)

pancakeshapessm.JPG
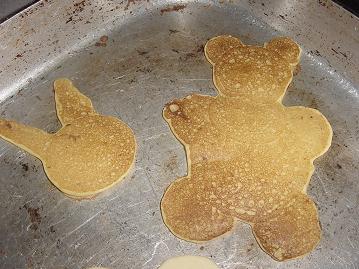
We were pretty happy with the way this bear and bunny turned out. 
We decided the bunny reminded us of Buster on Arthur! 

I LOVE this extra “down time” with my kids! I’ll look forward to sharing more ideas with you during the next several weeks! Here’s to a wonderful fun summer with our kids!

Find more great ideas at Rocks in My Dryer!

[tags] kids in the kitchen, summer projects with kids, summer activities[/tags]

Heavenly Homemaker's Club Members: Access your homepage and all your fantastic resources here! Not a member yet? Please join us!

Making Decisions

May 27, 2008 by Laura 15 Comments

This post may contain affiliate links. For more information, please see our disclosure policy.

As we’ve struggled through the last several days, suffering with grief and unbelief over the sudden death of my cousins, we’ve been faced with so many decisions. 

It’s amazing how difficult it can be to even think rationally, much less make a good decision, when your mind is really elsewhere. And we didn’t even have to make the really difficult decisions about where to bury my cousins or what the service should be like. I can’t even imagine the difficulty of those decisions for all of the immediate family. I know God is just giving them strength beyond belief right now.

Matt and I were simply struggling with the decision of staying for the funeral or not. Even though there really wasn’t a decision to be made (I mean, of course we should stay)…there were several days between my cousins’ deaths and the day of the funeral. That ended up being a lot of missed days of work for Matt, not to mention all of the other loose ends that hadn’t been tied up before we left home in such a rush. Could we handle it financially? Should we go home so he could work a day and a half, and then come back? (With these gas prices?!) 

We originally assumed that the funeral would be in Colorado where the couple had been living, so we didn’t think it would really be an option for us to go. It was then decided to bury them here in Kansas. As we wrestled back and forth with our decision to stay, someone finally said,

“Laura, how will you feel about your decision a few years from now? When you look back on this time and think about how you went home and missed the funeral…or about how you stayed and were surrounded by family…what will you feel?”

Mm. What is three days of missed work in the big picture? Isn’t God going to just totally take care of us anyway? Isn’t family more important? Wouldn’t we for sure look back with regret that we felt like we just couldn’t stay away from home any longer? What’s really important? (Probably not the over-due library book waiting for me at home.)

I was really grateful for the wise words about making a decision. I plan on remembering that for many decisions of my future. Even the small ones. 

Step back from the situation and ask yourself, “How will I feel about this decision in a few years? Will I have regrets? Will I feel like I did the right thing? What is truly important?”

If I’ve learned anything in the past few days, it’s that life is short…and can end unexpectedly. Our life is a vapor. This world is not our home.

It is just so important to focus on what really matters.
———————————————————–

More Works for me Wednesday here.

Heavenly Homemaker's Club Members: Access your homepage and all your fantastic resources here! Not a member yet? Please join us!

Once Upon a Time…

May 20, 2008 by Laura 9 Comments

This post may contain affiliate links. For more information, please see our disclosure policy.

Recently I was sitting with my two littler boys trying to kill time while we were waiting for Daddy. So we began taking turns making up and telling stories to each other.

My stories were always action packed thrillers about how “Once upon a time a boy and his brothers always played so nicely together and how they just loved to eat their asparagus and how they always picked up their toys when they were finished playing…”

I’m one wild story teller…as you can see…and my kids just sit on the edge of their seats when it’s my turn. (yawn) ;)

Well, here’s what Malachi (age three) came up with when it was his turn (and…no, these are not typos):

Once on a time, there was a big boy named Mommy. 
And he was coloring on the paper. And he was playing his “gurtar”. 
And he was making me a snow cone. 
Be end. 

Since we rarely need to use feminine pronouns around here…obviously Malachi hasn’t learned them yet. Everyone is a he (including you).

I’ve never played a “gurtar” before, nor have I ever been called a “big boy”…but it sure was fun hearing Malachi creatively come up with a story from his head. 

So, here’s my Works For Me Wednesday tip for today:

Telling stories is a great way to pass the time when you’re stuck waiting without any other “ammunition”….and a great way to hear how creative your kids can be.

Trust me….I’m a big boy named Mommy who plays the gurtar and makes snow cones while I color on paper. I should know.


Heavenly Homemaker's Club Members: Access your homepage and all your fantastic resources here! Not a member yet? Please join us!

Eat More Fruits and Veggies: Fun with Fruit!

May 13, 2008 by Laura 8 Comments

This post may contain affiliate links. For more information, please see our disclosure policy.

Here are a couple of simple ideas to help you encourage your kids to eat more fruit!

The first idea is to make some fun fruit shapes with thin slices of cantelope and watermelon!

fruitshapes5sm.JPG

My kids devour these almost faster than I can make them! ( And this time…I had to make them wait until I could take a picture! It was torture!)

fruitshapes3sm1.JPG

I carefully sliced thin strips of cantelope and watermelon. Then we used cookie cutters to cut the shapes!

fruitshapes4sm.JPG

The kids got involved in making these fun shapes too! (Which of course in our case means…climbing up onto the countertop so that they can put their whole body into the task…)  :)

I am not kidding when I tell you that we went through an entire watermelon and almost an entire cantelope in one sitting by doing this activity. (Daddy got to eat the scraps when he got home!)

And the second idea is a simple one…

Use a sharpie marker to draw fun faces on your bananas or oranges (um…I don’t recommend doing this on a strawberry or an apple…just in case you were thinking of doing that…)  ;)

Your kids will love these fruity friends!

fruitfriends2sm.JPG

One additional idea…

If you’re taking food to a sick friend…fruit is a wonderful thing to take along. Draw (or have your kids draw) some happy faces on the fruit for some Get Well Soon cheer!

Looking for more ideas like these?  Come sign up to win my new e-book, Have Your Fruits…and Veggies Too!

Check out more Works for me Wednesday tips at Rocks in my Dryer!

[tags]fun with fruit, ideas for kids[/tags]

Heavenly Homemaker's Club Members: Access your homepage and all your fantastic resources here! Not a member yet? Please join us!

Please Pass the Butter (and the Cream)

May 6, 2008 by Laura 32 Comments

This post may contain affiliate links. For more information, please see our disclosure policy.

Well, I had my sweet little Mother’s Day post written for today…all ready to fit right into our Celebrating Women series.

Then I noticed that there was a designated a theme for today’s Works for me Wednesday…”What DOESN’T work for me…Wednesday”. (I guess that would be WDWFMW?) 

Oooohh…well, we might all be sorry she asked. But this has been on my mind A LOT…and I’ve been needing a reason to bring it up.

So I will now be doing something I rarely do here. Hopping on my soap-box. 

My BIG FAT SOAPBOX.

Yes…I’m blogging about FAT today. 

Because here’s what DOESN’T work for me:

All the big talk and push to eat a low-fat diet. 

It used to work for me. Because I believed what I was told about fat and that eating it was bad.

But I’ve learned a lot about fat…and I’ve learned that it’s not a four letter word after all. (Depending on the kind of fat, of course…but more on that another time soon.)

Here’s my soap box-iest part of my BIG FAT Soapbox: 

God MADE fat. He made food with fat in it ON PURPOSE. 

He made cows to give whole milk. The cream from their milk makes butter. He made chickens to lay eggs…and he knew what he was putting into them.

I feel very frustrated that we’re being taught that we used to eat butter when we didn’t know better…so now that we know better…we eat chemicals in a bucket (a.k.a. low fat margarine).

I’m QUITE SURE God knew what he was doing. I don’t think that He is “up there” shaking his head at himself in disgust and saying, “What was I thinking when I put cholesterol in those eggs? And all the animal’s fat is saturated? I SO should have thought ahead on that one.”

Why would eating these real foods with fat work for a few thousand years…and then suddenly stop working for people in about 1920? 

And WHEN do you suppose our nation began to have extreme obesity and heart problems and an increase in cancer? Right about the time we started being told that butter and cream and eggs (and other real foods) were bad for us. (And when lifestyles became more sedentary.) 

Yes…at the very same time that we started to change out real food…for processed, fake, freaked out foods…our nation began to get fat and sick.

And yet…we blame all of our health issues today on butter.

Oh, I have so much to say about all of this. (Perhaps you could tell?)

So here’s what I’ve decided.

I’ve been sharing many of my recipes here on my blog and on my website. And if you’ve hung out here much, you’ve noticed that we work hard at our house to eat a healthy diet of real food. 

I think maybe I’ll start talking a bit more about WHY we choose to eat this way…and WHY we feel like it is important to eat real food. And what food I consider to be real…and what food I consider to be fake, freaked out food. And which fats are good for you and which aren’t. And how we afford to eat real food on a limited budget. And where I buy my real food. And why….

Yes, I believe this post is…to be continued…

Heavenly Homemaker's Club Members: Access your homepage and all your fantastic resources here! Not a member yet? Please join us!

Make Ahead Meals: Beefy Enchilada Bake

April 29, 2008 by Laura 56 Comments

This post may contain affiliate links. For more information, please see our disclosure policy.

We’re calling this Beefy Enchilada Bake. Why??

Anybody else have a husband who “won’t eat it if it’s a casserole?”

My sister-in-law, Kari,  told me of this recipe idea. But she said, “You can’t call it a casserole, or Randy won’t eat it!” Apparently it’s a common theme with husbands. Many don’t like casseroles. (My husband on the other hand, would probably eat it no matter what you called it. If there’s food in it – he likes it.)

So as Kari was making this, she decided, “It’s layered like a lasagna. I think I’ll call it Enchilada Lasagna.” (Fun name – I like it!)

Hey, call it whatever you want to. This dish is simple to prepare, really yummy to eat, and is great to make ahead of time, freeze, thaw and bake. I LOVE Make Ahead Casser Meals!

Beefy Enchilada Bake 

Beefy Enchilada Bake (aka Enchilada Lasagna)

Make Ahead Meals: Beefy Enchilada Bake
 
Save Print
Author: Laura
Serves: 6-10
Ingredients
  • 1 pound Ground hamburger meat
  • 3 Tablespoons arrowroot powder or cornstarch
  • ½ cup water
  • 1-2 teaspoons chili powder (depending on your taste)
  • salt
  • 3 cups tomato sauce
  • 8 ounces shredded cheddar cheese
  • 12 corn tortillas
Instructions
  1. Brown hamburger meat.
  2. Do not drain grease!
  3. Put cooked hamburger meat in separate bowl, salt and set aside.
  4. Sprinkle arrowroot powder into the grease and stir (if you do not have enough grease to absorb the arrowroot powder, add 2 T. butter).
  5. Keep your burner on medium to high heat.
  6. Pour in water and “smoosh” the clumps of arrowroot powder/grease around while you stir the water in.
  7. This will thicken and make a gravy.
  8. Pour in tomato sauce and chili powder.
  9. Stir well until bubbly. This is now your enchilada sauce!
  10. Cut corn tortillas into one inch strips.
  11. Dip tortilla strips in enchilada sauce and coat thoroughly.
  12. Cover bottom of baking dish with enchilada sauce coated tortilla strips.
  13. Sprinkle ⅓ of the cooked ground beef over the tortillas…then a little cheese.
  14. Repeat layers twice more: enchilada sauce coated tortilla strips, meat, cheese.
  15. If you have any leftover enchilada sauce, drizzle it over the top.
  16. Cover and bake at 350° for 30 – 40 minutes or until bubbly.
3.4.3177

There you go! A great meal that you can make ahead of time and pull out when you need it!

Because I’ve had several requests for more meals like this, and because I LOVE having meals like this, I’ve been playing a lot in my kitchen to come up with more great recipes that can save you time and energy! I’ll keep these recipes coming!

But I’m curious – does your family eat “casseroles”? Because I can come up with anti-casserole names. I’ll go think of some now…

(Easy Chicken HooHaa;  Tasty Noodley Goodley;  Cheesy Pleasey Chicken; Chunky Beef Bucket, Turkey Salad Surprise ; Couch Potato Cuisine…)

Heavenly Homemaker's Club Members: Access your homepage and all your fantastic resources here! Not a member yet? Please join us!

Toilets…or Taxes?

April 15, 2008 by Laura 18 Comments

This post may contain affiliate links. For more information, please see our disclosure policy.

At our house…we have a little arrangement. 

My husband does the taxes…I do the toilets.

It’s a nice arrangement. It works for me.

Since we are self-employed…tax time is not a pretty one around here. We never rush to get our taxes done early so that we can get our (what are those things called again?)…oh yeah… tax refund.

Yeah, we don’t get one of those. We always get to write a big check on April 15.

We’ve never had the benefit of our employer paying for half of our social security tax…so we get to pay the whole amount. (ouch) 

And, there are SO many crazy details to figure out…with mileage…expenses…supplies…what percentage of the house can we write off…

Oh, there’s so much fine print. And so many details. And forms. And details.

Therefore, I’m completely and totally thrilled that my husband is willing to read all of the fine print and details on all of the forms and figure out our taxes. 

I would MUCH rather clean the toilets. (And we have four little boys…so uh…well…you know…) 

So that’s our arrangement….Matt does the taxes…I do the toilets.

Now, he doesn’t think that’s fair…since he only has to do the taxes once a year…and I have to wash the toilets…well…more often than that.

But I’ve assured him over and over as he labors over the piles of forms and crunches numbers on the calculator until three in the morning for several days in a row…that I’m really okay with it. Really.

So, we got the taxes done and turned in yesterday…so his job is over for a while. 

As for me…our little tax write-offs have done a number in both bathrooms…and I’m gonna go grab the toilet brush.

(Huh. Is there any way we can use a percentage of the toilet brush as a tax write off? Yeah…probably not.)

Just curious? Which would you rather do…toilets or taxes?!

Heavenly Homemaker's Club Members: Access your homepage and all your fantastic resources here! Not a member yet? Please join us!

Pause Your Nose!

April 8, 2008 by Laura 39 Comments

This post may contain affiliate links. For more information, please see our disclosure policy.

With four kids…all of them old enough to talk…and all of them with VERY important things to say…things that MUST be said RIGHT now…

Sometimes I can feel overwhelmed with everyone talking at once and never really feeling like I can hear any of them.

It sorta sounds something like:

“MOM! We-I-Can-But-are-need-you-I-going-to-get-need-to-go-me-to-have-potty-a-pillow-fight-drink-talk-to-you!”

Okay, um…what?!

And of course, trying to have a conversation with my husband…one that I can actually finish…kinda looks something like thi……

(I may never really know how his work day really went…)

So while we’re working with the kids (constantly) to not interrupt…and to recognize that when others are speaking, they need to wait their turn…

And helping them to understand that their need to tell me about what happened to LarryBoy on the most recently watched Veggie Tale show is maybe not as urgent as they might think that it is…

I one day came up with a little tool that worked for me.

As two of my boys walked into the room and both started talking at once…I just reached out my pointer finger at one of them, pushed gently on his nose and said, “Pause.” (as if I was pushing his pause button…)

And he did…pause.

The first boy finished what he was saying.

And then I turned back to the other one and pushed his nose again, and said, “Unpause.” He grinned…and finished what he had started to say earlier.

From then on, I have been pushing their little pause button noses left and right. (so to speak…) 

It’s a lot easier than saying, “Please wait until your brother is finished talking, and then you can have your turn to speak…” 

Oh, and the kids love it!

Now, I am so used to pausing noses…that one day while talking to my friend in the church foyer…one of my kids came up and really needed to say something important…so I reached up without thinking and pushed my friend’s nose and said, “Pause.” 

She started laughing…and said, “Um, did you just pause my nose?”

And I realized that indeed…I had just pushed on my friend’s nose and told her to pause. 

(Thankfully she loved the idea and started using it with her own kids. I’m pretty sure she has since then paused my nose on occasion…)

While I am now more careful about who’s noses I’m pausing in church foyers…this plan works VERY well for my kids…and I highly recommend it!

Heavenly Homemaker's Club Members: Access your homepage and all your fantastic resources here! Not a member yet? Please join us!

Making Homemade Soft Pretzels…Again…

April 1, 2008 by Laura 118 Comments

This post may contain affiliate links. For more information, please see our disclosure policy.

Yes, I am aware that I have already posted this recipe and that MANY of you have told me how much you LOVE these pretzels!

But we were encouraged to re-post our favorite Works for me Wednesday post…and this is by far my favorite…for oh-so-many delicious reasons!

So now you can be re-encouraged to make these pretzels!! Here you go (again)…

Okay, brace yourself.

The recipe I am about to share with you is INCREDIBLE!

pretzels9sm.JPG

Yum

Ask anyone who’s ever tried them.

People have even called me the “Pretzel Lady”. (I’m sure they’ve even called me the “Beautiful Pretzel Lady” and the “Unbelievably Intelligent and Witty Pretzel Lady” behind my back.)

I used to sell these at our local farmers market each week. On my best week, I sold over 100 of them in less than 17 minutes (yes, I timed it).

Okay, so here is the recipe and the step by step tutorial on how to make Laura’s Amazing Soft Pretzels:

Ingredients:

1 cup water
2 Tablespoon yeast
2 teaspoon honey
2 1/2 cups milk
1 stick butter
1/2 cup honey
4 teaspoon salt
8 cups whole wheat flour
butter
salt

(You can make these with white flour and white sugar if you want to have a delicious mound of empty calories…but I have found that using these healthier ingredients does not make us like these pretzels any less!)

Okay, here are the directions for preparing the pretzels that are to die for:

In a large bowl, mix 1 cup very warm water, 2 T. yeast and 2 t. honey. Stir this together and kind of mush the yeast around. Let this sit for a few minutes while you do the next step.

pretzels1sm.JPG

Melt a stick of butter in a large saucepan.

pretzels2sm.JPG

Add 1/2 cup honey, 4 t. salt and 2 1/2 cups of milk. Heat this to 120 degrees.

pretzels3sm.JPG

Pour milk mixture into yeast mixture and stir.

pretzels4sm.JPG

Stir in 8 cups of flour, 2 cups at a time. (add more if you need it)

pretzels5sm.JPG

Knead the dough for 5-10 minutes.

pretzels6sm.JPG

Plop it into a bowl, cover it and let it rise for 1-1 1/2 hours.

pretzels18sm.JPG

And it should look like this:

pretzels8sm.JPG

Pull it out of the bowl and knead it a few times to get the air out.

Pull a ball of dough, about the size of your fist off and get ready to make your very first pretzel! (such a proud moment)

pretzels11sm.JPG

Roll it into a long snake.

pretzels10sm.JPG

Then do this:

pretzels12sm.JPG

Then twist it again to look like this:

pretzels13sm.JPG

Then pick up the ends and pull them down to the bottom. (And please make no snide remarks about my blueish, boney hands. It is always a little cold in my house and my hands are never quite warm AND I inherited my Nana’s boney hands and I know my Nana would have never allowed her hands to be put on a blog while she lovingly told you how to shape a pretzel because she was ashamed of her boney hands, but I’m okay with it. I’m not embarassed at all. Not one bit.)

pretzels15sm.JPG

And then, it should look like this. And if it doesn’t, just undo it and try again. By the time you get to the end of shaping your big blob of dough into pretzels, you’ll have the hang of it and be able to talk on the phone, make a grocery list, check your email, tie someone’s shoe AND shape a pretzel, ALL AT THE SAME TIME!

pretzels14sm.JPG

After you shape each pretzel, put them on a cookie sheet about an inch apart. Bake for 20 minutes at 350 degrees.

Melt a stick of butter in a saucepan.

Right when you take the pretzels out of the oven, slather them with butter. Lay it on thick. Don’t hold back.

pretzels16sm.JPG

Then sprinkle salt over them.

pretzels17sm.JPG

And, if at all possible, eat one right out of the oven. They are good two days later too, but OH MY GOODNESS, you HAVE to eat one right out of the oven!

With a glass of milk.

pretzels9sm.JPG

And if you really want to have fun, shape some into hearts!

heartpretzelssm.JPG

Whenever I want to make a special treat for my family, this recipe always works for me!

[tags]whole wheat soft pretzels, healthy treats, homemade breads[/tags]

Heavenly Homemaker's Club Members: Access your homepage and all your fantastic resources here! Not a member yet? Please join us!

S-P-E-L-L-I-N-G F-U-N

March 26, 2008 by Laura 7 Comments

This post may contain affiliate links. For more information, please see our disclosure policy.


Today, I wanted to share a little tip that has been such a sweet thing that works for our family. And I can take NONE of the credit for it! 

About two years ago, when my husband would go in to kiss the boys goodnight, he began giving our oldest son three words to spell…just as a fun thing to do as he spent special time with each boy. 

Of course, the littler ones began asking Daddy for “three words too” and so, he adapted his lesson for them.

Even our three year old thinks he needs “fwee words” now! 

So, each night as Daddy makes his rounds, he gives each boy three words to spell, according to their spelling level. 

The really fun part is:  The three words he comes up with are all related in some way. So after the boys spell the words, they have to figure out what the common theme is. 

For instance, if he gives the words:  thunder, tornado and sunshine…they have to come up with the common theme of :  weather. 

He usually comes up with some super fun, and usually quite challenging words and themes. 

(And by the way…when Daddy’s not home and Mama gives the three words…they usually let me know that it just isn’t quite the same. I give words like kiss, hug and love…. They kind of raise their eye brows at me, sigh and spell the words like they are the most boring words ever. I guess Daddy gives better words like ammunition, weapon and artillery…you know, “fun” words like that.)  :)

It has been a wonderful, great, favorite bedtime treat. It is a special sweet time that is treasured for Daddy and boys.

I doubt the boys will let this tradition stop any time soon. 

(I wonder if their future wives will mind the nightly phone call of three spelling words before bed…)

Heavenly Homemaker's Club Members: Access your homepage and all your fantastic resources here! Not a member yet? Please join us!
« Previous Page
Next Page »

Join Our Community!

 Facebook Twitter E-mail Instagram Pinterest

Popular Posts

~ Will All of the Real Moms Please Stand Up?
~ Easy! Stir-and-Pour Whole Wheat Bread
~ How to Make Gatorade
~ 31 Real Food Breakfast Ideas
~ Dear Teenage Girls...
~ When Mom Takes a Step Back
~ The Inexpensive Health Insurance We Love!
~ Let's Talk Real Food Grocery Budgets

Check out our latest posts!

  • Big Family Food and Fun: May 10-16, 2026
  • Big Family Food and Fun: May 3-9, 2026
  • Help Your Kids Become Independent in the Kitchen!
  • Big Family Food and Fun: April 26-May 2, 2026
  • Big Family Food and Fun: April 19-25, 2026
Home  ~  Simple Meals  ~  Club Membership  ~  Shop  ~  Privacy Policy  ~  Disclosure  ~ Contact

Copyright © 2026 · Beautiful Pro Theme on Genesis Framework · WordPress · Log in