Heavenly Homemakers

Encouraging women in homemaking, healthy eating and parenting

  • Home
    • About
    • FAQs
  • Recipes
    • Bread and Breakfast
    • Condiments
    • Dairy
    • Main Dishes
    • Side Dishes and Snacks
    • Desserts
    • Gluten Free
    • Instant Pot
    • Crock Pot
    • Heavenly Homemaker’s Weekly Menus
  • Homemaking
    • Real Food Sources
  • Store
  • Contact
    • Advertise
    • Disclosure
    • Privacy Policy
  • Simple Meals
  • Club Members!

Simple Taco Soup

February 9, 2016 by Laura 1 Comment

This post may contain affiliate links. For more information, please see our disclosure policy.

taco soup 1

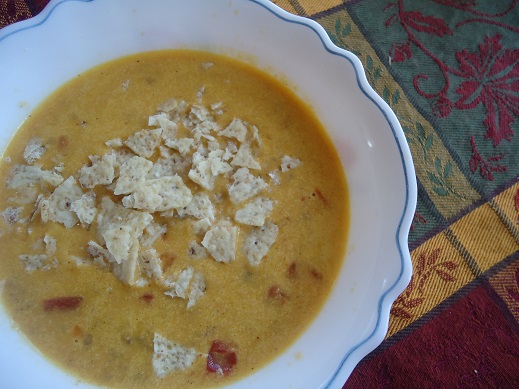
I can’t get a good picture of this soup. This is so easy to make and it’s amazing to eat and the picture looks like eh, whatever. So just glance over the picture and know that you need to make this soup.

Here’s my happy little soup secret: This Taco Soup is made with none other than this Real Food “Velveeta” and Rotel Recipe. See, you make that recipe and you double or triple it because it just makes sense because it is so delicious. You eat it with chips, or you boil some pasta and make it into Spicy Mac and Cheese. Or if you’re feeling soupy, you stir in some chicken or beef broth and top it with crunched chips. It becomes Taco Soup and you love it so much you can’t even stand it. Or maybe it’s just me.

Simple Taco Soup

Simple Taco Soup
 
Save Print
Author: Laura
Serves: 6-8
Ingredients
  • 1 pound hamburger meat
  • 2-4 Tablespoons butter
  • 2 heaping Tablespoons corn starch
  • 1 cup water
  • 1 teaspoon chili powder
  • sea salt to taste
  • 2 cups heavy cream
  • 10-ounce can diced tomatoes with green chilies (Rotel)
  • 1-2 cups shredded cheddar or colby jack cheese
  • 2-3 cups chicken or beef broth
Instructions
  1. Brown the hamburger meat in a large pot.
  2. Add butter to the meat, melting it throughout the pot.
  3. Sprinkle in corn starch, coating the meat.
  4. Pour in water, chili powder, and salt.
  5. Turn heat up and stir until the mixture thickens.
  6. Add cream, continuing to stir as the mixture thickens. (This all happens quickly in my experience.)
  7. Stir in Rotel and broth, heating for about 5 more minutes.
  8. Remove from heat.
  9. Add shredded cheese, stirring until the cheese has melted and the dip is smooth.
  10. Serve with tortilla chips.
3.4.3177

I know I’ve said it before, but I really, really love making triple batches of Real Food “Velveeta” and Rotel. It’s super easy and it is so versatile! Every few weeks I make it and store it in my fridge to pull out for easy meals. Now we use it to make soup too!

Here are some pictures of your options to entice you:

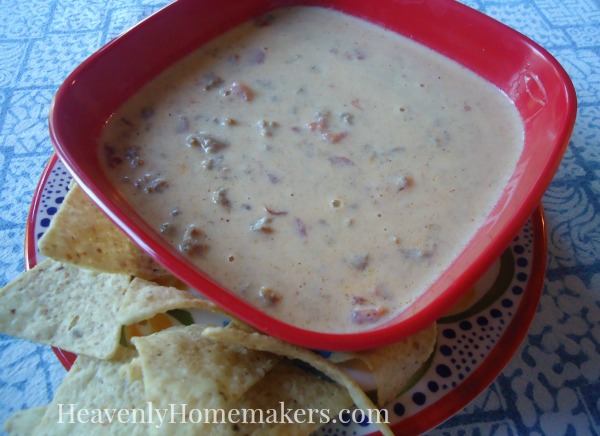
Real Food “Velveeta” and Rotel, served as a dip:

Real Food Velveeta and Rotel Dip

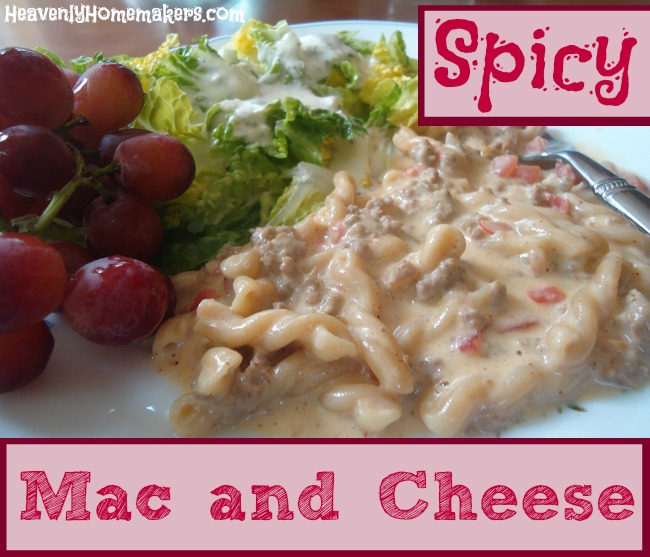
The very same dip, stirred into boiled pasta and served as Spicy Mac and Cheese: 

Spicy Mac and Cheese

Same dip again, with broth stirred in, served as Taco Soup:

Simple Taco Soup

Do you see why I make big batches of this?? 

If you’d like to take a look at my favorite way to make nourishing broth for soups like this, check out this post:

How I Make Veggie-Packed Chicken Broth and Beef Broth

Have you made the Real Food “Velveeta” and Rotel recipe? What’s your favorite way to eat it?

Heavenly Homemaker's Club Members: Access your homepage and all your fantastic resources here! Not a member yet? Please join us!

Easy Low Sugar Orange Melt-Away Cookies

February 2, 2016 by Laura 24 Comments

This post may contain affiliate links. For more information, please see our disclosure policy.

orange sugar cookies

In case by now you’re wondering if I’m obsessed with creating these Low Sugar Melt-Away Cookie varieties, the answer is obvious that of course I am obsessed. After two attempts at creating this here orange flavored variety, I have definitely decided that of all the flavors – orange is my new favorite.

Why two attempts, you ask? Oh well. I just burned the first batch, that’s all. Guys, it is so weird what happens to cookies when you put them in the oven, walk away, and then forget that there is actual life going on outside your office door. So weird. Someone should have warned me about this. We can’t even leave cookies unattended in a 350° oven for 27 minutes. Did you know that???

Set a timer much, Laura?

You know what? Just…I know, okay? I should have set a timer. I used to have one of those clicky, clicky, clicky timers but it got dropped four too many times so its spinner stopped spinning. Then Matt got me a digital timer that was persnickety and sometimes decided to shut itself off because it was selfish and couldn’t care less about the company coming over to eat in exactly 52 minutes. After a few months of this behavior, I declared it to be faulty and went to the store to purchase another one just like it. It, however, had the same exact issues as its brother and that is what tipped me off that maybe that brand couldn’t be trusted.

After that, I decided I could just use the timer app on my phone. This is a great idea except that it takes so many difficult and tedious steps to get to the point of actually setting the timer (find phone, turn phone on, unlock screen, find timer app, open timer app, think about how much time has elapsed since I started this whole process so I can figure out how long to set the timer at this point, so on and so forth). Also, I really hate to touch my phone when I have egg white on my fingers.

I think you can all see now how challenging it has been to accurately time my baked goods. I have mostly resorted to trusting my nose to be my timer. Typically, cookies and casseroles smell “just right” when they are ready to come out of the oven. What more do I need?

Oh yeah, just someone to remind me that I am actually baking cookies in the first place.

So the first batch burned. They were edible, just really, really crispy and not at all picture worthy. Over the weekend, I tried again. Oh my goodness, I will (go to the trouble to) set a timer from now on. It is worth it to pull the perfect cookies out of the oven when they are perfectly perfect in every way.

Easy Low Sugar Orange Melt-Away Cookies

Easy Low Sugar Orange Melt-Away Cookies
 
Save Print
Author: Laura
Serves: 24
Ingredients
  • 1 cup melted butter
  • ½ cup sucanat or raw sugar
  • 2 eggs
  • 1 teaspoon vanilla extract
  • The juice of one medium-sized orange
  • grated orange rind
  • 1 teaspoon baking powder
  • 3 cups of whole wheat pastry flour (give or take)
Instructions
  1. Stir together melted butter and sugar.
  2. Add eggs, vanilla, orange juice, and baking powder.
  3. Grate orange rind into the mix for extra flavor.
  4. Stir in flour until a solid ball of dough forms.
  5. Drop teaspoon-sized balls of dough onto a cookie sheet, about an inch apart.
  6. Bake in a 350° oven for 10-12 minutes or until cookies are lightly browned.
3.4.3177

grate orange rind

In other scatterbrained related news – the second time I made these cookies, I was talking to a friend and didn’t realize until later (like 9 hours later) that I hadn’t put eggs into the mixing bowl. These still turned out to be my favorite cookies. So eggs in this recipe? Take ’em or leave ’em. These turn out fine either way. This is further proof that I can’t talk and cook at the same time. Like you needed more proof.

Low Sugar Orange Melt-Away Cookies

Want to try the other varieties of these cookies?

  • Easy {Low} Sugar Cookies
  • Low Sugar Lemon Melt-Away Cookies
  • Low Sugar Almond Melt-Away Cookies

Hey, just curious. What kind of timer do you use??

~~~~~~~~~~~~~~~~~~~~~~~~~~~~~~~

Pyrex Storage Set Deal Alert!!

Christine emailed to tell me of this great deal on a 10-Piece Pyrex Storage Set. Get the entire set right now for just $12.63. No guarantees on how long this price will last. I have these, love them, and use them all the time!!

pyrex

Heavenly Homemaker's Club Members: Access your homepage and all your fantastic resources here! Not a member yet? Please join us!

Easy Chicken With Cream Cheese Sauce

January 3, 2016 by Laura 4 Comments

This post may contain affiliate links. For more information, please see our disclosure policy.

I have a wonderful chicken recipe to share with you. But first, a story.

Cream Cheese Chicken

Once upon a time, I was dating my husband. I mean, my boyfriend. I mean, we weren’t married yet when we were dating but then we did get married and all of that barely has anything to do with this recipe.

But back in the days of our dating, engagement, and early marriage we drove an hour away from our college town each Sunday morning to a small church with a sweet youth group. Matt was their youth leader, teaching Bible classes and forming relationships with the teens. These dear ones became our church family, worshiping with us, throwing us a wedding shower, celebrating our marriage, being a part of our first pregnancy, and welcoming Baby #1 into the world with us.

Some of our fondest memories of those years are looking back to the Sunday afternoons in the homes of various church family members. They took turns signing up to feed us after church. Those meals!!! Talk about a church full of good cooks. The fellowship was precious and I can remember in detail many of the ladies’ specialties. We were very well taken care of, that is for sure.

Well, one of these ladies frequently made chicken that was slathered in the most delicious cream sauce. When we knew Carlene had signed up to feed us, I’d always say to Matt, “Ooooh, I hope she made that chicken this time!” Anytime she did make it and we sat there gushing over the meal, she’d always shake her head at us and say, “Oh. It’s just food.”

Right. Just food. Just the best chicken I’ve ever eaten!!!

Since that time, I’ve always regretted that I never got her recipe. I’m not even kidding you that 20 years later I still get hungry for that meal. Finally about a month ago I thought to myself, “Laura, are you or are you not the lady who invents recipes? For Pete’s sake, woman. Go to the kitchen and figure out how to make Carlene’s chicken.”

You’d think I would have considered this option before.

Well, my friends. I now present to you Not-Quite-Carlene’s Chicken with Cream Cheese Sauce. Make this.

Easy Chicken with Cream Cheese SauceYum

Easy Chicken With Cream Cheese Sauce
 
Save Print
Author: Laura
Serves: 6-8
Ingredients
  • 6 boneless, skinless chicken breasts or thighs
  • 1 beaten egg
  • ⅔ cup whole wheat flour
  • Sea salt and pepper to taste
  • ½ cup palm shortening or other oil for frying
  • 8 ounces softened cream cheese
  • 2 cups chicken broth
Instructions
  1. Mix flour, salt, and pepper.
  2. Dip chicken in egg, then coat in flour mixture.
  3. Fry in oil for just a few minutes on each side. (Do not over cook or the chicken will become dry.)
  4. Remove chicken from pan.
  5. Pour chicken broth into the pan, scraping up the chicken drippings.
  6. Add softened cream cheese, stirring until smooth.
  7. Place cooked chicken back into the pan, coating on both sides with sauce.
  8. Serve with rice or pasta.
3.4.3177

Make-Ahead Instructions

Prepare and fry meat as directed. Allow it to cool, then cover and store in the refrigerator for up to two days. Prepare sauce as directed and stir in the chicken, heating through.

Freezer Instructions

Prepare and fry meat as directed. Allow it to cool. Freeze in a well-sealed freezer bag for up to three months. To serve, thaw cooked meat. Prepare sauce as directed and stir in the chicken, heating through.

Easy Chicken with Cream Cheese Sauce Recipe

I can’t think of a brilliant way to end this post. Go make this chicken! There. That oughta do it.

Heavenly Homemaker's Club Members: Access your homepage and all your fantastic resources here! Not a member yet? Please join us!

Bacon Ranch Hashbrown Casserole

October 21, 2015 by Laura 4 Comments

This post may contain affiliate links. For more information, please see our disclosure policy.

Bacon Hashbrown Casserole

Yum

A friend had just stopped by when I was pulling this dish out of the oven for lunch earlier this week. It smelled quite amazing. She asked what it was, so I went down the list of ingredients our lunch included, “bacon, ranch dressing, sour cream, cheese…” Then this is when she said,

“Bacon? Ranch? Cheese? With all that in it, you know it’s going to be good!”

Yep, pretty much. What’s not to love?

You might also love knowing how easy this is to make. Cook the bacon, stir in the other ingredients, spread it all in a cooking dish, put it into the oven. Easy. It does help if you have premade frozen hashbrowns and a jar of homemade ranch dressing mix ready to go. Just please put the lid on your ranch dressing before you shake it up. Please. I’m only here to help.

A big thanks to Plain Chicken for the idea for this recipe! I’m excited to think about possibilities of ways to continue tweaking this. Maybe add some cooked chicken to the mix? What else can you think of to add to this dish?

Bacon Ranch Hashbrown Casserole
 
Save Print
Author: Laura
Serves: 10 servings
Ingredients
  • 1 pound bacon
  • 2 cups shredded cheddar or Colby jack cheese
  • 3 cups sour cream
  • 3 Tablespoons Ranch Dressing Mix
  • 1 bag of frozen shredded hashbrowns (about 8 potatoes worth of homemade)
Instructions
  1. Cut bacon into bite-sized pieces and cook.
  2. Drain grease.
  3. In a large bowl, stir together cooked bacon, shredded cheese, sour cream, and ranch dressing mix.
  4. Fold in frozen hashbrowns until all ingredients are well combined.
  5. Bake uncovered in a 350° oven for 45-60 minutes or until casserole is lightly browned and bubbly.
3.4.3177

Some recipes you’ll need to go along with this one:

Homemade Ranch Dressing Mix

Homemade Hashbrowns

Lately I’ve been finding really great deals on packaged hashbrowns at the store, so I’ve picked up a few to save me some time. I much prefer homemade, but busyness doesn’t always allow me the luxury. It’s good to be relaxed and flexible about healthy eating, right? Right.

So far I’ve only served this casserole for lunch or dinner. But I also think it would be great for breakfast or brunch!

Want to make Bacon Ranch Hashbrown Casserole ahead and freeze it for later? Here’s how:

Make the casserole as directed. Before baking, cover well and freeze for up to three months. To cook and serve – thaw and bake as directed. Or, cover frozen casserole and place it into a cold oven. Turn the oven on to 225° and bake for 2-3 hours or until casserole has thawed, baked, and is heated through.

Bacon Ranch Hashbrown Casserole - Easy!

Note: This recipe is naturally gluten free. Hold onto this one if you have to avoid gluten – or so that you can bless friends who eat gluten free!

I’ll definitely be making this casserole often! Since it’s freezer-friendly, I’ll likely be making two or three at once so I can have no-brainer meals on hand for busy nights. After all, why dirty up more dishes tomorrow when tomorrow will have enough dirty dishes of its own? Right??

Heavenly Homemaker's Club Members: Access your homepage and all your fantastic resources here! Not a member yet? Please join us!

Hamburger Pot Pie Recipe – Nourishing Comfort Food

October 14, 2015 by Laura 4 Comments

This post may contain affiliate links. For more information, please see our disclosure policy.

Hamburger Pot Pie22

Oh comfort food. You are so…comforting.

If you love Chicken Pot Pie, you will love this Hamburger Pot Pie. I actually think I like this one even better. (No surprise there. I’m a beef-loving girl.) Pin this recipe so you can use it to keep yourself warm all winter long.

For the record, if you need to eat gluten free – or if you’re like me and you’re more into meat and veggies than bread – you can skip the topping on this and just eat it in a bowl like Hamburger Soup.

Hamburger Pot PieYum

4.5 from 2 reviews
Hamburger Pot Pie
 
Save Print
Prep time
30 mins
Cook time
45 mins
Total time
1 hour 15 mins
 
Author: Laura
Serves: 8-10
Ingredients
  • 1 pound hamburger meat
  • 1 small chopped onion
  • 6 cups beef broth
  • 4 large carrots, peeled and cut into bite sized pieces
  • 6 medium potatoes, peeled and cut into bite sized pieces
  • 2 cups frozen peas
  • Sea salt and pepper to taste
  • ⅓ cup cold water
  • 2 Tablespoons organic corn starch, arrowroot powder, or wheat flour
  • 1 cup milk
  • 1 cup mayonnaise (I use Hain Safflower Mayonnaise)
  • 1 cup whole wheat flour (I use freshly ground flour from hard white wheat)
Instructions
  1. In a large cooking pot, brown hamburger and onion together.
  2. Stir in broth and prepared veggies.
  3. Cook until veggies are tender.
  4. Mix cornstarch with water until smooth. Stir mixture into the broth/veggies, cooking for about one minute on the stove to help the mixture thicken.
  5. Pour contents into a 9×13 inch baking dish.
  6. In a separate bowl, stir together milk, mayo, and flour.
  7. Spread mixture over the veggies in the baking dish.
  8. Bake in a 350° oven for about 45 minutes or until the crust is golden brown.
3.4.3177

To save money and add nourishment, I recommend making your own broth for recipes like this one. Here’s How to Make Beef Broth. While we’re at it, here’s How to Make Chicken Broth. :)

Hamburger Pot Pie

What are your favorite winter comfort foods? Which do you typically enjoy more – hamburger or chicken?

Heavenly Homemaker's Club Members: Access your homepage and all your fantastic resources here! Not a member yet? Please join us!

Whole Wheat Stir-and-Pour Bread ~ It is So Easy!

October 8, 2015 by Laura 85 Comments

This post may contain affiliate links. For more information, please see our disclosure policy.

Whole Wheat No-Knead Bread

Yum

My life has forever been changed by a new bread recipe. You might think I’m exaggerating, but as soon as you try this, your life will also forever be changed and you’ll be like, “She was actually not even exaggerating. My life, too, has forever been changed by this bread recipe.”

As we all know, I have been avoiding the act of kneading bread lately. My No-Knead Cinnamon Rolls proves this. (You also need that recipe so click over to get it.)

This new Whole Wheat Bread recipe not only skips the kneading, it also skips many other normal bread-making steps. It’s basically like stirring together ingredients for a quick bread, only easier if you can possibly imagine.

This bread is so easy, even a three year old can make it. Whether you have time or not, gather your entire family and all of your neighborhood to watch this video. This kid is three and he shows us all how to make this bread – for real. I can’t get over how brilliant this is. (Click here to view if it isn’t showing up for you.)

Cooking Guy is a friend of ours (along with his sister, his mom, and his dad). This is my new favorite cooking show. I hope Cooking Guy will remember our house with its very fun legos and train set after he has become famous.

When his mom first gave me this recipe last week, I tried it by pouring the ingredients into a cake pan as directed by her (and now Cooking Guy). We cut it like cornbread and devoured it (with butter, obvs).

no knead bread 2

no-knead bread 2

Later I wondered how it would work in regular loaf pans. I buttered a 9-inch loaf pan, poured in the batter, and hoped for the best.

I’m so happy to report that the best is what I got!! When I pulled this out of the oven, this is when I knew my life was changed forever (see first paragraph).

no-knead bread 3

no knead bread 4

Make this for breakfast, make this to go with soup, make this to go with salad, just make this. We ate one loaf fresh out of the oven, then I hid the other one, which we ate for lunch the next day with Chicken Salad. So good.

4.9 from 12 reviews
Whole Wheat Stir-and-Pour Bread ~ It is So Easy!
 
Save Print
Prep time
5 mins
Cook time
45 mins
Total time
50 mins
 
Author: Laura
Serves: 1 loaf
Ingredients
  • 4 cups whole wheat flour (I use freshly ground hard white wheat)
  • 2 teaspoons active rise yeast
  • 2 Tablespoons sucanat or sugar or honey
  • 1 teaspoon sea salt
  • 1 egg (optional)
  • ¼ cup heavy cream (optional)
  • 2 cups warm water
Instructions
  1. Stir all ingredients together.
  2. Cover and allow it to sit for 30 minutes.
  3. Pour contents into a well-buttered cake pan or 1 well-buttered 9" loaf pan.
  4. Bake in a 425° oven for 20-25 minutes (cake pan) or in a 350° oven for 45-60 minutes (loaf pan) or until evenly browned.
Notes
If you have egg or dairy allergies, skip the egg and cream and you'll still turn out a great bread.
3.4.3177

Whole Wheat Stir-and-Pour Bread

I calculated that this bread costs about $1.00 per batch. That’s pretty impressive, seeing as it makes a lovely loaf of whole grain bread.

Thank you, Cooking Guy! You have now changed the lives of thousands of women. Not too shabby for a 3-year old.

Heavenly Homemaker's Club Members: Access your homepage and all your fantastic resources here! Not a member yet? Please join us!

Make Healthy Choices Easy For Your Family

October 6, 2015 by Laura 5 Comments

This post may contain affiliate links. For more information, please see our disclosure policy.

I’ve told you how much my kids love corndogs. And how I still love Dortitos. And how, if given the choice, my kids would choose the candy over the good stuff.

Oh look. My family is normal! (Normal is relative. Thank you for your support.)

This is why I have to be strategic when putting food on the table for meals and snacks. Yep, sometimes I offer chips. So be it. But in an effort to fill us all with as much nourishment as possible – as easily as possible – these are the tricks I’ve discovered through the years.

How To Make Healthy Choices Easy For Your Family

Healthy Choices Are Easier When There Are Several Choices

I’m not about to become a short-order chef. But when I know I’ll be serving a fruit or veggie one of my kids doesn’t love, I’ll always serve another one or two he does love. Then I don’t have to fight a battle that doesn’t even make sense. After all, even I don’t love every single veggie on the planet (sorry jicima, I tried). 

Serve the Healthy Choices on a Plate

This one may sound silly, but the truth is that the easier I make the food to grab and eat, the more my family will eat. Last week I got out jars and bowls filled with little bits of fruit and raw veggie leftovers from the past couple days’ meals. Had I put them on the table as-is – which would have meant that my kids would have had to reach farther across the table and down into jars to access the food – I know without a doubt that they wouldn’t have eaten as many fruits and veggies. Instead, I dumped everything out of the jars and made a big platter of the fruits and veggies for the table. The munching started even before I was ready to call everyone in for the Potato Soup meal. Bingo. My plan worked.

Assign a Number

Often when there is a plate of healthy grab-and-eat foods, I’ll tell my kids, “You each need to eat at least 8 foods from the plate.” Then Malachi says, “What if we eat 10, is that okay?” Smarty pants. Again, some of the foods on the plate aren’t my kids’ favorites, so they don’t even have to touch those and it doesn’t matter as long as they eat at least 8 (or sure, 10).

Healthy and Delicious Should Happen At the Same Time

What I love about healthy food is that it is so yummy and flavorful – naturally. But if a fruit is not in season, it’s not going to taste as good – so choose accordingly for the best chance at your family loving the food choices. Also, be sure your family doesn’t equate the word “healthy” with “dry, boring, and flavorless.” As for me and my household, we will avoid rice cakes at all cost and instead make delicious and flavorful dishes and snacks with herbs and spices, milk, cheese, meats, fruits, veggies, real butter, sea salt, and coconut oil. Real food is what deliciousness is made of.

Serve the Favorites – the Healthier Way

We all love pizza, tacos, hamburgers, fries, and did I mention corndogs? Sometimes we splurge on the not-so-good-for-you variety. Mostly though, it is less expensive and tastier to make all of these favorites with our own wholesome ingredients. Have you ever made homemade fries? On my stars. And corndogs? We can make those too.

I’d love to hear the tricks you use to make healthy choices easy for your family!

Heavenly Homemaker's Club Members: Access your homepage and all your fantastic resources here! Not a member yet? Please join us!

9 Favorite Summer Strawberry Recipes ~ With Free Printable Recipe Cards For All!

July 13, 2015 by Laura Leave a Comment

This post may contain affiliate links. For more information, please see our disclosure policy.

For your strawberry enjoyment, I put together all of my favorite summer strawberry recipes here for you for easy clicking. At the bottom of this post, you’ll find a fun strawberry freebie. Sweet! (literally) Use the printables to bless others. Maybe make them a strawberry treat to deliver along with the cards!

You’ve probably figured out by now that strawberries are my favorite fruit. Then if we put Chocolate Whipped Cream on them or make them into Strawberry Cheesecake Parfaits I am seriously in love.

9 Favorite Summer Strawberry Recipes

All of these recipes are made with real food. Real food tastes amazing (trust me). Skip the “strawberry flavored” non-food out there. Grab the real deal and indulge! Most of these recipes are also low in sugar, but don’t shy away. They are full of great flavor!

Low Sugar Strawberry Cheesecake Parfait

Low Sugar Strawberry Cheesecake Parfait 1

7-Minute Strawberry Ice Cream (with a dairy free option)

7-Minute Dairy Free Strawberry Ice Cream

Strawberry Creamsicles

Strawberry Creamsicles

 Strawberry Cream Muffins

strawberry_muffins_1

Strawberry Shortcake

Strawberry Shortcake with Whole Wheat and Honey

Strawberry Bread

Strawberry Bread

Strawberry Yogurt Fruit Dip

Strawberry Yogurt Fruit Dip

Strawberry Milkshakes

Strawberry Milkshake

Chocolate Whipped Cream on Strawberries

Chocolate Whipped Cream on Strawberries 2

And now, to help you have fun with strawberries and be a blessing to others – here are some free printable Strawberry Recipe Cards! Print them and use them for yourself or use them as gifts.

Enjoy your freebie and your strawberries!

Be a Blessing! Free Printable Summer Strawberry Recipe Cards

Print Your Free Strawberry Recipe Cards Here!

What’s your favorite way to eat strawberries?

Heavenly Homemaker's Club Members: Access your homepage and all your fantastic resources here! Not a member yet? Please join us!

Eat Right Away ~ Slow Cooker Chicken and Slow Cooker Beef Editions are Here!

July 7, 2015 by Laura 5 Comments

This post may contain affiliate links. For more information, please see our disclosure policy.

Eat Right Away Collection2

You asked. I hurried. :) Just in time to beat the summer heat, Eat Right Away: Slow Cooker Chicken Edition and Eat Right Away: Slow Cooker Beef Edition are here!

Eat Right Away Slow Cooker Chicken Edition 2sm

Actually, I wanted the Eat Right Away Slow Cooker Editions as much as you did – so I worked double time. Now that they are finished, I’m gonna tell you this: As much as I love the other editions, I love these slow cooker editions even more. These meals take even less time to prepare than the others (I didn’t know it was possible). And then to just place all prepared ingredients into a crock pot and walk away until meal time? It does not get any easier! Love, love, love!

Eat Right Away Slow Cooker Beef Edition 2sm

Beyond saving time and serving your family real food meals, these packets will help you save money. These meals are very low in cost!

Each of these downloadable Eat Right Away packets  include:

  • 5 brand new recipes
  • 5 individual meal grocery lists, plus 1 big grocery list to aid you in making all five meals in one sitting (though you’ll actually be standing, not sitting, my apologies).
  • 5 individual recipe instructions, plus 1 “Be Efficient” set of instructions to guide you through making all five meals in about a 1-hour time frame
  • Freezer safe instructions for each recipe, plus guidance on thawing, putting the food into a slow cooker, then serving each meal with little effort
  • Serving suggestions so you don’t have to think about the side dishes
  • Bonus tips

Each packet is only $2.00. Yep! That’s it. We want to get them into all of your hands to help you save time and money in your real food kitchen. Just like the other packets, the ten recipes in these two packets are either naturally gluten free or can be easily adapted to be gluten free. Bonus!

Check it out. I borrowed another family to be my taste-testers for some of these recipes. I wanted to be sure these really were as easy as I thought they were (and as yummy). I received some great feedback and food pictures, but of course, the picture with the three year-old taste-tester is my very fav.

taste tester

Here’s a closer look at each new packet:

Eat Right Away: Slow Cooker Chicken Edition ~ Recipes Included Are:

  • Cheesy Chicken Potatoes and Broccoli
  • Italian Chicken and Veggies
  • Black Bean and Corn Salsa Chicken
  • Barbecue Cranberry Chicken
  • Ranch Chicken Tacos

Eat Right Away Slow Cooker Chicken Edition Banner

Make all five recipes in about one hour. Put them in the freezer or fridge. Pull them out and throw them into the crock pot. Easy, real food goodness!

Eat Right Away: Slow Cooker Beef Edition ~ Recipes Included Are:

  • Roast Beef and Melted Cheese Sandwiches
  • Mongolian Beef
  • Balsamic Beef Roast
  • Sweet Pepper Beef Stew
  • Hawaiian Beef and Rice

Eat Right Away Slow Cooker Beef Edition Banner

Just like the chicken recipes, you can make all five beef recipes in about one hour. Put them in the freezer or fridge. Pull them out and throw them into the crock pot.

Get all four of our Eat Right Away Packets here!

[wp_eStore_fancy1 id=5]

I hope you’re enjoying these packets as much as I am. Three cheers for easy make-ahead meals and even easier dinner times with our families!

Heavenly Homemaker's Club Members: Access your homepage and all your fantastic resources here! Not a member yet? Please join us!

Using Our Real Food “Velveeta” and Rotel to make Spicy Mac and Cheese

July 5, 2015 by Laura 8 Comments

This post may contain affiliate links. For more information, please see our disclosure policy.

Allow me to introduce you to one of the easiest meals and most delicious comfort foods around: Spicy Mac and Cheese.

Spicy Mac and Cheese

Yum

Remember the Real Food “Velveeta” and Rotel Dip recipe I posted a few days ago? You need to make that today. I’m only bossing you around because when it comes to that dip – I know best, I’m right, and that dip will change your life. It’s a proven fact.

Then here’s what you do: You either eat that dip with chips because that’s what we do with dip. Or – you boil 16 ounces of pasta, drain off the water, then stir this dip into your noodles for the most delicious Mac and Cheese with a kick. The most delicious.

My kids, my kids’ friends, all the adults -we all love this dish. I love that it’s super easy, flavorful – and all real food.

A little hint: Double the dip recipe. Eat it one day as a dip. Put the leftovers in the fridge. A day or two later, boil noodles and stir in the leftover sauce for an oh-so-easy meal to throw on the table. (With fruits and vegetables. This is a given.)

I used whole wheat noodles (my favorite kind) and I’m sure brown rice noodles would work great too.

Spicy Mac and Cheese Recipe

This Dip
16 ounces of your favorite pasta

Make the dip as directed. Boil and drain pasta according to package. Stir sauce into cooked and drained pasta. 

Spicy Mac and Cheese 3

Now go make the dip! Then watch as life as you know it improves for the better – one bite at a time.

Heavenly Homemaker's Club Members: Access your homepage and all your fantastic resources here! Not a member yet? Please join us!
« Previous Page
Next Page »

Join Our Community!

 Facebook Twitter E-mail Instagram Pinterest

Popular Posts

~ Will All of the Real Moms Please Stand Up?
~ Easy! Stir-and-Pour Whole Wheat Bread
~ How to Make Gatorade
~ 31 Real Food Breakfast Ideas
~ Dear Teenage Girls...
~ When Mom Takes a Step Back
~ The Inexpensive Health Insurance We Love!
~ Let's Talk Real Food Grocery Budgets

Check out our latest posts!

  • Big Family Food and Fun: May 10-16, 2026
  • Big Family Food and Fun: May 3-9, 2026
  • Help Your Kids Become Independent in the Kitchen!
  • Big Family Food and Fun: April 26-May 2, 2026
  • Big Family Food and Fun: April 19-25, 2026
Home  ~  Simple Meals  ~  Club Membership  ~  Shop  ~  Privacy Policy  ~  Disclosure  ~ Contact

Copyright © 2026 · Beautiful Pro Theme on Genesis Framework · WordPress · Log in