Heavenly Homemakers

Encouraging women in homemaking, healthy eating and parenting

  • Home
    • About
    • FAQs
  • Recipes
    • Bread and Breakfast
    • Condiments
    • Dairy
    • Main Dishes
    • Side Dishes and Snacks
    • Desserts
    • Gluten Free
    • Instant Pot
    • Crock Pot
    • Heavenly Homemaker’s Weekly Menus
  • Homemaking
    • Real Food Sources
  • Store
  • Contact
    • Advertise
    • Disclosure
    • Privacy Policy
  • Simple Meals
  • Club Members!

Summer Family Fun ~ Less Than $1.00

May 25, 2016 by Laura Leave a Comment

This post may contain affiliate links. For more information, please see our disclosure policy.

Today’s “less than $1.00” theme includes ideas for fun you can have with your family during the summertime. I am so excited to be soaking up the sunshine (free) enjoying food off the grill (yum) and taking a break from formal school work with the kids (summer break rocks). Here are a few ideas for ya:

Free kids activity book

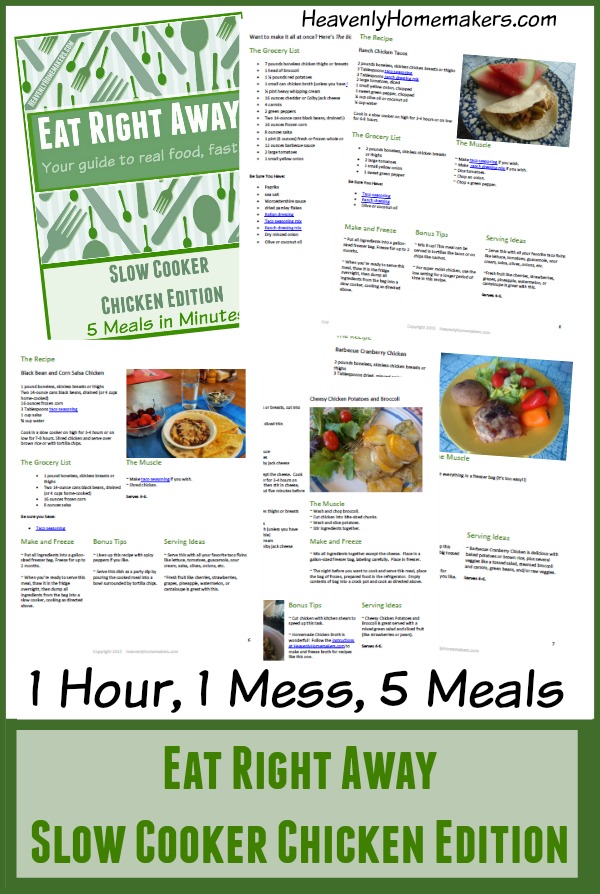
Many of you have this eBook already, but for those who don’t – you can get it free. It contains 101 fun pre-school project ideas – and many of them are great for summertime fun! These ideas all came from you, my readers. We put it together several years ago and it’s a fun one! Since this book is FREE, and many of the activities listed inside are inexpensive to do, this definitely qualifies for our “less than $1.00” theme!

101 Preschool Projects Free Download

Grab this FREE 101 Pre-School Projects book when you sign up to be a part of our Heavenly Homemaker’s Learning Zone!

Homemade Bubble Bath

This Homemade Bubble Bath idea has been on my site since my 14-year old turned 6. Needless to say, this 5’11” teenager with a deep voice doesn’t take bubble baths anymore. But he sure did enjoy this when I made it for him for his birthday 9 years ago. (I wish his birthday gifts were still this inexpensive!)
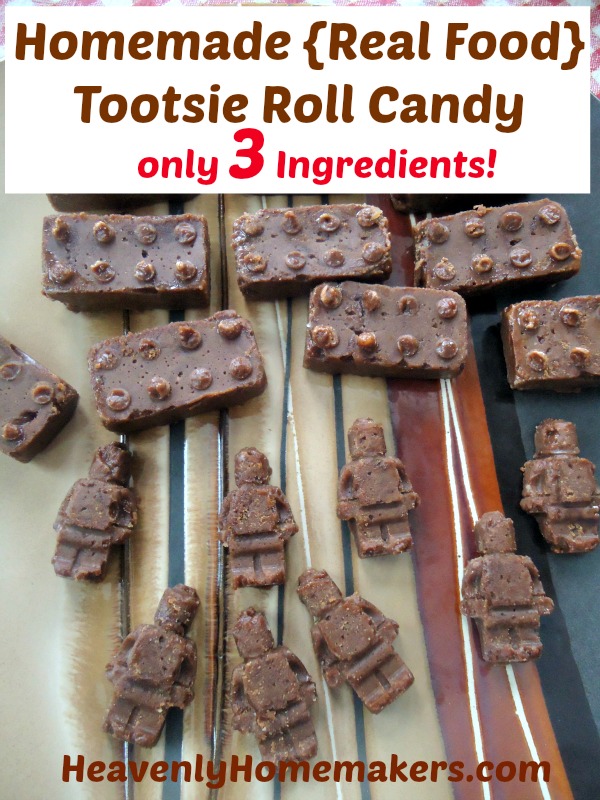
Homemade Bubble Bath for Pennies

Cook with your kids

Summer can be a great time to teach your kids more cooking skills. Here are a couple of Malachi’s favorite recipes: Homemade Real Food Tootsie Rolls and Easy Crustless Pizza Pie. You can also sign up for a free video series (open through June 6 only) that teaches your kids some basic skills, including how to use knives safely.
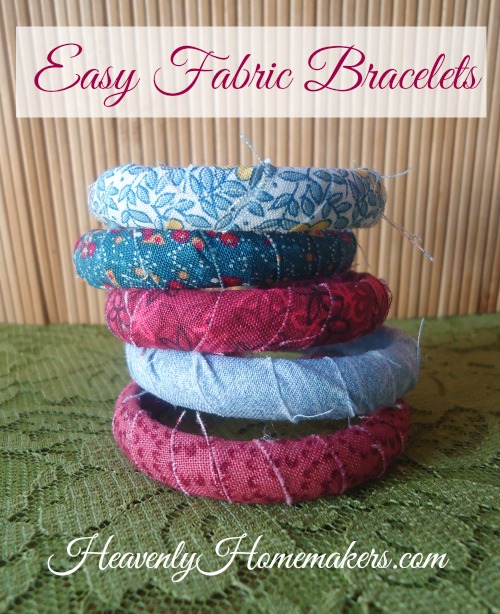
Homemade Real Food Tootsie Roll Candy

DIY Bracelets

These Easy Fabric Bracelets are really fun to make (even I can do it!). They cost about 8¢ each. If you have girls in your life, making these bracelets might be fun to craft some hot afternoon.

Quick and Easy Fabric Bracelets

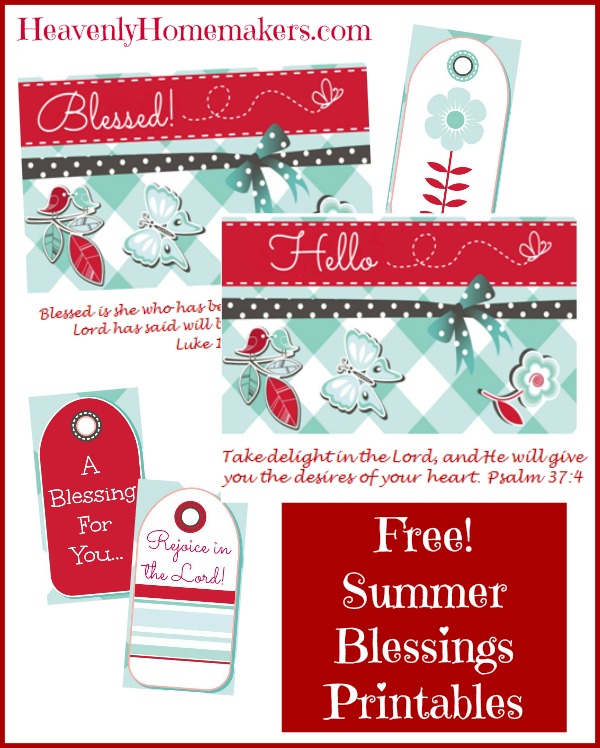
Summer Blessings Printable Cards

You can grab the download for these printable cards here, then print them off to use this summer as you need them.

Summer Blessings Printables

See our other “less than $1.00” ideas that have been shared this week here, here, and here.

Heavenly Homemaker's Club Members: Access your homepage and all your fantastic resources here! Not a member yet? Please join us!

This Week at Heavenly Homemakers: What You Can Cook, Read, Serve, and Craft for a Dollar or Less

May 22, 2016 by Laura 5 Comments

This post may contain affiliate links. For more information, please see our disclosure policy.

Over the weekend I had a fun idea to highlight some of my fun money saving ideas for you. So this week, I’ll be posting:

  • Meals you can serve your family for a $1.00 or less per plate
  • Crafts you can make with your kids for $1.00 or less
  • Ways you can serve/bless others for $1.00 or less
  • Random $1.00 or less tips
  • Freebies

It’s going to be kind of hodge-podge because I’m trying to keep you on your toes. Or maybe I’m just unorganized. (Hey, I’m working on it.)

$1.00 or Less Recipes, Crafts, Gift Ideas, and more!

First a fun craft and service idea for around a dollar or less

You all know I’m not the craftiest gal among us. But I can cut and glue, so there’s that. I had fun making these fun Owl Gift Sacks a couple years ago. You’ll find the free printables for this project here. Print ’em off, cut, glue, and fill the sacks with a treat to share. Get your kids involved. Have fun!

Owl Gift Sacks Free Printable

Now how about a recipe?

It’s the perfect time of year to put Garden Veggie Chicken Skillet on your menu frequently. This is a one-dish meal. It uses many vegetables, you can make it to your family’s liking, and it doesn’t cost much to make. I’ve calculated that it costs $1.00 or less per plate!

Garden Veggie Chicken Skillet 2

Want more inexpensive recipes?

You’ll get this eBooklet for free when you sign up to be a part of the Homemaker’s Savings Club. That’s the newsletter where I keep you up to date on all the best homemaking deals I find!

Top 10 Money Saving Recipes cover

Stay tuned all week for many more fun $1.00 or less ideas!

Subscribe here to make it easy to keep up!

  • Free Daily Subscription
  • Free Weekly Subscription
  • Join the Free Homemaker’s Savings Club!

The running list:

I’ll continue to update this post all week with the newest links to $1.00 or less ideas shared!

~ Tuesday: Bread, Recipe Card Craft, Service Ideas, and More

~ Wednesday: All Chocolate, All the Time

Heavenly Homemaker's Club Members: Access your homepage and all your fantastic resources here! Not a member yet? Please join us!

Ways Our Family Saves Money on Homeschool Curriculum

May 16, 2016 by Laura 1 Comment

This post may contain affiliate links. For more information, please see our disclosure policy.

Here are two things I’ve learned when it comes to buying homeschool curriculum:

  1. Homeschooling should be looked at as an investment.
  2. Homeschooling doesn’t have to be expensive.

In my 14+ years of homeschooling I’ve learned to recognize that just like with healthy eating – it is worth it to invest in the good stuff. Spending money for great curriculum is as worth it as spending money for great food. Ahhh, books and butter. Curriculum and vegetables. It all goes hand in hand, right? Buying high quality is worth the cost.

But there are also many ways to keep your curriculum costs down so that maybe, just maybe, we can enjoy good books and save money too. (Well, of course.)

How to Save Money on Homeschool Curriculum

How to Save Money on Homeschool Curriculum

Here are several ways I’ve saved money through our homeschooling years:

1. Use the Library

This one is too obvious, but still worth a mention. While I have really appreciated owning lots of great literature and having it on our shelves to grab at any time – there are plenty of books we have simply checked out from the library as needed. Cost is free, unless you forget to take the books back on time and have pay late fees. I know nothing about this.

2. Buy Used

Every year, I sit down with a list of books each of our kids will be reading during the school year. If we don’t already own it and I prefer not to have to get it at the library, I check on Amazon and see if I can find a used copy. I have saved so much money doing this.

Occasionally I’ve found needed books at garage sales or I’ve bought curriculum from other homeschool families who are cleaning the closet. (I’ve even been blessed by people handing me their used books for free!) As long as the book isn’t falling apart, buying a used book is just as nice as buying a new book – and you’ll save a few bucks per book too!

books

3. Borrow and Share

One of the best ways I’ve found to save on big ticket items (like Teaching Textbooks or Apologia Science books) is to borrow and share with friends. This only works if our kids are in different grade levels and will therefore not be needing the same books or software at the same time. But coordinating with friends (i.e. I’ll buy the 5th grade book and you buy the 6th grade book, then we’ll swap next year) can be a huge money saver.

4. Divide the Dollar Amount by Number of Kids in Your Family

It has helped me “justify” a quality purchase when I do the math – knowing that I will eventually use each item for all four of my kids. Therefore, if I spend $40 on something, I know it really breaks down to just $10 per kid. Make sense?

5. Use and Reuse

With many of our consumable books through the years, I had our oldest kids leave the book blank and write their answers in a 20¢ notebook instead. That way I could save the consumable book to reuse – instead of having to buy it over and over each time another kid needed it. Yay for Malachi. The youngest kid gets to write in his books.

6. Go Digital

I’m learning to love digital books more an more for these reasons:

  • They save bookshelf space
  • I can organize them easily on my computer
  • They save money
  • I can use them over and over as needed for my family

Last year when the Build Your Bundle Homeschool Curriculum Sale was offered, I grabbed several packages to use for my younger two boys. Ah-ma-zing. Throughout this school year I supplemented our regular curriculum with eBooks I had picked up last year for cheap!!

What great ways have you found to save money on books?

Heavenly Homemaker's Club Members: Access your homepage and all your fantastic resources here! Not a member yet? Please join us!

Stir-and-Pour Whole Wheat Pizza Crust

March 21, 2016 by Laura 22 Comments

This post may contain affiliate links. For more information, please see our disclosure policy.

Remember the Whole Wheat Stir-and-Pour Bread recipe I shared a few months ago? Not too long after I shared that, a reader Shelby, and then others, emailed to let me know they’d been using that recipe to make pizza crust.

Stir and Pour Pizza

Bless you. Bless you all. Now our homemade pizza making lives are easier than ever! Mix the dough, let it sit, spread the dough on baking sheets, let it bake. Your hands won’t even get messy. 

It took a little tweaking for me to get this crust just right. The recipe is the same as the bread, but it took a few tries for me to learn how thick or thin to spread this dough. I’m not a big fan of a thick crust, but the beauty of this recipe is that you can make it as thin or thick as you like!

I spread the dough into two large pizzas and could probably spread it into three if I tried. This recipe goes a long way toward a big pizza meal!

Whole Wheat Stir-and-Pour Pizza CrustYum

5.0 from 3 reviews
Stir-and-Pour Pizza Crust
 
Save Print
Author: Laura
Serves: 2 large pizzas
Ingredients
  • 4 cups whole wheat flour (I use freshly ground hard white wheat)
  • 2 teaspoons active rise yeast
  • 2 Tablespoons sucanat or sugar or honey
  • 1 teaspoon sea salt
  • 2 cups warm water
Instructions
  1. Stir all ingredients together.
  2. Cover and allow it to sit for 30 minutes.
  3. Spread dough on two *well-buttered* large pizza pans (three if you want a thinner crust)
  4. Bake in a 375° oven for 10 minutes.
  5. Pull partially baked crust out of the oven and top it however you like.
  6. Bake for 10-15 minutes more or until cheese has melted and becomes bubbly.
3.4.3177

Whole Wheat Stir and Pour Pizza Crust

I found that spreading the dough onto my baking pans with a rubber spatula worked best. I always use baking stones (like these) for pizza because I think they turn out the best crust. I’ve not tried them on metal baking sheets, so you may need to adjust the baking time if you don’t use stoneware.

You can definitely make these crusts ahead of time and freeze them until you are ready to bake pizza. This means that the easiness just gets easier. Amen and amen.

Have you tried the Whole Wheat Stir-and-Pour Bread recipe? How about Pizza Crust? Have you tried using it for pizza crust?

Just wait until later this week! I’ve got another great way to use this recipe that I’ll share with you!

Heavenly Homemaker's Club Members: Access your homepage and all your fantastic resources here! Not a member yet? Please join us!

Homemade Applesauce Cups To-Go ~ For Just a Few Cents

October 19, 2015 by Laura 16 Comments

This post may contain affiliate links. For more information, please see our disclosure policy.

Brace yourself for the cuteness. 

Homemade Applesauce Cups

Typically I make a boat load of canned applesauce each year. Still, there are always times I end up buying the little packaged applesauce cups to take on the road with us to soccer or basketball games. It feels so silly to spend money on the pre-made applesauce cups when I have home-canned applesauce in the pantry. Still, I do it. We need food for the road, after all.

This year, I got a brilliant idea. (My one and only of 2015. We’ve been waiting ten months for this.)

I checked online for little cups with lids to fill with applesauce to take on the road.

Small jars with lids work great for to-go applesauce, but those make our cooler weigh 380 pounds. Plus, I wanted to give some to Asa for his dorm fridge but didn’t want him to have to mess with saving all the jars to bring home. The cups with lids are a great solution!

~~Let us all pause here to say nice things about avoiding plastic and disposables in general. Plastic disposables are not our friend. I agree and I know there are strong opinions about this. Right now I’m the mother of many teenage boys who are active, hungry, and on-the-go frequently. It was either compromise and buy these plastic cups in an effort to save us money and help us eat well on the road – or spend more to buy them pre-made – or buy junk from concessions or McDonalds. I chose the plastic disposables and I am excited about what this provides for my family right now. Now, back to the cute applesauce cups.~~

Organic 100% fruit applesauce cups cost around 74¢ each. Non-organic are around 33¢ each. My homemade organic applesauce cups just cost me 15¢ each. This makes me very excited. Plus if it’s okay that I say so, my homemade applesauce tastes better than store-bought. :)

Applesauce Cups

This batch of applesauce turned out such a pretty shade of pink because I used a variety of dark red apples with very white flesh (Empire, I believe). No one who eats this can believe I didn’t add sugar. No need for sugar, my friends. Not when God made apples this good and sweet.

The cups with lids I chose are a perfect 5.5 ounce size. I filled them about 3/4 full, put the lids on top, then froze them. (I tested one to see if it froze/thawed well. It did. Now I have a freezer full!)

Next time we need travel food, we’ll grab several homemade applesauce cups from the freezer. I am so excited about this!

Homemade Applesauce Cups To-Go ~ For Just a Few Cents

Have any other good ideas to share for fun travel foods?

This post contains affiliate links.

Heavenly Homemaker's Club Members: Access your homepage and all your fantastic resources here! Not a member yet? Please join us!

5 {Easy!} Real Food Dinners for About $1.00 Each

October 13, 2015 by Laura 6 Comments

This post may contain affiliate links. For more information, please see our disclosure policy.

Remember our $1.00 Real Food Breakfast ideas? I promised then that I would share some lunches and dinners too.

Undoubtedly, lunches and dinners are trickier than breakfasts if you want to eat on the cheap. And just to be clear – I’m not into cheap. I’m into nourishing. But it’s always great when cheap and nourishing collide, don’t you think? (I actually prefer the word inexpensive. Cheap sounds so…cheap.)

As I stated in my $1.00 Breakfast post, the following dinner servings are my size, not my teenage boys’ size. They usually eat what I eat multiplied times four or five. Technically, these dinners still cost about $1.00 per plate. It’s just that my kids eat 3-5 plates. Each. But who’s counting?

Ooh, good news not entirely related to food but about the cost of teenage boys! We just learned how to lower our 18-year old son’s car insurance bill. So now we shall proceed with allowing our 15-year old son to pursue his license. Hey, it was “you can either eat or you can drive, which do you want?” I’m kidding. Mostly.

5 Real Food Dinner Plates for About $1.00

5 Real Food Dinners for $1.00Yum

Each of the following meals can be made for approximately $1.00 per plate. They are all made with real food ingredients. They are all served with 2-4 fruits or veggies (which ups the bill, but it’s worth it by a million).

1. Chili or Chili Mac

The trick to this one is to go easy on the hamburger meat. Let the beans offer the protein. Stretch it with a little whole grain pasta. And if you happen to have home-grown, home-canned tomato sauce all the better on the money savings.

chili_mac_2

2. Chicken Pot Pie

The best thing about this recipe is that it is a one-pot meal. It comes with veggies baked right in. Serve a salad on the side. Maybe a fruit. It is so good.

chicken_pot_pie_5

P.S. I just figured out a Hamburger Pot Pie recipe that I’ll be sharing tomorrow!

3. Pasta Alfredo

This is so delicious and tastes even better than a restaurant version (which you get for about twelve bucks a plate). Serve this with salad and steamed veggies. Adding some chicken will add to the cost, but it sure does taste delicious. If you have a little leftover chicken, stir it in, and you’ll still be keeping this low in cost.

alfredo_5

4. Creamy Chicken and Rice Casserole

This casserole is super nourishing because you’re cooking your rice in veggie-rich broth. Plus there are carrots in the casserole. Plus you can serve a salad on the side. Plus you can make extra and freeze it for another time. So convenient!

chicken_and_rice

5. Garden Veggie Chicken Skillet

I love this recipe because you can use whatever veggies are on sale or that you have on hand. The potatoes help stretch this dish. Everything is flavorful.

Garden Veggie Chicken Skillet 2

I’ve got more $1.00 Breakfasts coming soon (here’s the first one I posted). Plus I’m working on some $1.00 Lunch ideas too!

I love all this proof that healthy eating doesn’t have to be expensive. :)

Heavenly Homemaker's Club Members: Access your homepage and all your fantastic resources here! Not a member yet? Please join us!

Gratituesday: Why I Will Always Have Coffee in My Fridge

October 5, 2015 by Laura 13 Comments

This post may contain affiliate links. For more information, please see our disclosure policy.

gratituesday[2]

Remember that one time my oldest son graduated from high school and moved all the way to the other side of town to the college dorm? 

I am one spoiled mama, that’s what I am. While Asa is super busy (16 mostly upper-level credit hours plus work study) and super involved (soccer, choir, club, and everything else fun he can squeeze in) and is barely getting any sleep – every once in a while we do get to see his face. I love those moments. 

We get to see Asa at church most Sundays. We go to his home soccer games and the away games that are close-by. He comes home to do laundry every week or so. I feed him whenever a meal at home can be worked into his schedule. Sometimes he referees one of his brother’s soccer games. See? I am super spoiled. I know many moms who said goodbye in August and won’t see their son or daughter again until Thanksgiving or beyond. I’m blessed to see my boy here and there. 

We’re adjusting to life with just three boys at home. We’ve re-vamped the chore list and shuffled around beds in the boys’ bedroom and even figured out how to play games and watch movies without Asa being here. <— that part was so weird and hard at first. “We can’t watch that because not everyone is here!” had to be replaced with a sniff from Mom and an “I guess we’ll watch that without Asa.” Who knew that would be a tough adjustment? (It’s a “We love our family time” thing. That’s when we miss him most. That and when it’s his turn to take out the trash.)  ;)

Do you remember what it’s like to be a college student? We all stayed up way too late most nights and still got up for early morning classes. Somehow we survived. Now that I’m 42, my body is like, “It’s almost 9:45 and I might pass out if I don’t go to bed soon.” But 9:45 pm is still mid-afternoon for college students. That’s the time they have meetings, write papers, and hang out with friends. Night life in the dorm begins at midnight. But still there are 8:00 am classes. This is what motivates a college kid to begin drinking coffee, am I right?

So guess who likes coffee now? 

It happened like this: 

Asa’s girl, Brittany — Yes, Asa has a girl. Has had for over a year. I’ve respected her/their privacy by not going on and on about her here, but then I asked and she said it was okay so there you go — Anyway…Brittany has liked coffee shop coffee for quite some time. Asa teased her about it until the morning after the twelfth night in a row he hadn’t gotten enough sleep. That’s when he said, “I sure could go for some coffee” and she fell out of her chair. (See, this is why people shouldn’t give me permission to write about them on my blog.) 

She didn’t fall. She just hopped up and ran to our local coffee shop.

Long story short(ish) – now they both love fru-fru coffee but aren’t enjoying paying high prices or drinking oodles of sugar. They have loved my Frappes when I’ve served them, so recently when they were here, I said, “Anytime you want coffee, text me. My coffee will cost you nothing and it’s not full of sugar (plus then I’ll get to see you both which will make my day so please want coffee often and text me daily).” 

coffee for asa and britt

Lookie there. Frappes in to-go cups. 

I will stop here and tell you the specifics of my favorite way to make a delicious Frappe, because everyone needs to know this.

How To Make an Amazing (Much Healthier) Frappe

1. Grind some of the best coffee beans in the world. (I discovered these beans from Guatamala and I can’t stop loving how good the coffee is.)

2. Brew coffee as normal or make some via the cold brew method. By default, I usually brew coffee to drink in the morning, then cool and refrigerate leftovers to use in Frappes.

3. Make coffee ice cubes. 

4. Make Chocolate Frappe as directed here. Or this: Put cold coffee, a few coffee ice cubes, some cream, and a few squeezes of this amazing stevia sweetened chocolate syrup into a blender. (Note, that stuff is not cheap, but is still much less expensive and absolutely healthier than coffee shop coffee, so I grab some when I have Amazon or Vitacost credit.)

5. Blend until frothy and serve. 

Stevia Sweetened Chocolate Frappe

Starbucks is jealous of how delicious this is. Asa, Brittany, Matt, Justus, and Elias all love this drink. I’m still in the “plain coffee with cream” camp because it is so delicious as-is. It is so much fun to drink coffee with my people! (Malachi will come around, and for now will stick with hot chocolate.) 

The above combination of ingredients also tastes delicious as a hot drink (minus the ice cubes, I hope that was obvious). This is why I grabbed to-go coffee cups with lids because it is getting chilly outside and cold frappes for the college students probably won’t cut it much longer.

coffee cups

So there you go. I will always have coffee on hand so that I’m ready to say “Yep!” whenever I get a “Can we come get coffee?” text. For the record, I will also always have food to warm up (do not ever question this), fresh fruit, boxes of kleenex, an assortment of natural remedies, and if ever there is a request that I cannot immediately fulfill, I will put it on my Walmart list because I can’t even help it.

I’d love to hear what all of you are thankful for this Gratituesday!

Heavenly Homemaker's Club Members: Access your homepage and all your fantastic resources here! Not a member yet? Please join us!

5 {Easy!} Real Food Breakfast Plates for About $1.00 Each

September 30, 2015 by Laura 6 Comments

This post may contain affiliate links. For more information, please see our disclosure policy.

Here’s what we’re going to do. We’re going to put together five different real food breakfast plans that are super simple and cost about $1.00 per plate. We’re going to save money, save time, and eat well…all at the same time.

Confession time – my family of teenage boys eats BIG. Three of my boys cannot eat these foods for $1.00 because they eat such a freakishly large amount of food in one sitting. I do all I can to keep our costs down, but their plate quantities are something else. So just know that when I say $1.00 per plate – we’re talking about normal people plates. Not active, growing, hungry all the time, teenager people plates. (Not that my boys aren’t normal. But just, you know.)

Other Disclaimers: Your costs and my costs are not going to match up exactly. Fruit prices fluctuate, so I recommend price-matching (if it is an option for you), ordering from Bountiful Baskets or Azure Standard (if it an option for you), and buying in season and on sale.

5 Real Food Breakfast Plates for About $1.00

1. Fried or Scrambled Eggs, Whole Grain Toast with Butter, Fruit

I love that this meal can be prepared and put on the table in such a short time – and that is so packed with nourishment from protein to vitamins to minerals.

fried egg breakfast

2. Oatmeal with Fruit and Nuts

Make this inexpensive meal easier than ever by making ahead Instant Oatmeal Packets or Frozen Oatmeal Cups. Add any fruit you have, whether fresh, frozen, or freeze-dried.

One Dollar Breakfast 2

3. Muffins, Eggs, Fruit Smoothies

Make muffin batter ahead as described here, then bake in the morning. So easy! Scramble or fry some eggs. Throw frozen fruits into the blender for a smoothie. Voila! Our favorite smoothie recipe is: Pineapple Mango Smoothie. It is so delicious! We also love Green Machine Milkshakes and Creamy Orange Coolers.

One Dollar Breakfast 3

Creamy Orange Cooler

4. Homemade Grape Nuts Cereal, Fruit

This is super easy to make ahead of time, and the cereal is very filling! Throw berries into your cereal bowl or eat fresh fruit on the side. Need some protein to finish this off? How about a hard boiled egg? Perfection.

One Dollar Breakfast 1

5. Ham and Egg Breakfast Bowls, Fruit

My family can’t get enough of these, and you can make them according to your veggie preferences. These can be made ahead and re-heated in the morning if you like. They are great for a grab and go breakfast!

ham and egg cups1

I’d love to hear what your inexpensive real food go-to breakfast plates look like! Because my wheels are turning now, I feel like I could put together another post with an additional 5 Breakfast Plates for About $1.00. I’ll see what I can come up with – and I’d love to include your ideas too!

Stay tuned for 5 {Easy!} Real Food Lunch Plates for Less Than $1.00 Each and 5 {Easy!} Real Food Dinner Plates for Less Than $1.00 Each coming up in the next couple of weeks. (If you’re new here, you may want to subscribe to our free newsletter so you won’t miss out! This one is daily; this one is weekly. Join us!)

~~~~~~~~~~~~~~~~~~~~~~~~~~~~~~~~~~~~~~~~~~~~~~~~~~~~

Huge savings here —> Check out our amazing Simple Meals program!

You will love this!

728x90

Heavenly Homemaker's Club Members: Access your homepage and all your fantastic resources here! Not a member yet? Please join us!

How to Make Refrigerator Cookie Dough – Save Money and Use Healthier Ingredients

September 15, 2015 by Laura 14 Comments

This post may contain affiliate links. For more information, please see our disclosure policy.

This idea was born out of pure laziness. I was hungry for my Easy {Low} Sugar Cookies, but the idea of chilling the dough, and rolling out the cookie dough, then cutting out the dough…oh it was all just too much.

I don’t want to knead bread dough, I don’t want to roll out sugar cookies…has it really come to this? (Yes.) So here is what I did to save myself some effort and time:

I mixed the dough. I took half of the dough and I rolled it up in parchment paper – just like a tube of dough you would buy at the store, except that mine didn’t have a Pillsbury Dough Boy pictured on the side. I stuck the tube in the fridge. It worked so well, I did the same with the other half of the dough. It was too easy. An hour later, I sliced my cookie dough tubes. I baked my slices (just as the recipe states). I rejoiced that I had avoided the difficult task of using a rolling pin. I ate a cookie.

Sugar Cookie Collage

Just a reminder that these cookies are very low in sugar – kind of like a sweet, buttery biscuit. We don’t miss the extra sugar because they are so delicious just as they are. If you were wanting to try the Easy {Low} Sugar Cookies recipe but balked at the idea of rolling and cutting and getting flour down the front of your shirt – just roll the dough into a tube. You will feel so Betty Crocker-ish, perhaps a little Martha Stewart-y, but mostly you will break in to a Heavenly Homemaker dance. Do not ask me to show you what this looks like. 

One thing has led to another with cookie dough tubes in my kitchen. These are all the other important facts you need to know:

These Cookie Dough Tubes freeze well.Yum

These are so easy and fun to make, that I found that it made sense to make several batches to freeze to have on hand for all the cookie emergencies. To do this, simply place the parchment paper-wrapped dough into freezer bags, label, and freeze. Thaw in the fridge, if you think ahead better than I do. Otherwise, set the frozen dough tube on the counter-top for about 15 minutes, then slice and bake (according to the time and temp as directed in the cookie recipe). Yes, it’s that easy.

These Cookie Dough Tubes cost much less than what you can buy at the store.

I did the math, because I was curious and thought maybe you would be too.

One recipe of sugar cookie dough cost me roughly $2.60. This was using high quality ingredients, most of them organic. I get two tubes of dough out of one batch, each making about 18 cookies. This breaks down to $1.31 for one tube of cookie dough! Take that, Dough Boy! (I’m sorry. That wasn’t nice. You are adorable. You just aren’t good for us. And you are expensive. This is not your fault, because you are imaginary.)

These Cookie Dough Tubes aren’t limited to just sugar cookies.

Obviously, you can use this same idea to make other varieties of cookie dough. Chocolate chip works very, very well.

Chocolate Chip Cookie Collage

Need the recipes? But of course!

Whole Wheat Chocolate Chip Cookies

Easy {Low} Sugar Cookies

I haven’t tried yet, but I’m very sure this idea will work with:

Whole Wheat Chocolate Crinkle Cookies

Christmas Spice Cookies

How to Make Refrigerator Cookie Dough

Have you tried this idea before? What other varieties of cookies should we try with this idea?

Heavenly Homemaker's Club Members: Access your homepage and all your fantastic resources here! Not a member yet? Please join us!

Eat Right Away ~ Slow Cooker Chicken and Slow Cooker Beef Editions are Here!

July 7, 2015 by Laura 5 Comments

This post may contain affiliate links. For more information, please see our disclosure policy.

Eat Right Away Collection2

You asked. I hurried. :) Just in time to beat the summer heat, Eat Right Away: Slow Cooker Chicken Edition and Eat Right Away: Slow Cooker Beef Edition are here!

Eat Right Away Slow Cooker Chicken Edition 2sm

Actually, I wanted the Eat Right Away Slow Cooker Editions as much as you did – so I worked double time. Now that they are finished, I’m gonna tell you this: As much as I love the other editions, I love these slow cooker editions even more. These meals take even less time to prepare than the others (I didn’t know it was possible). And then to just place all prepared ingredients into a crock pot and walk away until meal time? It does not get any easier! Love, love, love!

Eat Right Away Slow Cooker Beef Edition 2sm

Beyond saving time and serving your family real food meals, these packets will help you save money. These meals are very low in cost!

Each of these downloadable Eat Right Away packets  include:

  • 5 brand new recipes
  • 5 individual meal grocery lists, plus 1 big grocery list to aid you in making all five meals in one sitting (though you’ll actually be standing, not sitting, my apologies).
  • 5 individual recipe instructions, plus 1 “Be Efficient” set of instructions to guide you through making all five meals in about a 1-hour time frame
  • Freezer safe instructions for each recipe, plus guidance on thawing, putting the food into a slow cooker, then serving each meal with little effort
  • Serving suggestions so you don’t have to think about the side dishes
  • Bonus tips

Each packet is only $2.00. Yep! That’s it. We want to get them into all of your hands to help you save time and money in your real food kitchen. Just like the other packets, the ten recipes in these two packets are either naturally gluten free or can be easily adapted to be gluten free. Bonus!

Check it out. I borrowed another family to be my taste-testers for some of these recipes. I wanted to be sure these really were as easy as I thought they were (and as yummy). I received some great feedback and food pictures, but of course, the picture with the three year-old taste-tester is my very fav.

taste tester

Here’s a closer look at each new packet:

Eat Right Away: Slow Cooker Chicken Edition ~ Recipes Included Are:

  • Cheesy Chicken Potatoes and Broccoli
  • Italian Chicken and Veggies
  • Black Bean and Corn Salsa Chicken
  • Barbecue Cranberry Chicken
  • Ranch Chicken Tacos

Eat Right Away Slow Cooker Chicken Edition Banner

Make all five recipes in about one hour. Put them in the freezer or fridge. Pull them out and throw them into the crock pot. Easy, real food goodness!

Eat Right Away: Slow Cooker Beef Edition ~ Recipes Included Are:

  • Roast Beef and Melted Cheese Sandwiches
  • Mongolian Beef
  • Balsamic Beef Roast
  • Sweet Pepper Beef Stew
  • Hawaiian Beef and Rice

Eat Right Away Slow Cooker Beef Edition Banner

Just like the chicken recipes, you can make all five beef recipes in about one hour. Put them in the freezer or fridge. Pull them out and throw them into the crock pot.

Get all four of our Eat Right Away Packets here!

[wp_eStore_fancy1 id=5]

I hope you’re enjoying these packets as much as I am. Three cheers for easy make-ahead meals and even easier dinner times with our families!

Heavenly Homemaker's Club Members: Access your homepage and all your fantastic resources here! Not a member yet? Please join us!
« Previous Page
Next Page »

Join Our Community!

 Facebook Twitter E-mail Instagram Pinterest

Popular Posts

~ Will All of the Real Moms Please Stand Up?
~ Easy! Stir-and-Pour Whole Wheat Bread
~ How to Make Gatorade
~ 31 Real Food Breakfast Ideas
~ Dear Teenage Girls...
~ When Mom Takes a Step Back
~ The Inexpensive Health Insurance We Love!
~ Let's Talk Real Food Grocery Budgets

Check out our latest posts!

  • Big Family Food and Fun: April 19-25, 2026
  • Big Family Food and Fun: April 12-18, 2026
  • Big Family Food and Fun: April 5-11, 2026
  • Big Family Food and Fun: March 29-April 4, 2026
  • My 2026 NON-Grocery Budget Update
Home  ~  Simple Meals  ~  Club Membership  ~  Shop  ~  Privacy Policy  ~  Disclosure  ~ Contact

Copyright © 2026 · Beautiful Pro Theme on Genesis Framework · WordPress · Log in