Heavenly Homemakers

Encouraging women in homemaking, healthy eating and parenting

  • Home
    • About
    • FAQs
  • Recipes
    • Bread and Breakfast
    • Condiments
    • Dairy
    • Main Dishes
    • Side Dishes and Snacks
    • Desserts
    • Gluten Free
    • Instant Pot
    • Crock Pot
    • Heavenly Homemaker’s Weekly Menus
  • Homemaking
    • Real Food Sources
  • Store
  • Contact
    • Advertise
    • Disclosure
    • Privacy Policy
  • Simple Meals
  • Club Members!

The BEST Creamy Mac and Cheese, Made Simpler and Faster

October 26, 2017 by Laura 7 Comments

This post may contain affiliate links. For more information, please see our disclosure policy.

Back in the olden days of blogging, I shared what became one of my most popular recipes: Creamy Mac and Cheese. What makes this Creamy Mac and Cheese different? It’s made with whole grain pasta and it’s made with a completely different method which gives it the ultimate chance of creaminess. This happens because…

We cook the pasta directly in milk.

creamy mac12

Yes. We dump dry pasta into a pot and we pour in a generous amount of milk (whole milk, because creaminess). We salt it to taste, then we cook and stir until the pasta is tender and the creaminess becomes perfection. We remove it from the heat because we are people who read directions! Then we stir in the cheese and we cry tears of joy as we serve the delicious Creamy Mac and Cheese to our families.

So now, eight years after I first shared this recipe online, I will tell you a fun little tip so you can make this wonderful recipe in an even simpler, faster way. It’s this:

The smaller the noodle, the faster your Creamy Mac and Cheese hits the table.

creamy mac22

It’s kind of a no-brainer. However, I had always used penne or fusilli shaped pasta for this recipe, both of which are similar in size and take about 15 minutes to cook. Fifteen minutes is not a long time to get dinner on the table. But…

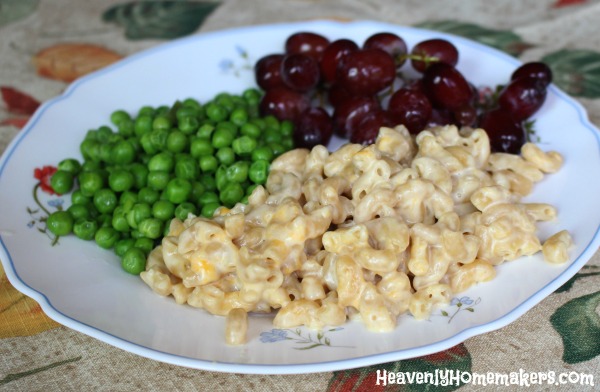
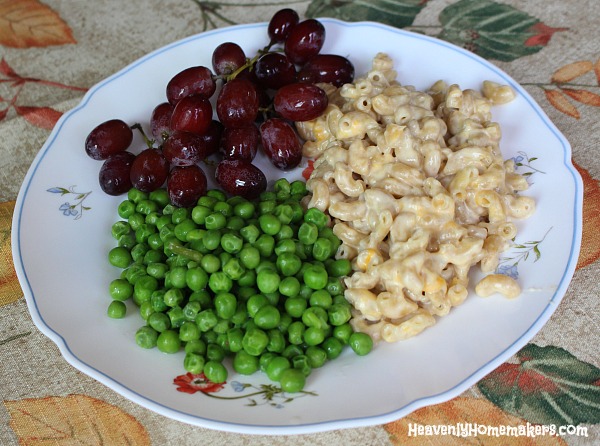
One day recently, I used small elbow noodles to make this Creamy Mac and Cheese and boom. The pasta was tender before I’d even cooked the peas or washed the grapes to go with our meal. Sweet! Not only can we make this meal without having to think ahead to thaw meat, we can throw it together even faster if we use a smaller noodle.

I’d say that taking advantage of this tip is really “using our noodle” but then I’d sound like Elmo and I’m not sure that’s how I want you to remember me.

Creamy Mac and Cheese Made Simpler and Faster

4.5 from 2 reviews
The BEST Creamy Mac and Cheese, Made Simpler and Faster
 
Save Print
Author: Laura
Serves: 4-6
Ingredients
  • 2½ cups whole grain pasta
  • 3 cups whole milk
  • ½ teaspoon sea salt (more or less to taste)
  • 1 cup shredded cheese
Instructions
  1. Mix pasta, milk, and salt in a large sauce pan.
  2. Cook over medium-high heat stirring almost constantly until the pasta is tender (10-15 minutes).
  3. Remove from heat. (IMPORTANT!)
  4. Add cheese and stir until melted.
  5. Serve immediately.
3.4.3177

Keep this recipe in your hip pocket for days you need to get a meal on the table quickly. Use small sized pasta so this will cook more quickly. Serve it with a salad and/or veggies and fresh fruit and you’ve just put a super simple meal on the table in record time.

The BEST Creamy Mac and Cheese

My favorite whole grain pasta to use in this recipe:

  • DeLallo Whole Wheat Elbows (quickest cooking pasta for the Creamy Mac and Cheese recipe!)
  • DeLallo Whole Wheat Penne
  • DeLallo Whole Wheat Fusilli
  • DeLallo Whole Wheat Shells
  • DeLallo Whole Wheat Gemelli (this is our all time favorite pasta shape for all the recipes in the world)

I have successfully made this recipe with Tinkyada Rice Pasta, so gluten-free friends, you get to enjoy this recipe too!

NOTE: It is quite important that you remove the cooked pasta from the heat BEFORE you add the cheese. If the pasta is still cooking when the cheese is added, this may cause the cheese to curdle. In addition, I’ve found that using pre-shredded cheese in this recipe doesn’t work as well because of the added ingredients in the packaging. I use cheese we shred at home for best results.

Creamy Mac and Cheese Varieties

  • Stir in bits of ham or cooked bacon, or follow these recipes:
  • Easy Tuna Casserole
  • Cheeseburger Macaroni
  • Three Cheese Garlic Chicken Pasta
  • Baked Three Cheese Chicken Pasta

Have you tried this method for making Mac and Cheese? What’s your favorite pasta shape?

Psssssst!

Seeing as this recipe is definitely a Heavenly Homemaker Favorite, you can bet that it’s included in my Best of Heavenly Homemakers book!! (There are only a few recipes included, but this had to be one of them!)

I just peeked and the book is up already on Amazon! Be the first to grab it!!

best of cover4

Heavenly Homemaker's Club Members: Access your homepage and all your fantastic resources here! Not a member yet? Please join us!

Make-Ahead Pumpkin Donuts (How to Cook Fresh Donuts in Minutes!)

October 12, 2017 by Laura 11 Comments

This post may contain affiliate links. For more information, please see our disclosure policy.

Introducing a perfect idea for this fall: Make-Ahead Pumpkin Donuts!

donuts4

After learning that it works well to make and freeze unbaked Giant Breakfast Cookies, Homemade Poptarts, Chocolate Chip Breakfast Bars, and all varieties of Muffins so that we can bake them fresh in the morning without any trouble, I thought, “Why not try this idea with my Whole Wheat Pumpkin Donut recipe?”

donuts5

One of these things is not like the the other. Someone, who shall remain nameless,
forgot to cut a donut hole in one of the donuts. Hmmm…

Indeed. We can mix up the pumpkin donuts, roll out the dough, cut the shapes, then freeze the uncooked dough on parchment paper or silicone mat-lined cookie sheets. We transfer the frozen dough into freezer bags, then any time we want fresh donuts (and when would we not want fresh donuts?), we can grab some out of the freezer and fry them up fresh to eat while sipping a cup of coffee, tea, or hot chocolate.

donuts6

Can you think of a better breakfast treat to enjoy this fall than fresh homemade Pumpkin Donuts?

The best part is that the mixing, rolling, cutting, and clean up will have already been taken care of! Well, clearly the best part is eating the fresh donuts. But eating the fresh donuts without looking at a messy kitchen that you’ll have to clean up afterward? Fabulous.

Make-Ahead Pumpkin Donuts

5.0 from 1 reviews
Make-Ahead Pumpkin Donuts (How to Cook Fresh Donuts in Minutes!)
 
Save Print
Author: Laura
Serves: 15-20
Ingredients
  • 3½ cups whole wheat flour (I use freshly ground hard or soft white wheat)
  • 4 teaspoons baking powder
  • 1 teaspoon sea salt
  • 1 teaspoon ground cinnamon
  • ½ teaspoon nutmeg
  • ½ cup sucanat or brown sugar
  • 2 Tablespoons melted butter
  • 2 eggs
  • 1 teaspoon vanilla extract
  • ½ cup buttermilk
  • 1 cup pumpkin puree
  • Oil for frying (I recommend coconut oil or palm shortening for healthy frying)
  • GLAZE:
  • 2 cups powdered sugar (I use unbleached powdered sugar)
  • ⅓ cup buttermilk
  • ½ teaspoon vanilla extract
Instructions
  1. Stir together whole wheat flour, baking powder, sea salt, ground cinnamon, nutmeg, and sucanat. Add melted butter, eggs, vanilla, buttermilk, and pumpkin puree – mixing until all ingredients are well combined.
  2. Roll dough on a well-floured surface.
  3. Cut out donuts and donut holes (makes about 30 of each).
  4. Lay the cut outs on a parchment-paper lined cookie sheet and freeze for at least 2 hours.
  5. Transfer prepared donuts to a freezer bag to store in the freezer until ready for use.
  6. To Cook: Set donuts out of the freezer at room temperature for about 15 minutes before frying.
  7. Fry dough in hot oil for about 3 minutes or until donuts are golden brown.
  8. Whisk glaze ingredients together and drizzle over warm donuts before serving.
3.4.3177

Make-Ahead Pumpkin Donuts (Whole Grain, Low Sugar, Easy!)

Concerned about the fact that these treats are fried? Don’t be! Coconut and Palm Oils can withstand high temperatures without becoming harmful to us. So instead of fearing the fry, we can actually enjoy the healthy fat we’re getting while enjoying these donuts.

Wow. Who knew we would ever be able to say, “I need some healthy fats in my diet. Please pass the donuts.”

But of course, let us not ever eat more donuts than veggies, yada, yada. You know the drill.

WAIT. There are veggies in these donuts (thank you, pumpkin, for being there for us when we need you). So I guess we can enjoy these to our heart’s delight, all while enjoying the fact that you can make them ahead and freeze them for ease in the kitchen.

This is what I call one happy fall recipe!

Some of these links are my affiliate links.

Heavenly Homemaker's Club Members: Access your homepage and all your fantastic resources here! Not a member yet? Please join us!

Easy Low Sugar Pumpkin Spice Roll-Out Cookies

October 1, 2017 by Laura 2 Comments

This post may contain affiliate links. For more information, please see our disclosure policy.

Allow me to introduce a new seasonal favorite: Easy Low Sugar Pumpkin Spice Roll-Out Cookies.

spice cookies 11

While I’ve shared that I just can’t get behind Pumpkin Spice Coffee (typing it actually makes me shudder just a little bit), I most certainly enjoy making many Pumpkin Spice treats this time of year – to eat while I drink my (plain, non-pumpkin-spice) coffee. If my house smells of nothing but Pumpkin Spice from now until Christmas, there will be much joy in the holiday season.

Of course, seeing as I live with a houseful of teenage boys, my house not only smells of Pumpkin Spice, it also frequently smells like Old Spice. And old shoes. Annnnnd cute girls.

It’s an interesting combination, you can be sure. One that I am so very blessed to experience. What a great God we serve!

Do you see His goodness all around you? Even in the midst of struggle? Even throughout the daily grind? Even during times of hardship and devastation?

spice cookies33

I love God. All that He offers is good, and all good comes from Him. I am continually in awe of how He provides for our spiritual needs, which makes all else fade.

What does this have to do with Pumpkin Spice Cookies? Ha. I don’t know. Lately I find myself working my way through all the day-to-day of life, which includes this houseful of teenage boys (and the cute girls that stop by) and in the midst of the cookies and the shoes and the vacuuming and the piles of mail, I sit in wonder at the peace God is revealing to me though His Spirit.

And in the Pumpkin Spice Cookie – well – there is joy. Especially when there is a great cup of coffee (sans Pumpkin Spice) to go with it.

spice cookies22

Easy Low Sugar Pumpkin Spice Roll-Out Cookies

Easy Low Sugar Pumpkin Spice Roll-Out Cookies
 
Save Print
Author: Laura
Serves: 18-24
Ingredients
  • 1 cup melted butter
  • ½ cup brown sugar or sucanat
  • 1 egg
  • 1 teaspoon vanilla extract
  • 1 Tablespoon Pumpkin Spice*
  • ½ teaspoon sea salt
  • 3 cups whole wheat flour (I use freshly ground soft white wheat)
Instructions
  1. Cream together melted butter and sugar.
  2. Add egg, vanilla, pumpkin spice, and sea salt.
  3. Stir in flour until well combined.
  4. Cover and chill dough for 1-2 hours.
  5. Roll dough to approximately ¼ inch thickness between layers of parchment paper or on a well-floured surface.
  6. Cut rolled dough with cookie cutter shapes and place cut-outs on a baking sheet, ½ inch apart.
  7. Bake in a 350 degree oven for 7-10 minutes or until cookies are lightly browned.
3.4.3177

Easy Low Sugar Pumpkin Spice Roll-Out Cookies


I’d love to hear about the joy of the Lord you are experiencing right now. Struggling to see His goodness? Look around at what you have, and I’m not talking about your stuff. See His goodness in the details of your life. In joy, in pain, in suffering – God is good. His mercies are new every morning.

And sometimes, they take on the form of a Pumpkin Spice Cookie dunked in coffee.

Heavenly Homemaker's Club Members: Access your homepage and all your fantastic resources here! Not a member yet? Please join us!

Breakfast Cake Muffins

April 10, 2013 by Laura 26 Comments

This post may contain affiliate links. For more information, please see our disclosure policy.

breakfast_cake_muffins

One reader, Kim, left a comment months ago sharing that she’d made my Breakfast Cake recipe into muffins instead of baking the batter into a cake. It sounded so good that I decided to try it right away!

And then I forgot. For months.

I think it’s actually been well over a year since she left that comment. That’s practically like trying the idea right away, right? Yeah, well…

Turns out these are an easy, yummy, freezable, on-the-go breakfast muffin that is hearty enough to keep us satisfied until lunchtime. Thanks for the idea, Kim! Next time you share a great idea like this one, I’ll try to get around to trying it before thirteen months go by. Sheesh.

Breakfast Cake MuffinsYum

2 cups whole wheat flour
2 cups whole rolled oats
1 teaspoon sea salt
1 teaspoon baking soda
1 cup butter, melted
¾ cup buttermilk or milk
¾ cup honey or 1 cup sucanat
2 eggs
1 teaspoon vanilla
1/2 cup chocolate chips, raisins, or other dried fruit  (We like Enjoy Life Soy Free Chocolate Chips)

Stir together flour, oats, salt and baking soda. Add butter, buttermilk, honey, eggs, and vanilla. Fold in chocolate chips, raisins, or other dried fruit.

Spoon batter into 18 paper lined muffin tins. Bake in a 400° oven for 20-25 minutes or until muffins are golden brown.

Give these a try. Don’t wait a year like I did. :)

Heavenly Homemaker's Club Members: Access your homepage and all your fantastic resources here! Not a member yet? Please join us!

A Week of Apples

October 16, 2011 by Laura 50 Comments

This post may contain affiliate links. For more information, please see our disclosure policy.

I have a grand total of 110 pounds of apples in my kitchen right now. You know what this means don’t you? Yes, it means that by the end of this week my fingers are going to look brown and dirty. And they’ll stay that way for about two weeks until the brown wears off. It’ll be really cute and not at all embarrassing (as long as I keep my hands stuffed into my pockets while out in public).

Oh, and if I don’t wear an apron while I’m working with all of these apples, the front of my shirt will also be covered in brown splatter stains, which will never come out. I learned this the hard way a few years ago when I made applesauce all day, while wearing a cute Disney shirt, before going to a soccer game. I completed the task of making applesauce, ran it through the water bath process to can it and put the jars away in my pantry. I didn’t look down at my shirt until I was at the soccer game that night cheering for my boys. It was then that I noticed that Eeyore was completely covered in ugly brown specks. (Of course, it had to be Eeyore.)  I was by far the most pitiful looking mother out at the soccer field that day. Of all days to leave my jacket at home.

So now you know:  While you peel, core, slice and chop apples – the juice will spit and splatter everywhere. If you work on 110 pounds of apples, everything around you, including every crevice on your hands, will turn brown for days. There’s not much you can do about this, so just embrace the fact that you’ll look like you’ve been working under the hood of your car. To avoid answering any difficult-to-answer questions from the powers that be, remove all school papers, bills, library books, and photos before proceeding. And for the love of Eeyore, please wear an apron.

My 110 pounds of apples await, and I guess it goes without saying that my apron is ready for action. Here’s what I’m looking at doing this week:

I’ll start by making and canning as many jars of Applesauce as I can make before I get sick of making applesauce. I will probably be using a slightly different method than the one described here, so I’ll give an update on that sometime during the week.

applesauce11sm.JPG

If, in fact, I still have a few pounds of apples left after making applesauce, I hope to then make a few Mini Apple Pies. These are great to have in the freezer for a quick breakfast or dessert.

miniapplepies7sm

I may also can a few jars of Apple Pie Filling. This is great to have on hand to when throwing together a quick apple crisp or of course, to make a big apple pie. Here’s my Whole Wheat Pie Crust recipe if you’re interested.

Malachi_apple_pie_1

I may also use my Excalibur Food Dehydrator and make Apple Fruit Leather and/or dried apple rings. When you have 110 pounds of apples, you can just keep going with the apple preserving until you’ve got a wide variety of apple goodies, or until you faint onto the floor of your kitchen – whichever comes first. Don’t worry – I plan to get my boys busy helping me with these projects this week. They are great applesauce makers.

We also plan to simply eat a bunch of these apples. I love having so many apples on hand for snacks. If you haven’t tried making Caramel Apple Dip, I highly recommend it. It’s one of my favorite ways to eat apples.

Throughout the week, I’ll be snapping pictures and sharing my apple preserving progress. Prepare to get sticky around here. I might even experiment with Apple Butter like several of you requested last week!

What is your favorite way to eat apples? Ever ruined an Eeyore shirt with apple spatters? This is why aprons were invented.


Heavenly Homemaker's Club Members: Access your homepage and all your fantastic resources here! Not a member yet? Please join us!

What it Means to “Soak Grains”

March 1, 2011 by Laura 70 Comments

This post may contain affiliate links. For more information, please see our disclosure policy.

It’s a funny term isn’t it? “Soak your grains.” It sounds like you need to dump a bunch of water into your bucket of hard white wheat kernels and give ’em a good soaking. But don’t do that.  You don’t want soggy wheat berries.

For those of you who are new to “soaking grains” and have emailed me with questions of confusion as to what this means exactly…I thought I would take the time to explain it a little bit better, and to show some pictures of what a bowl of “soaking grains” looks like!

First, let’s talk a tiny bit about why soaking grains is important. Because I’m not good at remembering big words and how to use them, here is a quote from the Nourishing Traditions cookbook about soaking grains:

Phosphorus in the bran of whole grains is tied up in a substance called phytic acid. Phytic acid combines with iron, calcium, magnesium, copper and zinc in the intestinal tract, blocking their absorption. Whole grains also contain enzyme inhibitors that can interfere with digestion. Traditional societies usually soak or ferment their grains before eating them, processes that neutralize phytates and enzyme inhibitors and, in effect, predigest grains so that all their nutrients are more available.

In Laura’s terms:  When you soak your grain, your tummy will feel better and the nutrients in the grain will be better used by your body.

If you’ve been reading here long, you know that I’m a little bit on the fence when it comes to soaking grains. Sometimes I’m a soaker…sometimes I’m not. It depends on the day and what recipe I’m using, but I do try to soak my grains if I can. There are different schools of thought behind soaking grains and you can read my thoughts about it (and other people’s ideas and comments) here. Matt and I have come to the conclusion that we don’t need to go into panic mode if I don’t get around to soaking our grains. Right or wrong…that’s where we’ve landed. I really like the pressure this has taken off of my brain.

Now, having said all of that…I would like to share what “soaking grains” really means. Ultimately, it means that you are soaking the whole grain that has already been ground into flour . (You can/should also soak oats or cornmeal. Oats are soaked the same as flour. Cornmeal requires a different variety of soaking, which I’ll discuss in a separate post.)

The soaking of said flour or oats needs to be done in an “acid medium liquid” for 12-24 hours, or at least overnight. This means, you can soak your flour or oats in:

  • Any cultured dairy product such as buttermilk, yogurt or kefir. You can read about how I easily and inexpensively make these products here. Or…
  • If you are not able to use dairy products in your family, you can instead use water with 2 Tablespoons of lemon juice or vinegar in place of the buttermilk, yogurt or kefir.

The flour doesn’t need to “go swimming” in the liquid. It simply needs to be wet. In any of my recipes that give soaking instructions, I will share the exact measurements of flour and/or oats and liquids needed for soaking. On my site, I have instructions for soaking:  Whole Wheat Waffles, Simple Soaked Pancakes, Breakfast Cookies, Breakfast Cake, Poptarts, Pizza Pocket dough, and others that I’m likely forgetting at the moment. :)  I also describe how to soak my Whole Wheat Tortillas in my Totally Tortillas ebook.

Here is what my Simple Soaked Pancakes look like in the morning after I’ve stirred together the flour and buttermilk the night before. See the little bubbles that formed? That means we’ve accomplished kind of a “sourdough” effect. Perfect! Next, I mix in the remaining ingredients and make the pancakes. (And then the fam will eat the entire triple batch before I have a chance to grab one if I’m not on top of my game.) 

This is what my Whole Wheat Tortillas look like once I’ve mixed them up and left them to “soak”. This recipe with soaking instructions is so simple because I put them all together, they soak, then they are ready right away for me to roll them out and cook them!

Soaking grains isn’t difficult at all…it just requires a little bit of planning ahead!

Some other frequently asked questions about soaking grains include:

Do I need to soak my flour even if it isn’t freshly ground in a grain mill?

Yes, even if it is store bought whole wheat flour, it is best to soak it if you can.

Do I need to soak my white flour?

Nope. The reason it’s white flour is because the bran and the germ have been taken out. The bran is what needs to be soaked in the first place. Since that’s not there…no reason to soak!

What other questions do you have about soaking grains? Are you a soaker?

Heavenly Homemaker's Club Members: Access your homepage and all your fantastic resources here! Not a member yet? Please join us!
« Previous Page

Join Our Community!

 Facebook Twitter E-mail Instagram Pinterest

Popular Posts

~ Will All of the Real Moms Please Stand Up?
~ Easy! Stir-and-Pour Whole Wheat Bread
~ How to Make Gatorade
~ 31 Real Food Breakfast Ideas
~ Dear Teenage Girls...
~ When Mom Takes a Step Back
~ The Inexpensive Health Insurance We Love!
~ Let's Talk Real Food Grocery Budgets

Check out our latest posts!

  • Big Family Food and Fun: May 10-16, 2026
  • Big Family Food and Fun: May 3-9, 2026
  • Help Your Kids Become Independent in the Kitchen!
  • Big Family Food and Fun: April 26-May 2, 2026
  • Big Family Food and Fun: April 19-25, 2026
Home  ~  Simple Meals  ~  Club Membership  ~  Shop  ~  Privacy Policy  ~  Disclosure  ~ Contact

Copyright © 2026 · Beautiful Pro Theme on Genesis Framework · WordPress · Log in