Heavenly Homemakers

Encouraging women in homemaking, healthy eating and parenting

  • Home
    • About
    • FAQs
  • Recipes
    • Bread and Breakfast
    • Condiments
    • Dairy
    • Main Dishes
    • Side Dishes and Snacks
    • Desserts
    • Gluten Free
    • Instant Pot
    • Crock Pot
    • Heavenly Homemaker’s Weekly Menus
  • Homemaking
    • Real Food Sources
  • Store
  • Contact
    • Advertise
    • Disclosure
    • Privacy Policy
  • Simple Meals
  • Club Members!

When All Else Fails (and Is Too Expensive) While Christmas Shopping

December 1, 2015 by Laura 7 Comments

This post may contain affiliate links. For more information, please see our disclosure policy.

Christmas was much easier and far less expensive when my boys were into Tonka trucks, wooden puzzles, and plastic balls. My teenagers want guitar amps, video recording equipment, microphone stands…

We see these items as useful toward their careers someday, but the price tags are frightening. Doesn’t anyone in this house want a hot wheel or a pez dispenser? Anyone??

Three out of four of our boys need tennis shoes. (Yep, the shoes are going under the tree. I buy all sorts of practical items the boys need this time of year. I have to buy them anyway. Might as well give them the pleasure of opening them as a gift.) My teens have adult feet and need quality shoes for their athletics. Target won’t cut it for my teenager shoes. But for Malachi, who is almost 11, I can still skimp on the everyday shoes. I look for quality, but try to pay less than $20.

This morning I clicked and clicked and clicked over all the sites I typically shop. I mostly shop Amazon, Target, Eastbay, and Kohl’s online – clicking back and forth to compare prices. All the shoes I found were ridiculously priced for kid shoes (or didn’t come in his size). Knowing he’ll outgrow them quickly or bust out the soles, I just couldn’t bring myself to pay $30+.

Finally, I remembered Zulily. I don’t know why I forget to look there. You never know what they might be featuring from day to day, but typically I’ve found our family’s essentials and almost always, their prices are competitive if not really, really good.

Look what I found for $12.99!!

zulily shoes

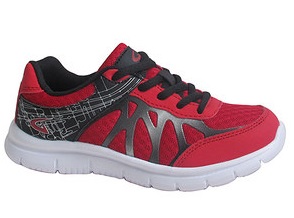
It’s not the finest shoe on the block, but it’s definitely not the worst either. Perfect for my youngest son. (Hey, Malachi. Probably not but just in case you get on Mama’s blog and see that shoe – that’s not the pair I got you. I posted a different pic just in case. Keep the magic alive, buddy.)

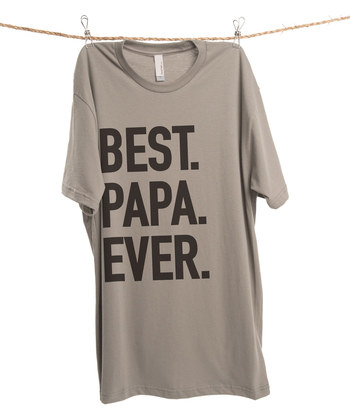
I snatched up the shoes and paid for shipping, which still cost less than all the other shoes I had looked at. Once I’d paid shipping, I qualified for free shipping on every other order today. Therefore, I went back and ordered a realllly nice coat for my oldest son, a pair of silly socks for another son, and this fun t-shirt for my boys to put their grandpa’s stocking when we go visit:

zulily papa

Today I checked Zulily as a “when all else fails” option. It has now bumped itself up on my list of “always check when shopping around.” I can almost always find a steal on something we need. At Christmastime, they always feature even more goodies.

Do you do most of your Christmas shopping online or in stores? Have you shopped Zulily before? 

Heavenly Homemaker's Club Members: Access your homepage and all your fantastic resources here! Not a member yet? Please join us!

Homemade Apple Cider in the Crock Pot

November 30, 2015 by Laura 8 Comments

This post may contain affiliate links. For more information, please see our disclosure policy.

Once upon a time, my friend Anne and I went to an orchard nearby and picked over 100 pounds of apples. At the time we had 6 children – ages 12 and under – between the two of us. Therefore, I think it is obvious that neither of us had enough to do with our time and we were frequently bored. That’s why we picked so many apples. That, and the fact that the apples were (mostly) organic, very delicious, and wonderfully priced. Most importantly of all though, it is so much fun to take your kids to an orchard to pick fruit. Days like this are some of my favorite memories of time spent with my boys when they were little.

On that very 100-pound apple day, we borrowed the orchard owner’s apple cider press. He kindly came to our house to set it up, promising to come pick it up again when we were finished using it. Our plan was to get all of our kids involved with pressing cider the old fashioned way. Wouldn’t that be fun?! It was a good plan. A beautiful idea, really.

And so we began.

Oh my goodness, I just realized I have pictures. I have pictures!!! 

cider1 cider2 cider3 cider4 cider5 cider6 cider7 cider8 cider9 cider10

Those pictures make me so happy, I cannot stop giggling. Such precious memories!!! I am going to sit here looking at those for the next few hours. After all, five out of six of those kids are teenagers now, so we are more bored than ever.

Well anyway, it didn’t take long for Anne and I to realize that having our small children press 100 pounds of apples into cider all afternoon was probably a bit unrealistic (you think?). Each child took a turn, then they all headed off to play. Anne and I spend the next few hours pressing cider like super-heros. We got stiff. We got sore. We had a blast. We were a sticky mess. But we had gallons of apple cider by the end of the day.

applecider1

It was fresh. It was raw. It was the best apple cider ever to be made or consumed on this planet.

If I may, I encourage you to find opportunities to pick fruit with your children. There is something so sweet about this experience. Make cider in an apple press if you ever have a chance. It is so much fun. You will look back at this and the pictures you took whilst pressing apples and you will be so in love with the memories.

In the meantime, I have another homemade apple cider recipe option for you. Just this year, I learned to make apple cider in the crock pot. It is much less work than a cider press, though obviously not nearly as endearing. Still, this recipe turned out delicious. I added no sugar! It’s just apples, water, and cinnamon sticks. Deliciousness!

Hot Apple Cider

Homemade Apple Cider in the Crock PotYum

5.0 from 2 reviews
Homemade Apple Cider in the Crock Pot
 
Save Print
Author: Laura
Serves: about ½ gallon
Ingredients
  • 10-15 apples, any variety
  • 3 cinnamon sticks
  • 4-6 cups of water
Instructions
  1. Wash, core, and quarter apples.
  2. Place them in a crock pot with the cinnamon sticks.
  3. Add water, enough to fill the crock about ⅔ full of water (but not enough to cover the apples and cinnamon sticks).
  4. Cover and cook on low for 6-8 hours or until the apples are very soft.
  5. Use a potato masher to mash the apples and release the liquid.
  6. Cover and allow the cider to cook on low for another hour.
  7. Strain the chunky liquid through a thin cloth. (I saved the solids and blended them to make apple bread.)
  8. Serve warm or store in the fridge for up to two weeks.
3.4.3177

Homemade Apple Cider in the Crock Pot

This recipe isn’t super specific on measurements. I simply fill my crock pot with cored apples, throw in cinnamon sticks, pour in water to fill about 1/2-2/3 full, then let it cook. Your house will smell like the holidays all day long – an added bonus!

Have you ever made apple cider – using a press or a crock pot or another method?

Heavenly Homemaker's Club Members: Access your homepage and all your fantastic resources here! Not a member yet? Please join us!

Simple {Practical} Homemade Gift Ideas for Teachers, Co-Workers, Ministry Staff, Neighbors, and Friends (For Less Than $2 Each)

November 29, 2015 by Laura 9 Comments

This post may contain affiliate links. For more information, please see our disclosure policy.

Simple and practical homemade gifts…the only kind I can handle!

lavender tea bags11

My mom was a super crafter. She had entire “craft room” with big shelves of totes filled with fabric, plus two of every craft supply found at Hobby Lobby. I loved looking through all her supplies, and I loved admiring all the detailed crafts she was making for people. She made everything from hand-pieced quilts to elaborate counted cross-stitch. Everything she made was gorgeous.

You’d think I would have the same crafty genes as my talented mother. You’d think. 

Laura only got the cooking genes. These are also good genes to have, but they don’t have the patience or the skill to turn out beautiful crafts. I’ve come to terms with it. I will forever admire the handiwork of others while I set out plates of homemade muffins. It’s a win-win.

Still. Every single Thanksgiving I get an intense hankering to craft something. I absolutely know that this hankering comes from the tradition ingrained in me from all my Thanksgivings with my mom when I was younger. We’d make it through the holiday feast, then she’d pull out the latest craft she had in mind for us to make for Christmas. She did all the tedious parts. I did all the no-brainer parts. (Laura: Place pine-cones in a basket. Mom: Make the pine-cone basket look like it came out of a magazine.)

Once again, this year I found myself needing to make crafts during Thanksgiving break. I even thought ahead and ordered supplies. The ideas I’m about to share truly are “if I can do it, anyone can” crafts. They are so easy, I actually had fun and didn’t want to scream, pout, or throw something while I was making them. (I might have crafting-anger issues. It stems from trying to follow counted cross-stitch patterns. I can’t talk about it.)

So my friends, here are three of the easiest crafts on the planet. As an added bonus, these crafts make great gifts, they all cost less than $2, and they are all practical and fun. Sorry. I just can’t not be practical. (I mean fun. I can’t not be fun. I am always so much fun. Except for when I’m following a counted cross-stitch pattern. Please, let’s not talk about it.)

3 Simple and Practical Homemade Gifts

3 Easy Homemade Gifts for $1.75 or Less

First I made the most adorable Lavender Oatmeal Bath Tea Bags (adapted from The Humbled Homemaker). This craft consists of mixing three simple ingredients, funneling the mixture into tea bags, ironing the tea bags closed, and then tying a ribbon around a few bags for a gift.

Do not the let ironing step throw you off!! This is actually the step I loved the most, and I hate ironing. It’s just that ironing the tea bag closed made me feel like an actual crafter. Plus it was fun to see that the little flap on the tea bag sealed when ironed for 8 seconds. I am now a professional tea bag ironer! I want to make more of these just so I can iron tea bags.

Lavender Oatmeal Bath

1/2 cup rolled oats
1/2 cup Lavender (use the code HOME for a 20% discount)
1/2 cup Epsom salts (purchased at Wal-Mart)

Pulse ingredients together in a blender until they are well combined and in small pieces. Use a funnel to transfer 1- 1 1/2 Tablespoon mixture to small tea bags. Fold down tea-bag flap and press to seal with a hot iron (like a boss). Tie a few tea bags together along with the free printable gift tag below.

This recipe makes about 20 Lavender Oatmeal Bath Bags, which is enough for 5 groups of 4 tea bags. I realize you could have done the math on that yourself, but it is holiday time. We all have enough to think about right now. Today I shall make crafts and do short division. I am on fire!

Make Lavender Oatmeal Bath Gift Packs for Less Than $1.00 Per Gift

Download FREE Lavender Oatmeal Bath Tags Here.

lavender gift tags

After my bath pouches were complete, I spent about five minutes pretending that putting cranberries and oranges into cellophane bags is actually a craft. The “star anise” in this recipe is optional (for those who think anise smells like a jelly bean gone wrong). But if you ask me, the anise stars triple the cuteness value of these pouches.

Christmas Potpourri Pouch

1/2 cup cranberries
1 small orange
3 Cinnamon Sticks (use the code “HOME” for a 20% discount!)
1 Tablespoon Mulling Spice (use the code “HOME” for a 20% discount!)
2 Tablespoons Star Anise

Place all ingredients in a bag. (I used these Clear Cellophane Bags.) Tie up with a ribbon and a free printable gift tag below.

Make a Christmas Potpourri Pouch for $1.75 Per Gift
Download FREE Christmas Potpourri Pouch Gift Tags Here.

Christmas Potpourri Gift Tags

Finally, I found a way to iron more tea bags (be very happy for me). I had a lovely pack of Chai Tea from Olive Nation. I researched how to make the awesome Chai Tea Drink people rave about, then put together some Chai Tea Kits. Total cost per gift set: 98¢. Getting to once again experience the ironing of the tea bags: Priceless.

Chai Tea Kit

Funnel 1 -1 1/2 Tablespoons Chai Tea into a tea bag. Iron flap down to seal(!!!). Place a few prepared tea bags along with 3-4 Cinnamon Sticks (<—use the code HOME for a 20% discount) into a small gift bag. Tie with a ribbon and a free printable gift tag below.

Make Chai Tea Gift Kits for Less Than $1.00

Download FREE Chai Tea Kit Gift Tags Here.
Chai Tea Kit Gift Tags

Supplies List for these Gifts

I had plenty of ribbon on hand, as well as a big bag of Epsom Salt from Walmart. I got most of the remaining (really cool) supplies for these crafts through Amazon or Olive Nation.

From Amazon:

  • Pack of 100 Disposable Tea Bags
  • Pack of 100 Clear Cellophane Bags

From Olive Nation:

  • Cinnamon Sticks
  • Star Anise
  • Mulling Spice
  • Chai Tea Spice Mix
  • Culinary Lavender (1 ounce = about 1 cup)

As an extra special treat, Olive Nation is giving us all 10% off any size order! Use the code CINNAMONGIFTS for the discount. Plus, if your order reaches $50, you’ll receive free shipping. AND!!! Your order of $50 or more entitles you to a free gift at check-out!! You can choose from any that they offer, but you should know that for this special promotion, they put together an extra big package of free cinnamon sticks – just for us! (It’s a pack of 10!) For all the fun gift-making purposes mentioned in this post, I’d pick that freebie if I were you.

I shall now continue to find more excuses to iron tea bags. I got Oolong Orange Blossom Tea in my Olive Nation order last week, so I’ll probably need to play with that. Beyond tea and tea bags, I made homemade Apple Cider in the Crock Pot last week with my cinnamon sticks and will be sharing the recipe soon. This time of year smells so good!!!

Are you making gifts this year? Are you a crafter?

This post contains affiliate links.

Heavenly Homemaker's Club Members: Access your homepage and all your fantastic resources here! Not a member yet? Please join us!

Thank Goodness I Got Ahead for Thanksgiving!

November 28, 2015 by Laura 5 Comments

This post may contain affiliate links. For more information, please see our disclosure policy.

Thanks to the Getting Ahead for the Holidays series, I was super motivated and had all the food cooked for Thanksgiving by Tuesday night. I did this so I could enjoy the holiday. As it turned out, I appreciated it even more because I came down with a cold on Tuesday night. Booooooo. I was so frustrated!!!

All day Wednesday I sat in my recliner blowing my nose, trying not to talk, watching Netflix, and being thankful I did not have to cook. I prayed that I’d be able to enjoy Thanksgiving. I took a bath with Epsom salt and essential oils. I drank hot tea by the gallon. I rested.

Thank you, Lord, for make-ahead meals – especially a make-ahead Thanksgiving meal.

Come Thursday morning, I was slightly better, though quite stuffy and low on energy. Matt and the boys cleared out the living room and set up tables and chairs. Brittany worked her magic to decorate. I worked on warming up the prepared food.

thanksgiving 20151

My mashed potatoes (which had been prepared and frozen) turned into soup on my crock pot. Now that wasn’t supposed to happen.

I transferred them to a pot on the stove to steam off some of the liquid. It took about 30 minutes, but it worked great! Below, you’ll see that while I was sick, I wasn’t too sick to take an ugly picture of mashed potatoes steaming in a pot for you. Now that is blogger dedication.

thanksgiving 20152

Meanwhile, all the other dishes sat warming in the oven. It took longer than I had planned. The more you load your oven, the longer food takes to heat up. Imagine that.

thanksgiving 20153

I helped myself to another cup of hot tea while the food heated and we waited for our guests to arrive. We had super icy weather that day (still do, actually), so a few of our guests weren’t able to make it. :(

thanksgiving 20154

When it was all said and done the tables were beautiful, the food was delicious, and we had a wonderful time with all our guests. If you look closely, you’ll see that I cheated and used rolls I had bought from Bountiful Baskets.

thanksgiving 20155

thanksgiving 20156

What you see there in that 9×13 pan is my friend Maureen’s famous Pumpkin Bars. I need the recipe. We all need the recipe. Maureen? We need the recipe. ;)

Since Thanksgiving day, we’ve eaten more delicious food, watched a couple of movies, and played a 6-hour game of Settlers of Catan. Only the Coppinger family can make Catan last 6-hours. In our defense, we had added several variables, which always adds time – even if you aren’t a Coppinger. But let’s just say that some of the people in this family are verrrry thorrrrrough with their turns. (Don’t look at me. I am a short turn-taker.)

Kleenexes and sore throat aside, this has been an awesome week of Thanksgiving break. Tonight we’re having Lasagna, tomorrow we’re having a new soup recipe Brittany and I came up with, and tomorrow night Asa and Brittany move back to the dorms. School commences, along with all the normal real-life stuff like work and chores. Ooh, but it’s Christmas season, so there is much to look forward to!

Tell me about your Thanksgiving! Was it a good one?!

Heavenly Homemaker's Club Members: Access your homepage and all your fantastic resources here! Not a member yet? Please join us!

20 Ways to Use Leftover Turkey and Super Sales on My Favorite Things

November 27, 2015 by Laura 2 Comments

This post may contain affiliate links. For more information, please see our disclosure policy.

Hello, Dear Ones. I hope you all had a wonderful Thanksgiving. Today I want to share some of my favorite ways to use up leftover turkey.

garlicchickenpastasm

20 Ways to Use Leftover Turkey

You’ll notice that these are many of my chicken recipes. How nice of turkeys and chickens to be interchangeable. Any time a recipe calls for chicken, just use turkey instead. See how easy this is?

  1. Turkey Sandwiches
  2. Turkey and Rice Casserole
  3. Turkey and Noodles
  4. Turkey Salad
  5. Turkey Roll Ups (Spread mayo and/or mustard on a soft flour tortilla, sprinkle on small bits of turkey, cheese, pickle, whatever…and roll it up.)
  6. Turkey Chef Salad  (Greens, turkey, cheddar cheese, boiled egg, carrots, tomatoes, peas…yum!)
  7. Turkey and Biscuits
  8. Turkey Pot Pie
  9. Turkey Tortilla Melts (Make these just like a quesadilla, just add turkey pieces)
  10. Turkey Tacos  (Simmer turkey in a little water with salt and chili powder…serve on flour tortillas with taco fixings.)
  11. Turkey Tortilla Soup
  12. Turkey Stir Fry
  13. Three Cheese Garlic Turkey Pasta
  14. Turkey Enchiladas
  15. Turkey with Spanish Rice
  16. Turkey Alfredo
  17. Turkey Quiche
  18. Turkey-n-Veggie Scramble
  19. Turkey Tostadas (Make like turkey tacos above, just fry your tortillas in olive oil to make them crisp.)
  20. Black Bean Taco Salad

I would have to say that my favorite way to use leftover turkey is in Turkey Salad. To make the most delicious Turkey Salad sandwiches, I make this easy Whole Wheat Stir-and-Pour Sandwich bread. Oh my goodness, that makes for an amazing meal when you add fruits and veggies on the side.

chicken_salad

Turkey and Rice Casserole is also amazing because it is a great way to use the turkey broth you’ve made while baking your turkey. And Turkey and Noodles? Well, this is what the family always requests after the holidays. It’s as much of a tradition as the holiday turkey itself.

What are your favorite ways to use up leftovers after a holiday meal?


Heavenly Homemaker's Club Members: Access your homepage and all your fantastic resources here! Not a member yet? Please join us!

How You Can Get a Completely Free $15 Gift (No Catch! You Could Actually Make Money on This.)

November 24, 2015 by Laura 6 Comments

This post may contain affiliate links. For more information, please see our disclosure policy.

topcashback7

What if you could get a fleece throw, a pajama set, a new top, a fun toy, jewelry, or another awesome gift of your choosing completely free? Man, I love coming across deals like this. It’s not just a deal. It’s a freebie. And if you work it right, you could even make extra cash on this.
topcashback1
Here’s the scoop: TopCashBack is a rebate site that offers a percentage value back on any purchase you make through their site. Sometimes they partner with other companies like Wal-Mart or K-Mart to give start-up freebies to new sign-ups. I’ve used TopCashBack for about 2 1/2 years now and have found them to always pay what they promise. You can trust this site.

topcashback4

This time, new members can pick anything from the K-Mart website ranging from $1-$20. TopCashBack will refund $15 to you, which will turn “payable” within 30 days. At that time, you can transfer that $15 from your TopCashBack account directly back to your bank account. If it were me, I’d be grabbing something for less than $10 so that I don’t have to pay shipping and so that I get a completely free item. On the other hand, if you get something closer to $20, you’re still getting $15 back so you’re still getting a great deal. (Just don’t get something for over $20 or less than $1 or the deal won’t go through properly!)

topcashback3

In addition to this – if you have a K-Mart close to you, you can select Free Store Pickup so you can get a free $15 item and avoid dealing with shipping costs altogether.

Are you ready for the specifics of how do get this deal?

How to Get a FREE $15 Gift

  1. Click this link to sign up for a TopCashBack account and to get all the details. (This offer is good for new sign-ups only, and that is my referral link.)
  2. You will be redirected to Kmart.com where you can select any item you like between $1 and $20.
  3. Add to your cart one item ranging from $1-$20. You may purchase anything you like, but in order for this deal to go through, you must not add any other items to your cart or transaction!
  4. If it is an option for you, click on “Free Store Pick-up” so that you won’t have to pay shipping. If that is not an option for you, I recommend selecting an item for less than $9 so that the $15 rebate will cover your shipping cost. No matter what you purchase, you’ll get $15 back. So if you spend less than $15, you’ll be making money on this deal!
  5. Don’t put anything else in your cart!! Proceed to check out and complete the purchase.
  6. Within 7 days, TopCashBack will refund $15.00 to your account.
  7. Within 30 days the $15.00 will become payable and you can transfer it to your checking account, your paypal account, or turn it into an Amazon gift card.

This offer ends Friday, November 27, 2015 at 11:59 pm PT. Do this now before you forget and enjoy your fun freebie!!

Let me know if you have any questions!

This post contains referral links.

Heavenly Homemaker's Club Members: Access your homepage and all your fantastic resources here! Not a member yet? Please join us!

Low Sugar Pumpkin Cheesecake Cups

November 24, 2015 by Laura 4 Comments

This post may contain affiliate links. For more information, please see our disclosure policy.

Pumpkin Cheesecake Bites

In preparation for Thanksgiving Day, I made a big Turkey, Cheesy Mashed Potatoes, Gravy, Stuffing Muffins, Green Bean Casseroles, Sweet Potatoes, Cranberry Sauce, Pineapple Fluff Salad , Pumpkin Pies, Pecan Pie Bites, Whipped Cream, and Apple Pies. I know what you’re thinking. You’re thinking the same thing I’m thinking. There may not be enough food! What will we do if we run out of food?

So I made more food. Just in case, you know?

Actually, I’m not worried about having enough food. But looking over that list, there is a definite shortage of cheesecake. It also occurred to me that I might enjoy a low sugar dessert on Thanksgiving day. That is why I took my Low Sugar Pumpkin Cheesecake recipe and adapted it to make fun these Pumpkin Cheesecake Cups.

We can all sleep better now knowing that along with the other 26 dishes on the Thanksgiving buffet, there will also be low sugar cheesecake. I’m not sure the day would have been complete otherwise.

Low Sugar Pumpkin Cheesecake Cups

Yum

Low Sugar Pumpkin Cheesecake Cups
 
Save Print
Author: Laura
Serves: 24
Ingredients
  • Shortbread Crust:
  • 3 cups whole wheat flour (I use freshly ground hard white wheat for this)
  • ½ cup sucanat (or brown sugar if you prefer)
  • 1½ cups melted butter
  • Pumpkin Cheesecake Filling:
  • 2 8-ounce packages softened cream cheese
  • 1½ cups heavy whipping cream
  • 2 cups pureed pumpkin
  • 1½ teaspoons ground cinnamon
  • ½ teaspoon ground nutmeg
  • ½ teaspoon ground cloves
  • Real maple syrup or liquid stevia to taste (I used 4 droppers full of stevia)
Instructions
  1. Make crust by stirring flour and sucanat together in a bowl.
  2. Add melted butter, combining well.
  3. Press mixture into 24 paper-lined muffin cups.
  4. Bake in a 350° oven for 10-15 minutes or until golden brown.
  5. Allow crust to cool completely.
  6. Blend all pumpkin cheesecake filling ingredients together until smooth.
  7. Scoop into prepared shortbread crust cups.
  8. Spread until smooth.
  9. Chill in refrigerator for at least two hours before serving.
3.4.3177

I found it fun to use fall-colored muffin cup liners for the occasion. Come Christmastime, I’ll use red and green. :)

Low Sugar Pumpkin Cheesecake Cups

I made the filling with stevia and was concerned that others might not like them as a result. But since the shortbread crust has a little sucanat and is so buttery and yummy, that balances the taste out for others. As for me, I think they are perfectly sweetened. In fact, I’m having to hold back to save the majority of these for Thanksgiving day. After all, there would be a definite void on the table if there were only 26 food choices and no cheesecake whatsoever.

Here’s to a wonderful holiday weekend! Happy Thanksgiving!

Heavenly Homemaker's Club Members: Access your homepage and all your fantastic resources here! Not a member yet? Please join us!

Deborah and Co. Cream Lace Cardigan Giveaway

November 23, 2015 by Laura 290 Comments

This post may contain affiliate links. For more information, please see our disclosure policy.

Deborah and Co. just sent me a new Cream Lace Cardigan to review for you. I think we all know how much I like cream. So am I weird to like a sweater just because it is the color of cream? I think not. After all, I painted my kitchen the color of butter and the trim on my house the color of fudge – so why not wear a cream colored cardigan, right? Of course. (Does everything always have to be about food? Yes, I think it does.)

Cream_Cardigan__Deborah_and_co2

Isn’t this sweater pretty? In person, I think the color is a bit darker than shown in the picture. Still, it is a very pretty color. I love the lace – which makes it a little dressier while still being casual. The sweater is very soft and comfy. It’s not bulky, but just right to add a nice layer. I plan to wear mine with a layering t-shirt and a scarf.

Deborah and Co. works to provide clothing that is:

  • modest
  • high quality
  • reasonably priced
  • comfortable
  • trendy
  • practical
  • attractive

I love this about Deborah and Co. You might also want to check out their Maternity section and their Little Deborah items (from princess dresses to paper dolls to books). There are some great Christmas gifts in there!

Through December 4, you’ll receive free shipping in the USA on orders of $50 or more. Take advantage of this and use the code HHSHIPFREE for free shipping to apply.

And now for the giveaway! One of you will win a Cream Lace Cardigan, which you can keep for yourself or give as a gift. Who wants to win?! Leave a comment on this post for a chance.

deborah and co

I’ll draw one random winner on Monday, November 30. Be watching for a post stating the winner as you will be responsible for contacting me if your name is chosen.

Heavenly Homemaker's Club Members: Access your homepage and all your fantastic resources here! Not a member yet? Please join us!

Our Thanksgiving Week Menu Plan

November 23, 2015 by Laura 4 Comments

This post may contain affiliate links. For more information, please see our disclosure policy.

This week will be a mixture of working double-time and taking time off, if that even makes sense. I want to “go to the trouble” to make some of our favorites since we’re on Thanksgiving break this week and not traveling. But I also want to have brainless meals so that I can relax while we have game days and movie nights. It’s the best of both worlds!

Just for fun, I thought it would be fun to share some of what we’re eating this week. As I’ve already shared, we’ll be feasting on Thanksgiving day with all the traditional food. Here’s a breakdown of my plans for that day.

pretzels_3

The rest of the week, here’s some of the food we’re planning to eat:

  • Soft Pretzels (I promised Asa I’d make these while he was home.)
  • Stir-n-Pour Bread (Having this on hand is super convenient!)
  • Pumpkin Chocolate Chip Muffins (Perfect for a simple breakfast that smells like the holidays.)
  • Quick Mix Pancakes (Because we all love these.)
  • Creamy Chicken and Rice Casserole (We actually already devoured a huge pan of this.)
  • Chili (Easy and perfect for this time of year.)
  • Hamburgers and Homemade Fries and Sweet Potato Fries (No explanation needed. We all love this meal.)
  • Triple batch of Real Food “Velveeta” and Rotel Dip (I already made this up so we can pull it out for quick meals of Nachos and Spicy Mac and Cheese.)
  • Take and Bake Pizzas (Mom’s night off!)
  • Spaghetti

Spicy Mac and Cheese

I’ve got a fridge full of fruits and veggies to go with our meals:

  • Green beans
  • Peas
  • Mixed greens and fresh spinach
  • Raspberries
  • Blackberries
  • Applesauce
  • Apples
  • Clementines
  • Oranges
  • Bananas
  • Red Pears
  • Pineapple
  • Broccoli
  • Carrots
  • Cucumbers

We’ll also be enjoying Hot Cocoa, Coffee, and Homemade Apple Cider (recipe on the way!). What is it about sipping hot drinks this time of year? They taste good all the time, but they are extra good during the holiday season!

Chocolate Whipped Cream - Perfect For Your Coffee

Need some Chocolate Whipped Cream for your coffee??

Are you making/eating any special food this week?

Heavenly Homemaker's Club Members: Access your homepage and all your fantastic resources here! Not a member yet? Please join us!

Stir-and-Pour Dinner Rolls ~ Freezer Edition

November 22, 2015 by Laura 7 Comments

This post may contain affiliate links. For more information, please see our disclosure policy.

stir and pour rolls 1

Guess what? 

One of my darling readers, Vicki, experimented with the Stir-and-Pour Dinner Rolls to see if we could make them even more convenient by making them ahead and freezing the dough. I won’t keep you in suspense!!! —–>

Okay, maybe just for a little bit.

I’m wearing a new sweater today. I got it on sale, of course. I got it the same day I got all the butter on sale. That was a great day for sales, no doubt. I sure do love good sales. And butter.

So how about those dinner rolls? Does it work to make and freeze the dough, just like we make and freeze muffin batter? Vicki tried it. She reported back. Drum roll please…

It worked!! This is great news, and much more relevant than pointless talk about my new sweater. Although the sweater led me back to talking about butter; and butter and rolls go together. Therefore everything I’m writing today makes sense and is on topic.

You must be wondering, is there even a way to make this very easy recipe even more convenient? I mean, how can it get easier than the Stir-and-Pour Bread and Stir-and-Pour Dinner Rolls recipes? But actually, it does. It gets easier. Vicki proved it.

Make and Freeze Stir-and-Pour Dinner Rolls

1. Mix the ingredients as normal.
2. Scoop batter into muffin pans. I super love my new silicone baking cups. I use them alllll the time.
3. Freeze dough immediately.
4. Remove frozen dough from muffin cups and transfer them to a freezer bag. Store in the freezer for up to three months.
5. To bake: Place frozen dough into muffin cups. Cover with a cloth. Thaw on the countertop for 4-6 hours.
6. Bake as directed.

Vicki said that these taste just as good prepared this way as they do when prepared fresh. I mean, these are still fresh. They’re just frozen first before baking them. I love this time-saving tip!

This is especially helpful for days such as…I don’t know…Thanksgiving maybe? That day we’re putting forty-seven ~ give or take ~ other dishes on the table all at the same time? If there is a way to dirty up fewer dishes and execute fewer food preparation steps, by all means, let us do it!
Yum

5.0 from 1 reviews
Stir-and-Pour Dinner Rolls ~ Freezer Edition
 
Save Print
Author: Laura
Ingredients
  • 4 cups whole wheat flour (I use freshly ground hard white wheat)
  • 2 teaspoons active rise yeast
  • 2 Tablespoons sucanat or sugar or honey
  • 1 teaspoon sea salt
  • 1 egg (optional)
  • ¼ cup heavy cream (optional)
  • 2 cups warm water
Instructions
  1. Stir all ingredients together.
  2. Cover and allow it to sit for 30 minutes.
  3. Pour contents into buttered muffin tins or silicone muffin cups.
  4. Place filled muffin cups in freezer immediately.
  5. Once frozen, transfer frozen dough to freezer bags, storing for up to three months.
  6. To Bake:
  7. Place frozen dough back in prepared muffin cups.
  8. Cover and allow dough to thaw 4-6 hours on the counter-top.
  9. Bake in a 350° for 20-25 minutes or until lightly browned.
  10. Serve right away.
3.4.3177

Make and Freeze Stir-and-Pour Dinner Rolls

Vicki said she used the leftover rolls to make Stuffing Muffins. I did the exact same thing a few days ago!

Let’s hear it for another great make-ahead tip!

This post contains an affiliate link.

Heavenly Homemaker's Club Members: Access your homepage and all your fantastic resources here! Not a member yet? Please join us!
« Previous Page
Next Page »

Join Our Community!

 Facebook Twitter E-mail Instagram Pinterest

Popular Posts

~ Will All of the Real Moms Please Stand Up?
~ Easy! Stir-and-Pour Whole Wheat Bread
~ How to Make Gatorade
~ 31 Real Food Breakfast Ideas
~ Dear Teenage Girls...
~ When Mom Takes a Step Back
~ The Inexpensive Health Insurance We Love!
~ Let's Talk Real Food Grocery Budgets

Check out our latest posts!

  • Big Family Food and Fun: May 31-June 6, 2026
  • Big Family Food and Fun: May 24-30, 2026
  • Free 7-Day Summer Menu Plan
  • Big Family Food and Fun: May 17-23, 2026
  • Easy Side Dishes for Summer
Home  ~  Simple Meals  ~  Club Membership  ~  Shop  ~  Privacy Policy  ~  Disclosure  ~ Contact

Copyright © 2026 · Beautiful Pro Theme on Genesis Framework · WordPress · Log in