Heavenly Homemakers

Encouraging women in homemaking, healthy eating and parenting

  • Home
    • About
    • FAQs
  • Recipes
    • Bread and Breakfast
    • Condiments
    • Dairy
    • Main Dishes
    • Side Dishes and Snacks
    • Desserts
    • Gluten Free
    • Instant Pot
    • Crock Pot
    • Heavenly Homemaker’s Weekly Menus
  • Homemaking
    • Real Food Sources
  • Store
  • Contact
    • Advertise
    • Disclosure
    • Privacy Policy
  • Simple Meals
  • Club Members!

Build a Fruit Salad Bar

March 12, 2015 by Laura 2 Comments

This post may contain affiliate links. For more information, please see our disclosure policy.

Create Your Own Fruit Salad

Yum

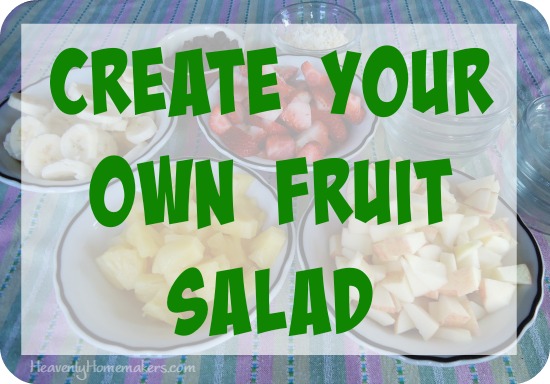
Sometimes fruits and veggies just need to be served in an exciting way to make them more appealing. That – and some people in my house just won’t eat bananas.  If there are bananas in the fruit salad, one of my kids will refuse the apples, strawberries, and pineapple too. “I’ll just put the bananas on the side,” thought I, as I prepared to make a fruit salad for dinner. But then I got the better idea to put everything “on the side” so each person could fill their bowl as they like. Fun!

As it turns out, I got all the boys involved in prepping a fruit. The result was a beautiful spread of choices that everyone was excited to dig into.

Build a Fruit Salad Bar

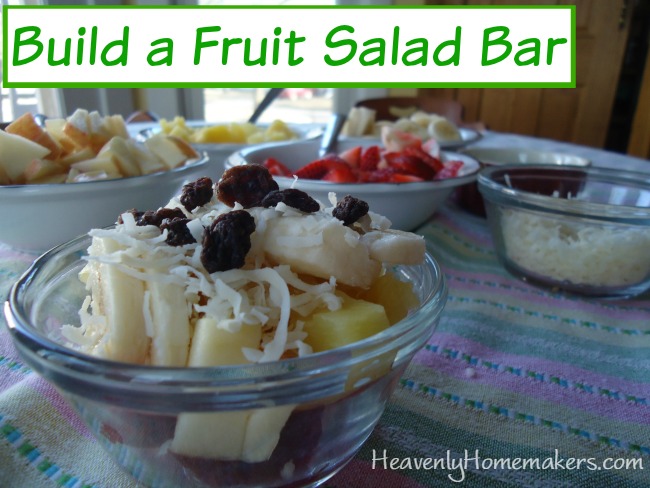
Justus (our 15 year old) built his salad and took this picture. Beautiful!

There’s nothing complicated about this:  Simply slice or chop whatever fruit you have on hand and set it out for people to pick from as they fill their bowl. Lay out shredded coconut, dried fruit, and nuts if you like. Real whipped cream or cottage cheese added to the spread wouldn’t hurt my feelings.

This was a perfect side dish with our pasta and mixed greens tonight. I’m thinking it would be fun to serve for breakfast some time soon, too!

What are your favorite fruits to add to a salad?

~~~~~~~~~~~~~~~~~~~~~~~~~~~~~~~

Quick Note!

I made a mistake on yesterday’s Visit Omaha giveaway post. Durham Museum IS NOT free. my bad  It’s the Joslyn Museum that’s free. I made the correction on the giveaway post, but wanted to make sure you got the update!

Heavenly Homemaker's Club Members: Access your homepage and all your fantastic resources here! Not a member yet? Please join us!

Honey Peanut Bars ~ Like a Healthy Payday Candy Bar

January 22, 2015 by Laura 25 Comments

This post may contain affiliate links. For more information, please see our disclosure policy.

Ladies and um, other Ladies (although surely there is a gentleman or three around here too):  We have a winner! Honey Peanut Bars it is!

Thanks to all who put in their vote as to which of the new healthy snack recipes from our upcoming eBook we should reveal early. It was a pretty close call on several. I put Malachi to work making tally marks as votes came in (a great school project for him). He had a lot of fun with it…

counting votes

Here’s how my afternoon sounded:

“Pizza Muffins are in the lead. They’re going to win for sure!”
“Mom! Peanut Bars have a ton of votes. They caught up to Pizza Muffins.”
“I think Oyster Crackers are going to pull ahead!”
“It’s back to the Peanut Bars. Why is everyone choosing that one?”

Yeah, Malachi doesn’t like peanuts. ;)

When it was all said and done, the Honey Peanut Bars won by several votes. Not to worry though. Our 227 Healthy Snacks eBook is almost finished. Then you’ll have access to all the recipes forever! (Our goal is to have the book ready for you by Sunday night.)

I mixed up a batch of these Honey Peanut Bars tonight again, just because they sounded good. Our older boys will probably finish them all off once they get home from basketball practice. What a perfect post-workout/bedtime snack for them. (With apples and cheese and whatever else they get out because…do I really need to explain?)

You should be excited to know that it only took about five minutes for me to mix these up tonight. Their simplicity is of the many reasons I love them. :)

Honey Peanut BarsYum

Honey Peanut Bars ~ Like a Healthy Payday Candy Bar
 
Save Print
Author: Laura
Serves: 8-10
Ingredients
  • 1¼ cup roasted, unsalted peanuts
  • ¼ cup roasted, unsalted almonds
  • ⅓ cup honey
  • 3 Tablespoons natural creamy peanut butter
  • ⅛ teaspoon sea salt
Instructions
  1. In a small saucepan stir honey, peanut butter, and salt together over low heat until well combined. Remove from heat.
  2. Stir in peanuts and almonds.
  3. Spread mixture into an 8x8 inch pan.
  4. Chill for 2 hours.
  5. Cut into bars.
3.4.3177

Honey Peanut Bars - Better Than a Payday

Told you they were easy to make! Go grab your simple ingredients and get busy on these bars. You will love them as much as we do (well, everyone but Malachi).

Grab your copy of 227 Healthy Snacks which includes this recipe and 226 more recipes and snack ideas that are super delicious!

227 Healthy Snacks 2

Heavenly Homemaker's Club Members: Access your homepage and all your fantastic resources here! Not a member yet? Please join us!

Simple Spinach Tuna Melts – Don’t Knock it Until You’ve Tried It

January 1, 2015 by Laura 8 Comments

This post may contain affiliate links. For more information, please see our disclosure policy.

Now that we’ve realized how easy it is to add spinach to our meals, I think we’re working it onto our table at least once each day. The day these Spinach Tuna Melts were invented, Matt was the guy in charge of figuring out lunch.

We almost always have several cans of tuna on hand, our freezer held plenty of cheese, and I think it goes without saying that we had spinach in the fridge. Here’s what Matt came up with:

Simple Spinach Tuna Melts

These were awesome.  I lost track of how many he had to make, as these are one or two bite tuna melts – and I’m not sure if you’ve seen our boys eat lately, but let’s just say they eat a lot of bites at each meal. We went through a lot of spinach, and not one boy complained that there was no bread involved in this meal.

This meal is perfect for days you’re limited on time to cook, days you don’t have meat thawed, and days you want extra nourishment in the form of spinach. (Every day is the day you want extra nourishment in the form of spinach. Join the spinach-eating bandwagon.)

How to Make Spinach Tuna MeltsYum

Open and drain a can of tuna. Use a fork to separate the tuna pieces, then place about a tablespoon on each leaf of spinach. Top with about a teaspoon of shredded cheddar cheese. Place prepared spinach/tuna/cheese on a baking sheet and broil in the oven for 1-2 minutes until the cheese is melted.

One 5-ounce can of tuna makes 6-8 Spinach Tuna Melts. If feeding teenage boys, open many cans of tuna and be prepared to make many pans of tuna melts.

So there you go! A super easy meal you can make that packs a big nutritional punch.

How are you doing on eating spinach? Have you found fun ways to work it into your meals?

Heavenly Homemaker's Club Members: Access your homepage and all your fantastic resources here! Not a member yet? Please join us!

Homemade {Easy} Tapioca Pudding

December 31, 2014 by Laura 41 Comments

This post may contain affiliate links. For more information, please see our disclosure policy.

You know what’s bad about feeding my family beans? (Well, besides that.)  It’s that I almost always forget to soak the beans ahead of time. This does not work, even a little bit, unfortunately. Crunchy beans do not make good chili.

As you can imagine, then, when it comes to making Tapioca Pudding, I am never prepared. Every recipe I’ve found calls for soaking the tapioca pearls overnight or longer. Then, most of them tell me to cook the tapioca pudding for a bazillion minutes in a double boiler.

tapioca pearls

See, I’m just not into recipes that require all kinds of thought and effort. Plus, I don’t even own a double boiler. My rebellious “yeah, I don’t want to go to the trouble to do it that way” recipe reading self sometimes gets into trouble. Usually though, I find that I can take short-cuts and still turn out a good product.

Real food recipes become easy, time consuming tasks become effortless, and recipes with twenty-seven steps become no-brainers. This is how this Tapioca Pudding recipe came to be. I suddenly got hungry for the comfort food Tapioca Pudding…and I wanted some right now. “Soak the tapioca pearls in milk then cook it in a double-boiler until Christmas morning 2019” just wasn’t going to cut it. What if? I thought. What if I just pour the tapioca into the milk along with my other delicious ingredients, and start cooking it in a plain ol’ saucepan?

But then the Follow All Instructions Exactly Police showed up at my door, so I’m actually writing this post from prison.

At least we can now all benefit from knowing this is super easy and delicious way to make Tapioca Pudding. Here’s how I did it:

Homemade {Easy} Tapioca PuddingYum

5.0 from 2 reviews
Homemade {Easy} Tapioca Pudding
 
Save Print
Author: Laura
Serves: 4-6
Ingredients
  • 1 cup tapioca pearls (unsoaked, booyah!)
  • 4 cups whole milk
  • 4 egg yolks (save the whites for something else)
  • ¼ teaspoon sea salt
  • ¼ cup real maple syrup (more if you like)
  • 1 teaspoon real vanilla extract
Instructions
  1. Measure tapioca pearls, milk, egg yolks, sea salt, and maple syrup into a medium sauce pan.
  2. Use a whisk to cook and stir constantly over medium-low heat for about 15 minutes or until tapioca pearls have "popped" and pudding is thick.
  3. Remove from heat and stir in vanilla.
  4. Serve right away, or refrigerate.
  5. This tastes great hot or cold.
3.4.3177

Homemade Tapioca Pudding - Easy!

I have yet to convince my boys that Tapioca Pudding is the bomb-diggity of comfort foods. You’d think me calling cooked tapioca pearls “eye-balls” would have at least intrigued them a little bit, but nope. They think those tapioca things are weird. My youngest actually suggested that perhaps Tapioca Pudding might taste good “without those tapioca things.” Oh well, more for me.

Do take heed of the “stir constantly” instructions in this recipe. While I’m obviously always eager to break rules and go about cooking my own way without following recipes word-for-word, walking away from your cooking tapioca pudding would be a very, very bad idea. Scorched milk, crunchy uncooked tapioca pearls, and black floaties in your pudding really will cause the I Told You So Police to show up at your door. Ask me how I know.

Are you a fan of tapioca pudding, or would you rather it didn’t have those tapioca things in there?

Heavenly Homemaker's Club Members: Access your homepage and all your fantastic resources here! Not a member yet? Please join us!

Cheesy Vegetable Casserole

December 20, 2014 by Laura 45 Comments

This post may contain affiliate links. For more information, please see our disclosure policy.

This Cheesy Vegetable Casserole makes it possible to help your entire family enjoy veggies!

XmasBrunch2011

This recipe is versatile so you can add your family’s favorite veggies – or be creative so you can learn to eat new ones. The mixture of all these ingredients makes any vegetable taste great!

Cheesy Vegetable CasseroleYum

Cheesy Vegetable Casserole
 
Save Print
Author: Laura
Ingredients
  • 2 pounds fresh variety of vegetables of your choice (broccoli, cauliflower, carrots, green beans, zucchini, or asparagus all work well)
  • ¼ cup chopped onion
  • ¼ cup melted butter
  • ½ cup mayonnaise (I use Hain Safflower)
  • 1 cup sour cream
  • 1  ½ cups shredded cheese (cheddar or Colby jack work well)
  • ½ teaspoon sea salt
  • ¼ teaspoon ground pepper
  • ¼ teaspoon garlic powder
Instructions
  1. Chop vegetables into bite-sized pieces.
  2. Stir all ingredients together in a large bowl.
  3. Pour into a 2-quart baking dish.
  4. Bake, uncovered, for 45-60 minutes in a 350° oven.
3.4.3177

Cheesy Veggie Casserole

This recipe is perfect to add to your holiday brunch table. Here are some dishes I recommend serving with your Cheesy Vegetable Casserole for brunch:

  • Angeled Eggs
  • Bacon Tomato Dip with Baked Tortilla Chips
  • Fruit Salad
  • Honey Peanut Bars
  • Hot Spinach and Artichoke Dip
  • Nectarine Cream Cups
  • No-Bake Chocolate Fudge Bites
  • No-Bake Peanut Butter Cookie Bites
  • No-Bake Snickerdoodle Bites
  • Pineapple Fluff Salad
  • Ranch Cheese Ball
  • Beef Summer Sausage
  • Barbecue Brisket
  • Crock Pot Barbecue Chicken Breasts
  • Turkey Ranch Pinwheels

The thing about brunches is that you’re wide open to serving just about anything – from main dish to side dish to breakfast dish to dessert. That’s what makes them fun. Putting this Cheesy Vegetable Casserole on the table – even with other breakfast type foods like muffins and sausage – really adds something special. And let’s not forget that it means your putting veggies on the table. With cheese. Veggies with cheese are always a hit!

What are your favorite dishes to add to a brunch table?

Check out DHGate for their fun kitchen gadgets!

Heavenly Homemaker's Club Members: Access your homepage and all your fantastic resources here! Not a member yet? Please join us!

Easy Peppermint Milkshakes

December 11, 2014 by Laura 4 Comments

This post may contain affiliate links. For more information, please see our disclosure policy.

It’s easy, filling, healthy, and delicious – a perfect treat anytime, but especially during the Christmas season. Serve a Peppermint Milkshake for a perfect side dish or snack!

Easy Peppermint MilkshakesYum

2 cups milk
1 Tablespoon real maple syrup
¼ teaspoon peppermint extract

Blend and serve!

We always add organic, farm-fresh raw eggs to our milkshakes for added nutrition. I believe this simple recipe would work great with coconut milk as well. :)

Easy Peppermint Milkshake

Heavenly Homemaker's Club Members: Access your homepage and all your fantastic resources here! Not a member yet? Please join us!

Easy Veggie Dip (With Homemade Seasoned Salt)

December 4, 2014 by Laura 1 Comment

This post may contain affiliate links. For more information, please see our disclosure policy.

It’s been exactly 21 hours and 4 minutes since I posted the Homemade Seasoned Salt recipe, so I’m assuming all of you have some mixed up and ready by now? Perfect. You’ll be needing it for this Veggie Dip recipe. You have cucumbers and carrots on hand, right? Perfect.

Easy Veggie Dip 1

One of the recipe cards that we made to go with your Seasoned Salt gift package shares this Easy Veggie Dip idea. Right after mixing up my first batch of seasoned salt, I made some Perfect Potato Wedges (a recipe also found on the free recipe card printable) and some of this Easy Veggie Dip. It was so….well, easy. The only way I can get my family (including the mother – that’s me) to eat cucumbers is if I supply dip. Typically, I go for ranch. But cucumbers with this Easy Veggie Dip is delicious. Even my hubby, who doesn’t really dig cucumbers, was enjoying the combo. Yay – another great way to eat veggies!

Easy Veggie DipYum

Easy Veggie Dip (With Homemade Seasoned Salt)
 
Save Print
Author: Laura
Ingredients
  • 1 Tablespoon dried minced onion
  • 2 cups sour cream
  • 2 Tablespoons real mayonnaise (I use Hain safflower mayo)
  • Seasoned Salt to taste
Instructions
  1. In a bowl, mix together minced onion, sour cream, and mayonnaise. Add Seasoned Salt until mixture changes color (it should become a light peach color), tasting as you go for desired flavor. Chill for at least one hour before serving. Serve as a dip with assorted raw vegetables.
3.4.3177

You’ll find our Seasoned Salt recipe here, along with this recipe (and 3 others) on cute printable recipe cards. This makes a great gift! This dip is great for holiday parties, or simply as a way to get your family to eat vegetables (like cucumbers!) any day of the week. <—- I’m looking at you Coppinger Clan.

Can’t wait to hear how you like this Seasoned Salt and the recipes to go with it!

Easy Veggie Dip with homemade Seasoned Salt

Heavenly Homemaker's Club Members: Access your homepage and all your fantastic resources here! Not a member yet? Please join us!

Beef Summer Sausage Recipe

November 25, 2014 by Laura 22 Comments

This post may contain affiliate links. For more information, please see our disclosure policy.

Summer Sausage has always been a favorite finger food of mine during the holiday season. I’ve tinkered with recipes before, but haven’t felt like I’ve nailed them – until now.

Folks, we can now eat Summer Sausage – worry free. High fives all around!  No MSG, no nitrites, no preservatives. Actually, salt is a natural preservative, so I guess I can’t say “no preservatives.” But the least of my worries is sea salt, especially when I use Redmond. That means that “summer sausage” and “good for you” can be used in the same sentence. Yay!!!

I think you’ll be as excited about this recipe as I am. It’s homemade beef summer sausage!! You will not believe how crazy easy this is to make.

Homemade Beef Summer Sausage - Easy and Healthy!

Homemade Beef Summer SausageYum

5.0 from 1 reviews
Beef Summer Sausage Recipe
 
Save Print
Author: Laura
Serves: 2 sausages
Ingredients
  • 2½ pounds hamburger meat
  • 2½ Tablespoons liquid smoke (I prefer Wright's Brand)
  • 1 Tablespoon sea salt (I prefer Redmond brand)
  • 1 teaspoon sucanat
  • 1 Tablespoon ground pepper
  • 1 Tablespoon minced garlic
  • 1 Tablespoon mustard seeds
Instructions
  1. Mix all ingredients together in a bowl, squishing with your hands until everything is well combined. Cover and refrigerate for 24 hours.
  2. Knead meat mixture, then shape into 2 logs, about 13x2 inches each. (I found that rolling them in parchment paper helped form a nice, round shape.)
  3. Place logs in baking dishes such as Pyrex 9x13 inch pans (so fat drippings will not spill over into the oven).
  4. Bake in a 300° oven for 2½ - 3 hours.
3.4.3177

To freeze Summer Sausage:  Allow baked summer sausage to cool completely. Wrap in parchment paper, then with plastic wrap. Place in a freezer bag, storing in freezer for up to 2 months.

As if it wasn’t already wonderful news that we can enjoy healthy summer sausage – it’s even better news that this will be perfect for your Make-Ahead Lunch Box. I’ll be packing this for road trips, for sure.

Share with us! What’s your favorite holiday finger food?

Heavenly Homemaker's Club Members: Access your homepage and all your fantastic resources here! Not a member yet? Please join us!

Apple Nachos ~ Quick and Easy!

October 7, 2014 by Laura 6 Comments

This post may contain affiliate links. For more information, please see our disclosure policy.

Apple Nachos - Easy!

There aren’t even words to describe this treat. But not to worry. I can always come up with plenty of words (just ask my family full of men). Let me see if I can come up with something…

Simple, fast, deliciously sweet, a little bit tart, sticky, drippy, caramely, chocolaty, the perfect fall treat. There.

If you’re questioning whether or not caramely is a word or not, I declare that it definitely is. The dictionary just doesn’t know it yet.  Don’t trust everything you don’t read. (I don’t get paid to make sense.)  I figure, if chocolaty is a word, caramely should be too. Also, I like to say words that get my point across whether they are real or not. So don’t get all grammary and English languagey on me. After all, you really want to know how to make these Apple Nachos.

How to Make Apple NachosYum

Slice apples and lay them on a plate. If you like, you can sprinkle them with lemon juice to keep them from turning brown. Drizzle warm Homemade Caramel Sauce over the apple slices. Sprinkle mini chocolate chips over the warm caramel sauce. Serve immediately.

The result is a chocolaty, caramely plate of amazingness.

apple nachos

I think we can all agree that caramely should be a real adjective found in the dictionary, as should the word soccery. What? I used that word just yesterday to describe how our front closet almost made me pass out. I innocently opened the closet door to throw in a pair of shoes and was met with a blast of stink that is typical in our home during soccer season. Sweaty shin guards and wet soccer cleats, along with all the other gear – ah, the lovely scent of autumn. I threw in the shoes and quickly slammed the door closed proclaiming, “Whoa-oh, gag me. It smells completely soccery in there.” Why take time to say real words in full sentences like, “The inside of this closet appears to be thick with the aroma of unpleasant apparel associated with this particular sport season in which we are all participating.”

No.  It just smells soccery.  It’s as simple as that. When basketball season comes, the closet will become basketbally. That’s just the truth of it.

I’m suddenly very aware that this is a terrible thing to talk about when writing a food post. I apologize. Sometimes, I get a little too real lifey when I write, forgetting that good food and sweaty footware should never be discussed in the same conversation. How terribly nonproper-ish of me.

I now take your attention back to the wonderful Apple Nachos idea, whose caramely goodness brought us all here to this unlikely point of conversation. Make these Apple Nachos. They’ll make us all use the word caramely so much that the dictionary will have no choice but to include it.

You heard it here first.

Heavenly Homemaker's Club Members: Access your homepage and all your fantastic resources here! Not a member yet? Please join us!

Hot Chocolate Souffle ~ A Recipe That Just So Happens To Naturally Be Grain Free and Dairy Free

October 2, 2014 by Laura 9 Comments

This post may contain affiliate links. For more information, please see our disclosure policy.

hot chocolate souffle 2

Elias, our 12 year old, is my cookbook buddy. Just like me, he enjoys looking through new recipes, getting food ideas, looking at the food pictures. He’s my right hand man when it comes to finding new recipe ideas to play with.

During our past few trips to the library, Elias and I have picked up different cookbooks to look through and get ideas from. This Hot Chocolate Soufflé is one he found recently. He liked the look of the dessert and figured we could adapt it with our healthier ingredients pretty easily. Obviously, he cares so much about using healthier ingredients, just like all normal 12 year old boys. Ha. Haha. Ha. Ha.  Well, at least he knows his mom cares, and he sort of understands why. Really, all he was concerned about was that this recipe looked like a yummy chocolate dessert. What else matters, right?

Here’s what’s fun about this Hot Chocolate Soufflé recipe:

  • It’s very easy to make
  • It only has 4 ingredients
  • It can be made for those who need to avoid gluten and/or dairy

Hot Chocolate SouffléYum

1/2 cup dark chocolate chips
1/3 cup sucanat powdered sugar
5 eggs, separated
pinch of sea salt

Separate eggs – whites and yolks – into two separate bowls. Stir sucanat powdered sugar into the egg yolks until smooth. In a small saucepan, melt the chocolate, stirring constantly and removing from heat immediately after chocolate has melted. Stir melted chocolate into egg yolks and sucanat mixture. Beat egg whites and sea salt until stiff peaks form. Fold chocolate mixture into the egg whites until barely mixed. Pour mixture into a 8×8 inch baking pan. Bake in a 400° oven for about 15 minutes or until done through and through.

Grain Free, Dairy Free Hot Chocolate Souffle

These would be great for your Make-Ahead Lunch Box. Also, I looked into where you can purchase allergy free dark chocolate chips. Here’s what I found:

    Do you like looking through cookbooks and recipes? (Hope so – this site is full of ’em!)

    This post contains affiliate links.

Heavenly Homemaker's Club Members: Access your homepage and all your fantastic resources here! Not a member yet? Please join us!
« Previous Page
Next Page »

Join Our Community!

 Facebook Twitter E-mail Instagram Pinterest

Popular Posts

~ Will All of the Real Moms Please Stand Up?
~ Easy! Stir-and-Pour Whole Wheat Bread
~ How to Make Gatorade
~ 31 Real Food Breakfast Ideas
~ Dear Teenage Girls...
~ When Mom Takes a Step Back
~ The Inexpensive Health Insurance We Love!
~ Let's Talk Real Food Grocery Budgets

Check out our latest posts!

  • Big Family Food and Fun: May 10-16, 2026
  • Big Family Food and Fun: May 3-9, 2026
  • Help Your Kids Become Independent in the Kitchen!
  • Big Family Food and Fun: April 26-May 2, 2026
  • Big Family Food and Fun: April 19-25, 2026
Home  ~  Simple Meals  ~  Club Membership  ~  Shop  ~  Privacy Policy  ~  Disclosure  ~ Contact

Copyright © 2026 · Beautiful Pro Theme on Genesis Framework · WordPress · Log in