Heavenly Homemakers

Encouraging women in homemaking, healthy eating and parenting

  • Home
    • About
    • FAQs
  • Recipes
    • Bread and Breakfast
    • Condiments
    • Dairy
    • Main Dishes
    • Side Dishes and Snacks
    • Desserts
    • Gluten Free
    • Instant Pot
    • Crock Pot
    • Heavenly Homemaker’s Weekly Menus
  • Homemaking
    • Real Food Sources
  • Store
  • Contact
    • Advertise
    • Disclosure
    • Privacy Policy
  • Simple Meals
  • Club Members!

Garden Veggie Chicken Skillet Recipe {Quick, Easy, Healthy, and Delicious}

March 15, 2015 by Laura 10 Comments

This post may contain affiliate links. For more information, please see our disclosure policy.

Garden Veggie Chicken Skillet 2

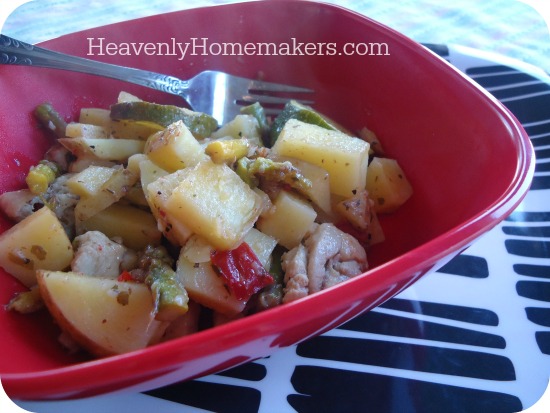
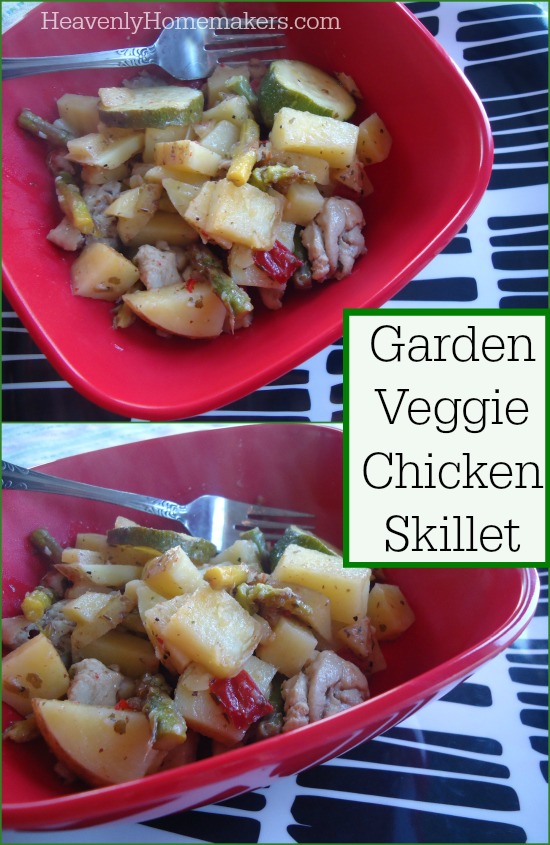
Several of you have commented that you would love more one-skillet-meal recipes. Tell you what – me too. I have very few recipes like that, especially those that fall under the healthy, real food, easy categories. So I tinkered last week and hoped my family would like what I came up with.

Did they like it?  Well, would I be posting it here if they didn’t? We were six for six on this one. Sweet! (Actually, it’s savory, but you get the point.)   So now I present to you a recipe which:

  • Takes only a few minutes to prepare
  • Takes only a few minutes to cook
  • Will help you stretch the meat, saving you money
  • Is full of tasty veggies
  • Is a complete meal in one dish
  • Tastes amazing (my family said so)

This recipe filled my large electric skillet, feeding six of us. If you have a smaller family, you may want to cut this recipe in half. Also, while this recipe covers all your nutritional bases, I still recommend serving this with a salad (more veggies!) and/or some fresh fruit.

Garden Veggie Chicken Skillet Recipe

Yum

5 medium potatoes, any variety, cut into small cubes
1 pound uncooked boneless chicken breasts or thighs, cut into small bites (I use thighs because they taste better to us)
4 cups chopped veggies – any variety or combination (zucchini, asparagus, sweet peppers, mushrooms, and onions recommended)
1/2 cup Italian dressing (I use my simple homemade Italian Dressing recipe)

Combine all ingredients in a large skillet. Stir dressing around to coat veggies, potatoes, and meat. Cover and cook over medium heat, stirring occasionally, for 12-20 minutes or until veggies are tender and meat is cooked thoroughly.

Garden Veggie Chicken Skillet

Garden Veggie Chicken Skillet Recipe {Quick, Easy, Healthy, and Delicious}
 
Save Print
Author: Laura
Ingredients
  • 5 medium potatoes, any variety, cut into small cubes
  • 1 pound uncooked boneless chicken breasts or thighs, cut into small bites (I use thighs because they taste better to us)
  • 4 cups chopped veggies - any variety or combination (zucchini, asparagus, sweet peppers, mushrooms, and onions recommended)
  • ½ cup Italian dressing (I use my simple homemade Italian Dressing recipe)
Instructions
  1. Combine all ingredients in a large skillet.
  2. Stir dressing around to coat veggies, potatoes, and meat.
  3. Cover and cook over medium heat, stirring occasionally, for 12-20 minutes or until veggies are tender and meat is cooked thoroughly.
3.4.3177

The Italian Dressing is the rock star in this recipe. It gives the meat and veggies awesome flavor, plus the oil in the dressing helps in the cooking process. Delicious and super simple!

 Think your family would like this meal?

Heavenly Homemaker's Club Members: Access your homepage and all your fantastic resources here! Not a member yet? Please join us!

How To Make Your Own Frozen Pizza

February 17, 2015 by Laura 14 Comments

This post may contain affiliate links. For more information, please see our disclosure policy.

Remember how busy last Saturday was for me? It was a crazy morning filled with broccoli blanching and valentine pancake making, then basketball gaming the rest of the day. This is why cooking dinner when I got home at 6:45 didn’t sound fun. Plus, you should (not) have seen how messy my kitchen was after the morning insanity when I was running late to serve concessions at the games, so I had to decide between washing dishes and getting dressed in actual clothes that weren’t pajama pants. I chose the latter. Everyone was grateful. But this choice meant that I came home to an exploded kitchen.

If ever there was an excuse to want frozen pizza, this one was it. We all have those times, right? We talked about this just last week. Some of you mentioned wishing you knew how to make your own frozen pizza, then others chimed in about how to do it, and since this has been on my list to tell you about anyway – I decided there was no better time.

So frozen pizza everyone: You can make them yourself. With real ingredients and whole foods, keeping your very own people and their preferences in mind.  With little effort.

And all the mothers everywhere shed a tear.

How to Make Your Own Frozen PizzaYum

1. Mix up your favorite pizza dough. I suggest this very easy Whole Wheat Pizza Crust recipe. I also suggest doubling or tripling or octupling (I was going for 8x there, how’d I do?) the recipe. It just makes sense to create only one mess in order to make several meals worth of pizza for your freezer.

2. Roll out the dough to your desired sizes, thickness, and shapes. Make personal sized crusts, make rectangle crusts to fit your pans, make circle crusts to fit your pans. Make whatever works best for your freezer, your oven, and your family.

frozen pizza 1

Life is too short to roll dough perfectly.

3. Bake each crust in a 375° oven for 5 minutes (assuming you are using this crust recipe), then remove them from the oven. They will be only lightly baked at this point – just done enough to be perfect for preparing your pizza for the freezer.

4. Top each pizza crust with toppings of your choice – any sauce, meats, cheeses, and veggies you like. Make a variety to suit your family’s preferences.

frozen pizza 2

I topped this one with sauce, spinach, colby jack cheese, hamburger meat, and red peppers.
We are still loving our silicone mats from Healthy Cooking Products!

5. Wrap each unbaked pizza well with plastic wrap. (I like Natural Value Brand.)  If it fits, you might also consider putting your wrapped pizzas into a 2-gallon size freezer bag for additional protection. (Be sure to reuse your freezer bags to get more bang for your buck!)

6. When you are ready to bake your frozen pizza, thaw it if you wish. Otherwise, just take it directly from the freezer, unwrap it, and put it on your baking pan. Bake in a 375° oven for 10-18 minutes or until the cheese is melty and perfect.

Aren’t you excited about how easy this is, about how much time this will save you, and how fun this will be to serve to your family?! It will be effortless to pull out some mixed greens and fruit to go with your pizza – so your meal prep on a homemade frozen pizza night will be nil!

I highly recommend making several pizzas for your freezer in one setting. If you’re going to mix up crust and make a little mess rolling it out, if you’re going to grate cheese, if you’re going to chop veggies, if you’re going to cook meat – you really might as well just hit it hard and get several pizzas stacked up in your freezer if you have the space.

In addition, consider prepping pizza ahead of time for a busy day and just keeping it in your fridge to bake at dinner time.

Now – go pin this time saving, money saving, health saving idea so that you won’t forget about it. :)

Make Your Own Frozen Pizza

Ever tried making homemade frozen pizza? How excited are you to try this idea?!

Heavenly Homemaker's Club Members: Access your homepage and all your fantastic resources here! Not a member yet? Please join us!

Simple Spinach Tuna Melts – Don’t Knock it Until You’ve Tried It

January 1, 2015 by Laura 8 Comments

This post may contain affiliate links. For more information, please see our disclosure policy.

Now that we’ve realized how easy it is to add spinach to our meals, I think we’re working it onto our table at least once each day. The day these Spinach Tuna Melts were invented, Matt was the guy in charge of figuring out lunch.

We almost always have several cans of tuna on hand, our freezer held plenty of cheese, and I think it goes without saying that we had spinach in the fridge. Here’s what Matt came up with:

Simple Spinach Tuna Melts

These were awesome.  I lost track of how many he had to make, as these are one or two bite tuna melts – and I’m not sure if you’ve seen our boys eat lately, but let’s just say they eat a lot of bites at each meal. We went through a lot of spinach, and not one boy complained that there was no bread involved in this meal.

This meal is perfect for days you’re limited on time to cook, days you don’t have meat thawed, and days you want extra nourishment in the form of spinach. (Every day is the day you want extra nourishment in the form of spinach. Join the spinach-eating bandwagon.)

How to Make Spinach Tuna MeltsYum

Open and drain a can of tuna. Use a fork to separate the tuna pieces, then place about a tablespoon on each leaf of spinach. Top with about a teaspoon of shredded cheddar cheese. Place prepared spinach/tuna/cheese on a baking sheet and broil in the oven for 1-2 minutes until the cheese is melted.

One 5-ounce can of tuna makes 6-8 Spinach Tuna Melts. If feeding teenage boys, open many cans of tuna and be prepared to make many pans of tuna melts.

So there you go! A super easy meal you can make that packs a big nutritional punch.

How are you doing on eating spinach? Have you found fun ways to work it into your meals?

Heavenly Homemaker's Club Members: Access your homepage and all your fantastic resources here! Not a member yet? Please join us!

Beef Summer Sausage Recipe

November 25, 2014 by Laura 22 Comments

This post may contain affiliate links. For more information, please see our disclosure policy.

Summer Sausage has always been a favorite finger food of mine during the holiday season. I’ve tinkered with recipes before, but haven’t felt like I’ve nailed them – until now.

Folks, we can now eat Summer Sausage – worry free. High fives all around!  No MSG, no nitrites, no preservatives. Actually, salt is a natural preservative, so I guess I can’t say “no preservatives.” But the least of my worries is sea salt, especially when I use Redmond. That means that “summer sausage” and “good for you” can be used in the same sentence. Yay!!!

I think you’ll be as excited about this recipe as I am. It’s homemade beef summer sausage!! You will not believe how crazy easy this is to make.

Homemade Beef Summer Sausage - Easy and Healthy!

Homemade Beef Summer SausageYum

5.0 from 1 reviews
Beef Summer Sausage Recipe
 
Save Print
Author: Laura
Serves: 2 sausages
Ingredients
  • 2½ pounds hamburger meat
  • 2½ Tablespoons liquid smoke (I prefer Wright's Brand)
  • 1 Tablespoon sea salt (I prefer Redmond brand)
  • 1 teaspoon sucanat
  • 1 Tablespoon ground pepper
  • 1 Tablespoon minced garlic
  • 1 Tablespoon mustard seeds
Instructions
  1. Mix all ingredients together in a bowl, squishing with your hands until everything is well combined. Cover and refrigerate for 24 hours.
  2. Knead meat mixture, then shape into 2 logs, about 13x2 inches each. (I found that rolling them in parchment paper helped form a nice, round shape.)
  3. Place logs in baking dishes such as Pyrex 9x13 inch pans (so fat drippings will not spill over into the oven).
  4. Bake in a 300° oven for 2½ - 3 hours.
3.4.3177

To freeze Summer Sausage:  Allow baked summer sausage to cool completely. Wrap in parchment paper, then with plastic wrap. Place in a freezer bag, storing in freezer for up to 2 months.

As if it wasn’t already wonderful news that we can enjoy healthy summer sausage – it’s even better news that this will be perfect for your Make-Ahead Lunch Box. I’ll be packing this for road trips, for sure.

Share with us! What’s your favorite holiday finger food?

Heavenly Homemaker's Club Members: Access your homepage and all your fantastic resources here! Not a member yet? Please join us!

Cream Cheese BLT – The Best Sandwich You’ll Ever Eat

November 6, 2014 by Laura 5 Comments

This post may contain affiliate links. For more information, please see our disclosure policy.

We had decided to go on an unplanned road trip. I was determined to avoid the grocery store and instead work with the abundance of food we had on hand to put together a meal we could take along with us and eat in the van. However, I had no bread, no lunch meat, no tortillas, and no cheese. It was time to get creative.

I quickly made a batch of One Hour Whole Wheat Yeast Rolls. Seriously, these rolls practically make themselves. (Although they are terrible about washing their own dishes.)  I almost always have a supply of bacon and cream cheese on hand because those are staple foods at the Coppinger house, along with butter and cocoa, of course. Therefore, I decided to take my BLT Wrap idea and turn them into sandwiches.

What makes a BLT even better? Cream cheese, of course. This “to-go” meal was a hit, though the sandwiches were a tiny bit messy. Eh, that’s what napkins are for, right?

Cream Cheese BLT

Cream Cheese BLT SandwichesYum

8 ounces softened cream cheese
1/2 cup mayonnaise
8 slices cooked and crumbled bacon
Tomato slices
Lettuce

Mix cream cheese and mayonnaise until smooth. Stir in bacon crumbles. Spread mixture on bread or buns and top with lettuce and tomatoes. Delicious!! This mixture makes enough for 10-12 sandwiches.

The best news of all is that you can add this Cream Cheese BLT Sandwich idea to your Make-Ahead Lunch Box list. Simply make the bacon/cream cheese/mayo mixture ahead of time, prep your lettuce and tomatoes, and put it all together on bread, buns, or tortillas when packing your lunch box. It’s a great change of pace from a regular ol’ sandwich.

You’ll definitely want to check out the inspiring idea behind this recipe:  BLT Wraps. Whether in a tortilla, on a bun, or even simply wrapped in lettuce – these are truly amazing.

BLT Wraps

Need more Make-Ahead Lunch Box ideas? Look through all these posts of yumminess.

These BLT Wraps and Cream Cheese BLT Sandwiches rich and filling, so the sides you’ll want to go alongside these need to be simple and light. Our favorites are:

  • Carrot sticks
  • Sliced cucumbers
  • Apples
  • Sliced sweet peppers
  • Pears
  • Applesauce

Now go get out your cream cheese and bacon. Wait. You do have these staples on hand, right?! :)

Heavenly Homemaker's Club Members: Access your homepage and all your fantastic resources here! Not a member yet? Please join us!

Lazy Dogs ~ The Make-Ahead Lunch Box

September 30, 2014 by Laura 20 Comments

This post may contain affiliate links. For more information, please see our disclosure policy.

The Make-Ahead Lunch Box

Find all of our Make-Ahead Lunch Box recipes and ideas here.

You might laugh at this recipe for several reasons. It is a little different from those I typically share.

First of all…hot dogs?

Yes, hot dogs. Remember how I’ve told you that I really love me a good, all beef hot dog? It’s true. I love sweet peppers, apples, strawberries, and asparagus better. But a good quality beef hot dog tastes really yummy to me. What can I say?

Second reason to laugh at this recipe:  This is not exactly the most inexpensive recipe I’ll ever suggest that you make. I didn’t find my hot dogs on sale, and I got the best quality dogs I could find at the store that don’t contain nitrites. So…cha-ching.  I used real cheese, not American cheese slices, which is obviously, more expensive because it’s real.

I did save by making my own whole wheat tortillas. But other than that? I’m not telling you how much each of these Lazy Dogs cost me. I’ll do it better next time by waiting for a sale on hot dogs. (If you have my Oh, For Real cookbook, you’ll find the tortilla recipe there. It’s also in my Totally Tortillas eBook.)

So if these Lazy Dogs are a little more on the pricey side, why am I sharing this recipe with you? Because these Lazy Dogs taste good. Because they are still less expensive than eating out. Because they are a fun, kid friendly (and apparently Laura friendly) food. And because you can make them ahead of time and put them in your lunch box.

I can’t take the credit for this great idea. When I posted my Taco Quesadilla recipe, “Busy Mom in AL” shared this:

Another of our “wraps” are some that we call Lazy Dogs! We boil some hot dogs to plump them up, roll them up with some cheese in a tortilla and heat them up in the oven until the cheese melts! Very good, even cold!

I loved the idea and made them for our soccer games and travel that very weekend. Once I had the tortillas made, the boys got in an assembly line to help put the Lazy Dogs together. Just like that, our to-go meal was ready.

Lazy DogsYum

Tortillas (I use homemade whole wheat tortillas)
Cheese Slices (I use Colby jack slices)
High Qualtity Beef or Turkey Hot Dogs (I found Oscar Meyer Angus Nitrite Free Dogs)

Boil the hot dogs just long enough for them to plump. ( <— what a weird sentence.)  Lay one slice of cheese on each tortilla, top with a hot dog, and roll it up. Bake in a 350° oven for about 10 minutes or until cheese has melted.

Make these ahead of time! Warm them in the oven, then serve.

Lazy Dogs ~ Perfect For Your Lunch Box

We found that we preferred these warm instead of cold. Still, if you want to pack them to-go, simply bake, wrap, and pack. Easy and fun!

Are you a hot dog lover? What is your favorite kind?

Heavenly Homemaker's Club Members: Access your homepage and all your fantastic resources here! Not a member yet? Please join us!

Taco Quesadillas ~ The Make-Ahead Lunch Box

September 16, 2014 by Laura 34 Comments

This post may contain affiliate links. For more information, please see our disclosure policy.

taco quesadillas 2

Have you ever made quesadillas, let them cool, then put them into the fridge or freezer for another day? You should do this.  They are perfect for your Make-Ahead Lunch Box.

Now you’re thinking, why would I do that? Quesadillas are already my easy go-to meal to make on the fly. How would it help to make them ahead of time?

Come closer. I have something to tell you. If you make quesadillas ahead of time, then they will already be made when you want to serve or eat them.  <— It has taken years of research, trial, and error to arrive at wise and knowledgeable comments such as these.

Okay fine. I just figured it out last week. It should have been obvious to me long ago, but I thought melty cheese should always be warm. Yes, somehow I forgot cold pizza was a food group for some people. Who knew cold quesadillas were also good? And if you don’t want to eat them cold, but instead want them warm again, simply warm them up at serving time. <—- Again, the brilliance of advice read here must continue to amaze you.

Now, the best part about a quesadilla is that you can fill them with whatever you like. Cheese, obviously. But what about varieties of meat and/or veggies? Taco Quesadillas are my current favorite, dipped in a small bowl of fresh salsa. I will tell you from experience that these taste great warm or cold. Warm would be my top choice, but we threw a bunch of cold ones into a bag to take to a soccer game recently and they were delicious. This means you can make these ahead of time and throw them in your lunch box for work or school. Perfect!

Taco QuesadillasYum

Your favorite tortillas (we like my homemade whole wheat tortillas)
Shredded cheese (my fav is Colby jack or white cheddar)
Leftover cooked taco meat
Salsa

Place a tortilla in a skillet and top with shredded cheese and cooked meat. Top with an additional tortilla. (I do feel a little bit silly telling you how to make a quesadilla, as if you don’t know how to make a quesadilla. But hey, if you didn’t know before, now you do.)  Cook on medium heat for about 2 minutes on each side until cheese has melted.

Watch to be sure tortillas don’t burn. <—- Breaking out one more time with more never-heard-before, ground breaking advice. You’re welcome.

Taco Quesadillas

I would love to hear how you like to fill your quesadillas and if you have ever tried eating them cold. What are your favorite meats and veggies used to fill tortillas?

Have any earth-shattering advice for us? Here’s one more nugget of wisdom from me, completely unrelated to quesadillas:  When it is cold outside, you should wear a coat. Now, your turn.

The Make-Ahead Lunch Box

Find all of our Make-Ahead Lunch Box recipes and ideas here.

Heavenly Homemaker's Club Members: Access your homepage and all your fantastic resources here! Not a member yet? Please join us!

Barbecue Beef and Cheese Hot Pockets ~ The Make-Ahead Lunch Box

September 4, 2014 by Laura 5 Comments

This post may contain affiliate links. For more information, please see our disclosure policy.

Hot pockets can actually be eaten cold. Who knew?

The Make-Ahead Lunch Box

When I asked you what you needed in a packed lunch, this is what you told me:

  • Quick and easy
  • Can be eaten cold
  • Hearty and filling

These Barbecue Beef and Cheese Hot Pockets are all that plus they are delicious. You can make them big or small, accommodating big or small appetites. They taste great hot or cold. You can make them ahead of time and pull them out as needed. They freeze well. What more do you need? Just the recipe I guess…

Barbecue Beef and Cheese Hot PocketsYum

Barbecue Beef and Cheese Hot Pockets ~ The Make-Ahead Lunch Box
 
Save Print
Author: Laura
Serves: 16
Ingredients
  • 2 pounds beef stew meat
  • 1 batch homemade barbecue sauce (more if you like)
  • 2 cups shredded cheese
  • 1 batch whole wheat pizza dough
Instructions
  1. Place stew meat and barbecue sauce in a skillet.
  2. Cook on low heat for about an hour, stirring occasionally, until meat is cooked and tender.
  3. In the meantime, mix the whole wheat pizza dough and set it aside to rise.
  4. Once both meat and dough are ready, remove meat from the heat.
  5. Stir in cheese until it is melted.
  6. Divide dough into about 16 pieces.
  7. Roll each piece of dough into a thin circle.
  8. Spoon meat mixture into the center of the circle, then gather up the edges of the dough and pinch to seal.
  9. Place pinched side down on a baking sheet.
  10. Once all dough is filled with meat, allow the pockets to rise about 15 minutes more.
  11. Bake in a 375° oven for 15-25 minutes or until pockets are golden brown.
3.4.3177

Barbecue Beef and Cheese Hot Pockets

This would be a great way to use up leftover roast beef. In addition, you can fill hot pockets with any variety of meats and cheeses. They are a great, versatile meal idea!

~~~~~~~~~~~~~~~~~~~~~~~~~~~~~~~~~~~~~~

http://www.dreamstime.com/royalty-free-stock-images-retro-seamless-pattern-set-image20825059

If you’re hitting the restart button with us this fall, I challenge you to find one recipe (maybe this Barbecue Beef and Cheese Hot Pocket recipe?) that you can make ahead of time and freeze. Having food prepared like this in the freezer is a life saver on busy days when you need a healthy meal quickly. You’ll find all of our Make-Ahead Meal recipes here.

Once you’ve completed the challenge, come back to this post and leave a comment letting us know what you made. Can’t wait to hear!

Heavenly Homemaker's Club Members: Access your homepage and all your fantastic resources here! Not a member yet? Please join us!

Bacon, Egg, and Avocado Salad ~ Make-Ahead Lunch Box

August 24, 2014 by Laura 3 Comments

This post may contain affiliate links. For more information, please see our disclosure policy.

How do we get our family to eat a lot of greens? Put bacon, eggs, and avocado in the bowl with the lettuce.

The Make-Ahead Lunch Box

Rarely is my family of men pleased to see a lovely bowl of salad as the main dish at lunchtime. You can almost see the “am I gonna get full?!” look of panic in their eyes. After all, typically a tossed salad lunch just doesn’t stick with a person very long into the afternoon. But if there’s bacon in it? And boiled eggs? And avocado? And cheese? Well, now we’re on to something.

My family devoured this last week when I made it – even the boys who don’t typically love eating avocados. With all the other flavors mixed in, this salad with all its goodness works for even my pickiest eaters. Along with the salad, I served fresh pineapple, fresh cantaloupe, and a new recipe I was experimenting with: Coconut Fudge Bars. We were all very full after our meal – and stayed full until after we got back from swimming that evening at 5:15. At that point we were all ready to eat our own beach towels – but that’s typical no matter what we’ve eaten for lunch.

This recipe is hardly a recipe. Simply throw together whatever amounts of each ingredient you feel is best for each family member. We all ate great big bowls full, because that’s what we do around here. Need to this be Gluten Free? It’s GF without having to try. Need it to be Dairy Free? Leave out the cheese.  You might have been able to figure that one out by yourself.  ;)

Bacon, Egg, and Avocado Salad

Bacon, Egg, and Avocado SaladYum

Bacon, Egg, and Avocado Salad ~ Make-Ahead Lunch Box
 
Save Print
Author: Laura
Serves: 6-8
Ingredients
  • Bacon, cut into bites, cooked, and drained
  • Boiled eggs
  • Avocado, cut into bites (as well as you can cut an avocado into bites)
  • Cheddar or Colby jack cheese, cut into small chunks
  • Mixed greens, lettuce, and spinach of choice
  • Tomatoes, chopped
  • Salad dressing of choice
Instructions
  1. Toss ingredients together and have a feast.
3.4.3177

To prepare for the lunch box:

Prepare all ingredients in advance, from cooking the bacon to boiling the eggs to chunking the cheese. Toss the fixin’s into a jar or bowl with a lid before heading out for the day. Put the dressing into a separate container to add just before eating.

These ingredients, prepared in advance, will last a week or two in the fridge for quick salad prep. If you chop your avocado ahead of time, simply place the avocado pit into the container to help maintain the nice green color.

Side dish ideas:

  • Fresh fruit like pineapple, cantaloupe, watermelon, apples, oranges, and/or grapes
  • Carrot sticks with hummus
  • Coconut Fudge Bars or Chewy Granola Bars
  • A favorite muffin or slice of quick bread
  • Crispy Cheese Crackers
  • Fruit and kefir/yogurt smoothie

You really have to try this salad. Really – even people who don’t normally love salad should love this one. It has bacon in it, for crying out loud. It’s happiness in a bowl.

Hey, have any of you tried the “Salad in a Jar” idea? I am excited to try that sometime, both because it’s a great packaging idea…and of course, because it involves a jar. It’s happiness in a jar. With bacon (for crying out loud).

Find more Make-Ahead Lunch Box recipes and be sure to follow along in this series for more fun ideas!

Heavenly Homemaker's Club Members: Access your homepage and all your fantastic resources here! Not a member yet? Please join us!

Whole Wheat Pizza Swirls ~ The Make-Ahead Lunch Box

August 10, 2014 by Laura 13 Comments

This post may contain affiliate links. For more information, please see our disclosure policy.

The Make-Ahead Lunch Box

I’m excited to kick off our new Make-Ahead Lunch Box series with a fun new recipe I recently tried for my family. We all love these Whole Wheat Pizza Swirls.  Here are my favorite perks to this recipe, and why I think this is perfect for your Make-Ahead Lunch Box:

  • You can make Pizza Swirls ahead of time, wrap them individually, and store them in the freezer until you need them.
  • You can fill the Pizza Swirls with any of your favorite toppings, making this recipe versatile and ideal for accommodating food preferences.
  • These taste great both hot and cold.
  • Pizza Swirls are simple to make.
  • Pizza Swirls are filling and easy to eat.

Whole Wheat Pizza SwirlsYum

1 recipe of Whole Wheat Pizza Dough
1 cup pizza sauce
2 cups shredded cheddar or mozzarella cheese
3 Tablespoons grated parmesan cheese
variety of pizza fillings – your choice – like meat, olives, and veggies
2 Tablespoons olive oil (optional)

Mix Whole Wheat Pizza Dough as directed. On a clean, well floured surface, roll dough into a long oval until it is about 1/4 inch thick. Spread pizza sauce over the dough. Sprinkle with cheeses and your favorite pizza toppings. Roll the dough up, beginning on the long side. Tuck the ends under. Place on a cookie sheet. Spread olive oil over the top if you like. Bake in a 375° oven for about 15 minutes or until the top is golden brown. Slice and serve. Makes about 8-10 Pizza Swirls.

Whole Wheat Pizza Swirls

Bonus Tips:

  • Want to pack these Pizza Swirls to go? Once the swirls have cooled completely, wrap them individually and place them in an air tight container in the freezer. Set frozen wrapped Pizza Swirl in the fridge overnight to thaw to pack in a lunch box the next day.
  • Need to eat Gluten Free? Copy the idea and use your favorite gluten free dough recipe.
  • Tired of pizza? Skip the sauce and use turkey or chicken with cheese to make Meat and Cheese Swirls.

Great to Serve with Pizza Swirls:

  • Fresh fruit like apple slices, orange slices, peaches, cantaloupe, pineapple, or pears
  • Carrot sticks, sliced cucumbers, celery, or sweet peppers
  • Olives or pickles

I double, triple, or quadruple this recipe so that I can make lots at once to make my getting-ahead efforts worthwhile. This also means I can make a variety of different Pizza Swirls to have on hand. Our favorites are:

  • Pepperoni and Cheese
  • Combination (meat, cheese, green peppers, mushrooms, olives)
  • Hamburger and Green Pepper
  • Pepperoni and Olive

What kind of pizza swirls do you think your family will like? Have any other ideas you feel would be good to serve with Pizza Swirls (especially ideas that will pack well in a lunch box)?

Heavenly Homemaker's Club Members: Access your homepage and all your fantastic resources here! Not a member yet? Please join us!
« Previous Page
Next Page »

Join Our Community!

 Facebook Twitter E-mail Instagram Pinterest

Popular Posts

~ Will All of the Real Moms Please Stand Up?
~ Easy! Stir-and-Pour Whole Wheat Bread
~ How to Make Gatorade
~ 31 Real Food Breakfast Ideas
~ Dear Teenage Girls...
~ When Mom Takes a Step Back
~ The Inexpensive Health Insurance We Love!
~ Let's Talk Real Food Grocery Budgets

Check out our latest posts!

  • Big Family Food and Fun: May 3-9, 2026
  • Help Your Kids Become Independent in the Kitchen!
  • Big Family Food and Fun: April 26-May 2, 2026
  • Big Family Food and Fun: April 19-25, 2026
  • Big Family Food and Fun: April 12-18, 2026
Home  ~  Simple Meals  ~  Club Membership  ~  Shop  ~  Privacy Policy  ~  Disclosure  ~ Contact

Copyright © 2026 · Beautiful Pro Theme on Genesis Framework · WordPress · Log in