Heavenly Homemakers

Encouraging women in homemaking, healthy eating and parenting

  • Home
    • About
    • FAQs
  • Recipes
    • Bread and Breakfast
    • Condiments
    • Dairy
    • Main Dishes
    • Side Dishes and Snacks
    • Desserts
    • Gluten Free
    • Instant Pot
    • Crock Pot
    • Heavenly Homemaker’s Weekly Menus
  • Homemaking
    • Real Food Sources
  • Store
  • Contact
    • Advertise
    • Disclosure
    • Privacy Policy
  • Simple Meals
  • Club Members!

Bacon Ranch Hashbrown Casserole

October 21, 2015 by Laura 4 Comments

This post may contain affiliate links. For more information, please see our disclosure policy.

Bacon Hashbrown Casserole

Yum

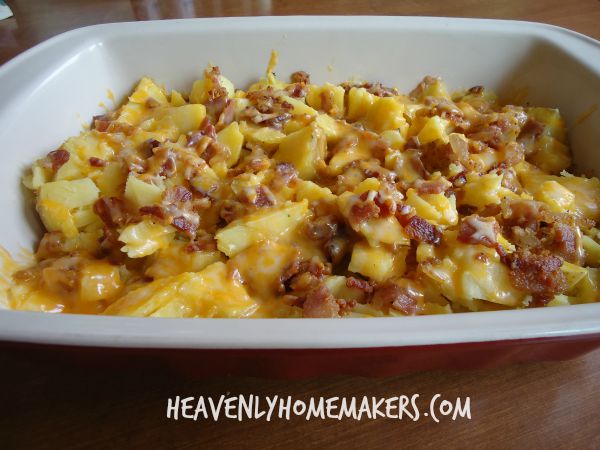
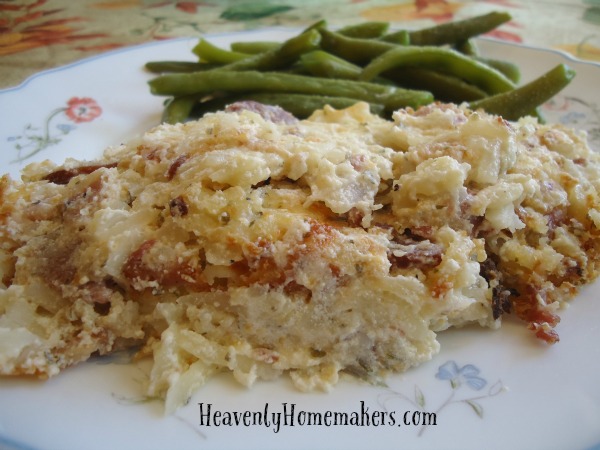
A friend had just stopped by when I was pulling this dish out of the oven for lunch earlier this week. It smelled quite amazing. She asked what it was, so I went down the list of ingredients our lunch included, “bacon, ranch dressing, sour cream, cheese…” Then this is when she said,

“Bacon? Ranch? Cheese? With all that in it, you know it’s going to be good!”

Yep, pretty much. What’s not to love?

You might also love knowing how easy this is to make. Cook the bacon, stir in the other ingredients, spread it all in a cooking dish, put it into the oven. Easy. It does help if you have premade frozen hashbrowns and a jar of homemade ranch dressing mix ready to go. Just please put the lid on your ranch dressing before you shake it up. Please. I’m only here to help.

A big thanks to Plain Chicken for the idea for this recipe! I’m excited to think about possibilities of ways to continue tweaking this. Maybe add some cooked chicken to the mix? What else can you think of to add to this dish?

Bacon Ranch Hashbrown Casserole
 
Save Print
Author: Laura
Serves: 10 servings
Ingredients
  • 1 pound bacon
  • 2 cups shredded cheddar or Colby jack cheese
  • 3 cups sour cream
  • 3 Tablespoons Ranch Dressing Mix
  • 1 bag of frozen shredded hashbrowns (about 8 potatoes worth of homemade)
Instructions
  1. Cut bacon into bite-sized pieces and cook.
  2. Drain grease.
  3. In a large bowl, stir together cooked bacon, shredded cheese, sour cream, and ranch dressing mix.
  4. Fold in frozen hashbrowns until all ingredients are well combined.
  5. Bake uncovered in a 350° oven for 45-60 minutes or until casserole is lightly browned and bubbly.
3.4.3177

Some recipes you’ll need to go along with this one:

Homemade Ranch Dressing Mix

Homemade Hashbrowns

Lately I’ve been finding really great deals on packaged hashbrowns at the store, so I’ve picked up a few to save me some time. I much prefer homemade, but busyness doesn’t always allow me the luxury. It’s good to be relaxed and flexible about healthy eating, right? Right.

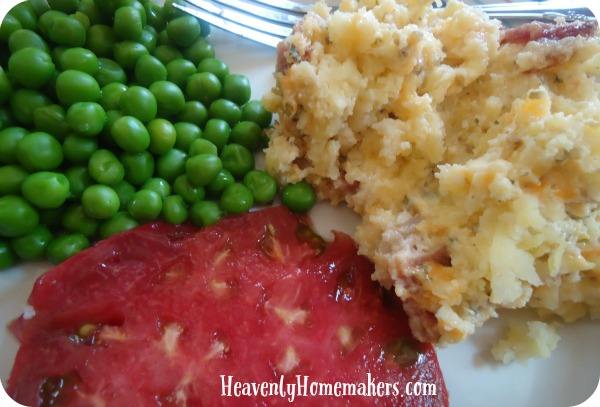
So far I’ve only served this casserole for lunch or dinner. But I also think it would be great for breakfast or brunch!

Want to make Bacon Ranch Hashbrown Casserole ahead and freeze it for later? Here’s how:

Make the casserole as directed. Before baking, cover well and freeze for up to three months. To cook and serve – thaw and bake as directed. Or, cover frozen casserole and place it into a cold oven. Turn the oven on to 225° and bake for 2-3 hours or until casserole has thawed, baked, and is heated through.

Bacon Ranch Hashbrown Casserole - Easy!

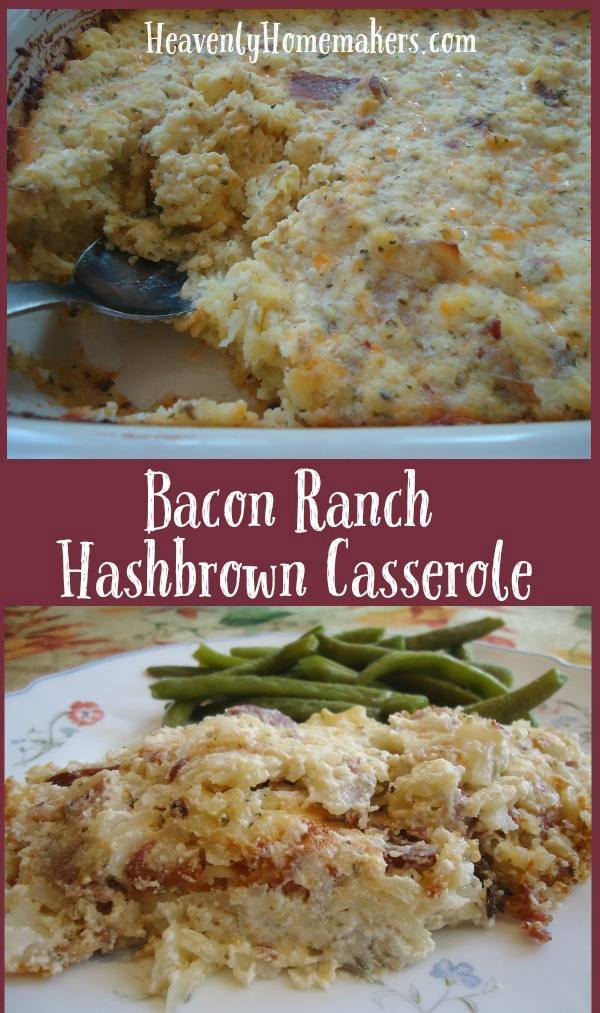
Note: This recipe is naturally gluten free. Hold onto this one if you have to avoid gluten – or so that you can bless friends who eat gluten free!

I’ll definitely be making this casserole often! Since it’s freezer-friendly, I’ll likely be making two or three at once so I can have no-brainer meals on hand for busy nights. After all, why dirty up more dishes tomorrow when tomorrow will have enough dirty dishes of its own? Right??

Heavenly Homemaker's Club Members: Access your homepage and all your fantastic resources here! Not a member yet? Please join us!

Hamburger Pot Pie Recipe – Nourishing Comfort Food

October 14, 2015 by Laura 4 Comments

This post may contain affiliate links. For more information, please see our disclosure policy.

Hamburger Pot Pie22

Oh comfort food. You are so…comforting.

If you love Chicken Pot Pie, you will love this Hamburger Pot Pie. I actually think I like this one even better. (No surprise there. I’m a beef-loving girl.) Pin this recipe so you can use it to keep yourself warm all winter long.

For the record, if you need to eat gluten free – or if you’re like me and you’re more into meat and veggies than bread – you can skip the topping on this and just eat it in a bowl like Hamburger Soup.

Hamburger Pot PieYum

4.5 from 2 reviews
Hamburger Pot Pie
 
Save Print
Prep time
30 mins
Cook time
45 mins
Total time
1 hour 15 mins
 
Author: Laura
Serves: 8-10
Ingredients
  • 1 pound hamburger meat
  • 1 small chopped onion
  • 6 cups beef broth
  • 4 large carrots, peeled and cut into bite sized pieces
  • 6 medium potatoes, peeled and cut into bite sized pieces
  • 2 cups frozen peas
  • Sea salt and pepper to taste
  • ⅓ cup cold water
  • 2 Tablespoons organic corn starch, arrowroot powder, or wheat flour
  • 1 cup milk
  • 1 cup mayonnaise (I use Hain Safflower Mayonnaise)
  • 1 cup whole wheat flour (I use freshly ground flour from hard white wheat)
Instructions
  1. In a large cooking pot, brown hamburger and onion together.
  2. Stir in broth and prepared veggies.
  3. Cook until veggies are tender.
  4. Mix cornstarch with water until smooth. Stir mixture into the broth/veggies, cooking for about one minute on the stove to help the mixture thicken.
  5. Pour contents into a 9×13 inch baking dish.
  6. In a separate bowl, stir together milk, mayo, and flour.
  7. Spread mixture over the veggies in the baking dish.
  8. Bake in a 350° oven for about 45 minutes or until the crust is golden brown.
3.4.3177

To save money and add nourishment, I recommend making your own broth for recipes like this one. Here’s How to Make Beef Broth. While we’re at it, here’s How to Make Chicken Broth. :)

Hamburger Pot Pie

What are your favorite winter comfort foods? Which do you typically enjoy more – hamburger or chicken?

Heavenly Homemaker's Club Members: Access your homepage and all your fantastic resources here! Not a member yet? Please join us!

How to Cook Beans in the Crock Pot

October 7, 2015 by Laura 24 Comments

This post may contain affiliate links. For more information, please see our disclosure policy.

Cooking beans is crazy easy. It’s remembering to soak them the night before that is the hard part.

My morning brain and my night brain are two completely different beasts. My morning brain is like, “Wooooo yeah! We gonna cook all day and do school work with the kids (let’s do art today!) and organize ourselves completely and make all the phone calls and make 20 quarts of applesauce and finish the laundry and write two blog posts! Let’s do this!”

As the days wears on, I knock out about three of my twenty lofty goals (because my time and energy always run out before my to-do list ends –  and also because I hate making phone calls). After a full day of thinking hard and working hard and loving hard, my night brain is like, “I’m not speaking to you right now.”

This is why it is hard to soak beans.

The irony is that I never forget to grind coffee beans at night to put into my coffee pot for easy coffee making the next morning. Obviously, I have my priorities. Perhaps my two bean worlds could collide and I could let my coffee beans trigger a reminder about my pintos? It only makes sense.

On the rare occasion I do remember to soak beans, I feel so accomplished when I get into bed at night. Forget all the other stuff I did for 15 hours all day long. I totally put my beans in a pot with water! I am so very amazing!

Once the beans have been soaked, we can put them into a crock pot to cook all day for our dinner that night.

How to Cook Beans in a Crock Pot

How to Cook Beans in a Crock PotYum

1. At night before bed, put about 4 cups of any variety of beans into a pot with 6-8 cups of water.

2. Splash in a little vinegar. It’s supposed to help with the toots. I offer no guarantees.

making beans1

3. Let the beans soak overnight.

4. Strain and rinse them in the morning. Put them into a crock pot and cover them with fresh water.

5. Add a couple of chopped onions to the post for flavor. This is optional but yummy and recommended.

6. Cover and cook the beans on low for 8-10 hours or until they are tender.

multitasking 5

At this point, you can enjoy your beans in any way you enjoy beans. Our favorites are:

  • Chili
  • Chili Mac
  • Easy Cheesy Bean Dip
  • Black Bean Chicken Nachos
  • Black Bean Salsa
  • Bean and Cheese Burritos
  • Calico Beans

What are your favorite ways to eat beans? Please tell me about your morning brain vs. your night brain. Which works better for you?

Heavenly Homemaker's Club Members: Access your homepage and all your fantastic resources here! Not a member yet? Please join us!

Help! My Alfredo Sauce Leftovers Don’t Reheat Well!

September 22, 2015 by Laura 11 Comments

This post may contain affiliate links. For more information, please see our disclosure policy.

Not that I know much about leftovers around my house anymore. But occasionally when we have a small amount of alfredo sauce leftovers, we’ve found that the butter separates when reheated, making for a greasy noodle on a plate. Have you ever run into this problem? Not to worry – I am here to solve the dilemma.

alfredo leftovers 2

What to do with alfredo sauce leftovers

Perhaps you have figured out the trick to prevent this and would like to share. In the meantime, this is what our family does to remedy the problem:

We stir the leftover Alfredo Sauce into some marinara sauce. Have you ever had marinara mixed with alfredo? It’s incredibly delicious. It’s so delicious, in fact, that my boys sometimes request that I make this on purpose. This is fine because I always love preparing two separate sauces when I make pasta because I have nothing better to do than to double my efforts in the kitchen.

alfredo leftovers 1

But seriously, it’s worth making two sauces because the combination is so good. Or…we could simply make extra Alfredo Sauce on purpose one day to eat as Fettuchini Alfredo. Put the leftovers away, then make spaghetti with marinara sauce the following day. Put those leftovers away, and then on the third day we can stir all the leftovers together and have a Spaghetti Alfredo meal.

Probably the day after that, we should make something besides pasta. You think?

The Perfect Solution for Warming Leftover Alfredo Sauce

Yum

The two sauces together with pasta truly is delicious. If only all leftover issues could be solved by stirring them into something else to create a delightfully brand new dish.

For the record, Homemade Alfredo Sauce with pasta is amazing and tastes even better than what you order at a restaurant. Talk about a money saver!

Have you discovered any tricks for reheating Alfredo Sauce?

Heavenly Homemaker's Club Members: Access your homepage and all your fantastic resources here! Not a member yet? Please join us!

Easy (Make-Ahead) Baked Potato and Bacon Casserole

September 9, 2015 by Laura 15 Comments

This post may contain affiliate links. For more information, please see our disclosure policy.

It’s a Potato and Bacon Casserole. Life is good.

Bacon Baked Potato Casserole

This is so easy we can hardly call it a recipe. I’m pretty sure my family will be having this every other week for the rest of our lives for the following reasons:

  1. Bacon. Of course. And also, cheese.
  2. We can slather it with Spicy Ranch Dressing, which tastes so good I believe I shall become addicted to it.
  3. I can make several of these casseroles at once and freeze them for later, making this easy meal even easier.

This “casserole” is basically baked potatoes cut up in a dish with bacon and cheese all over it. I’m sorry that I can’t make it more complicated for all of you who would rather spend many more minutes sauteing, braising, and broiling. This time, you’ll have to get your steeping and zesting fix elsewhere.

Everyone else: I lovingly suggest that you go scrub some potatoes. You’re having this for dinner tonight.

Baked Potato and Bacon CasseroleYum

Easy (Make-Ahead) Baked Potato and Bacon Casserole
 
Save Print
8 medium-sized potatoes (any variety) 1 pound bacon 2 cups shredded cheddar or colby jack cheese Sour cream, chives, and/or Spicy Ranch Dressing for topping
Author: Laura
Ingredients
  • 8 medium-sized potatoes (any variety)
  • 1 pound bacon
  • 2 cups shredded cheddar or colby jack cheese
  • Sour cream, chives, and/or Spicy Ranch Dressing for topping
Instructions
  1. Scrub and bake potatoes by putting them into a covered dish in a 350° oven for 1½ hours.
  2. In the meantime, cut bacon into bite-sized pieces and cook thoroughly on the stove-top.
  3. Cut baked potatoes into chunks, spreading them out into a 9x13" baking dish.
  4. Sprinkle cooked bacon over the potatoes.
  5. Top with shredded cheese.
  6. Bake in a 350° oven for about 10 minutes or until the cheese has melted.
3.4.3177

Offer sour cream, chives, and/or Spicy Ranch Dressing to complete this main course. Serve with a salad and another fruit or veggie. It is too easy. Makes 6-8 servings.

Baked Potato Bacon Casserole

To Freeze This Dish: 

Make it as directed above. Allow it to cool completely. Cover and label. Put it in the freezer.

To Reheat and Serve This Dish:

This is my favorite trick. Get the casserole out of the freezer. Cover the frozen dish with foil (somebody needs to invent a 9×13 glass cover for my pyrex dishes). Put the frozen casserole into a COLD oven. Turn the oven on to 250° allowing it to heat up along with the casserole. After one hour, turn the oven up to 350° and bake for one more hour or until the casserole is thawed, heated through, and looks like wonderful cheesy deliciousness.

Let us all add this recipe to our “Reasons to Make Extra Baked Potatoes When We’re Making Baked Potatoes Anyway” list.

7 Ways to Use Baked Potatoes

Switch out the bacon in this casserole for other cooked meats. Switch out the regular potatoes for sweet potatoes. Just whatever you do, try it with the Spicy Ranch Dressing. Ah-mazing.

Heavenly Homemaker's Club Members: Access your homepage and all your fantastic resources here! Not a member yet? Please join us!

Using Our Real Food “Velveeta” and Rotel to make Spicy Mac and Cheese

July 5, 2015 by Laura 8 Comments

This post may contain affiliate links. For more information, please see our disclosure policy.

Allow me to introduce you to one of the easiest meals and most delicious comfort foods around: Spicy Mac and Cheese.

Spicy Mac and Cheese

Yum

Remember the Real Food “Velveeta” and Rotel Dip recipe I posted a few days ago? You need to make that today. I’m only bossing you around because when it comes to that dip – I know best, I’m right, and that dip will change your life. It’s a proven fact.

Then here’s what you do: You either eat that dip with chips because that’s what we do with dip. Or – you boil 16 ounces of pasta, drain off the water, then stir this dip into your noodles for the most delicious Mac and Cheese with a kick. The most delicious.

My kids, my kids’ friends, all the adults -we all love this dish. I love that it’s super easy, flavorful – and all real food.

A little hint: Double the dip recipe. Eat it one day as a dip. Put the leftovers in the fridge. A day or two later, boil noodles and stir in the leftover sauce for an oh-so-easy meal to throw on the table. (With fruits and vegetables. This is a given.)

I used whole wheat noodles (my favorite kind) and I’m sure brown rice noodles would work great too.

Spicy Mac and Cheese Recipe

This Dip
16 ounces of your favorite pasta

Make the dip as directed. Boil and drain pasta according to package. Stir sauce into cooked and drained pasta. 

Spicy Mac and Cheese 3

Now go make the dip! Then watch as life as you know it improves for the better – one bite at a time.

Heavenly Homemaker's Club Members: Access your homepage and all your fantastic resources here! Not a member yet? Please join us!

Make Pizza Boats on the Grill ~ Fast and Easy!

June 30, 2015 by Laura 4 Comments

This post may contain affiliate links. For more information, please see our disclosure policy.

Grilled pizza boats! Who knew!!?

Ever since I became a big girl and learned how to turn on our grill, a whole new world of summertime food opened up to me. I think I turned 38 that summer. I had always left certain tasks like that up to my husband – things like installing our window air conditioners, getting the oil changed in our car, and grilling meat.

Then one day I was like, dude it sure would be nice to get dinner cooked instead of waiting for Matt to get home and grill the meat. (The deep thoughts of a hungry 38 year old…)

So I prepared myself for a detailed lesson in propane and matches and safety and how to avoid setting the house on fire. Then Matt got home and showed me how to simultaneously turn a knob and push a button. Four seconds later, the grill was aflame.

Hmmm, thought I. I probably could have even learned that when I was as young as 37.

Don’t tease. Need I remind those of you who have been operating a grill since adolescence that some of us experienced trauma at age 17 which may or may not have involved a fire and the total destruction of a huge barn on my family’s property? Some of us have hated fire for a very, very long time. Some of us might have equated lighting a grill to lighting a barn on fire and watching it smolder for three to fourteen days. Some of us.

So now I’m 41 (and three quarters) and the grill is my best friend in the summertime. In my 3 years of grilling experience, I have not burned anything down – not our house, not someone else’s house, not even a barn.

Regarding food of many kinds: if I can grill it, I do. If I’ve never seen it grilled before, I try it. Anything to avoid turning on the oven on a hot day. Plus, grilled food is fun and special and it feels like a big deal to say, “we’re grilling chicken tonight” instead of simply saying, “we’re having chicken.” Right? Can’t you hear the difference?

So enter: Grilled Pizza Boats

Making pizza on the grill (the regular crust kind) is quite doable and very yummy. You can learn how to do that here. But that is a bit time sensitive and laborious (woe is me) so I rarely go to the trouble. Pizza Boats, however? Well this is absolutely too easy.

Make a Quick Meal of Pizza Boats - On the Grill!

How to Make a Pizza BoatYum

Slice a loaf of French or Italian bread in half the long way (you know, like a boat). Top each half with your favorite pizza goodies. Bake in a 350° oven or on the grill until the cheese is melted (about 10 minutes).

It’s as easy as that.

In fact, it’s one of the easiest meals there is. Slice the pizza boats and serve them with salad and fresh fruit.

And then I just have to say it: Be sure you turn off your grill. I refuse to be the one responsible for any other fires, large or small. I’ve met my quota.

What are your favorite foods to grill?

Heavenly Homemaker's Club Members: Access your homepage and all your fantastic resources here! Not a member yet? Please join us!

Real Food “Velveeta” and Rotel Recipe

June 28, 2015 by Laura 46 Comments

This post may contain affiliate links. For more information, please see our disclosure policy.

To be clear, this recipe does not include Velveeta as one can not use the words “real food” and “velveeta” in the same recipe and be telling the truth. In addition, this is not a recipe for Velveeta. I refuse to experiment to come up with a way to make a cheese product that has a shelf life.

Real Food Velveeta and Rotel Dip

But. As many of you know, I have a ridiculous love for the completely nasty and absolutely delicious Velveeta Rotel Dip that I grew up on as a kid. You may remember that I wrote a love letter to Velveeta a few years ago and bid her farewell as I created a tasty dip to replace her. Sure enough, we make that dip frequently at our house as it is super easy, all real food, and absolutely yummy.

But. That recipe, as good as it is, is still not the same as the Velveeta Rotel Dip I crave. That is why (and I’m not proud of this) sometimes I put a $6 log of boxed cheese product (otherwise known as Velveeta) into my cart along with 2 cans of Rotel and I bring it home and I melt it together and I eat it even though it is terribly terrible and truthfully it doesn’t even taste as good to me as it used to because of that whole real food thing I’m into now which has made all bad foods taste like chemicals on a tortilla chip.

So what is my problem?

Problem? I don’t have a problem.

Okay fine. Whatever. I have a problem.

And also? When did fake cheese become so expensive? You’d think that would deter me from buying it. But as I said, I have a problem.

It was either time to begin a Velveeta support group or get back in the kitchen to try my hand at another dip recipe since I’ve only tried like seventeen other times and posted like five other cheese dip recipes through the years and may have to rename this website to cheesediprecipesforaddicts.com with the tag line “All Cheese Dip Recipes, All the Time.”

A support group was out of the question because it is my understanding that they don’t serve chip dip at those meetings. So here we are again, back in the kitchen for another attempt at a real food version of my beloved dip.

You guys. I think I nailed it this time. And I mean that with all the humility and sweetness possible, but hey guess what? I just made the best chip dip ever!!! 

So here’s how this dip becomes amazing. Two things:

  1. We must make a cheese sauce for this to work. This requires butter and corn starch and actual cheese. Relax. It’s not as hard as it sounds.
  2. We must use actual Rotel or an off brand of “diced tomatoes and green chilies. Salsa isn’t the same. Thankfully, Rotel is still a real food – read the ingredient label and rejoice.

Note: My wonderful grass-fed beef produces the perfect amount of fat so I never have to drain off grease. In order to make a sauce, one must have fat or grease to work with. That’s why my recipe includes butter. Depending on what meat you have, I recommend either skipping the butter (if your meat has some grease to work with) or draining the grease and adding the butter or using your grease with some butter. Just so you have about 4 Tablespoons of fat to work with, you’re golden.

Real Food “Velveeta” and Rotel Dip RecipeYum

5.0 from 2 reviews
Real Food "Velveeta" and Rotel Recipe
 
Save Print
Author: Laura
Serves: 6-8
Ingredients
  • 1 pound hamburger meat
  • 2-4 Tablespoons butter
  • 2 heaping Tablespoons corn starch
  • 1 cup water
  • 1 teaspoon chili powder
  • sea salt to taste
  • 2 cups heavy cream
  • 10-ounce can diced tomatoes with green chilies (Rotel)
  • 1-2 cups shredded cheddar or colby jack cheese
Instructions
  1. Brown the hamburger meat in a large pot.
  2. Add butter to the meat, melting it throughout the pot.
  3. Sprinkle in corn starch, coating the meat.
  4. Pour in water, chili powder, and salt.
  5. Turn heat up and stir until the mixture thickens.
  6. Add cream, continuing to stir as the mixture thickens. (This all happens quickly in my experience.) Stir in Rotel, heating for about 2 more minutes.
  7. Remove from heat.
  8. Add shredded cheese, stirring until the cheese has melted and the dip is smooth.
3.4.3177

If you don’t remove your sauce before adding cheese, your cheese will end up funky and not smooth and creamy. You’ve been warned, so don’t add your cheese while your pot is still on the stove, then email me and ask why your cheese got funky. Not that anyone would ever do that.

Real Food Velveeta and Rotel Recipe

If you need me, I’ll be in the kitchen eating another bowl of my homemade not velveeta but way better than velveeta because it’s real food Chip Dip.

Who wants to come join me? I need to know who loves this dip as much as me. Admit it. Join my support group – the one where there IS CHIP DIP AT THE MEETINGS because my support group meetings rock and we support one another by eating dip.

~~~~~~~~~~~~~~~~~~~~~~~~~~~~~~~~~~~~~~~~~~~~~~~~~~~~

It’s recipes like this Real Food Velveeta and Rotel that makes Simple Meals what it is. It offers you huge money and time savings. Not to mention you don’t have to think as hard every week about what to cook and what to buy.

Join the fun! Check out our amazing Simple Meals program!

You will love this!

728x90

Heavenly Homemaker's Club Members: Access your homepage and all your fantastic resources here! Not a member yet? Please join us!

My Favorite Cheesecake Factory Salad Makeover

May 14, 2015 by Laura 11 Comments

This post may contain affiliate links. For more information, please see our disclosure policy.

Who loves a Cheesecake Factory BLT Chopped Salad more than cheesecake???? This girl. I’ve only been there a few times, but I found a salad there that I love soooo much. This begs the question: A salad? At cheesecake factory? Why?

See, here’s the thing. When one goes to the Cheesecake Factory, one wants to enjoy the cheesecake right? Therefore, eating a salad as a meal preceding the cheesecake makes perfect sense. One must save room for the cheesecake! That is how I discovered this salad. Or a salad much like this.

I believe the salad I ordered at Cheesecake Factory had chopped apples and some chicken in it too (but it’s been about a year since I’ve been there so I can’t remember all the specifics). Add those to this if you like. All I know is that this salad is so good that our family devoured a huge bowl of it – two days in a row. And I want to make it again tomorrow.

Helpful hint: Want to get your kids to like salad? Add BACON.

BLT Chopped Salad with Feta Cheese

BLT Chopped Salad with Feta CheeseYum

5.0 from 1 reviews
My Favorite Cheesecake Factory Salad Makeover
 
Save Print
Author: Laura
Serves: 6-8
Ingredients
  • 6 cups chopped mixed greens, lettuce, or spinach (any combination you like)
  • 2 chopped tomatoes
  • ½ pound bacon, cut into bites, cooked, and drained
  • 1-2 cups sweet corn, cooked and cooled
  • 1-2 chopped avocado
  • 4 ounces feta cheese crumbles
  • Dressing:
  • 2 Tablespoons olive oil
  • Juice of one lime (about 2 Tablespoons)
  • salt and pepper to taste (I put in a few shakes of each)
Instructions
  1. Toss salad ingredients into a large bowl.
  2. In a small jar, shake together dressing ingredients.
  3. Pour over salad and toss.
  4. Serve right away!
3.4.3177

This is a perfect spring or summertime meal. I think I could eat this every day. And believe it or not, I don’t even have to have cheesecake afterward. :)

I can’t tell you how delicious and flavorful this is. You MUST try it. Every bite is delicious.

What’s your favorite thing to get at Cheesecake Factory?

Heavenly Homemaker's Club Members: Access your homepage and all your fantastic resources here! Not a member yet? Please join us!

Don’t Forget the Tuna

April 28, 2015 by Laura 25 Comments

This post may contain affiliate links. For more information, please see our disclosure policy.

This is probably the most exciting blog post you will ever read. Never mind all the insightful, scripture-filled, life-changing inspiration you might find online. I’m here to talk to you about tuna.

Don't Forget the Tuna and other deep thoughts

Yum

It’s an important topic and that’s all there is to it.

See, here’s the thing. You and I have busy schedules. Some of us love to spend time in the kitchen making nice meals for our families. Some of us don’t. Either way – we all want to be healthy and there are many days each week we need something quick to throw out on the table. For me, this need is most prevalent at lunchtime during our homeschool days. Shoot, right now it’s also very important at dinnertime when we’re running out the door to soccer games. You know what? I need simple meals three times a day, seven days a week. I just do. I’m sure you can relate.

I think this little convenience food can be overlooked as an easy meal option. So don’t forget the tuna. Remember the tuna.

Long live the tuna.

And now, the most frequently asked questions about this oft forgotten meat choice. Seriously, they are asked frequently. Like all the time. My email inbox is flooded with tuna talk. You have no idea.

How do you make your tuna salad?

I add Hain Safflower mayonnaise and homemade pickle relish. Usually I shake in a little salt. How much of each, you ask? Probably 2 Tablespoons of mayo and 2 teaspoons of relish per can of tuna.

How many cans do you go through in one meal?

Do you really want to know? This is the Coppinger family we’re talking about here. Our boys eat at least one can each. It’s alottatuna. (When I wrote that just now, I said it in an Arnold Schwarzenegger voice. Try it: It’s alottatuna. See? Is it just me, or can you just totally hear him say that? I am so weird.)

Where do you get your tuna?

There has been some tuna controversy through the years. Doesn’t tuna have too much mercury? Is it hurting the dolphins? Salted or unsalted? In oil or in water?

I’ve researched it. We don’t eat it every day, but I do feel okay eating and serving it every couple of weeks. I order cases of Yellow Fin Tuna from Natural Value. My understanding is that this variety has the lowest amount of mercury.

How do you serve your tuna salad?

I usually have my boys mix up a big bowl (yay for kids who can do this kind of work so that I can sit around talking like Arnold Schwarzenegger). Then we have it with crackers and whatever fruits and veggies we have in the fridge. It’s also great served on a bed of lettuce and a tomato slice. I like scooping tuna into a big bowl of mixed greens, chopped cucumbers, and diced tomatoes.

Or, if we’re really feeling creative (brace yourself for this one), we’ll spread some tuna salad on a slice of bread. We call them sandwiches. Incredible invention.

Don’t forget this wonderful idea: Tuna Melts on Spinach

Tuna Melts on Spinach

And also the ever wonderful real-food Tuna Casserole that makes for a very easy and fast meal:

Are you a tuna lover? What’s your favorite way to eat tuna? Join in the tuna talk!

Heavenly Homemaker's Club Members: Access your homepage and all your fantastic resources here! Not a member yet? Please join us!
« Previous Page
Next Page »

Join Our Community!

 Facebook Twitter E-mail Instagram Pinterest

Popular Posts

~ Will All of the Real Moms Please Stand Up?
~ Easy! Stir-and-Pour Whole Wheat Bread
~ How to Make Gatorade
~ 31 Real Food Breakfast Ideas
~ Dear Teenage Girls...
~ When Mom Takes a Step Back
~ The Inexpensive Health Insurance We Love!
~ Let's Talk Real Food Grocery Budgets

Check out our latest posts!

  • Big Family Food and Fun: May 3-9, 2026
  • Help Your Kids Become Independent in the Kitchen!
  • Big Family Food and Fun: April 26-May 2, 2026
  • Big Family Food and Fun: April 19-25, 2026
  • Big Family Food and Fun: April 12-18, 2026
Home  ~  Simple Meals  ~  Club Membership  ~  Shop  ~  Privacy Policy  ~  Disclosure  ~ Contact

Copyright © 2026 · Beautiful Pro Theme on Genesis Framework · WordPress · Log in