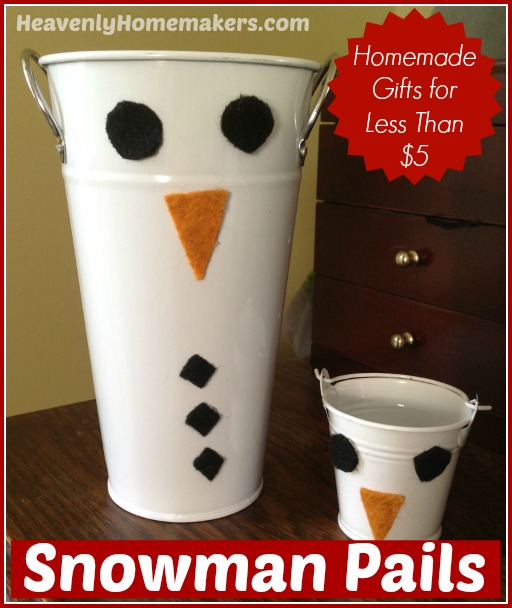
Heavenly Homemakers

Encouraging women in homemaking, healthy eating and parenting

  • Home
    • About
    • FAQs
  • Recipes
    • Bread and Breakfast
    • Condiments
    • Dairy
    • Main Dishes
    • Side Dishes and Snacks
    • Desserts
    • Gluten Free
    • Instant Pot
    • Crock Pot
    • Heavenly Homemaker’s Weekly Menus
  • Homemaking
    • Real Food Sources
  • Store
  • Contact
    • Advertise
    • Disclosure
    • Privacy Policy
  • Simple Meals
  • Club Members!

No-Sew Rice Heating/Ice Pads ~ A Great Gift for Men, Coaches, or Anyone for Less Than $5

December 10, 2014 by Laura 20 Comments

This post may contain affiliate links. For more information, please see our disclosure policy.

No Sew Rice Heating and Cooling Pads

I came home from the store with socks, rice, and ribbon. Here are the questions I heard from my boys when they saw the supplies for this project:

  • Are those socks for me? (No, they are for a gift for your basketball coaches.)
  • You bought our coaches socks? (Yes, but it’s for a craft project.)
  • Why did you buy such a huge bag of white rice? (To put in the socks for your coaches.)
  • You’re putting rice in socks for our coaches. Why would you do that?

I have no idea why none of this made sense to my boys. It is so self-explanatory.

I quickly had to explain that we weren’t going to cook the rice before putting it into the socks. Still, I don’t believe the idea made sense until they saw the finished product, and even then, I think they thought it would have made more sense to just make our coaches a plate of cookies. I’ll admit, this is kind of a silly idea. But it’s a useful gift, so hopefully they’ll like it at least a little bit. :)

If you, like my boys, have never heard of this lovely Rice Heating Pad idea, allow me to share one of the easiest gift projects on the planet. There are many ideas for these out there, many of which include fabric, a sewing machine, and a pattern. This one though? It only involves socks. The clean kind. New is preferred.

No-Sew Rice Heating Pads

What You’ll Need

  • White Rice (raw, non-instant)
  • Essential Oil (optional)
  • Socks
  • 3/8″ Ribbon
  • Scissors
  • Tall Drinking Glass

How To Make No-Sew Rice Heating Pads

Fill the glass with dry rice. Add 1-3 drops of essential oil if you like (peppermint is a great choice). Fit the opening of the sock over the top of the glass filled with rice, as shown in the picture above, then turn the cup over to fill the sock with rice. Continue this until the sock is full, leaving 2-3 inches of empty sock at the top. (The rice in the drinking glass idea was the best way I figured out to fill the socks since using three hands was not an option that day.)

Tie a ribbon (grosgrain works best) securely at the top. If you want to be very sure the sock won’t open and spill, feel free to use a needle and thread to close the sock with a few stitches before tying the ribbon. We could just call that version “Barely-Sew” Rice Heating Pads.

Because I used large men’s socks, 5 pounds of rice only filled three heating pads. I have no idea what I will do with the odd sock. Maybe I’ll just add it to my laundry and let my dryer eat it. Or perhaps I should buy more rice and make more cool gifts.

How To Use Your Rice Heating Pad

If you have/use a microwave, you can heat this up for 1 1/2-2 minutes, then put it around your neck to keep warm or use it to relieve pain from sore muscles. Don’t want to use a microwave? Place your heating pad in a baking dish in a 300° oven for 10-15 minutes.

If you prefer ice to heat, store the rice pad in the freezer for cold therapy. Then you can call this your Rice Heating Cold Pad, which makes no sense but is fun to say.

Rice Bag Gift Tag Instructions

Download a page of Rice Bag Gift Tags

Since I’m making these for our boys’ basketball coaches, I bought socks in our team colors and basketball ribbon. Here’s football, soccer, more soccer, volleyball, softball, and baseball. You could also look for ribbon with your recipient’s favorite sport’s team.

Or, skip the sport idea altogether and pick fun socks and ribbon that fits any person on your list. From Hello Kitty to Duck Dynasty, I’m pretty sure you could tailor make these heating/cooling pads for just about anyone.

I figured this gift costs just a little over $2 each. Not too shabby!

Ever used a Rice Heating/Cooling Pad?

This post contains affiliate links.

Heavenly Homemaker's Club Members: Access your homepage and all your fantastic resources here! Not a member yet? Please join us!

I’m Giving Away $200 Worth of My Favorite Things!

December 10, 2014 by Laura 1,106 Comments

This post may contain affiliate links. For more information, please see our disclosure policy.

Actually, I’m keeping all of my favorite things. Sorry. They are my very favorite items and I use them constantly. However, I am going to give one of you a package full of duplicates of many of my favorite things so that you can enjoy them too! How fun is this?!

Now, the trick is that all of these favorites have to fit inside a stocking. This is why I’m not giving away my husband or children. (Not even their monthly grocery bill would fit inside a stocking.)  Plus, I really want to keep them around.

I also decided not to include butter in this give away. Butter fits inside a stocking, but sending it in the mail? Well, I decided to skip it. I do think it is fitting to ask that every time you use butter, you think of me with a smile.

So, no butter, no family members, and you also can’t have my personal Bible or my recliner. (Again, stocking size restrictions, obviously.)  But enough about what this giveaway does not include. What are these amazing items I’m choosing to giving away???

My Favorite Things Giveaway

The winner of this giveaway will receive:

BeeSilk Family Size Hard Lotion Bar ($12.95)

I haven’t stopped raving about these since I started using them several years ago. They are completely non-toxic and healthy for the skin, and they have saved my hands!!! I love this stuff and don’t go a day without it.

beesilk hard lotion bars in hand

1/4 pound Vanilla Beans through Olive Nation ($19.95)

Making Homemade Vanilla Extract has been one of the most fun and delicious adventures in my kitchen since we switched to real food. Everyone needs to make this.

vanilla_beans

Lilla Rose Flexi-Clip ($13.00)

I wear Flexi-Clips almost daily. They are crazy easy to use and so very pretty. They don’t pull or break my hair like cheap ponytail holders. I absolutely love Flexi-Clips. The winner of this giveaway will win an extra-small Snowflake Flexi – perfect for young Frozen fans and their moms. :)

lilla rose fav giveaway
Polder’s Old World Market Spurtle
($39.00)

Ever heard of a Spurtle? It’s like a spatula, spoon, and paddle all in one. Not only is it a super handy kitchen gadget, it is beautiful and the best quality utensil I have in my kitchen. It is hand made – pure walnut. The winner of this giveaway will receive an Original Spurtle Spatula. These are fantastic!

spurtle

Half-Tee Tank from Deborah and Co. ($17.99)

While this isn’t a winter item, you will be very glad you have this Deborah and Co. Half Tee Tank come spring and summer. I love mine so much I’m going to need to order more next summer. They are wonderful for comfortably adding a modest layer under tanks and dresses – definitely one of my very favorite things. (I just learned that this week only in the U.S., Half Tees are shipping for free!)

deborah and co 3

Hand-Made Slippers from The Purple Lamb ($80)

Seem like an expensive pair of slippers? Well, you get what you pay for. Regular $20 slippers from the store don’t last long since I tend to wear slippers all day long several months out of the year. I’ve had my Purple Lamb slippers for over two years and they still look and feel like they did the day they arrived. I cannot say enough about these amazing, custom, hand-made slippers. They are so well made, so perfect for my foot, so warm and comfortable – they are amazing. The inside of the slippers feature New Zealand Shearling – seriously the softest most luxurious thing ever. They include suede soles and are made from 100% wool. You will love these. (Available in up to an 11 inch foot.)

Oh, For Real! Cookbook ($25.95)

You know my cookbook is one of my favorite things. ;)  I use this so much that my copy has splashes and stains on it by now. It is a cookbook full of our family’s favorite recipes, as well as all my best tips for keeping life simple (and healthy) in the kitchen. I want you to have my cookbook!

ForRealBookCover6

Leave a comment on this post for a chance to win this fun giveaway of many of my favorite things.  I will draw a random winner on Thursday, December 18. Be watching for a post stating the winner as you will be responsible for contacting me if your name is chosen!

If that isn’t exciting enough, wait until you hear this:

12 other bloggers stuffed stockings with their favorite things too! Not only can you enter for a chance to win the package I put together for you – you can enter 12 more wonderful giveaways while you’re at it!

Giveaway collage

  • Check out the Stocking Giveaway Collage featuring 12 other beautiful bloggers and their Favorite Things stockings.
  • Enter to win my Christmas Stocking Giveaway at the giveaway below (just leave a comment!).
  • HOP to all the other sites and enter to win their stockings!
  • Look around and enjoy the sites of these incredible bloggers. I love this hand-picked group of blogs. They all love the Lord and their sites and content reflect that. If you like Heavenly Homemakers, you’ll surely like these blogs too!

1. Thriving Home 2. Happy Home Fairy 3. The Nourishing Home 4. Heavenly Homemakers

5. Meaningful Mama 6. Slugs and Bugs 7. Seeds Family Worship 8. Jennifer Ebehack

9. The Generous Wife 10. The Modest Mom Blog 11. My Humble Kitchen 12. Kara Chupp

13. Motherhood on a Dime

If you’re new to Heavenly Homemakers, I’d love for you to sign up for our free newsletter. The fun never ends around here!

This post contains affiliate links.

Heavenly Homemaker's Club Members: Access your homepage and all your fantastic resources here! Not a member yet? Please join us!

Gratituesday: Music Lessons and Malachi’s First Piano Recital

December 8, 2014 by Laura 7 Comments

This post may contain affiliate links. For more information, please see our disclosure policy.

gratituesday[2]

This is a year of music lessons for our family. I wish we’d started earlier – particularly for our oldest who has much musical talent but no spare time now that he’s a senior. But, there’s no point in having regrets. We’re thankful we were able to work in music lessons for our three younger boys this year. (Asa’s sure to pick up on bits of what his brothers are learning, right?)

We gave them each a choice. Because they all have musical ability but different interests, the three boys chose three different instruments. Justus chose guitar, Elias chose drums, and Malachi chose piano. Who knows? Maybe someday they’ll have their own band!

Juggling in all the lessons and practices has been a good discipline for the boys. Is our house even louder now than it was before? Oh yeah! But we love hearing them practice. It’s been wonderful to hear them develop their talents.

This Sunday, Malachi had his first piano recital. He had practiced his songs so many times he could play them in his sleep. He wore his favorite shirt and tie for the occasion, and played his first song without a mistake. He acted like he wasn’t nervous at all!

malachi recital 1

And then there was me.  See, I had agreed to play a simple duet with Malachi that he and I had had so much fun with at home. It was an appropriate song for this Christmas recital, and he wanted us to play it there together.

This mama only plays the piano just a tiny bit, and I never – never – play for people. But because playing with Malachi has brought so much joy, I said yes to joining him for his second recital piece. Phew, I got nervous. I believe I only messed up three times, so we’ll count it as a success. ;)

malachi recital 2

Bless my friend Jenny for getting pictures! (My older boys had tried but hadn’t been successful in getting good ones.)

I can’t wait to see where my boys take what they are learning with their music. They are off to a great start, and we’re so thankful God has provided such wonderful, godly teachers for them!

What are you thankful for this Gratituesday? Please leave a comment to share. I’m always so encouraged to hear how God is working in your life!

Heavenly Homemaker's Club Members: Access your homepage and all your fantastic resources here! Not a member yet? Please join us!

What’s On Your Holiday To-Do List?

December 8, 2014 by Laura 1 Comment

This post may contain affiliate links. For more information, please see our disclosure policy.

A friend showed me a similar version of this list, and I loved it so much I decided to recreate it. There’s so much “noise” and busyness this time of year that we can quickly lose our focus. May we always remember what is important as we love others this Christmas season.

Holiday To-Do List

Download and print a free Holiday To-Do List to use as a reminder and to share with others!

Heavenly Homemaker's Club Members: Access your homepage and all your fantastic resources here! Not a member yet? Please join us!

How To Make Geoboards ~ Homemade Gifts for Less Than $5

December 8, 2014 by Laura 1 Comment

This post may contain affiliate links. For more information, please see our disclosure policy.

Cantina sent in this idea, along with instructions and pictures. This is a great homemade gift for kids!

geoboard 1

Our middle child loves to build and he is great with a hammer. With a little help he is making geo-boards this year.

We had a scrap piece of lumber that he spray painted (picture above is the first one we did and it wasn’t painted). Then we use graph paper to hammer in nails in 2 inch squares. Don’t nail them all the way down. Then with colored rubber bands you can make all kind of fun shapes. My children have had the best time with this board and Elijah is now making a few for Christmas presents. The nails cost $1.97 per pack and the rubber bands were $.97 a pack. Since we had the scrap lumber and spray paint these will cost us under $5 per board.

How to Make a Geoboard

Thank you, Cantina! I think I will put my 12 year old on this project. What a fun idea!

Heavenly Homemaker's Club Members: Access your homepage and all your fantastic resources here! Not a member yet? Please join us!

Homemade (Real Food) Mint Oreos

December 7, 2014 by Laura 11 Comments

This post may contain affiliate links. For more information, please see our disclosure policy.

This recipe needs no introduction. It’s a homemade mint oreo.  What more do I need to say? It’s happy, happy, delicious, happiness – perfect for a holiday gathering.

Besides the fact that these are made with whole food ingredients, perhaps the most exciting bragging point of these cookies is this:  After you eat one of these, you can smile at your friends without fear of having “oreo teeth.” You know what I’m talking about, right? Oh my goodness.

oreos 1

Allow me to introduce you to your new friend:

Homemade Oreo CookiesYum

1 cup melted butter
3/4 cup cocoa powder
1 cup sucanat or brown sugar
2 eggs
1/2 teaspoon baking soda
1/2 teaspoon sea salt
1 teaspoon vanilla extract
2 1/4 cups whole wheat flour (less or more as needed)

Stir together melted butter, cocoa powder, and sucanat. Add eggs, baking soda, salt, and vanilla until well combined. Stir in flour. Use a cookie scoop to place cookie dough two inches apart on a cookie sheet. Bake for 8-10 minutes in a 350° oven. Once the cookies have cooled, use the following filling recipe to create cookie sandwiches.

Filling

3 cups unbleached powdered sugar (more or less as needed)
2 Tablespoons melted butter
4 Tablespoons milk (more or less as needed)
Sprinkle of sea salt
1/2 teaspoon peppermint extract

Mix all ingredients together with a hand mixer until smooth and it has reached desired consistency. Spread filling onto cookies to form sandwiches like oreos.

Makes about 25 Mint Oreo Cookie Sandwiches. Want just a “plain” oreo? Simply leave out the peppermint extract in the filling recipe.

Homemade Mint Oreos

As you can see, some of mine are “regular” and some are “double stuffed.” This is because I care so much about perfection and consistency while I slap on the filling. Eh, life is entirely too short to spend time frosting cookies evenly. I especially feel this way because no one – I repeat no one –  cares about perfect cookies when they are eating a Homemade Mint Oreo. They are simply happy to be eating this treat.

Here is the part where I tell you to eat these in moderation, and to be sure to eat vegetables in great abundance before, after, and during your homemade oreo eating event. (You knew this was coming.)  After all, eating these may not leave you with oreo teeth, but you could end up with other issues, including but not limited to a suppressed immune system and cavities.

Wow, do I know how to ruin a great cookie recipe post or what? Never mind all the vegetable talk. You just make this recipe and enjoy your homemade oreo cookies!!! After you’ve eaten a large tossed green salad.

It has become clear that I cannot talk about sugar without encouraging vegetables. Hey, at least I didn’t tell you to add spinach to the cookie dough or frosting. Although now that I think about it…..
Heavenly Homemaker's Club Members: Access your homepage and all your fantastic resources here! Not a member yet? Please join us!

Menu Plan for the Week, Using Fresh Cranberries, and Price Matching at Wal-Mart?

December 6, 2014 by Laura 20 Comments

This post may contain affiliate links. For more information, please see our disclosure policy.

I bought a few groceries at the beginning of the week:  broccoli, pears, cantaloupe, spinach, cottage cheese, cucumber, raspberries, clementines, blackberries, and petite carrots. All but the cottage cheese and half the cranberries are gone already.  Time to go back to the store.  This is a good “problem” to have. I am so thankful for all the delicious variety of produce available.

dec 6 groceries

By the way, that cantaloupe was the sweetest we’ve eaten in a long time. That’s amazing to me, seeing as it’s December. We devoured that melon.

I came up with a fantastic Cranberry Almond Orange Bread recipe this weekend, which I’ll share with you during our 5th Annual Heavenly Homemakers Christmas Brunch. But regarding cranberries – I’m curious what you make with fresh cranberries? Leave a comment to let us know how you like to eat them and what you like to make with them. I’d love to hear your ideas.

You might remember the Orange Cranberry Scone recipe I shared two years ago. I rarely make this, but the Christmas season is definitely the perfect time to treat my family to this. :)

Orange Cranberry Scones

Here’s what our menu includes this week:

Breakfast

  • Applesauce Bread
  • Crepes with fruit and Cream Cheese Filling
  • Pumpkin Pancakes
  • Warm Chocolate Soother
  • Raspberry Oatmeal Bars
  • Poptarts
  • Quick Mix Biscuits

Lunch

  • Bacon, Egg, and Avocado Salad
  • Baked Potatoes in the Crock Pot with cheese and sour cream
  • Beef Summer Sausage with Crispy Cheese Crackers
  • Calico Beans
  • Cheeseburger Soup
  • Potato Soup
  • Pizza Boats

Dinner

  • Tuna Casserole
  • Spanish Rice with Chicken
  • Salmon Patties
  • Orange Chicken
  • Italian Pasta Bake
  • Chili
  • Cheesy Salsa Enchiladas

Fruits and Veggies (I serve 1-4 per meal)

  • Mixed Greens
  • Green Beans
  • Peas
  • Broccoli
  • Applesauce
  • The rest depends on what I get at the store – spinach, pears, apples, clementines, carrots…

Oh! And we have an Aldi in Lincoln now, so I’ve heard I can start price-matching at Walmart since it’s 50ish miles away. I’m excited to learn more about how this will work. Any expert price matchers out there with tips for me?!

Heavenly Homemaker's Club Members: Access your homepage and all your fantastic resources here! Not a member yet? Please join us!

2-Ounce, 4-Ounce, and 8-Ounce Vanilla Extract – For Sale Now While Supplies Last

December 6, 2014 by Laura 11 Comments

This post may contain affiliate links. For more information, please see our disclosure policy.

It’s time! We’ve got our Homemade Vanilla Extract bottled up and ready to send you. As you can imagine, our house smells delicious. :)

vanilla_two

We always encourage you to make your own batch of vanilla extract. It’ll save you lots of $$ and give you the most delicious and pure vanilla ever! If your batch isn’t ready yet or you don’t want to make your own, we are excited to offer ours twice each year. The timing for this sale is perfect for holiday baking and gift giving. We have plenty of 2-ounce and 4-ounce bottles as these are perfect stocking stuffers, teacher appreciation gifts, gifts for neighbors, gifts for co-workers….yes – these make awesome gifts!

The prices below include all shipping and handling fees. There will be no charges added to the amounts below. We do have to limit this sale to U.S. for shipping purposes.

Ready? When we run out, we run out, so don’t wait if you want some! We’ve sold out within only 5 hours before – that was one crazy morning! I try to keep this post updated when the supply begins to run low.

Have fun. We can’t wait to get this liquid gold in the mail to you. Mmmmm, deliciousness!

2-ounce bottle
$8.00
Add to Cart

8-ounce bottle
$29.00
Add to Cart

Heavenly Homemaker's Club Members: Access your homepage and all your fantastic resources here! Not a member yet? Please join us!

Pinecone Holiday Decor ~ Homemade Gifts for Less Than $5

December 5, 2014 by Laura 4 Comments

This post may contain affiliate links. For more information, please see our disclosure policy.

I can’t take credit for this idea, which is probably obvious to you once you see how clever, beautiful, and well-done this decoration is! Vickie sent in this idea with fabulous instructions and pictures. Bless you, Vickie!

pinecone decor

I’m super impressed that this entire craft decoration (worth $20) only cost Vickie 50¢. Amazing!

Here’s Vicki:

This gift has about a $20 value and I made it for 50 cents out of stuff I already had.
  • 12 pinecones (selling for 50 cents each at the local store or harvest them from your backyard for free)
  • 2-3 ft of ribbon ($4-6 or use repurposed ribbon for free)
  • basket ($5-10 or again, repurpose one for free. You can also shop 2nd hand stores for baskets.)
  • craft paint ($1 per bottle)  I used 1/2 bottle of yellow and a smidge of white. You can also use any old leftover paint.
  • glue
  • optional picture hanger and felt pads (cost ?, I found these in my tool drawer so for me they were free)
Wash and paint your basket to the desired color. Dry brush the tips of the pinecones with white paint. You may want to wear gloves if you have sappy pinecones like I did. Let everything dry well. Arrange the pinecones in a decorative manner in the basket, remove carefully trying to remember your pattern, then apply glue to the back/bottom of cones and replace in basket. You don’t want the glue to show when finished. Wrap with a festive ribbon and you are done! If you want to hang your basket you may need a picture hanger of some sort. Mine had a smooth wood back so I screwed and hot-glued the hanger to the back. I also added some felt pads to protect any surface it may hang/sit on.
This took me one full day with dry time. The basket, painted yellow and white, makes a nice seasonal decoration that can be hung on a door/wall or just set on it’s side.
Pinecone Holiday Decor for Less Than $5

This is such a lovely idea. I think my boys might even enjoy collecting and painting pinecones for this. Vickie:  Thank you! Keep the ideas coming, Dear Readers. I love your brilliance and creativity!

Heavenly Homemaker's Club Members: Access your homepage and all your fantastic resources here! Not a member yet? Please join us!

Pumpkin Pecan Pie Squares ~ Share Your Story

December 4, 2014 by Laura 4 Comments

This post may contain affiliate links. For more information, please see our disclosure policy.

I loved reading this story of how Kelley blessed her brother with a delicious, home-cooked meal! Our Pumpkin Pecan Pie Squares recipe was a highlight of this story, as was our Salmon Patties recipe. It doesn’t have to be difficult, just cooked with love. :)

Share Your Heavenly Homemakers Recipe Story


Hi Laura!

Last night my brother was coming over for dinner. He works so much, he rarely gets a home cooked meal, so I decided to make it special and make your pumpkin-pecan pie squares. :) They were such a huge hit! My husband said they were even church worthy!! To those who don’t understand, most of the ladies at church dinners have at least one special dish that they excel at and everyone asks for. So, anyway, that is the first time I’ve had a “church worthy” recipe so I am super excited!! For supper we had your Salmon Patties that I tweaked a little (think some Italian seasoning and heavy whipping cream), coleslaw, and roasted Italian/Rosemary/Garlic potatoes. Needless to say, there were NO leftovers!

Kelley

kelley 1

Such a delicious spread!

kelley 2

  I’m not sure which recipe Kelley used, but here’s my very simple Creamy Coleslaw recipe if you’re interested. Kelley’s looks so pretty!

kelley 3

These Salmon Patties turned out looking so good! I think I’ll start making mine big like this too. My boys would appreciate that. :)

kelley 4

These look great, and I bet we would all love having the recipe. Pretty please, Kelley?!?!??! :)

 kelley 5

Last but not least, Kelley’s plate of Pumpkin Pecan Pie Squares.
If you need an easy and delicious dessert this holiday season, these are a great choice.
“Church worthy” according to Kelley’s husband. Yes!

Keep sending in your stories. I love them!

Heavenly Homemaker's Club Members: Access your homepage and all your fantastic resources here! Not a member yet? Please join us!
« Previous Page
Next Page »

Join Our Community!

 Facebook Twitter E-mail Instagram Pinterest

Popular Posts

~ Will All of the Real Moms Please Stand Up?
~ Easy! Stir-and-Pour Whole Wheat Bread
~ How to Make Gatorade
~ 31 Real Food Breakfast Ideas
~ Dear Teenage Girls...
~ When Mom Takes a Step Back
~ The Inexpensive Health Insurance We Love!
~ Let's Talk Real Food Grocery Budgets

Check out our latest posts!

  • Big Family Food and Fun: May 3-9, 2026
  • Help Your Kids Become Independent in the Kitchen!
  • Big Family Food and Fun: April 26-May 2, 2026
  • Big Family Food and Fun: April 19-25, 2026
  • Big Family Food and Fun: April 12-18, 2026
Home  ~  Simple Meals  ~  Club Membership  ~  Shop  ~  Privacy Policy  ~  Disclosure  ~ Contact

Copyright © 2026 · Beautiful Pro Theme on Genesis Framework · WordPress · Log in