Heavenly Homemakers

Encouraging women in homemaking, healthy eating and parenting

  • Home
    • About
    • FAQs
  • Recipes
    • Bread and Breakfast
    • Condiments
    • Dairy
    • Main Dishes
    • Side Dishes and Snacks
    • Desserts
    • Gluten Free
    • Instant Pot
    • Crock Pot
    • Heavenly Homemaker’s Weekly Menus
  • Homemaking
    • Real Food Sources
  • Store
  • Contact
    • Advertise
    • Disclosure
    • Privacy Policy
  • Simple Meals
  • Club Members!

Freezer Cooking Diary of the Week

April 2, 2010 by Laura 26 Comments

This post may contain affiliate links. For more information, please see our disclosure policy.

I’m gonna just admit to you that I bit off more than I could chew this week (so pardon me while I type with my mouth full).

This was not a good week for me to try to make extra food. This would have been a good week for me to HAVE extra food in my freezer ready to pull out and warm up quickly. But what did I do? I cooked extra food. In the midst of running around like a funky chicken taking my kids to soccer and musical practices…putting the final touches on all of our LTC projects…preparing for a short trip…working on costumes…going on a field trip…sorting through spring/summer clothing…and doing school work.

WHAT was I thinking?

I think I was thinking that having extra food on hand in the coming weeks will be very handy, and I’m right…it will be very handy. But I’m whipped.

I am NOT whining. No ma’am. I’m just saying that maybe next time I should make a better judgment call on when I should do extra cooking. 

And also, I’m letting you know that every single room of my house looks like a bomb went off. There were apparently separate bombs for every room and some bombs were larger than others and had a flying clothing effect.

Ah, but at least I have lots of prepared food in my freezer now, eh?

Here’s a run down of the week:

Sunday night I started a pan of beans to soak and mixed up a double batch of tortillas to soak overnight.

Monday morning before schooltime, I started cooking beans and rolling out tortillas. I put together the Bean and Cheese Burritos and got them into the freezer by noon. I then mixed up a double batch of dough for Homemade Pizza Pockets and Beefy Enchilada Bake to soak. I also made a batch of Homemade Ice Cream for the Ice Cream Experiment. That was it for Monday.

freezercookingapril1sm


Tuesday was the biggest cooking day as the only extra thing we had going on was one soccer practice.

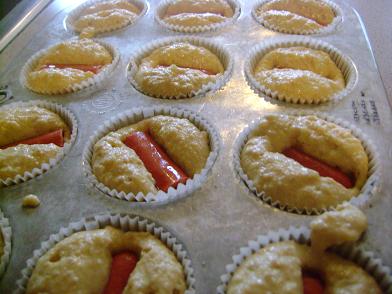
I got five pounds of meat cooking before breakfast. Once I got the kids started on their math and other individual work, I mixed up a double batch of Corn Dog Muffins and got those into the oven.

The meat was then finished browning, so I stirred up three pounds of Sloppy Joes and put them into jars for the freezer. The remaining two pounds of hamburger helped make up two big pans of Beefy Enchilada Bake.

I then set about putting together Homemade Pizza Pockets and Mini Apple Pies. I had to take a break somewhere in there and feed us all lunch. Everyone was disappointed that we weren’t having pizza pockets and apple pie for lunch. (Ah, but what they didn’t know what that I had secretly stuck a big apple pie in the oven for later!)

freezer_cooking_april_sm

Here’s a look at a very adorable five year old, along with the finished
Beefy Enchilada Bakes, Homemade Pizza Pockets, Corn Dog Muffins and Sloppy Joes.

freezer_cooking_april_3_sm

And here’s a closer-up picture of the food…but without the five year old..
so this picture may not be as fun to look at.

freezer_cooking_april_2_sm

Finally, I got the Mini Apple Pies finished and put into the freezer. 
Those will make a wonderful breakfast some morning soon!

I finished Tuesday off by mixing up a double batch of Giant Breakfast Cookies to soak for the next day.

Wednesday I spent the morning baking Giant Breakfast Cookies. While each round of cookies was in the oven baking, I’d go tackle some homework help or spring clothes sorting.

freezercookingapril3sm

I took some time to shake up some Ranch  Dressing Mix, Italian Dressing Mixand Taco Seasoning Mix. I LOVE having these mixes ready for when I need to make dressing or dip or tacos or…all the other things I use making these mixes.

freezercookingapril4sm

And there you go. I didn’t quite finish everything on my list, but that’s okay! I think we will be using many of these convenience foods next week while we CLEAN UP the war zone that is our house. 

Has anyone seen my broom?

Heavenly Homemaker's Club Members: Access your homepage and all your fantastic resources here! Not a member yet? Please join us!

Becoming a Better Help Meet: Expectations

March 31, 2010 by Laura 31 Comments

This post may contain affiliate links. For more information, please see our disclosure policy.

helpmeet

When we got married, we had quite a few expectations about what we thought marriage would be like. 

I personally had quite a blissful view of what it would be like to be a wife and homemaker. My kitchen would always be clean. My chores would always bring me joy. I would always be rested, organized and cheerful. My husband would always say and do exactly the things I needed and wanted him to say and do. We would have beautiful children who were well behaved and quiet and who never argued. Oh, and of course, some of those beautiful children would be of the girl variety.

Fifteen and a half years later, I am a (very happily married) woman with a frequently dirty kitchen and a large list of unfinished chores that occasionally make me feel very grumpy. I could use a nap and I have to pray and put forth quite an effort to continually be cheerful. My husband certainly doesn’t always say and do exactly what I need him or want him to do. None of my children are of the girl variety…and hardly ever are they quiet.

Am I disappointed with all of these expectations that have gone unfulfilled? No way.  I’m still doing everything I always wanted to do…I’m just living within the realm of reality now. The fact that God gave us four boys has been joyful beyond my wildest dreams. I could never keep a perfect house because well…we’re all living in it. My husband can’t possibly say everything and do everything perfectly because as great as he is, he is also human and for goodness sake..sometimes I don’t even know what I want. How is he supposed to know? 

You know the way life always turns out so perfectly in books that you read and movies that you watch? Yeah…those aren’t real!!  Books and movies are stories written by people. I have to be very careful when I’m reading a good Christian fiction book that I don’t suddenly become dissatisfied with my own husband and my own life. Somehow the main male character in those books knows exactly what his woman needs and wants and always says the perfect thing. (Funny isn’t it that these books are usually written by WOMEN!)

I am going to suggest then that while we absolutely should aim high and desire a wonderful life with a wonderful man of God…we also need to recognize that there is no such thing as a perfect life with a perfect man. If there was a perfect man out there…he wouldn’t be choosing the likes of me because well…I’m not perfect.

I have more to say about expectations, specifically with our husbands, but I’ll share that another time.

For now I’ll stop with the simple idea that as a help meet to our husbands we need to learn to be joyful while we live lives that are less than perfect.  Lives that may include spills, mistakes, socks on the floor, stains on the rug, bad breath, hurt, death, sickness, sore backs, misplaced documents, dried out markers, toilet seats left up, squishy bananas under the table and lost library books.

Embrace the life God gave you with the husband you chose. Let go of perfect expectations…and choose JOY!

Heavenly Homemaker's Club Members: Access your homepage and all your fantastic resources here! Not a member yet? Please join us!

The Ice Cream Experiment: Take One

March 30, 2010 by Laura 105 Comments

This post may contain affiliate links. For more information, please see our disclosure policy.

Is all ice cream created equal? Should we go with the cheap stuff…or is it worth it to pay a little more to make our own or buy brands that have more wholesome ingredients?

I recently read an ice cream story that left me with my jaw on the ground. With Randy’s permission, I will share part of his story (taken from a monthly newsletter I receive from North Star Neighbors)…

On February 25th, I went to [a grocery store] and purchased  2-quarts of ice cream. It tasted so-so. I went to try again and when opening the cartons, it just didn’t look right and fresh! So, I set both cartons in the sink to melt.
 
The [first brand] took 2 days to actually melt. The [second brand] NEVER did melt. Three days after sitting on the counter, I stuck a spoon in it and it ‘stood up’ all by itself. 

I read through the rest of this email and was shocked that an entire month later, the second brand of ice cream had still not melted!!!! Ice cream that doesn’t melt?! Whoa! I knew that many store brand ice creams contain some funky ingredients, which is why I avoid them, but funky ingredients that actually keep the ice cream from melting?! Kinda makes you think that maybe this frozen stuff in a box is possibly…not real food?!?!

And so, I decided to do a little ice cream experiment of my own, and blog the progress for you. Only for you (and because I’m weird enough to want to see this for myself) would I buy two cartons of ice cream that I wasn’t planning to eat  and leave it on my countertop for days and days to watch it’s progress.

At the risk of sounding like Dr. Seuss, please allow me to introduce to you…Brand One and Brand Two:

icecreamex1sm

Brand One Ingredients:  milk, cream, sugar, skim milk, corn syrup, whey protein concentrate, mono- and diglycerides, guar gum, sodium phosphate, cellulose gum, sodium citrate, polysorbate 80, carrageenan, vanilla extract, artificial flavor, annatto

Brand Two Ingredients:  milk, cream, buttermilk, whey, high fructose corn syrup, sugar, guar gum, mono & diglycerides, sodium phosphate, cellulose gum, sodium citrate, polysorbate 80, carrageenan, natural flavor, annatto

We took a scoop out of each, just to show the texture.

Brand One:

icecreamexsm

Take special notice of the layer of gunk (for lack of a better word) on the top of the box of Brand Two:

icecreamex3sm

We set the ice cream out at precisely 10:40 am Saturday, March 27 (2010).

Exactly one hour later, Brand One looked like this:

icecreamex4sm

And Brand Two looked like this:

icecreamex5sm

They appear to be melting don’t they? Oh dear, maybe we should stop the experiment right now and eat the ice cream before it melts all over the place! But no, let’s not. Let’s wait and see what happens.

Two hours later…Brand One:

icecreamex7sm

Brand Two (notice again, the lid gunk that hasn’t changed a bit):

icecreamex8sm

As the familiar saying goes, a watched ice cream carton never melts…so we put a towel under it and walked away for the evening. 

The next morning…

Brand One:

icecreamex9sm

Brand Two:

icecreamex10sm

The towel underneath the cartons was wet and clearly the cartons were slightly less full than when we first started this two days ago. So, I will give it this much:  the ice cream was melting somewhat.

Moving on to Monday morning…

Brand One:

icecreamex12sm

Brand Two:

icecreamex11sm

At this point in the experiment, it had been almost 48 hours since we’d taken the ice cream out of the freezer. When we gently pushed on the contents of the cartons, it resembled a sponge. A sticky sponge.

What could we do now, but make Homemade Ice Cream with all natural ingredients to make a comparison! And so, we lugged out our ice cream maker and got it whirling.

Homemade Ice Cream Ingredients:  Cream, milk, real maple syrup, egg yolks, vanilla, arrowroot powder

icecreamex13sm

Okay…yum.

I know this experiment isn’t exactly apples to apples (or ice cream to ice cream as the case may be) because I just wasn’t willing to part with an entire quart of homemade ice cream to see how long it would take to melt. Instead, we scooped some out into a small bowl.

Here’s the Homemade Ice Cream at 11:40 Monday morning:

icecreamex14sm

Homemade Ice Cream at one hour later at 12:40 pm:

icecreamex.15sm

And the homemade ice cream on Monday at 1:26 pm:

icecreamex16sm

The homemade ice cream melted in our mouths too…but that goes without saying.

So let’s review:

Homemade Ice Cream…melted in just under two hours.

Brand One and Brand Two…72 hours later, we’re still waiting to find out.

Check back  here in a few days and I’ll share the ice cream melting progress (or lack thereof)!

And um, just in case it never melts…how long do you suppose I should let it sit on my countertop?
——————————————

Heavenly Homemaker's Club Members: Access your homepage and all your fantastic resources here! Not a member yet? Please join us!

Gratituesday: Creamy Orange Cooler

March 29, 2010 by Laura 63 Comments

This post may contain affiliate links. For more information, please see our disclosure policy.

Wow I love me a good Creamy Orange Cooler!

Over the weekend when I was nursing a sinus infection, I found myself without an appetite. But, I knew I needed to keep some good foods going in so that my body would have something to work with to fight the infection.

Something made me think of a recipe I had tried years ago (like before Asa was even born), and suddenly it sounded SO GOOD. I got out my old recipe book, made several tweaks to the concoction and guzzled it down!!! If I hadn’t been sick and out of energy, I would have done a dance around my kitchen! Maybe I had been hungrier than I thought – or maybe this was just exactly what I needed. Either way, I made another batch the next day!

Creamy Orange Cooler

Creamy Orange Cooler

Gratituesday: Creamy Orange Cooler
 
Save Print
Author: Laura
Ingredients
  • Juice of 3 medium oranges
  • 2 cups buttermilk
  • 2 teaspoons real maple syrup (or more to taste)
  • ½ teaspoon vanilla extract
  • a handful of ice cubes (optional)
Instructions
  1. Squeeze juice from the oranges and pour into a blender with remaining ingredients.
  2. Blend until smooth (or until ice is crushed if added).
3.4.3177

This drink is so easy to whip up. The buttermilk mixed with the sweet citrus creates an amazingly tangy taste that is SO refreshing!

I also love that this is a new way to get down some cultured buttermilk! (Learn how easy it is to make your own buttermilk here.)  I have a hard time drinking the raw, cultured buttermilk by itself, but in this mixture – I could just drink it straight from the blender!

And yes, I know dairy products aren’t great when you have a sinus infection…but I didn’t care. ;)  I needed something that would go down easily and satisfy my insides. It did exactly that. (Plus I used raw milk, which doesn’t have the same ill effects on the sinuses as store-bought milk does.)

Looking for more healthy, satisfying recipes? Here is a list of all my healthy Bread and Breakfast Recipes.

Heavenly Homemaker's Club Members: Access your homepage and all your fantastic resources here! Not a member yet? Please join us!

Our Healthy Eating Journey, Part 8

March 29, 2010 by Laura 16 Comments

This post may contain affiliate links. For more information, please see our disclosure policy.

healthyeatingjourney

If you missed them, please catch up on
Part 1, Part 2, Part 3, Part 4, Part 5, Part 6 and Part 7.

Because of Malachi’s severe eczema, we had started looking into the world of healthy eating. Here’s one of the first (and biggest) things we learned:  This new definition of healthy eating I was reading about was WAY different from anything I’d ever heard of.

For sure, I had spent years thinking that healthy eating meant eating as little fat as possible. Avoid the french fries and the pizza. Choose margarine over butter, don’t eat eggs, watch the cheese, eat chicken not beef. Drink fat free milk, choose fat free candy, eat fat free yogurt. This is what I’d been taught was “a healthy diet”.

Suddenly, everything I had ever learned about eating healthy was being challenged. Not only that, but if I was going to start eating these whole foods I’d been reading about, I was going to have to actually spend money on food. I didn’t like spending money on food. What was I going to do? How important was it to eat healthy, anyway?

About the time we were starting to wrestle with and learn about healthy eating,  my asthma started giving me some real trouble. The boys were 8, 5, 3 and 8 months at the time. I was pretty exhausted, mainly from getting so little sleep night after night trying to comfort Malachi. I was still nursing him exclusively because we were very afraid to feed him any food. I was drained.

My guess was that it didn’t help that I was drinking a lot of Pepsi every day. Even though I was in the process of learning about raw milk and grass fed meats and free ranged chickens and organic produce…I was having the HARDEST time giving up my Pepsi. I drank Pepsi because I LOVED it. I drank Pepsi because it tasted so good. I drank Pepsi to “give me energy”. I drank Pepsi because I was in the habit of drinking Pepsi. And also, I just LOVED it. (But I think I said that already.)

I drank it in the morning with my breakfast (I always called it my “coffee”). I drank it with my lunch. I drank it in the afternoon if I had some “down time”. I drank it in the afternoon if I didn’t get my “down time” because well…then I really “needed it”! I would usually go through almost a liter and a half a day (or 3-5 cans, depending on what I had bought on sale).

And…if I went out to eat? I would SO take advantage of the free refills!!! Oh yes, I would. It’s almost embarassing. (almost?) 

All that to say…my immune system was pretty shot. (I’m sure the Pepsi wasn’t the only reason, but, WOW that’s a lot of sugar consumption!)  Once my depleted body started to have worse asthma symptoms…I found myself unable to fight back. 

It started with what seemed to be a cold, but I could not get over it. I got so sick I could hardly walk across the room for lack of energy and breath. Friends came over to help with the kids and laundry. I lost a lot of weight (I looked terrible). I had no appetite. Every breath hurt. I coughed all the time. I fell asleep in the middle of a noisy room with the kids playing all around me. I couldn’t answer questions. I remember my friends asking me what I’d eaten for lunch and I’d just give them a blank stare. Matt was trying to juggle his work and the kids and a very sick wife. He would fall asleep at night with his clothes on, he was so tired from trying to keep up. (By the way, during the time I was the sickest, I wasn’t drinking Pepsi anymore…I wasn’t that stupid! But I hadn’t decided to give it up for good yet!)

My doctor was trying different medications to get the asthma under control, but nothing seemed to work. He was very concerned about my weight and overall health and wanted me to stop nursing Malachi since I was so depleted. He finally insisted on hospitalizing me so that we could do something about my lungs and get me hydrated.

I was in the hospital for four days. My friends and church family were incredible. They took care of the kids. They brought meals. Some of my fellow nursing mothers were even kind enough to pump extra milk for Malachi. 

It took almost two months for me to finally begin to feel well again. And then, I began to drink Pepsi again because I missed it so much…and I was feeling so much better, so why not?! 

It didn’t take long for my lungs to feel wheezy and my energy to wane. I was getting sick again…

To be continued…

Heavenly Homemaker's Club Members: Access your homepage and all your fantastic resources here! Not a member yet? Please join us!

Freezer Cooking Plan for April

March 28, 2010 by Laura 11 Comments

This post may contain affiliate links. For more information, please see our disclosure policy.

Crystal and Jessica are at it again, working to inspire all of us to save time and money by preparing some foods in advance with an April Freezer Cooking Day.

This is going to be especially important for me to do right now with all four boys being involved in our home school musical in April. Plus spring soccer season is just about to come into my life at full force. Meal times are likely to be rushed many nights this month as we head out to practices, games and rehearsals. 

Therefore, I must be organized. I must plan ahead. I must put some ready to grab food in the freezer. I must not panic.

Ugh, but I must make four animal costumes in the next 3 weeks. 

Okay, I can do this. I have a plan (for the cooking, not for the costumes). Do you want to hear about it?

Each day this week, I’ll be making a little extra food to freeze. By the end of the week, I should have all kinds of food in the freezer to keep me from panicking while I attach black spots to white sweat pants so that I can make my eight year old look like a dalmatian puppy. 

Here’s what I’ll be working on:

Giant Breakfast Cookies x 2

breakfastcookiessm

Mini Apple Pies

miniapplepies9sm

Beefy Enchilada Bake x2

enchiladalasagna2sm

Bean and Cheese Burritos

burritosm

Corn Dog Muffins x 2

corndogmuffinssm.JPG

Homemade Pizza Pockets x 2

pizzapockets2sm

Sloppy Joes x 3

sloppyjoemeatsm

Here’s what I need to do to prep:

  • Soak oats/flour for breakfast cookies
  • Soak dough for apple pies and pizza pockets
  • Soak beans for burritos
  • Make whole wheat tortillas for burritos
  • Thaw five pounds of ground beef for enchilada bake and sloppy joes
  • Thaw/grate cheese for burritos and pizza pockets

In addition, I’d like to also prepare the following to simplify my life:

  • Homemade Chewy Granola Bars
  • Ranch  Dressing Mix x2
  • Italian Dressing Mix x2
  • Bunches of carrot sticks

I’ll post the results of my efforts (again, for the cooking, not the costumes) at the end of the week!

Heavenly Homemaker's Club Members: Access your homepage and all your fantastic resources here! Not a member yet? Please join us!

Menu Plan for the Week

March 28, 2010 by Laura 6 Comments

This post may contain affiliate links. For more information, please see our disclosure policy.

macandcheese2sm

I spent the weekend fighting a sinus infection. My Gratituesday post this week may be about how thankful I am for soft kleenexes, because you just don’t realize how much you appreciate the softness until you go through two entire boxes in three days. I promise I’ll write about something else for Gratituesday. But kudos to the folks at Puffs. Many, many thanks.

In other news, I have three weeks to make two puppy costumes, a goat costume and a pig costume. Our boys are in a Three Little Pigs musical, which is going to be SO STINKIN’ CUTE. But, making costumes is not my gift. Do you suppose they could just be super heroes? I have all kinds of super hero costumes already. Picture it:  Super Man comes in and saves the Two Little Pigs and The One Little Batman from the Big Bad Wolf and everyone lives happily ever after. The end. I like it. I’m going to talk to the director and see if she’ll go for it.

Just in case she doesn’t, does anyone want to come help me make costumes? 

And now, without any kind of nice segue, here is our menu for this week:

Sunday, March 28
Oatmeal, peaches
Soccer game – packed sandwiches, etc.
Creamy mac and cheese, steamed carrots

Monday, March 29
Simple soaked pancakes, blueberries
Bean and rice bowls with salsa and kreme fresh, oranges
BBQ meatballs, baked potatoes, green beans

Tuesday, March 30
Scrambled egg sandwiches, clementines
Spaghetti with meat sauce, tossed salad
Rice and veggie stir fry, pineapple

Wednesday, March 31
Warm chocolate soother, toast, apple slices
Beefy enchilada bake, fruit-kefir smoothies
Three cheese garlic chicken pasta, tossed salad, fruit

Thursday, April 1
Cinnamon swirl bread, pears
Salmon patties, steamed broccoli and cauliflower
Hamburgers on whole wheat hamburger buns, carrot sticks, apple slices

Friday, April 2
Spending the day with friends…meals??!!

Saturday, April 3
Scrambled eggs, toast, fruit
Tortilla meat and cheese wraps, carrots,apples
Chicken sandwiches, onion rings

There are just a few more hours to sign up for the Custom Blog Design from Delight Design giveaway! Hurry over and sign up!

Also, stop by and sign up for our newest giveaway for a $25 Gift Certificate from FBS Books!

Coming up on the blog this week…I’ve finally got new posts in BOTH the Becoming a Better Help Meet series and Our Healthy Eating Journey series! I’m going to try to get some extra cooking/baking in this week, so you can follow along with my progress. Plus be watching for a very crazy science experience I am conducting in my kitchen!!  Mwooohahahaha!
——————————————

Find more menu planning inspiration at Organizing Junkie!

Heavenly Homemaker's Club Members: Access your homepage and all your fantastic resources here! Not a member yet? Please join us!

Dinner or Supper – Question #62

March 26, 2010 by Laura 85 Comments

This post may contain affiliate links. For more information, please see our disclosure policy.

What happens when you tell your dad that you’ll be traveling home for a visit and will be there in time for dinner?

Well, in my case…he would expect my family to show up around noon. But in reality, we wouldn’t show up until 6ish. Oops.

This has certainly been a problem before. I have learned to be very specific about what I mean when I say “dinner” to my dad who lives in Kansas.

I grew up calling the noon meal dinner and the evening meal supper.  When I got married and moved to Nebraska, it seemed that most people called the noon meal lunch and the evening meal dinner. Therefore I defied the loving teaching I had been raised with my entire first 21 years of life and converted to become an evening time dinner eater. Why, I haven’t eaten supper in years. Oh, except for the last time I went to Kansas. I suppose then I had supper several nights in a row.

Maybe it’s a family thing. Maybe it’s regional. But what I want to know today is…

When do you eat dinner? Lunchtime or evening time? Ever showed up to someone’s house for dinner at the wrong part of the day?!

Heavenly Homemaker's Club Members: Access your homepage and all your fantastic resources here! Not a member yet? Please join us!

Homemade Chewy Granola Bars (without corn syrup!)

March 25, 2010 by Laura 420 Comments

This post may contain affiliate links. For more information, please see our disclosure policy.

Chewy Granola Bars. No corn syrup. Easy recipe. Grab-and-go snack option. Fantastic.

Chewy Granola Bars - No Corn Syrup

Every homemade chewy granola bar recipe I’ve ever seen includes corn syrup and/or marshmallow cream (not ingredients we feel okay about eating or feeding my family). Even most pre-made granola bars I have seen at the store (even the organic ones) have ingredients I don’t like feeding my family.

I finally figured out a chewy granola bar recipe that we like! It’s easy and includes all natural sweeteners and ingredients! These bars are way cheaper than store bought granola bars! Plus you can customize it according to your family’s taste and allergies! They can be easily wrapped individually to take in the car or packed in a lunch!

Homemade Chewy Granola BarsYum

5.0 from 2 reviews
Homemade Chewy Granola Bars (without corn syrup!)
 
Save Print
Author: Laura
Ingredients
  • ½ cup peanut butter or sunbutter
  • ⅓ cup honey
  • ¼ cup coconut oil (or another oil of your choice)
  • 1 cup oats
  • 1 cup total of any combination of: sesame seeds, coconut flakes, sunflower seeds, dried fruit, mini chocolate chips
Instructions
  1. In a medium sized saucepan, melt together peanut butter, honey and coconut oil.
  2. Remove from heat and add one cup of oats.
  3. Choose your favorite combination of coconut flakes, sesame seeds, sunflower seeds, dried fruit and mini chocolate chips, to equal a total of ONE CUP. (I just got out my one cup measuring cup and poured in the ingredients until the cup was full.)
  4. Pour in and stir well.
  5. Spread mixture into a 8x8 or 9x4 pan.
  6. Chill for two hours, then cut into bars.
3.4.3177

granola_bars_1

granola_bars_2

granola_bars_3

Wrap in plastic wrap for a quick grab and go snack!

granola_bars_4

Many have said that these taste similar to the oldie-but-goodie No Bake Cookie recipe we’re all familiar with. How fun that these are quite a bit healthier!

I’ve found that these keep best in the fridge as they get a little bit too soft if left out for too long. What a perfect grab-and-go snack!

Heavenly Homemaker's Club Members: Access your homepage and all your fantastic resources here! Not a member yet? Please join us!

How Much Should You Pay Your Babysitter? A Guest Post

March 23, 2010 by Laura 54 Comments

This post may contain affiliate links. For more information, please see our disclosure policy.

Today’s post is by Craig Ford from Money Help For Christians. Craig is a missionary overseas who writes about issues related to faith and finances. If you read his blog you’ll learn about things like how to afford to be a stay at home wife. Since I’ve never had a CLUE how much to pay a babysitter, I am SO excited about his guest post today!!
—————————————————–

One of the reasons why some people don’t like to get babysitters is because they are clueless about the going rate. They want to pay the babysitter a decent amount, but they also want to be sure they are are not overpaying the babysitter.

One way around a paid baby sitter is by forming a frugal community. This way you can share babysitting responsibilities, and the best part is that no one pays anything.

However, there will still be occasions where you need a babysitter.

A Guide For Determining How Much To Pay Your Babysitter:

  1. Ask your babysitter – If you are contacting a new babysitter, don’t be afraid to ask about their usual rate. Some babysitters have an hourly rate set.
  2. Ask your friends – If you have a new baby, call someone in your church and ask them what they typically pay for a babysitter. If the amount sounds off, make a couple of calls so you have a point of comparison.
  3. Check online – The babysitter rate calculator allows you to enter your zip code, age of the sitter, and their years of experience, and they will give you a suggested rate. I was shocked to see an 18 year old with a couple of years of experience suggested $13.25. Either I’ve lived overseas too long, or I’m in the wrong business. On the other hand, an About.com article suggests we pay babysitters between $4 – $12 per hour. In general, on Yahoo answers, the consensus was much lower – closer to $5-$6 for a babysitter.
  4. Compare it to other typical teen jobs.  What is McDonald’s paying new workers?

Factors that Influence Babysitter Pay:

  • Age of the babysitter – Obviously, your 12 year old neighbor is going to make less than a 19 year old college student.
  • Number of kids – Are you a Cheaper By the Dozen family? Well, you’re really going to pay for it.
  • Age of the kids – The younger and more dependant they are, the more it is going to cost.
  • Is your kid difficult? Some babysitters deserve more money just because your kid is a lot of work.
  • Special needs – Do you need a babysitter with any special qualifications? If so, the sitter should be compensated accordingly.
  • Time of day – If the kids are going to be sleeping for 1/2 of the night, then the babysitter does not need to be paid as much.
  • Weekends vs. Weeknights – Weekends cost more.
  • Location – How far do you live from your babysitter? Does he or she need to drive a long distance? Are you providing transportation?
  • Are you exchanging anything else? Providing the babysitter a meal or allowing them to do their laundry is a good way to offer a non-financial incentive.

We all know raising kids can be expensive. However by saving money while raising young kids we can always make a dollar go just a little bit further. So here’s ..

5 Ways to Reduce Babysitting Costs:

  1. Find someone you know.  Teenagers at church often already have a relationship with your kids and are happy to do it for a service with less pay. Just don’t take advantage of them.
  2. Offer non-financial benefits.  This could include making the job easier by setting rules for your kids. Rent their favorite movie for after the kids go to bed. Cook their favorite meal. Tutor them.
  3. Go out on week nights.  Babysitters are in less demand during the week.
  4. Move overseas.  I pay my babysitter $1.25 per hour, and that’s double minimum wage! Still, I’m not sure that babysitting rates are a big enough reason for moving overseas. What do you think?
  5. Plan at home dates.  For several months, one night a week my wife and put the kids to bed and then cooked a late dinner together. Creativity can make an at home date a lot of fun. Anytime you avoid the restaurant you save money.

How much do you pay your babysitter? What do you think is a fair rate? How do you determine how much to pay your babysitter? How do you reduce babysitting costs?

Heavenly Homemaker's Club Members: Access your homepage and all your fantastic resources here! Not a member yet? Please join us!
« Previous Page
Next Page »

Join Our Community!

 Facebook Twitter E-mail Instagram Pinterest

Popular Posts

~ Will All of the Real Moms Please Stand Up?
~ Easy! Stir-and-Pour Whole Wheat Bread
~ How to Make Gatorade
~ 31 Real Food Breakfast Ideas
~ Dear Teenage Girls...
~ When Mom Takes a Step Back
~ The Inexpensive Health Insurance We Love!
~ Let's Talk Real Food Grocery Budgets

Check out our latest posts!

  • Big Family Food and Fun: June 7-13, 2026
  • Big Family Food and Fun: May 31-June 6, 2026
  • Big Family Food and Fun: May 24-30, 2026
  • Free 7-Day Summer Menu Plan
  • Big Family Food and Fun: May 17-23, 2026
Home  ~  Simple Meals  ~  Club Membership  ~  Shop  ~  Privacy Policy  ~  Disclosure  ~ Contact

Copyright © 2026 · Beautiful Pro Theme on Genesis Framework · WordPress · Log in