Heavenly Homemakers

Encouraging women in homemaking, healthy eating and parenting

  • Home
    • About
    • FAQs
  • Recipes
    • Bread and Breakfast
    • Condiments
    • Dairy
    • Main Dishes
    • Side Dishes and Snacks
    • Desserts
    • Gluten Free
    • Instant Pot
    • Crock Pot
    • Heavenly Homemaker’s Weekly Menus
  • Homemaking
    • Real Food Sources
  • Store
  • Contact
    • Advertise
    • Disclosure
    • Privacy Policy
  • Simple Meals
  • Club Members!

The little Green Project: Our Garden

March 13, 2009 by Laura 20 Comments

This post may contain affiliate links. For more information, please see our disclosure policy.

littlegreenproject.jpg

It’s almost time to plant our garden!

Just as soon as the ground thaws out long enough to be tilled. 

Just when it seemed that spring was coming to Nebraska…we woke up to days and days worth of freezing cold weather again.

Oh Sunshine…I need you. Where did you go? Where are you now?

Okay…enough whining (hopefully). Some day soon it will be so hot I won’t even want to turn on the oven to make brownies. (yeah, right)

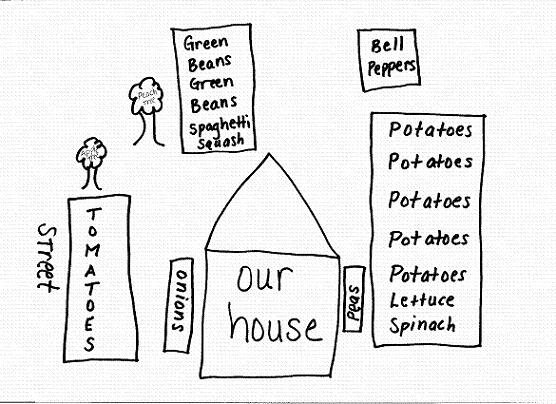
So, just pretending that I really will be able to get my hands into some soil soon…here’s the garden plan we drew up. We try to rotate our crops each year. By the way…I have several different garden spots. We started with one when we first moved here…but every year we keep tilling up more because we just want more…MORE! We’re saving a little bit of yard for soccer playing though. Aren’t we nice?

garden091.jpg
(Well…you know my  name is Simon…
and the things I draw come true
…) 
(PLEASE tell me you remember that song!! Or am I just that old?)

So, I can’t draw as well as Simon…but I did my best. (Yeah, it’s pitiful, I know.)

And, obviously I didn’t take the time to draw this to scale. There’s actually a good bit of yard between “onions” and “tomatoes” that is our official soccer playing field. In the picture I drew, it looks like I’d have to shimmy sideways through that area to get through.

Someday when things are green and lovely (but before the weeds have grown in) I’ll take you on a tour of our yard. Until then, you get to see my little garden drawing. 

We’re also hoping to plant a bunch of sweet corn with a friend who has a larger garden area…we’ll see if that works out!

Sooooo, are any of you planting a garden this year?? What are you planting? 
——————————————

Let’s see YOUR little Green Projects this week! Working on going green, saving green, eating something green, making some extra green….ANYTHING green? Blog about your little Green Project then come link up with us here! 

[blenza_autolink code]

Heavenly Homemaker's Club Members: Access your homepage and all your fantastic resources here! Not a member yet? Please join us!

How to Make Fresh Butter

March 12, 2009 by Laura 128 Comments

This post may contain affiliate links. For more information, please see our disclosure policy.

If you recall, last week when I showed you how to make mozzarella cheese, I mentioned that if you’re making it from raw milk, you skim off the cream and save it to make butter. HERE is one way to make butter!

butter1sm.JPG

Yum

Fill your food processor 1/3 full of heavy cream. Be sure not to fill it more than 1/3 full…it will probably not turn into butter if there’s too much in the container.

butter3sm.JPG
Turn your food processor on high…and then flee the room. (It’s really loud and annoying!)  The food processor will whip and whip and whip the cream until it turns it into butter. It should take somewhere between 8-15 minutes.

butter4sm.JPG
Once the fat has been “pulled out” of the cream, it should look something like this…and you can turn off the food processor.

butter5sm.JPG
Pull all the solid pieces and squish them together. 
Place the solids in to a clean bowl.

butter6sm.JPG
 Run some clean COLD water into it.

butter7sm.JPG
Clean the butter with the cold water by squishing it with a wooden spoon until all the liquid comes out of it. Repace the cold water 2-3 times as you clean it.

butter8sm.JPG
Squeeze the excess water out of the butter and shape it with your hands.

butter9sm.JPG
Ah, look…a lovely little butter ball.

You can add salt to the cream if you want salted butter…this will also be a preservative, making the butter last longer.

OR…if you don’t have a food processor and want to have a little family fun…put your cream into a jar and shake it like crazy. Pass the jar around, and take turns shaking it. (I’ve tried shaking it all by myself once when no one was around to help…and I thought my head and arms would fall off from shaking the jar so much all by myself. I don’t think I ever got butter out of that jar.)

Have you ever made butter before?  Isn’t it COOL to see the butter form out of the cream!? 

I LOVE how with just one little gift from a cow (or goat or whatever) you can make SO MANY great yummy things!

P.S. Even if you don’t have fresh cream…go buy some heavy whipping cream at the store and try making butter. It’s just…cool.

Next week…RICOTTA CHEESE! :)

(Join us Saturday for the little Green Project!)
——————————————-

This post is linked to Frugal Fridays.

Heavenly Homemaker's Club Members: Access your homepage and all your fantastic resources here! Not a member yet? Please join us!

I am…Soccer Mom (But Please Make Sure I Stay on the Side Lines)

March 11, 2009 by Laura 7 Comments

This post may contain affiliate links. For more information, please see our disclosure policy.

I live with five male people who love…live…eat…drink…and sleep…soccer.

And I love it.

I’m just not very good at it myself.

I’ve tried. Because I think the idea of “family games of soccer” sound like such a fun thing to do. And because everyone else loves it so much. 

Sometimes I get brave and go outside to play a game with the boys. They usually say things like, “Are you gonna play too, Mom?” What do you think that means exactly? That they are excited that I am actually putting down the bowls and the butter to join them for a game….or that they are sure that now that Mom is here the fun will be over??

As the game begins…I feel alive and exuberant and full of energy and with-it-ness. About thirty seconds in…I remember how old I am. By the time one minute has passed I start thinking about how sore I’ll be tomorrow. After a minute and a half…I start asking for a time-out, so that I can…you know…discuss the playing strategy with my teammates.

After two minutes, fear begins to creep in…telling me that there’s a good chance that my body will continue to move forward in an effort to reach the ball…but instead of making my feet stop appropriately, I will run smack into a tree. 

It is then that I’m hit with the glaring realization that our health insurace plan is not even close to being good enough for me to continue to try to run after a rolling ball alongside four little boys, each with the ability to always get to the ball before I do.

So, instead of joining in the game anymore…I decide that surely I can kick a few goals to my sons so that they can improve their goalie skills. Yes, I think to myself. I’ll just stand there and kick balls to them. That I can handle.

Excited about this new idea…the boys and I move two stumps to form goal posts.

I watch the boys shoot goals at each other for a while. It looks pretty stinkin’ easy. Just kick the ball forward a few feet. Hey, I say, give me a turn now.

They smile at me with excitement as I walk confidently up to the ball. One boy readies himself in the “goal box”. 

Wait a second, I say to the boys. Which part of my foot should I kick with for a shot like this…the top or the side? (Because at least I know enough that I shouldn’t toe bash it.)

The boys come over and proceed to give me a ten minute (not an exaggeration) tutorial on the proper way to kick a ball at the goal from this particular distance. Wow, I think. Matt is doing a really good job teaching them the finer points of soccer. And while they can hardly remember to put the seat down after they use the toilet…they sure can remember every piece of soccer admonition they have ever received from their daddy.

I patiently listen for the entire ten minutes…then I calmly ask again, “Okay, so which part of my foot should I kick with?”

Finally ready to give it a go…I back up a few paces from the ball. One boy puts himself back into goalie readiness. The other boys say nice things like, “Go Mommy” and back out of the way.

I pull in a deep breath, take a look at the goal, and feel totally confident that I can kick the ball straight into it. My only hope is that I don’t kick it so hard as to hurt the boy in the goal box.

I take a few bounds toward the ball, rear my foot back and kick. 

The ball limps pitifully to the left for a few short feet and then spins slowly to a stop.

The boys glance at me with raised eyebrows and a look that seems to say, “Um…I’m not going to laugh…but I also don’t have any idea about what I should say to you right now.”

I rescue them by saying, “Well…that’s all for me today. I better go in and work on dinner.”

The boys shrug, grin and decide who’s turn it is to kick the ball next as they watch me go into the house to do what I’m oh so much better at doing.

I still don’t know which part of my foot I kicked that ball with. But I’ll probably know tomorrow when the soreness kicks in.

I’d love to know how it works for YOU when (if) you play sports with your kids!?

Heavenly Homemaker's Club Members: Access your homepage and all your fantastic resources here! Not a member yet? Please join us!

The Joy of Boys

March 11, 2009 by Laura 8 Comments

This post may contain affiliate links. For more information, please see our disclosure policy.

If you haven’t been over there already…you may be interested to read a guest post I wrote for Lindsay at Passionate Homemaking on the Joy of Raising Boys. Lindsay just gave birth to her first baby boy last week!

Heavenly Homemaker's Club Members: Access your homepage and all your fantastic resources here! Not a member yet? Please join us!

High Five Recipes: Ranch Potato Wedges

March 10, 2009 by Laura 47 Comments

This post may contain affiliate links. For more information, please see our disclosure policy.

High Five Recipes 2

Here’s a simple recipe that you can serve with just about everything! Really…these Ranch Potato Wedges are a great side dish with any meat (steak, chicken, hamburgers, meatballs, fish…).

They are a perfect thing to make to go with your lunch…they are a super easy side dish to make with dinner. Good grief…you could even scramble up some eggs with them and serve them at breakfast or brunch.

Like many of the High Five Recipes…this recipe takes just a few minutes to prepare.

Ranch Potato WedgesYum

4 medium sized potatoes
1 Tablespoon mayonnaise (I use Hain Safflower mayonnaise)
3 Tablespoons Ranch Dressing Mix

Scrub potatoes and slice into eight wedges each. Stir together mayonnaise and ranch dip mix in a large bowl. Toss potato wedges in mixture until coated. Lay wedges singularly on a cookie sheet. Bake at 400 degrees for 35-40 minutes.

ranchpotatowedgessm.jpg
I am SO hungry now for a meatball with Ranch Potato Wedges!

What do you think…could you serve these with just about anything? What would you serve them with?

The next High Five Recipe I’ll share is the promised Peanut Butter Honey Fudge!

Heavenly Homemaker's Club Members: Access your homepage and all your fantastic resources here! Not a member yet? Please join us!

The Best Reason to Make Donuts

March 10, 2009 by Laura 11 Comments

This post may contain affiliate links. For more information, please see our disclosure policy.


chocolatedonuts4sm.JPG
Check out that hand snitching a donut!!

One of my favorite things to do with the boys is read. We’ve discovered so many great books…mostly through the Sonlight curriculum guide. And…even though our boys are so very interested in doing anything BUT sitting down and being still…they love listening to me read good books. I’m amazed that after sitting still and listening for an entire long chapter of a book…they’ll sometimes ask me to keep reading!

Monday we started reading Homer Price. Have you read Homer Price? If you have daughters, I think they’ll like it. If you have sons….they will LOVE it! Our boys can’t get enough of this book. We’ve almost finished it already!

There’s a great chapter in the book about Homer making donuts with his uncle’s donut machine…SUCH a fun chapter! The donuts got out of control!! Of course, what do you think we had to do after reading it, but make a big batch of donuts for an afternoon treat!

chocolatedonuts3sm.JPG

I love how books not only make you lose yourself in adventure…they also inspire you to want to create adventures of your own. In this case…our adventure was in Chocolate Donuts! (If only all of our life’s adventures included chocolate…)

We made our donuts using this Whole Wheat Donut recipe…then drizzled some leftover chocolate frosting I had in the fridge. Here’s the frosting recipe:

Simple Fudge Frosting

2 1/2 cups powdered sugar
¼ cup cocoa
¼ cup butter
¼ cup water
½ t. vanilla

Stir powdered sugar and cocoa together in a bowl. In a small saucepan, melt butter. Add water and bring to a boil. Pour boiling water and butter into powdered sugar and cocoa. Add vanilla. Beat with hand mixer until frosting is combined.

Since I had some leftover in the fridge already, I added a little water, heated it on the stove…and drizzled it over the hot donuts. YUM!!!!

chocolatedonuts5sm.JPG

chocolatedonuts2sm.JPG

Do ya like Malachi’s little Tarzan costume?! Seems like he was having another kind of creative adventure before we even started making donuts!

Heavenly Homemaker's Club Members: Access your homepage and all your fantastic resources here! Not a member yet? Please join us!

Gratituesday: Grace that is Amazing

March 9, 2009 by Laura 18 Comments

This post may contain affiliate links. For more information, please see our disclosure policy.

gratituesdayspring2.jpg

You know how you can hear something your whole life and understand it and appreciate it and be happy about it…

And then you hear it again and think more deeply about it…

And the idea suddenly seems new to you?

That’s how I feel about grace this week.

I’ve known that I was saved by grace. I’ve been thankful that Jesus loved me enough to die for me…extending his grace to me. I’ve understood that my salvation was a gift because of the grace of God.

Oh, but sometimes it’s just good to sit and think about what that all means. My Nana sent me a link to the song Amazing Grace  sung by Il Divo last week…it’s beautiful. (I’m sorry I wasn’t able to embed the code for you here…you’ll have to just click over and listen.)

Grace.

Amazing grace.

That saved a wretch as me.

I once was lost…but now I’m FOUND!!

Was blind but now I see!

Old familiar song….unending beautiful message.

I’m so grateful for God’s grace…that is quite simply…amazing.
———————————————

What are you thankful for this Gratituesday? Read the details here, then come link up with us so that we can all read about what you are thankful for! If you don’t have a blog, please leave a comment letting us know what you’re grateful for.

[blenza_autolink code]

Heavenly Homemaker's Club Members: Access your homepage and all your fantastic resources here! Not a member yet? Please join us!

Some More Cheesy-ness

March 9, 2009 by Laura 8 Comments

This post may contain affiliate links. For more information, please see our disclosure policy.

I thought I’d take a little time to answer questions from my mozzarella cheese making post:

1. Have you ever found rennet or citric acid at a pharmacy or local store?

No, I haven’t…but I don’t have a lot of options in the smallish town I live in. I have found citric acid at a bulk food store I like to visit on my way to visit family in KS…otherwise…I just rely on my online resources. What in the world did Ma Ingalls do without the world wide web?

2. I’m curious as to what your outcome is in quantity. How many cups of cheese? Cups of whey? …

I usually get about three eight ounce (ish) balls of cheese when I start with two gallons of milk. There is a ton of whey leftover (how many cups are in a ton, do you suppose?). More accurately, I’d say it’s around a gallon, maybe?

3. Can you shred that mozarella to use on pizza and stuff?

Oh yeah! My kids like for me to just cut off hunks of it for them to munch on, but I shred it and put in on our pizza, definitely. It doen’t shred quite as easily or melt quite as well as store bought but it works well enough. It’s kinda string-y…a lot like string cheese. I need to try to make cheese sticks sometime with it!

4. What about cheddar? Can you teach us that one too?

Oh, how I wish I could. Cheddar is a whole-nuther process. It requires (as far as I understand) a cheese press and other equipment…plus it has to age for several months. It’s not nearly as “easy” as mozzarella and I don’t know if I’ll ever be able to learn it. If I do, you’ll be the first to know! For now, I’ll stick with Landmark Raw White Cheddar…it is SO good. (BTW, don’t most of us say whole-nuther, even though it’s not even a word? I think it should be a word.) 

5. Are you an Italian or a Nebraskan? Both?

Actually…neither. (Well, I guess I am an official Nebraskan now)  (Go Huskers!)  Born and raised in Kansas…there’s not a lick of Italian blood in me (as far as I know). Which proves that you (yes, you) also have what it takes to make mozzarella cheese all by yourself. It’s realllllly not that difficult…and it’s realllly cool and fun to try. 

Oh…and it’s also my favorite thing to say to people when they can do something I can’t (like drive a stick shift or answer questions correctly when we play Trivial Pursuit).

“Oh yeah?” I say. “Well I can make mozzarella cheese. Betcha can’t do that? Huh, huh?”

Okay, I don’t really say that. Usually. At least I don’t say it out loud.

Sounds like a whole-nuther issue of mine to deal with doesn’t it?

;)
———————————————-

Heavenly Homemaker's Club Members: Access your homepage and all your fantastic resources here! Not a member yet? Please join us!

Menu Plan for the Week

March 8, 2009 by Laura 8 Comments

This post may contain affiliate links. For more information, please see our disclosure policy.

You should see my freezer!

We had been running low on hamburger meat, so I ordered some from our great Nebraska source, North Star Neighbors. I figured that while I was ordering and paying a delivery fee, I might as well order some stew meat and cube steak. And while I was at it I should get some chickens too. So…last week two great big boxes of meat showed up on my door step!

PLUS…Smart Chicken brand boneless skinless chicken breasts have been on sale at our grocery store for $2.49 a pound (WOW!) so I bought the entire shelf a lot of packages. Here’s part of it:

smartchickensm.JPG
P.S. Matt looked up from his work at the computer while I was taking this picture and said, “Oh, did you get a good deal on chicken?” It was at this moment that I realized that only a weird food blogger such as myself takes a picture of her chicken before she puts it into the freezer. Oh the stories my husband could tell. 

AND…it just so happened that this very same week, the lamb I ordered was ready to be butchered.

So, now our freezer is very full of meat. I love having so many choices for meals!

Sunday, March 8
Oatmeal, toast
Beef stew, cornbread
Leftover homemade pizza, cantaloupe

Monday, March 9
Whole wheat waffles
Homemade chicken nuggets and fries
Grilled salmon, stir fried rice and veggies

Tuesday, March 10
Mini breakfast pizzas, oranges
Cheeseburger mac, steamed carrots
Chicken fried steak, mashed potatoes, gravy, peas

Wednesday, March 11
Applesauce bread, bananas
Sloppy joes, deviled eggs, carrot sticks
Roasted chicken, ranch potato wedges, green beans

Thursday, March 12
Kefir-fruit smoothies, toast
Alphabet soup, homemade soft pretzels
Leg of lamb, baked potatoes, steamed broccoli and carrots

Friday, March 13
Blueberry muffins, applesauce
Bean dip with tortilla chips, pears
Lamb-burgers on homemade buns, onion rings

Saturday, March 14
Giant breakfast cookies
Mashed potato pancakes, cottage cheese and peaches
Lasagna, tossed salad, corn

Well…it seems that Ranch Potato Wedges wins the vote for the next High Five Recipe you’d like me to share. Be watching for that this week! 

Thanks to everyone who joined in and shared a little Green Project over the weekend! Be sure to plan on joining us again this weekend for another round of green!

If you haven’t signed up to win an iPod Touch…or a Card Design from Hinton Creations….HURRY…the giveaways end Monday!

Heavenly Homemaker's Club Members: Access your homepage and all your fantastic resources here! Not a member yet? Please join us!

The little Green Project: Mint Milkshakes

March 6, 2009 by Laura 13 Comments

This post may contain affiliate links. For more information, please see our disclosure policy.

When I announced the little Green Project in this post…Sarah admitted,

“Whenever I think of green in March I think of Green shakes at McDonalds. (Horrible I know, but they are so yummy!)”

I haven’t had one of those in forever, in fact I forgot they existed. BUT, since she brought it up, that’s all I’ve been able to think about. Mmmm! Shamrock Shakes.

SO, I did what I MUST. I tried to re-create a minty milkshake. They aren’t the healthiest things on the planet…but because I knew the ingredients in them I KNOW they’re healthier than the McD’s version.

And because I made them myself, I know they’re less expensive than the McD’s version, so I saved some green.

Okay, so my milkshake isn’t green. I tried to find some fresh mint, but I wasn’t successful. I had to use mint extract instead.

mintmilkshakesm.jpg

Hey, if you want to add green food coloring…I’ll look the other way. 

Instead, I put a green straw in mine and took a picture of it on my green tea towel. 

We all found this milkshake to be SO refreshing and a very fun treat (that I’ll probably make once a year…sometime in March.)  My men love it when I experiment with recipes for you. :)

March Minty Milkshake (Oh how I love coming up with ridiculous recipe titles)

3 cups vanilla ice cream (unless you’re using homemade, I recommend Breyer’s ice cream since at least it uses real ingredients)
1 cup whole milk
1 1/2 t. pure mint extract

Mix all ingredients well in a blender. Makes 4 one cup servings.

So that was my fun little Green Project this week. What fun little Green Project did YOU come up with to share? 

Blog about anything green…saving green, eating greens, crafts that are green, ANYTHING you want to that has any possible thing relating to the color green. Link up with us here so that we can come read about YOUR little Green Project!

[blenza_autolink code]

Heavenly Homemaker's Club Members: Access your homepage and all your fantastic resources here! Not a member yet? Please join us!
« Previous Page
Next Page »

Join Our Community!

 Facebook Twitter E-mail Instagram Pinterest

Popular Posts

~ Will All of the Real Moms Please Stand Up?
~ Easy! Stir-and-Pour Whole Wheat Bread
~ How to Make Gatorade
~ 31 Real Food Breakfast Ideas
~ Dear Teenage Girls...
~ When Mom Takes a Step Back
~ The Inexpensive Health Insurance We Love!
~ Let's Talk Real Food Grocery Budgets

Check out our latest posts!

  • Big Family Food and Fun: June 14-20, 2026
  • Big Family Food and Fun: June 7-13, 2026
  • Big Family Food and Fun: May 31-June 6, 2026
  • Big Family Food and Fun: May 24-30, 2026
  • Free 7-Day Summer Menu Plan
Home  ~  Simple Meals  ~  Club Membership  ~  Shop  ~  Privacy Policy  ~  Disclosure  ~ Contact

Copyright © 2026 · Beautiful Pro Theme on Genesis Framework · WordPress · Log in