
Italian Stew
1 pound chopped stew meat
6-8 medium potatoes, scrubbed and cut into bite sized chunks
2 cups frozen green beans
2 T. dry Italian dressing mix
Stir together all ingredients in a crock pot. Cook on low for 3-5 hours.

Encouraging women in homemaking, healthy eating and parenting
Italian Stew
1 pound chopped stew meat
6-8 medium potatoes, scrubbed and cut into bite sized chunks
2 cups frozen green beans
2 T. dry Italian dressing mix
Stir together all ingredients in a crock pot. Cook on low for 3-5 hours.
 Heavenly Homemaker's Club Members: Access your homepage and all your fantastic resources here! Not a member yet? Please join us!
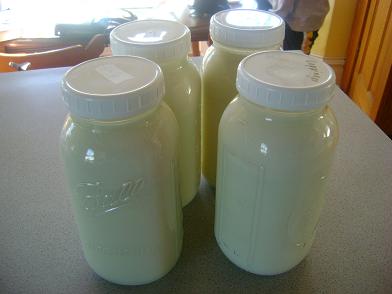
Want to know what makes me excited (besides little plastic drawers)? The fact that with only two gallons of milk…I can squeeze out THREE great dairy products. With the two gallons of raw milk you see pictured below, I was able to make three eight ounce balls of mozzarella cheese…a half pound of butter…and about a cup of ricotta cheese.
Talk about milking something for all it’s worth! (Whoa…very cheesy joke.) (Which I feel is appropriate because this post is about making…cheese. Cheesy-ness abounds.) Anyway…
Even if you don’t think you’ll ever make your own mozzarella cheese…you may still have fun reading about how it’s made!
To make Mozzarella Cheese you will need:
Okay, ready to make cheese? You’ll need to block out about two and a half to three hours of time…but most of that time is wait time, not work time!
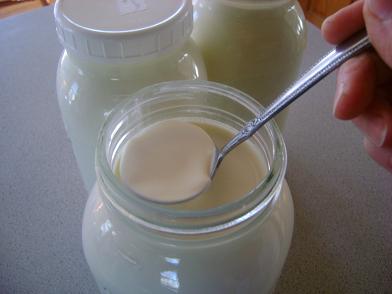
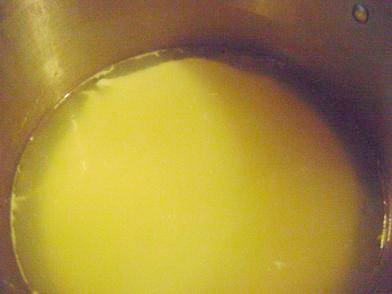
First, if you’re using raw milk…skim off the cream. You know I’m usually big on leaving in the fat…but the fat separates itself out of the cheese while you’re making it for some reason. So, skim it off, put it into another jar and save it for making butter!

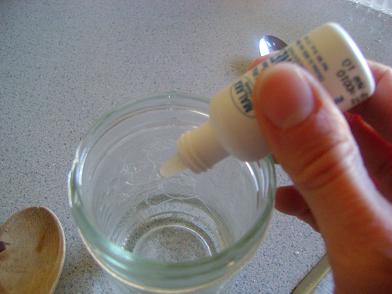
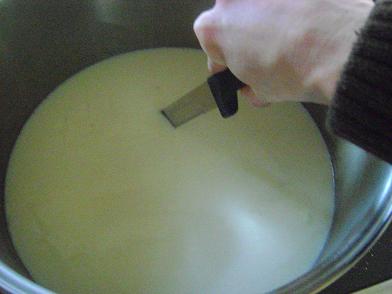
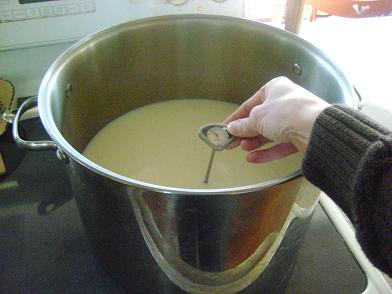
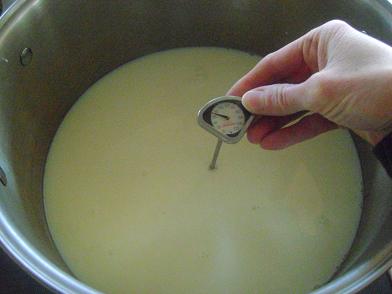
Pour the milk into a large pot (I use my big stock pot). Stir in the buttermilk and citric acid mixed with water. Heat to 91 degrees. Remove from heat, put the lid on and let it sit for one hour.
Add the rennet mixed with water to the milk. Allow it to sit for at least 15 minutes, or until the milk solidifies slightly and it able to be “sliced”.
Use a long knife to “cut the curd” into one inch squares.
Let the curd sit about five minutes.
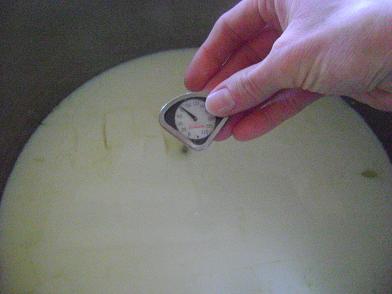
Heat the curd to 91 degrees. Remove from heat, place the lid on the pot and allow it to sit for one hour. After one hour, the curd and the whey should have separated.
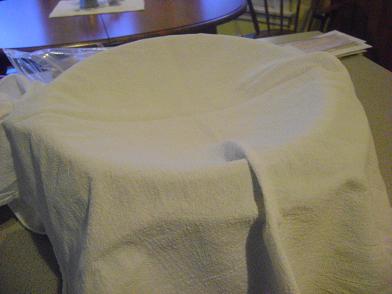
Place a strainer into another large pot and cover it with a tea towel.
Pour the curds into the strainer/tea towel…straining out as much whey as you can. Save the whey!!
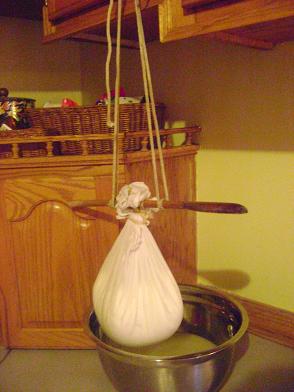
Rig up something fancy like this to hang your curds, making sure you have a bowl underneath to catch more whey that will drip out. I usually leave mine overnight as it takes several hours for all of the whey to be removed.
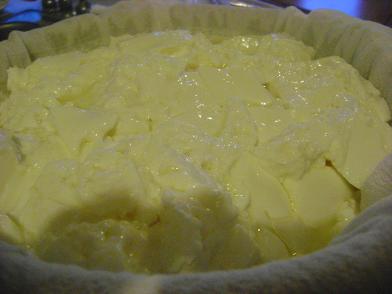
In the morning…remove the tea towel. Wow, a big hunk of cheese! Now…the fun part begins!
In your large pot…heat one gallon of water mixed with 1/2 cup salt. (Hint: I use Redmonds Real Sea Salt and it can be too chunky if I don’t try to dissolve some of it first. Therefore, I put my water and salt into a jar and shake it well, then pour it into the pot. The residue from the salt remains in the jar, leaving only salty water…without chunks!
Heat the salt water to 170 degrees. Meanwhile…
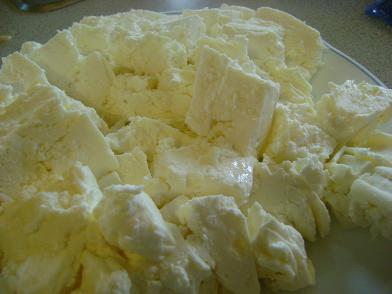
Cut the cheese (oh, my boys think it’s SO FUNNY when I say that…) into 1-2 inch squares.

Once your water reaches 170 degrees, remove it from the heat and dump in your cheese. Kind of stir it around for a minute or two until the cheese softens and begins sticking together.
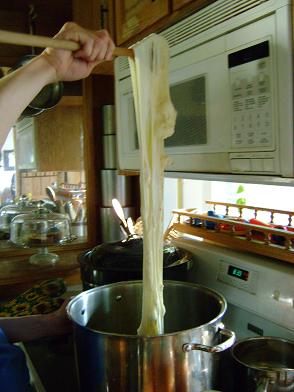
Use a big wooden spoon to catch the cheese from the water. It should start sticking together and forming a blob on your spoon. Stretch the cheese. This part is SO COOL!! Dip it down into the hot water every once in a while to reheat the cheese so that it will continue to stretch, but try not to keep it in the water too long. Keep on stretching and dipping the cheese until it is shiny. This stretching process will take about 8 minutes. (Every once in a while I get a batch of cheese that just won’t stretch. It’s a bummer. The cheese still tastes fine…it just doesn’t look as pretty, shred as well, or melt as nicely. We eat it anyway!)
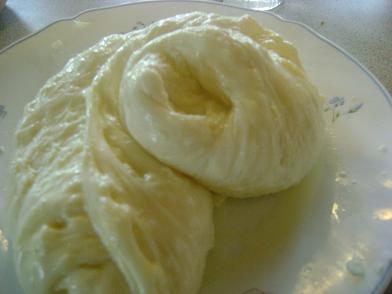
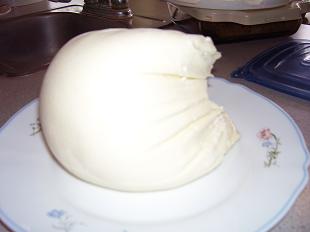
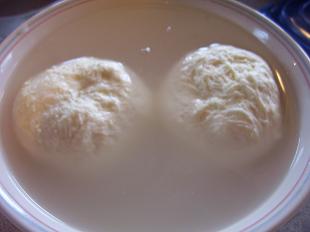
After you’ve stretched your cheese and it has formed a big long shiny wad, take it out and put it onto a plate.
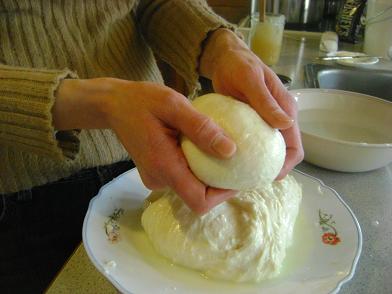
I divide my cheese into three blobs. Squeeze out the excess water and shape the cheese into nice balls.
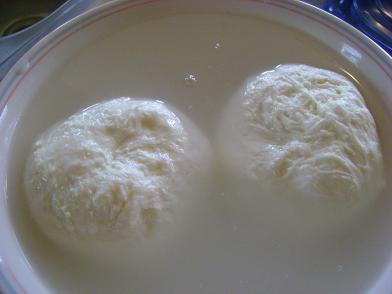
Place the balls into a bowl of cold water. This will take out the heat and help them hold their shape.

Tada!!! Mozzarella Cheese!
I’ll take time during my next two Frugal Friday posts to share how I make butter with the leftover cream…and ricotta cheese with the leftover whey!
So…have you ever made cheese before? Do you think this process looks like something you could do? You wanna come over and make cheese with me some time? (Then we can say “cut the cheese” together and laugh like we’re really funny.)
———————————————-
Heavenly Homemaker's Club Members: Access your homepage and all your fantastic resources here! Not a member yet? Please join us!
To those of us with children….
Here’s what I’ve discovered as I’ve been trying to love on and minister to others while I raise kids: Kids make it easier.
Usually.
Sometimes they make it harder. (Like, it’s harder to load everyone up and take everyone to an event when you have a nursing baby and two in diapers and one who’s potty training and one with a runny nose…) Your family comes FIRST, so make sure you’re meeting their needs first before you run out and start ministering to others.
But…if you have kids…please don’t use that excuse to avoid all other ministries. There are simple ministries you can be involved in and your kids can make it easier for you because their cute little selves can break the ice with the people you’re ministering to. They give you something to talk about besides the weather.
In case you missed it, I wanted to share Kari’s comment from this post:
Let’s not miss the fact that our children are little ministers too: children with a mission. I find all the time that my baby is a “conversation starter” if you will. I get to say things like, “I am so blessed to have this baby in my life” and “God is so good” just in response to some simple questions about the cute kid in my cart.
So, if you have kids…minister with them.
The first time I realized that kids were little ministers was on a tragic day that our friend’s husband was killed in a farming accident. Asa was a baby at the time and we went to see the grieving family. I was trying my hardest to keep Asa quiet and still in my arms while we hugged the family and visited. Finally I decided to put him down to crawl because he was getting restless in my arms. He immediately crawled over the the woman who had just lost her husband. Inwardly I cringed, thinking that the last thing this woman needed was a wiggly nine month old to crawl into her lap and slobber on her.
She reached down and picked him up, snuggled him, talked to him…and then guess what she did? She smiled.
Asa, as a nine month old innocent baby, brought joy and comfort to this woman who had just lost her husband.
After that moment, I have worked to involve my kids as much as I can when I do something for others.
If you are taking a meal to someone, let them help you cook. Talk with them about what you are doing. Ask them questions like, “We’re taking dinner to Johnny’s family. What kind of yummy food do you think Johnny would like?”
Encourage them to make cards for people. Who wouldn’t love a homemade card from your kids?
Help them learn to be comfortable around older people and sick people.
Use wisdom of course in involving your kids….but I really think that the best way they will learn to see people’s needs and meet them is by watching you and working with you. By the time they are adults, serving others will be natural to them.
Have you found that your kids (or someone else’s kids) are good conversation starters when you visit with people? What are some ways you’ve involved your kids in ministries?
———————————————-
Join Amy for Finer Things Friday.
Heavenly Homemaker's Club Members: Access your homepage and all your fantastic resources here! Not a member yet? Please join us!Last Monday, at the beginning of the day, our house was a mess. I don’t know how that happened because usually we clean on the weekends so we can start our week off right. But somehow this particular Monday came upon us with messes everywhere.
SO, we got busy. Along with teaching the boys school and feeding everyone…and doing all the other normal things I usually do during the day…the boys and I also spent a lot of time tackling the upstairs bedrooms.
We swept, vacuumed, dusted, rearranged beds, washed sheets, remade beds with clean sheets and put away books and toys. By dinner time, the upstairs looked great!
After tucking the boys in that night, I came down to the living room and plopped down on the couch…exhausted. I leaned my head back to relax and looked up at the ceiling.
Do you know what was on my ceiling?
Cobwebs.
The nerve.
I immediately began to feel discouraged about keeping up with everything…or rather with the fact that it is SO HARD to keep up with everything.
Then I was reminded of something my sister-in-law Kari and I visited about a couple of months ago.
Instead of focusing at the end of the day on all the things you didn’t get done…think instead of all the things you DID get done.
As long as you were working hard and being productive all day…there is nothing to feel bad about.
If the laundry isn’t done…but you worked hard and loved on your family, then your priorities are in the right place.
After you get a good night’s sleep you can start to tackle the rest of your undone list tomorrow.
For tonight…rest well knowing you did a good job today.
So…what DID you get done today?! (I bet it was a lot!)
————————————-
Read more Works For Me Wednesday posts here!
Heavenly Homemaker's Club Members: Access your homepage and all your fantastic resources here! Not a member yet? Please join us!
If I keep talking about spring coming…will it actually happen?! I thought a new spring Gratituesday banner was in order…since it’s March now and spring will be here somewhere between 10 and 109 days.
What’s the weather like where you live? Are you looking forward to spring like I am?
I love the change of seasons. I’m glad I live in a place where we have a definite four seasons. (Although sometimes it seems like we only have two seasons…Summer and Winter…with two days of fall and two days of spring sandwiched somewhere in between).
Usually by now, I am so sick of winter I can hardly stand to be around myself. Guess what? I haven’t felt that way this winter!
And that’s what I’m grateful for this Gratituesday.
God blessed us this winter with several days of reprieve here and there from the harsh, bitter cold. Some of the days this winter…the SUN has actually been shining. Some of the days, the boys were able to play outside in light jackets. Some of the days, we haven’t even needed to build a fire.
One day this winter (I think it was in January) I actually took a book outside and read on the porch. In January.
Just so you know, that’s really unusual in Nebraska.
So, while I’m very excited that spring is coming soon full of all the green and loveliness that comes with it….I’m so grateful for the coziness we’ve had this winter and that God gave us a little taste of warmer weather here and there to bring relief.
———————————————
What are you grateful for this Gratituesday? Read the details here, blog about what you’re grateful for, then come link up here with us. If you don’t have a blog, please leave a comment telling us what you’re grateful for!
[blenza_autolink code]
Heavenly Homemaker's Club Members: Access your homepage and all your fantastic resources here! Not a member yet? Please join us!
As I’ve been developing this idea for High Five Recipes…I am AMAZED at how many yummy dishes you can make with five ingredients or less. Cooking healthy food really, really is simple. I have a big (and ever growing) list of recipes to share with you ranging from main dishes to side dishes to desserts and snacks…all that only require FIVE or less high quality ingredients!!
I mentioned here that we’re trying to add more fish to our diets. A friend of mine told me about how she makes Salmon Patties and what an EASY lunch they are. Ooh, she was right.
These Salmon Patties are SO easy and super delicious. I used Rubinstein’s Wild Alaskan Pink Salmon. (This is a very inexpensive dish to make!)
Not only are these a perfect lunch idea…it’s a great “rescue me” dinner too if you’re on the run in the evening since you don’t have to plan ahead to thaw meat for this dish!
Lunchtime Salmon Patties
14 oz can salmon
1 egg
1/2 cup bread crumbs
1 t. lemon juice
oil for cooking (I use palm shortening or coconut oil)
In a bowl, mix together salmon, egg, bread crumbs and lemon juice. (You can mix the bones from the salmon in if you’d like…they cook right in and are good for you. However, I get a little wigged out about them and take out the biggest ones.)
Heat a small amount of oil in a skillet. Spoon tablespoon sized balls of the salmon mixture into the oil, flatten and cook for about five minutes, turning once. The salmon patties should be golden brown.
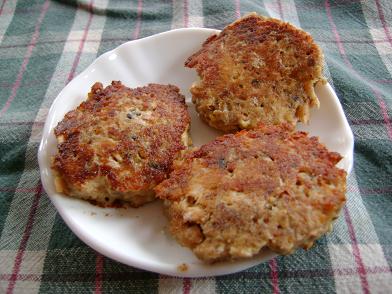
If you’re not a big fan of fish…I encourage you to give this simple recipe a try. I think you’ll probably be surprised!! And…this is one of those recipes that not only takes five ingredients…it only takes about five minutes to prepare. Yay!
Heavenly Homemaker's Club Members: Access your homepage and all your fantastic resources here! Not a member yet? Please join us!It doesn’t take much to make me squeal.
Just provide me with some rubbermaid totes with snap on lids and you’ll be my friend forever.
We recently acquired several new (to me) big rubbermaid totes…AND some of those cool plastic drawers. (It’s a long story of how we acquired them.)
The plastic totes are SO gonna help me get a handle on all the wonderful hand-me-downs we receive for the boys.
And the sets of plastic drawers? I gave those babies (and myself, by default) a good scrubbing, then Malachi and I headed into the school room with them.
Do you think we needed to?
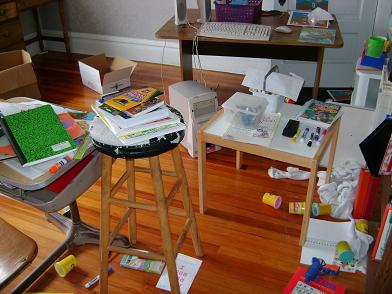
Oh, I’m sorry. Maybe I should have told you to be sure you were sitting down before you looked at that. Scary isn’t it?
Want another view?
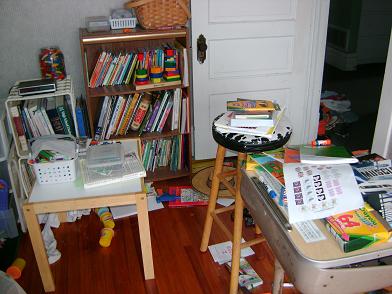
And you ask, “LAURA?! How could you possibly let your school room turn into such a disaster?!”
And I’d say, “Well, it was really quite simple.” ;)
We don’t really do our school work in the school room because it’s so much cozier to read history on the couches in the living room and to do math on the rug in front of the fireplace. Our school room has now just become a “hub” where we keep our books and stuff.
Therefore, after the boys are finished with a book or an activity, they go put it in the school room. And slowly but surely the idea of putting the book or activity in it’s place just didn’t hold any appeal to little boys who would rather go-play-with-legos-because-they-finally-got-all-their-work-done!!!! Plus, I’m pretty sure that room is full of hot lava.
My coping strategy was to simply close the door and walk away.
But seriously, I can hardly stand that much insanity in a room for so long before I begin to break out in a rash.
I finally sent the big boys in to put their books where they belonged. Then, Malachi and I used the new plastic drawers to organize his activities and fun pre-school stuff.
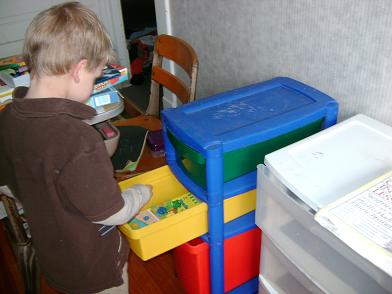
Here he is putting his little counting frogs into his “Counting Tools” drawer.
He’s counting them as he goes of course…
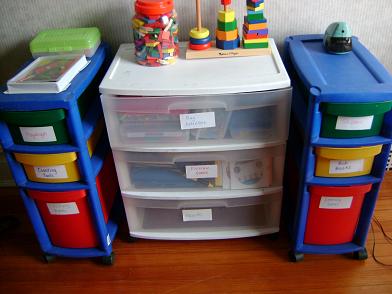
Ah, the joy of organized little plastic drawers. WITH labels on them. Doesn’t that just make you want to go get some beads out of drawer number four and string ’em up in a pattern?
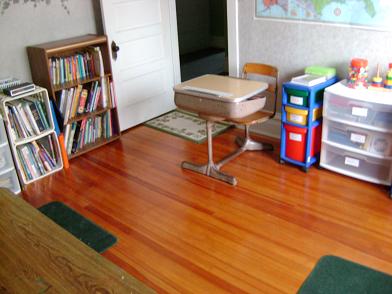
Now. We’re starting a new week of school work. Hot lava or not…I think we’ll try to do a better job of keeping the school room looking like this!
Does anyone else get a kick out of plastic storage containers as much as I do?
————————————-
Heavenly Homemaker's Club Members: Access your homepage and all your fantastic resources here! Not a member yet? Please join us!Thank you so much for being understanding about my taking a bit of time off last week from “normal blogging”. I had a VERY productive week. I met the deadlines for the extra writing I was doing…made significant progress on couple of ebooks I’ve been working on (for like, over a year) and I fine-tuned the new ideas I wanted to unleash for you. I’m really looking forward to hearing your ideas for The little Green Project…and I can’t wait to start sharing some High Five Recipes!
And now, I’m energized and ready to start a new week. Here’s what we’ll be eating this week:
Sunday, March 1
Oatmeal, toast
Fundraising dinner for Youth Missions
Oven mac and cheese, steamed carrots
Monday, March 2
Simple sourdough pancakes
Popcorn chicken, strawberry-peach slushies
Italian roast wraps, tossed salad
Tuesday, March 3
Fried eggs on toast, clementines
Melting snowflakes, pears
Steak, baked potatoes, green beans
Wednesday, March 4
Pumpkin bread, bananas
Stir fried rice and veggies (with chicken)
Shepherd’s pie
Thursday, March 5
Sourdough biscuits, applesauce
Grilled cheese sandwiches, tomato soup
Creamy garlic shrimp pasta, tossed salad
Friday, March 6
Peanut butter honey toast, peaches
Black eyed peas, apples with strawberry yogurt dip, cornbread
Hamburgers on homemade buns, onion rings
Saturday, March 7
Mom is Great breakfast cake, oranges
Beefy vegetable soup
BBQ chicken, peas, steamed carrots
And now…I’m gonna go make Malachi some chocolate pudding because he’s been asking me to make it for a long time and well…I like me some chocolate pudding too. :) And then, the two of us are going to re-organize the school room and his “school supplies”.
Psst….watch for a post on making Mozzarella Cheese in the next few days!!
I hope all of you are thinking about your little Green Projects!!!
—————————————
Visit Organizing Junkie for more menu planning ideas!
Heavenly Homemaker's Club Members: Access your homepage and all your fantastic resources here! Not a member yet? Please join us!Would you give me a high five if I told you that I’m planning to share more healthy recipes that are super simple to make? (Or would you bowl me over with a big bear hug? ‘Cause that would be okay too.)
Beginning next week I’ll begin to share some new recipes with you that I’ve labeled: High Five Recipes.
High Five Recipes are…
High Quality Recipes that include FIVE Ingredients or less!!
I hope you’re as excited about it as I am.
Not only are there only five basic ingredients….most of the recipes only take five minutes to put together.
Simple and healthy…and low in cost.
Cooking healthy has never been easier.
Ah, skip giving me a high five. Let’s all have a group hug.
:)
—————————————–
Help me out here! What kind of recipes are you most interested in me posting? Is lunchtime a challenge? What kinds of High 5 Recipes would help you out the most?!
Heavenly Homemaker's Club Members: Access your homepage and all your fantastic resources here! Not a member yet? Please join us!On Saturday night our church hosted a Mother/Son Banquet. I took four very handsome dates with me. (Although when I was making Elias put on church clothes for the event on a SATURDAY…he whined, “Ah Mom…why do you want me to look handsome?” He much preferred the holey sweat pants he was wearing.)
The banquet included a nice meal (which included plenty of food since there were so many BOYS at the event), a music video, and a couple of ladies sharing some stories about raising boys (I was one of them). To end the evening, they asked any of the sons who wanted to share something about their mom to come on up to the microphone.
That was my favorite part. Some of the little boys shared some pretty sweet things about their moms.
But here is my favorite. The little guy got up to the mike and said,
“Once my mom and I went to a movie when I was really little. I fell asleep in her lap and she didn’t leave me there to go to the bathroom or let me fall off of her lap. That’s how I know she loves me.”
Is that the cutest?! :)
The night ended with the boys bringing roses to their moms. Because of the volume of boys I am mother to…I ended up with a whole bouquet! Yay for me!

I was a little nervous to be speaking during the banquet…therefore I left the house without my camera. (I was concentrating on leaving the house with my notes and the four boys who are my sons.) So…the pics of the flowers are all I have to show you for now! A couple of others took pictures of us though and hopefully I can show them to you soon!
Even though I don’t have pictures to prove we were at this wonderful event..I’m very grateful for the opportunity to make special memories with my sons!
————————————————-
Share what you’re grateful for this Gratituesday! Read the details here then come link up with us! If you don’t have a blog, please leave a comment letting us know what you’re grateful for!
[blenza_autolink code]
Heavenly Homemaker's Club Members: Access your homepage and all your fantastic resources here! Not a member yet? Please join us!