Heavenly Homemakers

Encouraging women in homemaking, healthy eating and parenting

  • Home
    • About
    • FAQs
  • Recipes
    • Bread and Breakfast
    • Condiments
    • Dairy
    • Main Dishes
    • Side Dishes and Snacks
    • Desserts
    • Gluten Free
    • Instant Pot
    • Crock Pot
    • Heavenly Homemaker’s Weekly Menus
  • Homemaking
    • Real Food Sources
  • Store
  • Contact
    • Advertise
    • Disclosure
    • Privacy Policy
  • Simple Meals
  • Club Members!

How to Make Healthier Corndogs for the Freezer

September 18, 2016 by Laura 7 Comments

This post may contain affiliate links. For more information, please see our disclosure policy.

Of all the recipes I share, this one is not the healthiest. Just whatever though, because corndogs taste amazing. (With a salad. And fruit. And digestive enzymes.) I’m providing a homemade option so that at least we’ll know these are better than store-bought.

Homemade Corndogs

Yum

First – try to find hotdogs that are nitrite free. Also, beef. Always beef hotdogs. Fine, turkey is okay too. Just try to avoid the hotdogs that are only pretending to be meat. I can’t even believe I’m still trying to convince myself that any form of a hotdog is healthy. But for real, at least try to find some that aren’t terrible. Why I like hotdogs is beyond me.

Now that we’ve covered the sacred topic of the hotdogs, allow me to share another compromise I make. This. We bought this fun corndog maker for one of our sons a few years ago as a gift because he is the ultimate corndog lover. (I have no idea where he gets this.) I think having dozens of appliances that only do one task each is fairly ridiculous. But shucks if having a corndog maker isn’t a lot of fun, so there. We’ve used it for more than just corndogs (like muffins and cookies – who knew?!) so hallelujah for an appliance that is actually multi-functional.

I will tell you that this machine makes the effort of creating homemade corndogs so easy and mess free that a few days ago, I made 48 corndogs in less than an hour – while I was making tomato sauce, French toast, and frozen yogurt. The corndog maker allows me to multitask while making food for my freezer. And here you thought that appliance was pointless.

Anyway….

The long and short of making homemade corndogs is that you simply use your favorite cornbread recipe, add a bit of extra milk so the batter will coat the dogs, then you either fry them in oil or bake them in the above mentioned corndog maker.

What about sticks?

Life is too short to poke sticks into hotdogs. Do the stick poking if you must, but as for me and my house, we will skip the sticks and just eat the dogs.

How to Make Healthier Corndogs (in Bulk) for the Freezer

How to Make Healthier Corndogs for the Freezer
 
Save Print
Author: Laura
Serves: 24-48
Ingredients
  • 2⅔ cup Homemade Jiffy Cornbread Mix*
  • 2 eggs
  • 1½ cups milk
  • 4 Tablespoons melted butter
  • 24 hot dogs
Instructions
  1. In a mixing bowl, whisk together cornbread mix, eggs, milk, and butter.
  2. If using a corndog maker, cut hotdogs in half.
  3. Dip hotdogs in batter to coat thoroughly.
  4. Fry until golden brown, or cook in a Corndog Maker**
  5. Serve right away, or cool and freeze in freezer bags.
  6. Rewarm corndogs by placing them on a baking sheet in a 350 degree oven for 10-15 minutes or until heated through.
3.4.3177

*Homemade Jiffy Cornbread Mix recipe

I put these homemade cornbread mixes together and have them on hand for convenience. I highly recommend this!

** I cut my hotdogs in half, then cook my corndogs in this fun Corndog Maker. It saves a lot of time and mess!

Homemade Corndogs for the Freezer

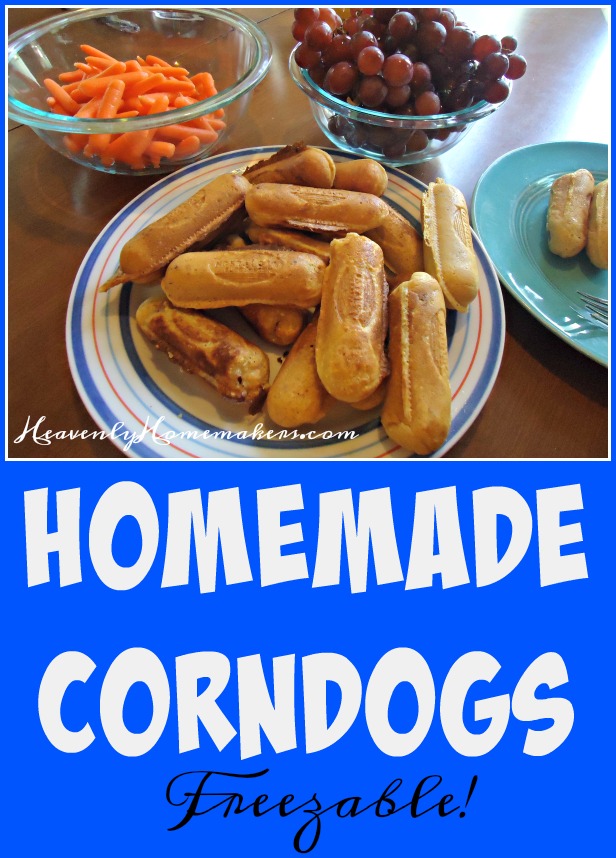
If you make these to freeze, all you have to do at mealtime is pull them out and warm them up while you’re getting out all the actual nutritious parts of the meal (fruits, veggies, and more veggies with a side of another vegetable).

‘Fess up. Do ya like hotdogs?

Heavenly Homemaker's Club Members: Access your homepage and all your fantastic resources here! Not a member yet? Please join us!

Giant Breakfast Cookies For the Freezer

September 13, 2016 by Laura 27 Comments

This post may contain affiliate links. For more information, please see our disclosure policy.

It’s likely that many of you have been making my Giant Breakfast Cookies for years. It was one of my very first recipes I shared here. (Aww, sweet memories.)

Freezer Breakfast Cookies5

Yum

I used to always bake big batches of these cookies (or even a double batch) and freeze them to pull out as needed. This is great! But I like this new idea better.

See, with this idea we can have hot, fresh breakfast cookies whenever we want them. I think we can all agree that a hot, fresh breakfast cookie with a glass of milk or a cup of coffee is much, much better than a room temperature cookie with a glass of milk or a cup of coffee.

So this is what I do now:

Make Giant Breakfast Cookie Dough Balls for the Freezer

I mix up the Giant Breakfast Cookie recipe as normal. I scoop out cookie dough and freeze it on a cookie sheet like this:

Freezer Breakfast Cookies1

Once frozen, I transfer the cookie dough balls to a freezer bag.

Freezer Breakfast Cookies2

In the morning, I get out a few cookie dough balls to bake fresh.

Freezer Breakfast Cookies3

I put them into the oven (yep, from their frozen state) and bake them while the coffee brews.

Freezer Breakfast Cookies4

When the family wakes up, there are hot, fresh breakfast cookies ready to go with the rest of our breakfast!

These cookies are always the star of breakfast, but I usually only make enough for two per person so the fruit and protein can get the attention they need. :)

Here’s the recipe and freezing instructions:

Giant Breakfast Cookies (with frozen cookie dough ball instructions)

Giant Breakfast Cookies For the Freezer
 
Save Print
Author: Laura
Serves: 20-24
Ingredients
  • 1 cup melted butter
  • ½ cup honey
  • 2 eggs
  • 1 teaspoon sea salt
  • 1 teaspoon ground cinnamon
  • 1 teaspoon baking soda
  • 1 teaspoon vanilla extract
  • ½ cup buttermilk (the recipe will not be effected if you choose to leave this out)
  • 2 cups whole wheat flour
  • 2 cups rolled oats
  • ½ cup raisins or chocolate chips
Instructions
  1. Mix butter, honey, eggs, salt, cinnamon, baking soda, vanilla, and buttermilk.
  2. Stir in flour and oats.
  3. Fold in raisins or chocolate chips.
  4. Scoop heaping tablespoons of dough onto a cookie sheet.
  5. Bake at 350 degrees for 15-20 minutes.
  6. TO FREEZE:
  7. Mix dough and scoop side-by-side onto a cookie sheet.
  8. Freeze dough balls, then transfer them to a freezer bag.
  9. Place desired amount of frozen cookie balls onto a baking sheet while oven pre-heats.
  10. Bake at 350 degrees for 15-20 minutes.
3.4.3177

Breakfast Cookies for the Freezer

Ever tried freezing cookie dough balls before? I’ve been doing this with regular cookies for years. Why it took me this long to do this with Breakfast Cookies is just sorta silly.

More freezer recipes and ideas coming soon!

TO MAKE COOKIE BARS:

If you’d like to skip the scoop, simply spread the cookie dough into a 9×13 inch baking dish. Bake at 350 degrees for 18-22 minutes or until cookie bars are lightly browned and cooked through to the center. I like to take them out of the oven when they are barely brown so that they are gooey and moist!

Heavenly Homemaker's Club Members: Access your homepage and all your fantastic resources here! Not a member yet? Please join us!

Whole Wheat Chocolate Zucchini Muffins

August 14, 2016 by Laura 25 Comments

This post may contain affiliate links. For more information, please see our disclosure policy.

You know you’ve got a fabulous recipe when your 14-year old son takes a bite of a fresh Chocolate Zucchini Muffin and says, “Hmm. Great texture.” Or maybe I’ve just got a fabulous 14-year old son. This is a given.

zucchini muffins

Here’s a pic of this amazing kid at church camp this summer. Yes, the girls have noticed him. Every single girl has noticed. Let’s go back to talking about the muffins.

Elias at camp 2016

These muffins are “moist like a cupcake.” Again – the description of my 14-year old.

The original recipe I had for these muffins called for one full cup of sugar and (brace yourself) an entire bag of chocolate chips. An entire bag. Not only am I not interested in adding that amount of sugar to the healthy and necessary meal I like to call “breakfast” – I’m also way too cheap. Would you like a little muffin with those chocolate chips?

With proportions like that, you might think that cutting the sugar so drastically as I did might turn out a boring and inedible muffin. But allow me to remind you of the teenager’s comment from above, that these muffins are “like a cupcake.” This from someone who would never have argued with me if I had chosen to dump an entire bag of chocolate chips into my muffin mix. He didn’t even know what he was missing.

He also didn’t know he was eating zucchini.

When writing this recipe for you, I shared a range of measurements for the sugary ingredients. Your family might prefer these muffins to be a bit sweeter, in which case you’ll want to go with the 1/2 cup portion of sugar and chocolate chips. Either way, the muffins will turn out amazing. You know – moist like a cupcake.

Whole Wheat Chocolate Zucchini MuffinsYum

4.7 from 3 reviews
Whole Wheat Chocolate Zucchini Muffins
 
Save Print
Author: Laura
Serves: 12
Ingredients
  • 1½ cups whole wheat flour
  • ¼ cup sucanat or brown sugar
  • ½ cup unsweetened cocoa powder
  • 1 teaspoon baking powder
  • ½ teaspoon sea salt
  • 1½ cups shredded zucchini
  • 2 eggs
  • ½ cup coconut oil
  • ¼ - ½ cup mini chocolate chips
Instructions
  1. Mix together flour, sugar, cocoa, baking powder, and salt.
  2. Stir in shredded zucchini, eggs, and oil until well combined.
  3. Fold in chocolate chips.
  4. Scoop into 12 prepared muffin tins.
  5. Bake in a 350 degree oven for 20-25 minutes.
3.4.3177

Whole Wheat Chocolate Zucchini Muffins

I like to use Enjoy Life Soy Free Chocolate Chips when possible. :)

Enjoy these muffins for a Back-to-School breakfast or as an after school snack. Need more breakfast ideas? Find 60 Make Ahead Breakfast ideas in this post.

Here’s your final reminder to sign up to win a copy of our new Low Sugar Treats eBook!!

Heavenly Homemaker's Club Members: Access your homepage and all your fantastic resources here! Not a member yet? Please join us!

How to Make Overnight Whole Wheat Waffle Batter

June 27, 2016 by Laura 29 Comments

This post may contain affiliate links. For more information, please see our disclosure policy.

What if you could mix up a yummy waffle batter before you go to bed at night, then stumble into the kitchen in the morning to cook just as many waffles as you need – with little effort?

Overnight Whole Wheat Waffles

Are you telling me that you don’t stumble into the kitchen in the mornings? That you’re a bouncer? A springer? That you wake up like Tigger? I am so happy for you.

For the rest of us stumblers, we can use this recipe to wake up slowly but still have breakfast on the table in a very short amount of time. The measuring and mixing (and the thinking and the reading of recipes) will have been done the night before. You can have your waffle iron set out and ready so that all you have to do is plug it in, turn it on, and wait for it to heat.

For that matter, you might consider prepping berries and whipped cream the night before because a waffle with syrup is good, but a waffle with berries and whipped cream is even better.

My aunt gave me this recipe a long time ago. Then I misplaced it. Now I have it back again. (Good talk.)

That fascinating story was my way of telling you that while I did do some tweaking of this recipe to use ingredients I prefer, I give all the credit to my Aunt Claudia for providing the genius behind it so that you and I can be morning stumblers. These waffles are delicious!

Overnight Whole Wheat WafflesYum

5.0 from 3 reviews
How to Make Overnight Whole Wheat Waffle Batter
 
Save Print
Author: Laura
Serves: 8 waffles
Ingredients
  • 2¼ teaspoons active dry yeasr
  • ¼ cup warm water
  • 2 cups whole milk
  • 2 large eggs
  • ½ cup melted coconut oil
  • 1 teaspoon honey, sucanat, or sugar
  • 3 cups whole wheat flour (I use freshly ground soft white wheat)
  • 1 teaspoon sea salt
Instructions
  1. Dissolve yeast in warm water and set aside.
  2. Heat milk to just warm.
  3. Beat in eggs, oil, yeast mixture, and all remaining ingredients. (I used my blender for this, or you can use an electric mixer if you like.)
  4. Cover and refrigerate overnight.
  5. Bake in a waffle iron.
3.4.3177

Easy Overnight Whole Wheat Waffles

See the bubbly batter you’ll wake up to in the morning? No need for you to be bubbly. You get to stumble. The batter will be bubbly enough to make up for your inability to be bubbly in the morning. You might find it is enough to bring a slight smile to a half-awake face.

Overnight Whole Wheat Waffle Batter

Some additional recipes and tips you might find helpful to go along with this waffle recipe:

  • How to Make Whipped Cream
  • Blueberry Syrup recipe
  • Peach Syrup recipe
  • Raspberry Syrup recipe
  • What is whole wheat pastry flour? (more about using soft white wheat in recipes)

While we like fruity syrups, we typically enjoy fresh (raw) berries on our waffles. Fresh strawberries with whipped cream is our favorite waffle topping. So amazing!

Have you ever tried a mix-the-waffle-batter-the-night-before idea? I love this and plan to make it a staple at our house to save time (and brain) in the mornings!

Heavenly Homemaker's Club Members: Access your homepage and all your fantastic resources here! Not a member yet? Please join us!

Veggie-n-Egg Scramble ~ A Great Last Minute Meal Idea

May 18, 2016 by Laura 2 Comments

This post may contain affiliate links. For more information, please see our disclosure policy.

I think this Veggie-n-Egg Scramble might become one of my favorite and most relied upon go-to meals.

Veggie and Egg Scramble

Yum

I used to make something like this years ago, but kind of forgot about it. Weird how that happens.

A few weeks ago, I needed a quick meal before we headed out to a soccer game. I didn’t have time to cook meat, but I did have a fridge full of veggies and a few dozen eggs. I called the boys into the kitchen and started throwing vegetables and knives at them. Hold on. That didn’t come out right. I didn’t throw knives at them. (Peppers maybe, but not knives.) I’m just saying I started handing out jobs and we all worked together to make this quick and nourishing meal.

Everyone started chopping until my big electric skillet looked like this:

Veggies for veggie scramble
All the veggies are good in this Veggie-n-Egg Scramble, but I will suggest that onions are a key player. Onions give this dish such amazing flavor! Sweet peppers are a close second. Broccoli, asparagus, zucchini, and spinach come next. The beauty is that you can use whatever veggies you like and whatever you have on hand.

Saute the veggies in olive oil or butter until tender. Scramble in some eggs with salt. Toss in a little cheese for extra amazingness. So much deliciousness. Very little work. Extra wonderful nourishment.

Veggie-n-Egg Scramble ~ A Great Last Minute Meal Idea
 
Save Print
Author: Laura
Serves: 3-4
Ingredients
  • 4 cups chopped veggies (onions, sweet peppers, zucchini, asparagus, spinach, broccoli, or any others you like in any combination)
  • 3 Tablespoons butter or olive oil
  • 6 eggs
  • 2 Tablespoons milk
  • sea salt to taste
  • shredded cheese to taste
Instructions
  1. Saute vegetables in oil or butter until tender.
  2. Meanwhile, crack eggs into a bowl and whip with milk.
  3. Pour egg mixture over cooked veggies and salt as you like.
  4. Scramble the eggs with the veggies until they are cooked through.
  5. Sprinkle cheese on top to melt.
  6. Serve
3.4.3177

I at least double this for my family of 6 big eaters. Plus we serve it with fresh fruit. Buttered toast also helps fill them up. Seriously. We really do eat and keep eating at our house.

TIP: If you happen to have leftover ham or bacon – even chicken or beef – hanging out in your fridge, those would be a wonderful addition to this dish.

This meal has become one of the easiest ways to get my family to eat a big variety of veggies in one meal. It ranks right up there with Easy Noodle Stir-Fry.

Easy Veggie and Egg Scramble

Do you ever make a meal like this at your house? What veggies would you or do you include? 

It’s meals like this that make “teaching our kids about nutrition” quite natural.

P.S. It is worth noting that this dish makes it possible to feed my family very well for about $1.00 per plate. (We won’t talk about how many plates we go through during a meal…)

Heavenly Homemaker's Club Members: Access your homepage and all your fantastic resources here! Not a member yet? Please join us!

The Easiest Sweet Vanilla Coffee Creamer Recipe

April 10, 2016 by Laura 25 Comments

This post may contain affiliate links. For more information, please see our disclosure policy.

Before I say anything else about this Sweet Vanilla Coffee Creamer, I should tell you that this tastes 100-times more amazing if you use Homemade Vanilla Extract. Not that I’ve tested it on anything else. This is just an obvious conclusion since homemade vanilla makes everything 100-times better.

Homemade Vanilla Creamer

You like how my fruit bowl is in the picture behind my coffee mugs and bottle of coffee creamer? It is there to show that photography is not my gift. Also, using precious energy to walk all the way around the table and move it out of the picture would have been just too much. What am I? A teenager? Plus I hadn’t had my coffee yet. Thanks for understanding.

I did take the time to scatter coffee beans and vanilla beans on the table for effect. Mostly they just smelled really good. Try to imagine.

So why did I make a Sweet Vanilla Coffee Creamer recipe to share with you? After all, I drink my coffee with no sweetener – just some cream (which is perfectly sweet if you ask me). I did it for the kids. MY kids. Yup. Justus and Elias enjoy a cup of coffee with me now a few mornings each week. It’s pretty special that we can share this simple pleasure together. There’s just something cool about sharing a cup of coffee with someone. (Though to be clear – I do not share my own personal cup of coffee. It’s mine and everyone else can back away and get their own cup. I guess I should have said that I share my pot of coffee. I’m sorry to give you the impression that I was actually nice enough to share even a drop of what is in my mug each morning.)

For the past several months, the boys have been making their coffee with a splash of cream and a squeeze of NuNaturals Chocolate Syrup. I love that this makes such an amazing cup of coffee that they love – particularly because it contains no sugar. If you haven’t tried this concoction, you really want to. You won’t believe how good it is.

A couple of weeks ago, Elias asked what else he could do with his coffee – you know – for a little variety? He played with different NuNatural Flavored Stevia options, but nothing hit a home-run for him.

So we experimented with ingredients to come up with this Sweet Vanilla Coffee Creamer. Unfortunately it’s not stevia-sweetened like the chocolate syrup – so he has this one less frequently. Still though – he thinks it’s pretty tasty and worth sharing with you. Remember – Homemade Vanilla makes all the difference. Why just put in one teaspoon when you can put in two?

Sweet Vanilla Coffee CreamerYum

5.0 from 2 reviews
The Easiest Vanilla Coffee Creamer Recipe
 
Save Print
Author: Laura
Ingredients
  • 1 cup half-and-half
  • 3-4 Tablespoons real maple syrup
  • 2 teaspoons vanilla extract
Instructions
  1. Place all ingredients in a jar or bottle.
  2. Shake well.
  3. Refrigerate for up to two weeks.
  4. Shake well before each use.
  5. Pour desired amount into a hot cup of coffee and stir.
3.4.3177

Homemade Sweet Vanilla Coffee Creamer Recipe

Feel free to sweeten it more or less to reach your desired flavor preference. This recipe is a no-brainer so even if you don’t measure exactly, you can’t mess it up.

Would you be so kind as to leave a comment sharing how you like your coffee? I know my boys would have fun playing with different combinations and flavors – and maybe we can come up with more recipes to share!

This post contains affiliate links.

Heavenly Homemaker's Club Members: Access your homepage and all your fantastic resources here! Not a member yet? Please join us!

Low Sugar Dairy Free Chocolate Sauce (3 Ingredients!)

April 5, 2016 by Laura 6 Comments

This post may contain affiliate links. For more information, please see our disclosure policy.

Dairy free chocolate sauce….the new way to top a waffle.

Dairy Free Chocolate Sauce

We sure do eat a lot of cream cheese around our house.

This has nothing to do with the recipe I’m about to share with you – except that it is my way of saying, “We definitely aren’t a dairy-free family.”

Why a Dairy Free Chocolate Sauce then?

  • Because coconut milk is nourishing and I like to use it in addition to cow milk as a way to give my family a variety of nutrients.
  • Because I love having recipes on hand that I can use to bless our friends who can’t eat dairy.
  • Because this Chocolate Sauce is rockin’ and I can actually eat it because it is low in sugar.

You pretty much can’t mess up this recipe. Go ahead. Try. Not that you would. (I mean, I can sometimes mess up a recipe without even trying, say…when I’m trying to talk and cook at the same time??)

But this recipe is really fool-proof and adaptable. You can make it a little sweeter if you like. You can keep the sugar low and enjoy this as a “dark chocolate” sauce. You can add a splash of vanilla extract or mint extract.

Oh my goodness, you could stir in some peanut butter! I just thought of that, will try it, and get back to you. You’ve gotta love it when a delicious brainstorm comes in the middle of writing a sentence.

How to use your Low Sugar Dairy Free Chocolate Sauce

  • We love it on fresh strawberries, bananas, blueberries, or raspberries.
  • Often we use it as an apple dip.
  • Try stirring it into a cup of hot coffee. Yup.
  • Instead of maple syrup, spread this sauce over your pancakes or waffles.
  • Hello. Just eat it on a spoon.
  • You can drizzle this on ice cream, but if you do have to eat dairy free, you’d also have to make or find dairy free ice cream (this was obvious but still worth mentioning)

Low Sugar Dairy Free Chocolate SauceYum

Low Sugar Dairy Free Chocolate Sauce
 
Save Print
Author: Laura
Ingredients
  • 13.5 ounce can of full fat, unsweetened coconut milk
  • ⅓ cup unsweetened cocoa powder
  • ¼ - ½ cup sweetener (honey, sucanat, or brown sugar)
Instructions
  1. Mix ingredients in a small saucepan, cooking and stirring on medium heat until well combined.
  2. Serve warm or cold.
  3. Store this sauce in a covered container in the refrigerator, rewarming on the stove-top as needed. It will keep for up to a month in the fridge.
3.4.3177

Low Sugar Dairy Free Chocolate Sauce

This sauce just takes a few minutes to whip up and it seriously tastes like a gourmet treat.

Need Coconut Milk?

I typically purchase cans of coconut milk in bulk online. Some of my favorite resources are:

  • Vitacost
  • Amazon

Want the Dairy-Full version? You’ll find one here. Be warned: it’s super full of sugar. I should play with that and see how we can reduce it!

Can you think of other great ways to eat this sauce? 

Heavenly Homemaker's Club Members: Access your homepage and all your fantastic resources here! Not a member yet? Please join us!

Simple Taco Soup

February 9, 2016 by Laura 1 Comment

This post may contain affiliate links. For more information, please see our disclosure policy.

taco soup 1

I can’t get a good picture of this soup. This is so easy to make and it’s amazing to eat and the picture looks like eh, whatever. So just glance over the picture and know that you need to make this soup.

Here’s my happy little soup secret: This Taco Soup is made with none other than this Real Food “Velveeta” and Rotel Recipe. See, you make that recipe and you double or triple it because it just makes sense because it is so delicious. You eat it with chips, or you boil some pasta and make it into Spicy Mac and Cheese. Or if you’re feeling soupy, you stir in some chicken or beef broth and top it with crunched chips. It becomes Taco Soup and you love it so much you can’t even stand it. Or maybe it’s just me.

Simple Taco Soup

Simple Taco Soup
 
Save Print
Author: Laura
Serves: 6-8
Ingredients
  • 1 pound hamburger meat
  • 2-4 Tablespoons butter
  • 2 heaping Tablespoons corn starch
  • 1 cup water
  • 1 teaspoon chili powder
  • sea salt to taste
  • 2 cups heavy cream
  • 10-ounce can diced tomatoes with green chilies (Rotel)
  • 1-2 cups shredded cheddar or colby jack cheese
  • 2-3 cups chicken or beef broth
Instructions
  1. Brown the hamburger meat in a large pot.
  2. Add butter to the meat, melting it throughout the pot.
  3. Sprinkle in corn starch, coating the meat.
  4. Pour in water, chili powder, and salt.
  5. Turn heat up and stir until the mixture thickens.
  6. Add cream, continuing to stir as the mixture thickens. (This all happens quickly in my experience.)
  7. Stir in Rotel and broth, heating for about 5 more minutes.
  8. Remove from heat.
  9. Add shredded cheese, stirring until the cheese has melted and the dip is smooth.
  10. Serve with tortilla chips.
3.4.3177

I know I’ve said it before, but I really, really love making triple batches of Real Food “Velveeta” and Rotel. It’s super easy and it is so versatile! Every few weeks I make it and store it in my fridge to pull out for easy meals. Now we use it to make soup too!

Here are some pictures of your options to entice you:

Real Food “Velveeta” and Rotel, served as a dip:

Real Food Velveeta and Rotel Dip

The very same dip, stirred into boiled pasta and served as Spicy Mac and Cheese: 

Spicy Mac and Cheese

Same dip again, with broth stirred in, served as Taco Soup:

Simple Taco Soup

Do you see why I make big batches of this?? 

If you’d like to take a look at my favorite way to make nourishing broth for soups like this, check out this post:

How I Make Veggie-Packed Chicken Broth and Beef Broth

Have you made the Real Food “Velveeta” and Rotel recipe? What’s your favorite way to eat it?

Heavenly Homemaker's Club Members: Access your homepage and all your fantastic resources here! Not a member yet? Please join us!

Easy Chicken With Cream Cheese Sauce

January 3, 2016 by Laura 4 Comments

This post may contain affiliate links. For more information, please see our disclosure policy.

I have a wonderful chicken recipe to share with you. But first, a story.

Cream Cheese Chicken

Once upon a time, I was dating my husband. I mean, my boyfriend. I mean, we weren’t married yet when we were dating but then we did get married and all of that barely has anything to do with this recipe.

But back in the days of our dating, engagement, and early marriage we drove an hour away from our college town each Sunday morning to a small church with a sweet youth group. Matt was their youth leader, teaching Bible classes and forming relationships with the teens. These dear ones became our church family, worshiping with us, throwing us a wedding shower, celebrating our marriage, being a part of our first pregnancy, and welcoming Baby #1 into the world with us.

Some of our fondest memories of those years are looking back to the Sunday afternoons in the homes of various church family members. They took turns signing up to feed us after church. Those meals!!! Talk about a church full of good cooks. The fellowship was precious and I can remember in detail many of the ladies’ specialties. We were very well taken care of, that is for sure.

Well, one of these ladies frequently made chicken that was slathered in the most delicious cream sauce. When we knew Carlene had signed up to feed us, I’d always say to Matt, “Ooooh, I hope she made that chicken this time!” Anytime she did make it and we sat there gushing over the meal, she’d always shake her head at us and say, “Oh. It’s just food.”

Right. Just food. Just the best chicken I’ve ever eaten!!!

Since that time, I’ve always regretted that I never got her recipe. I’m not even kidding you that 20 years later I still get hungry for that meal. Finally about a month ago I thought to myself, “Laura, are you or are you not the lady who invents recipes? For Pete’s sake, woman. Go to the kitchen and figure out how to make Carlene’s chicken.”

You’d think I would have considered this option before.

Well, my friends. I now present to you Not-Quite-Carlene’s Chicken with Cream Cheese Sauce. Make this.

Easy Chicken with Cream Cheese SauceYum

Easy Chicken With Cream Cheese Sauce
 
Save Print
Author: Laura
Serves: 6-8
Ingredients
  • 6 boneless, skinless chicken breasts or thighs
  • 1 beaten egg
  • ⅔ cup whole wheat flour
  • Sea salt and pepper to taste
  • ½ cup palm shortening or other oil for frying
  • 8 ounces softened cream cheese
  • 2 cups chicken broth
Instructions
  1. Mix flour, salt, and pepper.
  2. Dip chicken in egg, then coat in flour mixture.
  3. Fry in oil for just a few minutes on each side. (Do not over cook or the chicken will become dry.)
  4. Remove chicken from pan.
  5. Pour chicken broth into the pan, scraping up the chicken drippings.
  6. Add softened cream cheese, stirring until smooth.
  7. Place cooked chicken back into the pan, coating on both sides with sauce.
  8. Serve with rice or pasta.
3.4.3177

Make-Ahead Instructions

Prepare and fry meat as directed. Allow it to cool, then cover and store in the refrigerator for up to two days. Prepare sauce as directed and stir in the chicken, heating through.

Freezer Instructions

Prepare and fry meat as directed. Allow it to cool. Freeze in a well-sealed freezer bag for up to three months. To serve, thaw cooked meat. Prepare sauce as directed and stir in the chicken, heating through.

Easy Chicken with Cream Cheese Sauce Recipe

I can’t think of a brilliant way to end this post. Go make this chicken! There. That oughta do it.

Heavenly Homemaker's Club Members: Access your homepage and all your fantastic resources here! Not a member yet? Please join us!

Easy No-Knead Whole Wheat Cinnamon Rolls For the Freezer ~ With Honey’d Orange Glaze!

September 13, 2015 by Laura 13 Comments

This post may contain affiliate links. For more information, please see our disclosure policy.

No-knead breads are THE WAY to go.

Cinnamon Roll with Orange Glaze

I’m not sure that my dearly missed, hard working grandma would be too pleased with me about this – but I’ve decided that kneading bread dough just isn’t my favorite thing. I mean, I’ll do it if I have to. But I’d rather stir ingredients, smile at the pile of dough (you know, for encouragement), then walk away.

This is how I found myself experimenting with my Whole Wheat Cinnamon Roll recipe. I had all the ingredients mixed together, but then I was like, “Really? Do I really have to knead this now? That just sounds soooo hard and time consuming.” (Really, Grandma. I know you lived through the Great Depression and fed nine children three meals a day from scratch with food that you grew or raised on your farm, that you worked from sun-up to sun-down in your teeny-tiny kitchen, and the only time you rested was to watch Judge Wapner after you turned 80. But do try to understand what I’m up against here.)

I figured that at the very worst, I’d have little hard cinnamon roll hockey pucks we could dunk in milk. So I did it. I walked away from my dough without kneading it.

It looked like this when I covered it up:

cin rolls 10

An hour later, it looked like this:

cin rolls2

Did it work, or did it work? 

Thus, my Whole Wheat Cinnamon Roll recipe is being turned into a No-Knead Whole Wheat Cinnamon Roll recipe because our lives are too full from all the hard work it takes to think about Grandma scrubbing all of the manure-crusted clothes on a wash-board.

What you see here is absolutely not a picture of me kneading the dough. It is simply me working a little flour into the dough after it rose so that I could roll it out without it sticking to the countertop.

cin rolls3

After I rolled it out, I spread melted butter over it and sprinkled a little sucanat and cinnamon over it.

cin rolls4

Then (like a boss) I rolled both ends until they met in the middle and separated the rolled dough with a knife. (Start on the outside, top and bottom, and roll them into the middle.)

cin rolls5

cin rolls6

I then proceeded to cut individual rolls, making a huge mess in the process.

cin rolls7

My rolls went on a pan in a most unattractive way because I leave perfectionism up to the perfectionists. Do not poke fun. They can’t help how they look.

cin rolls8

I froze the dough rolls on the pan, then transferred the frozen rolls to a freezer bag for another day. I will use them when I am busy not having to pluck a chicken for our dinner.

cin rolls9

No-Knead Whole Wheat Cinnamon Rolls – for the freezer (or for directly into the oven)

Easy No-Knead Whole Wheat Cinnamon Rolls For the Freezer ~ With Honey'd Orange Glaze!
 
Save Print
Author: Laura
Serves: 15-18
Ingredients
  • 1 cup warm (but not hot!) water
  • 2 Tablespoons yeast (active dry)
  • 2 teaspoons honey
  • 2½ cups milk
  • ½ cup butter
  • ½ cup honey
  • 4 teaspoons sea salt
  • 7-8 cups whole wheat flour (I use freshly ground hard white wheat)
Instructions
  1. In a large bowl, mush the yeast and 2 teaspoons honey together with the warm water and set aside. It will begin to form bubbles soon.
  2. In the meantime, stir together milk, butter, ½ cup honey, and sea salt on the stove until the butter has melted and the mixture has reached 120°.
  3. If the temp exceeds this, allow it to cool before moving on.
  4. Pour the milk mixture into the bubbly yeast mixture and stir.
  5. Mix in flour, two cups at a time until a nice dough has formed.
  6. Do not knead. (There is no need.)
  7. Cover the dough and allow it to rise for at least one hour, or until you remember that you were making rolls.
  8. Prepare the innards:
  9. Ingredients for the “innards” of your cinnamon rolls: ½ cup melted butter, ½ cup sucanat or brown sugar, and ½ Tablespoon ground cinnamon
  10. On a well-floured surface, roll the dough to about ¼ inch thickness.
  11. Spread melted butter over the rolled dough.
  12. Sprinkle with sucanat, then cinnamon.
  13. Roll up the dough from the outsides of the "dough circle" as pictured above.
  14. Cut apart the two rolled lengths, then cut the dough into ½ inch thick rolls.
  15. Place the rolls side-by-side on a baking pan.
  16. Allow them to rest/rise for about 20 minutes, then bake the rolls in a 350° oven for about 25 minutes or until they are golden brown.
  17. Glaze and serve!
3.4.3177

Honey’d Orange GlazeYum

2 teaspoons orange juice concentrate
1/4 cup heavy cream
2 Tablespoons honey

Whisk ingredients together on the stove until smooth. Drizzle over baked cinnamon rolls.

To Freeze and Bake:

Place the prepared rolls about a 1/2 inch apart on a baking sheet. Freeze for about two hours, then transfer them to a freezer bag. Store in the freezer for up to two months.

To bake, place the desired number of frozen rolls on a baking pan. Cover and refrigerate overnight. (In the winter, I leave them on the countertop overnight.) Place the rolls into a cold oven, then turn the oven on to 350°. Bake as directed above, adding a few minutes of additional time as needed.

Easy No-Knead Whole Wheat Cinnamon Rolls for the Freezer with Honey'd Orange Glaze

These are deliciously easy, and mostly low in sugar! They kind of resemble those frozen orange rolls you can buy in the freezer section – except that these have a little bit of nutritional value and not nearly as much sugar, so we can all rejoice.

Are you a perfectionist? Did my frozen roll picture cause you to cringe? I’m just a “get the job done and move on” kind of girl…which basically means that I am a mess when I cook.

Heavenly Homemaker's Club Members: Access your homepage and all your fantastic resources here! Not a member yet? Please join us!
« Previous Page
Next Page »

Join Our Community!

 Facebook Twitter E-mail Instagram Pinterest

Popular Posts

~ Will All of the Real Moms Please Stand Up?
~ Easy! Stir-and-Pour Whole Wheat Bread
~ How to Make Gatorade
~ 31 Real Food Breakfast Ideas
~ Dear Teenage Girls...
~ When Mom Takes a Step Back
~ The Inexpensive Health Insurance We Love!
~ Let's Talk Real Food Grocery Budgets

Check out our latest posts!

  • Big Family Food and Fun: May 10-16, 2026
  • Big Family Food and Fun: May 3-9, 2026
  • Help Your Kids Become Independent in the Kitchen!
  • Big Family Food and Fun: April 26-May 2, 2026
  • Big Family Food and Fun: April 19-25, 2026
Home  ~  Simple Meals  ~  Club Membership  ~  Shop  ~  Privacy Policy  ~  Disclosure  ~ Contact

Copyright © 2026 · Beautiful Pro Theme on Genesis Framework · WordPress · Log in