Heavenly Homemakers

Encouraging women in homemaking, healthy eating and parenting

  • Home
    • About
    • FAQs
  • Recipes
    • Bread and Breakfast
    • Condiments
    • Dairy
    • Main Dishes
    • Side Dishes and Snacks
    • Desserts
    • Gluten Free
    • Instant Pot
    • Crock Pot
    • Heavenly Homemaker’s Weekly Menus
  • Homemaking
    • Real Food Sources
  • Store
  • Contact
    • Advertise
    • Disclosure
    • Privacy Policy
  • Simple Meals
  • Club Members!

Easy Noodle Stir Fry

August 28, 2011 by Laura 219 Comments

This post may contain affiliate links. For more information, please see our disclosure policy.

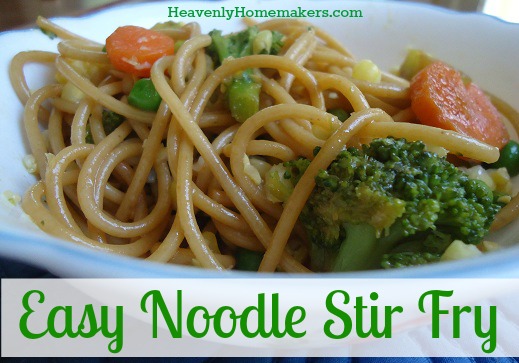
You’ll want to make this stir fry recipe a part of your weekly menu plan!

It is a fact that earlier in the summer, my oldest son requested Ramen Noodles for his 14th birthday lunch. Bleh. I obliged because it was his birthday and because I could afford the 17¢ required to purchase the desired package of what can’t possibly be food since it only costs 17¢. Asa completely understands why we don’t normally eat MSG covered cardboard – but doggonit – he likes the stuff and it was a birthday treat.

Our family used to make a great stir fry dish using Ramen Noodles “back in the day” before we began our healthy eating journey. Asa has fond memories of that dish and was actually the inspiration behind this new version. One day he simply said, “Mom – don’t you think you could just use spaghetti noodles and soy sauce instead of ramen noodles and make the Stir Fry taste the way it used to taste?” Huh, well now why didn’t I think of that?

We tried it and WOW. We all devoured it (which isn’t entirely shocking because “devour” is typically what we do around our table three or more times each day). This dish is great for several reasons:

  • It is very easy to make.
  • It is completely healthy.
  • You can make it a variety of ways, depending on which vegetables your family likes and has on hand.
  • You can make it a meatless dish or add chicken to make it a complete meal!

Easy Noodle Stir FryYum

3.0 from 1 reviews
Easy Noodle Stir Fry
 
Save Print
Author: Laura
Serves: 6-8
Ingredients
  • 2-4 cups fresh or frozen veggies of your choice (broccoli, carrots, peas, peppers, corn, zucchini, squash, etc.)
  • 3 Tablespoons olive oil
  • 1 clove minced fresh garlic or ½ teaspoon garlic powder
  • 10 ounces whole wheat spaghetti noodles
  • Soy sauce (to taste)
  • Sea salt (to taste)
Instructions
  1. In a skillet, toss vegetables, garlic and olive oil together - cooking on medium heat until veggies are tender.
  2. In the meantime, boil the spaghetti noodles in water and drain.
  3. Stir cooked veggies and noodles together.
  4. Add soy sauce, stirring until the noodles are barely coated.
  5. Add sea salt (and more soy sauce) if desired.
3.4.3177

Easy Noodle Stir Fry

What is your relationship with Ramen Noodles? Love ’em? Hate ’em? Do you know what’s in ’em? You don’t want to know. I highly recommend switching to whole grain pastas and skipping any MSG filled sauces and flavorings as part of your Funky Fresh Kitchen challenge. You can do it! Look how tasty this dish is without any artificial anything!

 ~~~~~~~~~~~~~~~~~~~~~~~~~~~~~~~~~
malachi cutting
My youngest son can now cut all the veggies for this meal. I LOVE THIS!
This week only, grab the FREE Knife Skills Videos so your kids can learn how to cut fruits and vegetables safely!
Heavenly Homemaker's Club Members: Access your homepage and all your fantastic resources here! Not a member yet? Please join us!

Homemade Pudding Pops

July 19, 2011 by Laura 122 Comments

This post may contain affiliate links. For more information, please see our disclosure policy.

You know how all your friends growing up always had the cool snacks at their house? (Although I’m sure my friends thought I was the one with the cool snacks.)  One of my friends always had Jello Pudding Pops at her house. Visiting her in the summer was always a treat. Don’t worry – I liked her for more than just her pudding pops. I mean, she also had really cool Cabbage Patch Dolls. No really – I liked my friend for who she was – not just for her pudding pops and dolls (and cool play room and cute puppy).

I can not recreate a Cabbage Patch Doll, nor do I think my boys would want me to. But Beth at Turn 2 the Simple reminded me a few days ago with her comment on my Creamy Pudding recipe that I can recreate a Pudding Pop! I love how tasty these are, how refreshing they are on a hot day – and how they actually offer some nourishment and keep my kids full for a little while.

I simply followed my Creamy Pudding recipes and froze the mixture into pudding pops. EASY!!! I made both chocolate and vanilla. I didn’t try butterscotch, but I think I might next time just for fun!

How to Make Pudding Pops:

Make a batch (or two or three) of pudding. You can use my healthy varieties of Creamy Pudding if you want!

Yum

Pour the pudding into popsicle containers or 3 ounce sized bathroom cups.
Each batch of pudding made about 15 Pudding Pop cups.
I found it easiest to put all the cups on a large cookie sheet for easier transport the freezer.


Allow the pudding to cool and set up (about 45 minutes). Place a popsicle stick in each cup:


Put the Pudding Pops into the freezer for at least 4 hours. I was surprised that it took quite a while for these to be frozen through and through. Oh, but when they were frozen – it took me back to my days as a little girl playing with Cabbage Patch Dolls with my friend, and eating pudding pops on her porch.


Do you have any Pudding Pop or Cabbage Patch Doll memories to share? Oh dear, or are some of you too young to remember Cabbage Patch Dolls?

Heavenly Homemaker's Club Members: Access your homepage and all your fantastic resources here! Not a member yet? Please join us!

Coconut Cupcakes (Dairy Free!)

June 1, 2011 by Laura 21 Comments

This post may contain affiliate links. For more information, please see our disclosure policy.

My adorable little nephew isn’t able to eat dairy, which means his (favorite) Aunt Laura had to do a little bit of experimenting before his visit last week. I came up with a very delicious and healthy Coconut Cupcake recipe that all of my kids loved! Coconut Milk is awesome stuff and works very well for baking. (I had purchased a case of Thai Kitchen Coconut Milk to experiment with and to have on hand.)  We don’t need to eat dairy free at our house, but I will be making these cupcakes again!

Coconut CupcakesYum

3 cups whole wheat flour
2 cups sucanat
1 Tablespoon baking powder
1 can (13. ounces) coconut milk
1/2 cup melted coconut oil
1 teaspoon vanilla extract
2 eggs

Mix all ingredients together with beaters. Spoon into 24 paper lined cupcake pans. Bake at 375° for about 25 minutes or until a toothpick inserted in the middle of the cupcakes comes out clean. Allow the cupcakes to cool completely before frosting.

Frosting

1/2 cup palm shortening (I buy palm shortening from Tropical Traditions or through Amazon.)
1/2 teaspoon vanilla extract
2 1/2 cups powdered sugar (I use organic, unbleached powdered sugar or I make powdered sugar myself with sucanat and a blender.)
1-2 tablespoons coconut milk
shredded coconut for garnish (optional)

By the way, this Coconut Milk also works great for making these pudding recipes and these whole wheat donuts. Yes, Aunt Laura does like to spoil her nieces and nephews, what can I say? Don’t worry. I also gave them protein and vegetables. :)

Ever done any cooking or baking with Coconut Milk? I’m excited to experiment more with this great product!

Heavenly Homemaker's Club Members: Access your homepage and all your fantastic resources here! Not a member yet? Please join us!

Healthy Homemade Ketchup (finally!)

May 25, 2011 by Laura 134 Comments

This post may contain affiliate links. For more information, please see our disclosure policy.

I think I’ve been working on a homemade ketchup recipe for about forty years. (I have actually not reached the age of forty yet, but I am rather fond of exaggerating and I feel like I’ve been experimenting with ketchup for like totally forever.)

It’s taken quite a bit of trial and error to find a recipe that we think tastes good. So many recipes just don’t quite taste ketchupy enough for me. This recipe I’ve finally settled on is one I found and adapted from Happy in Dole Valley. I’m happy to say that this is a very easy recipe to make. Tastes good…healthy…and easy. Yes, this is the kind of recipe I like to share with you.

During my experiments, one of the toughest challenges was to sweeten the ketchup in a way we liked. I didn’t want it too sweet, but it did need to be a little bit sweet – and not too tomato-ee. (I’d like to see the words ketchupy and tomato-ee become a part of the dictionary someday, wouldn’t you?)

I tried making ketchup with raw honey to sweeten it, and found that the taste was too strong. Regular ol’ sucanat (dehydrated cane sugar juice) is a little crunchy in this recipe, so I finally figured out a great way to sweeten our homemade ketchup:  Grind the sucanat in the blender like you’re making this healthier, unprocessed powdered sugar…then add it to your ketchup ingredients. Easy and perfect!

Healthy Homemade KetchupYum

Healthy Homemade Ketchup (finally!)
 
Save Print
Author: Laura
Ingredients
  • 7 ounces of tomato paste
  • ⅓ cup water
  • 2 Tablespoons vinegar (I used distilled coconut vinegar)
  • ¼ teaspoon onion powder
  • ¼ teaspoon garlic powder
  • ¼ teaspoon dry mustard
  • pinch of cinnamon
  • pinch of cloves
  • pinch of allspice
  • pinch of cayenne pepper
  • ¼ teaspoon sea salt
  • ⅛ cup sucanat
Instructions
  1. Whisk ingredients together until mixed well and smooth.
3.4.3177

I’ve found that if you grind the sucanat in the blender to make it less “crunchy” it works better.

Make french fries, get them nice and crunchy, salt them well with sea salt and give me a call.

Defining “a pinch”: When a recipe calls for “a pinch” of something, I usually put in about 1/8 teaspoon – an amount you could “pinch” between your fingers if you were to reach into the spice jar and pull some out. I don’t really like putting my fingers in to pinch my spices. But you go right ahead if you want to.

The true test with our Homemade Ketchup Experiment:  Did the kids like it?

All of my kids love ketchup, but one particular son of mine eats ketchup on everything:  eggs, green beans, broccoli… He’s also my pickiest kid (which is why he eats ketchup to get his veggies down). I  hesitantly put this homemade ketchup on his plate with a nice helping of homemade fries. He ate it. He loved it. He said, “Is this the homemade ketchup?” and I said, “Yep” and he said, “Wow it’s really good!”

Score! We have a winner!

Homemade Ketchup Recipe

Now that I’ve conquered ketchup, I’ll move on to some of the other recipes on the Heavenly Homemakers Recipe Challenge list. I’ve gotta say, I’ve been working on mayonnaise and it is about to kill me. I can not get a homemade mayonnaise to thicken even a little bit and it’s beginning to make me mad. Those of you who make mayo…what in the world is the secret to getting the ingredients to actually thicken into mayo? Ketchup took me forever to figure out, and now the mayo.  I apparently have condiment issues.

Well anyway, what’s your favorite use for ketchup? Please tell me it isn’t green beans, like my son.

Heavenly Homemaker's Club Members: Access your homepage and all your fantastic resources here! Not a member yet? Please join us!

The Story of My Mom’s Salsa (and Why I Can’t Share My Salsa Recipe)

May 17, 2011 by Laura 46 Comments

This post may contain affiliate links. For more information, please see our disclosure policy.

salsa_1

I’ve been promising for months to share my mom’s salsa story. Not her recipe…but her story. I can’t share her recipe. But the story is kind of a nice one. :)

My mom began making salsa when I was a little girl, tweaking and playing with ingredients from her garden until she figured out a recipe that was just right. We all loved it. Neighbors loved it. Family members loved it. Friends loved it. There was nothing incredibly fancy about Mom’s salsa. It was slightly sweet. Slightly spicy. Just right.

When my brother and I were in college, she would send her home-canned salsa to the dorm with us. It became a hit with our college friends and it wouldn’t last long. :)  I’m not sure when Mom’s salsa really began to become a “big thing” locally, but I believe it was around the time I was graduating from college and getting married.

People all over the town where she and my dad lived were requesting that she make them some of her salsa. She began receiving orders. A downtown shop began to request her salsa so that they could sell it to their customers. After a while, she was making so many jars of salsa, she could barely keep up. She knew with the volume of salsa she was making, she needed a licensed kitchen to work in. She was swimming in salsa. :)

Around that time, my uncle and aunt in Chicago who had “connections” set up a meeting with a company who could make and market my mom’s salsa for her. Mom and Dad flew to Chicago, toured the commercial kitchen, made necessary negotiations, signed a bunch of papers…and my mom’s salsa officially became  BJ’s Salsa:

(My mom’s name was Bettye Jo…her family and some friends often called her BJ.)

Now my mom didn’t have to break her neck to keep up with the salsa demand! It was being made and shipped out to stores and marketed by others. My mom was so pleased with this success, and well she should be. She’d worked hard for this!

My mom was diagnosed with ALS (Lou Gehrigs Disease) in the fall of 2002. Salsa sales had begun to slow by then anyway, and all of us were so focused on Mom and her health and keeping her comfortable, salsa was really the last thing on our minds.

After she went to be with Jesus in July of 2004, our family was so thankful to have a few jars of her salsa left. We cherished and hoarded them. We were out of sorts and grieving. We weren’t thinking very logically (or at least I wasn’t), which is why it took over a year for us to talk about or realize that it may still be possible for her salsa to be made and sent to us.

Dad checked into it and sure enough. We could get ourselves some BJ’s Salsa.

We still cherish each jar of my mom’s salsa. But we don’t have to hoard it anymore. And every time I open a new jar, I feel like I’m opening something made by my mom. There is a simple statement on each jar:

“Developed in the kitchen of Bettye Jo Hamm”

It helps me not miss her quite so much. Or maybe it makes me miss her even more.

I use her recipe now (which must be kept a secret) to make salsa with ingredients from my own garden. It’s not quite as good as “Grammy’s salsa” was, but we like it okay. ;)

salsa_2

Now, anytime I talk about using salsa in a recipe, you know that I’m not just using any ol’ salsa. I’m opening a treasure each time I open a jar of salsa. One that came right out of “Bettye Jo’s kitchen”.

{Edited to note:  BJ’s Salsa isn’t sold in any stores right now (except for one small shop in my hometown). Thanks for inquiring about it. Maybe we should look into putting it in stores again? Hmm…}

Heavenly Homemaker's Club Members: Access your homepage and all your fantastic resources here! Not a member yet? Please join us!

Why You Want Homemade Ice Cream

May 13, 2011 by Laura 31 Comments

This post may contain affiliate links. For more information, please see our disclosure policy.

Like I really need to give you a reason to want homemade ice cream? Especially the really creamy kind. The really creamy kind with homemade hot fudge sauce on it. (Now I’m just being cruel, aren’t I?)

I just wanted to remind you about the Ice Cream Experiment that I conducted about a year ago, in case you’re new here or in case you’ve forgotten.

To be inspired to make Homemade Ice Cream or to at least be encouraged to buy a more “real ingredient” variety of ice cream at the store, check out the following posts:

  • The Ice Cream Experiment, part 1
  • The Ice Cream Experiment, part 2
  • Which Ice Cream Maker (just in case you’re curious)
  • Recipe for Homemade Vanilla Ice Cream (that’s healthy enough to eat for breakfast!) and tastes great if made with Homemade Vanilla Extract and topped with this delicious Hot Fudge Sauce

Here’s a little hint about why you want Homemade Ice Cream :

icecreamex22sm

This was Ice Cream Brand One after sitting for eight days on my countertop.
Mmmmm, ice cream that doesn’t melt. Tasty.

Let’s all give three cheers for real, whole food, shall we?

Now that I’ve shared all that, I have to tell you that I’m sitting here shivering while I write about ice cream. Where we live, we keep shifting from ice cream weather to hot cocoa weather. Some days I’m so confused I make hot cocoa to go with our ice cream .

Not really. But I am confused about what season it is here in Nebraska.

Do share…where you live are you experiencing Ice Cream weather or Hot Cocoa weather?

Heavenly Homemaker's Club Members: Access your homepage and all your fantastic resources here! Not a member yet? Please join us!

Healthier Cheese Dip – a Velveeta and Rotel Recipe Knock Off!

May 4, 2011 by Laura 143 Comments

This post may contain affiliate links. For more information, please see our disclosure policy.

Today, I have written a very heart felt letter to my friend, Velveeta. I hope you don’t mind that I shared it. It’s rather personal, so I hope no one feels embarrassed to read my inner-most thoughts. I’m sure that my friend Velveeta is a friend to some of you too. Truly, if I would have had a daughter, I would have named her Velveeta in honor of my friend.

Okay, totally not really. But still.

Dear Velveeta,

I dearly love you. I grew up eating you and some days, I really miss you. I often visit you in the store, just in case you miss me too. Have you seen me there, lingering by your shelves?

What exactly are you made of anyway? Wait – don’t tell me. I don’t want to know. Reading your label makes me queasy, but when I mix you with a can of rotel, I could gladly grab a bag of chips and eat half the bowl. You are delicious. You are comfort food. You are memories from my childhood. And for goodness sakes you taste incredible alongside a cold glass of Pepsi.

But you are “processed cheese food”. What in the world does that mean? No wait – really – don’t tell me. I don’t want to know. I just want to eat you in ignorance so that I won’t know the full effects of what something such as you can do to the insides of my body.

But alas, since my family began Our Healthy Eating Journey a few years ago, I chose to give you up. I have a new friend now that has a striking resemblance to you, but one that doesn’t make me feel so sick inside.

Those were some good times we had together – you, me and the Pepsi. Please know that I’ll hold the memory of you forever in my heart.

Insanely Yours,
Laura @ Heavenly Homemakers

Well, now you know. Velveeta-Rotel chip dip and I go way back. I miss her. I love her. But there’s a new kid in town, one that is made from real food that I can trust not to turn my gut wrong-side-out. I’ve been tinkering with this dish for the past couple of years and my family loves it! It’s not quite as thick as the Velveeta-Rotel dip, but I would imagine that the ingredients that make that one thick are ingredients you and I don’t know how to pronounce. Just lean over the bowl when you eat this. A little dip running down the chin never hurt anyone.

Don’t leave me hanging. I must know if you are friends with Velveeta too. Do you love her with Rotel? And tell me, is Velveeta a lovely name, or what?

Again, totally not really.

Healthier Cheese Dip - a Velveeta and Rotel Recipe Knock Off!
 
Save Print
Prep time
5 mins
Cook time
5 mins
Total time
10 mins
 
Author: Laura
Recipe type: Snack
Cuisine: American
Serves: 4-6 servings
Ingredients
  • 1 pound ground hamburger meat (seasoned with Homemade Taco Seasoning if you like!)
  • 2 cups salsa
  • 1 cup cream
  • 1 cup shredded cheddar cheese
  • Organic Corn Chips
Instructions
  1. Brown hamburger meat and season if desired. Stir salsa and cream into the meat, stirring constantly while heating on medium heat for about three minutes. Remove mixture from heat and add shredded cheese. Stir until cheese is melted. Serve with Organic Corn Chips. (You can stir in ½ cup sour cream or 3 ounces cream cheese if you'd like.)
3.4.3177
Heavenly Homemaker's Club Members: Access your homepage and all your fantastic resources here! Not a member yet? Please join us!

Pretzel Challenge Winner

April 30, 2011 by Laura 3 Comments

This post may contain affiliate links. For more information, please see our disclosure policy.

You all made this week super fun, with all of your creative pretzel making and picture taking. My inbox filled up quickly as you sent in your pictures and told of your experiences. I LOVED seeing whole families involved in the pretzel making process – kids, dads, pets…

Okay, not pets. Although they might have had fun too.

Here are a few pictures I grabbed to share  – wish I had room to show them all! Way to go everyone!

The winner of our Pretzel Challenge winner is:

Laura:  (laura.hojnacke@)

Laura, email me and I’ll send you your Heavenly Homemakers Gift certificate code worth $20 off anything downloadable in the Heavenly Homemakers Shop! 

If you haven’t had a chance to make these whole wheat soft pretzels yet, might I encourage you go do that? Make it a family event. Get the kids involved. Call in the neighbors. You can come up with different shapes and letters and twist up pretzels all fancy like if you want. Hey, it’s better than a game of Twister. Unless you like embarassing yourself in front of your neighbors. And then you get to eat the pretzels, which is obviously the point, and the best part of all.

Hey, maybe next I should extend a Twister Challenge. Now those would be some fun pictures to see. Not that you’d be able to actually take a picture with your right hand “on red” and your left knee “on blue”.

I’ve gotta say, that game ranks up there with some of my least favorite. Makes you wonder why I keep talking about it, huh?

Happy National Pretzel Day (Week) everyone! :)

Heavenly Homemaker's Club Members: Access your homepage and all your fantastic resources here! Not a member yet? Please join us!

My New Kitchen Aid Food Processor (and a little frozen fruit drama)

April 28, 2011 by Laura 67 Comments

This post may contain affiliate links. For more information, please see our disclosure policy.

Mama got a new food processor!

I seem to be a breaker of kitchen appliances. (Is breaker a word? Perhaps I’m a breakist?)

I think it’s a combination of two things:  1) I often buy cheap appliances. 2) I use my kitchen appliances constantly.

Therefore, when my previous food processor broke, we decided that instead of paying around $30 for another cheap food processor that would break in a year or less, we should save up and invest in a food processor that would last (because that would save us money in the long run!).

So, we saved. And while we were saving, I continued to use my broken food processor that still sort of worked, but if left unattended would fly off the counter and spray peanuts into the living room. The last day I used my old food processor, everyone was at the table waiting for their Mock Frozen Yogurt when all of a sudden, because I wasn’t holding the gadget with all my weight and standing on my right pinky toe just right, we had a sudden flinging of frozen berries and yogurt. The boys watched in astonishment as their Mama shrieked, the result of three frozen blueberries striking her on the forehead. The walls were covered in spattered yogurt and half the ingredients were dripping off the nearby pile of mail.

It was at that point that Matt, while gently dabbing at the blueberry stain that was running down my face, said, “Let’s get you that new food processor, what do you say?”

And so we looked around a little bit and decided on the Kitchen Aid 9-Cup Food Processor. I cringed when I first saw the price, because I’m used to buying cheap appliances. But now that I’ve got it all set up in my kitchen, I’ve decided that it was worth every penny. It’s so heavy duty that there is no comparison to the dinky things I formerly used.

Ain’t she purty? I’ve been playing…wanna see?

I spent several hours playing with her the first day she arrived. (I’m calling her a her because she’s so lovely and because there are plenty of males in our household so I can call her a her if I want to.)  As you can see, I began by making Peanut Butter. Two batches actually. The boys ate the Homemade Peanut Butter on their Whole Wheat Waffles, then I used some of it to make Peanut Butter Honey Fudge. This processor made my Homemade Peanut Butter making experience SO much easier!!!! What do you know…a food processor that actually works efficiently!

Next, I got out my cashews and dates and made some Homemade Larabars. Wow, those are fun to make and deliciously healthy for snacks!

I couldn’t resist setting the snacks up side by side and taking a picture. Oh lovely food made by my lovely new food processor. (Sorry to be gushing. I am obviously having a lot of fun playing with my new toy, can you tell?)

After I made those snacks, I got her all cleaned up and made some Mock Frozen Yogurt to go with our lunch. After all, I needed to see if I could make this treat without the drama of the previous Mock Frozen Yogurt mishap.

I’m happy to report that with my new Kitchen Aid 9-Cup Food Processor there was no blueberry violence or yogurt flinging. Nor did any peanuts shoot into the living room. All was calm in the kitchen as my new investment went to work for me.

Now there’s a story with a happy ending. :)

So, do you have a food processor? What kind do you have? Do you tend to buy cheap appliances, or do you invest in more efficient ones? Ever been a victim of frozen berry violence?

Heavenly Homemaker's Club Members: Access your homepage and all your fantastic resources here! Not a member yet? Please join us!

Happy National Pretzel Day!!!

April 26, 2011 by Laura 19 Comments

This post may contain affiliate links. For more information, please see our disclosure policy.

Yes indeed, today is the big day. It’s National Pretzel Day! (I’m sure you all dressed up for the occasion.)

I made a big batch of pretzels earlier this afternoon. They came out fat and sassy this time, and rich and buttery, and were best hot and steamy and well {she says, with a bit of a tear in her eye}, this is quickly becoming one of my favorite holidays. 

Oh look, a tower of Pretzels:

It’s been so much fun to receive your emails showing your pretzel pictures and telling of your pretzel adventures!! Thanks to all have been participating so far in our “Pretzel Challenge“. 

It’s not too late for the rest of you to join in! Read more of the details about the Pretzel Challenge here (not that it’s very complicated), then send me your pretzel pictures!!

Everyone who participates in the Pretzel Challenge by Friday night, April 29, will be in a drawing to win a $20 Gift Certificate from the Heavenly Homemakers Shop!

Happy Pretzel Baking!

Heavenly Homemaker's Club Members: Access your homepage and all your fantastic resources here! Not a member yet? Please join us!
« Previous Page
Next Page »

Join Our Community!

 Facebook Twitter E-mail Instagram Pinterest

Popular Posts

~ Will All of the Real Moms Please Stand Up?
~ Easy! Stir-and-Pour Whole Wheat Bread
~ How to Make Gatorade
~ 31 Real Food Breakfast Ideas
~ Dear Teenage Girls...
~ When Mom Takes a Step Back
~ The Inexpensive Health Insurance We Love!
~ Let's Talk Real Food Grocery Budgets

Check out our latest posts!

  • Big Family Food and Fun: May 10-16, 2026
  • Big Family Food and Fun: May 3-9, 2026
  • Help Your Kids Become Independent in the Kitchen!
  • Big Family Food and Fun: April 26-May 2, 2026
  • Big Family Food and Fun: April 19-25, 2026
Home  ~  Simple Meals  ~  Club Membership  ~  Shop  ~  Privacy Policy  ~  Disclosure  ~ Contact

Copyright © 2026 · Beautiful Pro Theme on Genesis Framework · WordPress · Log in