Heavenly Homemakers

Encouraging women in homemaking, healthy eating and parenting

  • Home
    • About
    • FAQs
  • Recipes
    • Bread and Breakfast
    • Condiments
    • Dairy
    • Main Dishes
    • Side Dishes and Snacks
    • Desserts
    • Gluten Free
    • Instant Pot
    • Crock Pot
    • Heavenly Homemaker’s Weekly Menus
  • Homemaking
    • Real Food Sources
  • Store
  • Contact
    • Advertise
    • Disclosure
    • Privacy Policy
  • Simple Meals
  • Club Members!

Creamy Chicken and Rice Casserole (with no cream soups!)

October 30, 2011 by Laura 108 Comments

This post may contain affiliate links. For more information, please see our disclosure policy.

I am a canned Cream of Fill in the Blank Soup rebel. I have avoided canned cream soups since we began Our Healthy Eating Journey. Why? Because their ingredient lists scare me. (As in, I literally scream out loud, from deep in the back of my throat, when I pick up a can and read it at the store. Not really. But I wonder what my boys would do if I did? Maybe I’ll do that sometime. Not really.)

The ingredients in a can of Campbell’s Cream of Celery Soup, according to the Campbell’s Food Service Website are (and do try not to scream when you read this):

Water, Celery, Vegetable Oil (Corn, Cottonseed, Canola, and/or Soybean), Wheat Flour, Modified Food Starch, Contains less than 2% of: Salt, Soy Protein Concentrate, Monosodium Glutamate, Cream Powder (Cream [Milk], Soy Lecithin), Yeast Extract, Flavoring, Beta Carotene for Color.

Well, at least the first two ingredients are water and celery. ;)

There are all kinds of recipes which share how to make homemade cream soups. I’ve tried some of them, and I’m thankful that the recipes are available. For some reason though, I just haven’t had a loving enough relationship with cream soup to try to keep the homemade varieties on hand.

The question is then, how do you make a casserole without a cream soup? Ah, very simple:  I use cream.

Cream of what? No, just cream. Cream. The stuff that rises to the top of your raw milk. Or the thick, white liquid you can buy in the dairy department of the store, usually labeled Heavy Whipping Cream. If you use cream, along with a few spices that enhance your casserole, your dish will be tasty, easy and surprise, surprise:  creamy.

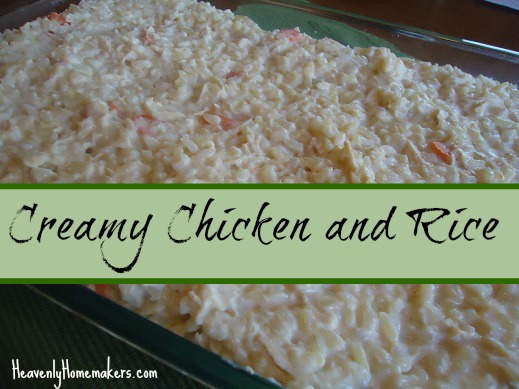
Here is how I now make my Creamy Chicken and Rice Casserole with real, whole food ingredients:

Creamy Chicken and Rice CasseroleYum

4 cups chicken broth (I avoid canned broth or bouillon because they are also loaded with MSG.)
4 carrots, peeled and sliced
1 medium onion, diced
2 cups brown rice
2-3 cups cooked chicken, cut into bite sized pieces
1/2 teaspoon (or more) garlic powder
Sea salt, to taste
1 1/2 cups cream (heavy whipping cream, or fresh cream which has risen to the top of whole, raw milk)

In a large pot, bring chicken broth, carrots and onion to a boil at high heat. Add rice, stir, and place the lid on the pot. Reduce heat to low and cook the rice and vegetables in the broth for 45 minutes. (To avoid sticky rice, don’t stir the rice while it’s trying to cook – just walk away and ignore it for the entire 45 minutes. You can do it.)

When the rice is done, stir in cooked chicken, garlic powder and cream. Shake in liberal amounts of sea salt for best flavor. (I use Redmonds Real Sea Salt, which is unbleached and full of natural minerals.)  Cook ingredients for about five more minutes to heat the chicken and cream. Serve directly from pot, or pour into a 9×13 inch baking dish. This meal can be prepared ahead of time, refrigerated and reheated in the oven at serving time. Cover and heat in a 350° oven for 20-30 minutes or until hot through and through. Serves eight.

(You can also freeze this meal. To reheat, simply put the frozen, covered casserole into the oven, turn the oven onto 350° and cook for about 1 1/2 hours or until it is heated thoroughly.)

Creamy Chicken and Rice

Creamy Chicken and Rice Casserole (with no cream soups!)
 
Save Print
Author: Laura
Serves: 8-10 servings
Ingredients
  • 4 cups chicken broth (I avoid canned broth or bouillon because they are also loaded with MSG. Here's my easy homemade chicken broth recipe, which includes frighteningly ugly pictures of a chicken carcass. Again, try not to scream.)
  • 4 carrots, peeled and sliced
  • 1 medium onion, diced
  • 2 cups brown rice
  • 2-3 cups cooked chicken, cut into bite sized pieces
  • ½ teaspoon (or more) garlic powder
  • Sea salt, to taste
  • 1½ cups cream (heavy whipping cream, or fresh cream which has risen to the top of whole, raw milk)
Instructions
  1. In a large pot, bring chicken broth, carrots and onion to a boil at high heat.
  2. Add rice, stir, and place the lid on the pot.
  3. Reduce heat to low and cook the rice and vegetables in the broth for 45 minutes.
  4. When the rice is done, stir in cooked chicken, garlic powder and cream.
  5. Shake in liberal amounts of sea salt for best flavor.
  6. Cook ingredients for about five more minutes to heat the chicken and cream.
  7. Serve directly from pot, or pour into a 9x13 inch baking dish.
  8. Cover and heat in a 350° oven for 20-30 minutes or until hot through and through.
3.4.3177

Cooking your rice in the chicken broth gives this dish a wonderful, naturally delicious flavor. And in case I didn’t mention it before, the cream makes this dish…creamy.

Where have you landed on the Cream of Fill in the Blank issue? Have you given them up yet? Have you ever screamed out loud when reading the ingredient list on a can of soup at the store? Do you make your own cream soups? Or do you use another substitution? (Sour cream works well too, in some recipes!)

Heavenly Homemaker's Club Members: Access your homepage and all your fantastic resources here! Not a member yet? Please join us!

Healthy Crockpot Recipes: Apple Butter

October 25, 2011 by Laura 44 Comments

This post may contain affiliate links. For more information, please see our disclosure policy.

Many of you offered suggestions as to how to make Apple Butter – thank you!

My house smelled wonderful for hours, thanks to all of you! I decided to experiment with my friend Leesa’s apple butter method, and found it to be very simple and delicious. I only made a small amount this time, since I was experimenting – so you’ll want to double or triple this recipe if you want a larger amount. When I started with one quart of applesauce, I ended up with two and a half – half pints of apple butter. However, it is very clear to me that writing half – half just looks weird and confusing. It may make more sense for me to say that one quart of applesauce resulted in 2.5 half-pint jars.

Or we could say that I ended up with one full pint plus a half of a half pint of apple butter. This is, of course, the same as two and a half cups of apple butter, which is otherwise known as five half cup portions of apple butter, better known as ten – 1/4 cup portions, which we all know is precisely 20 – half of a half of a half of a half of a half pints of apple butter. Give or take a half of a half of a pint.

I’m done now.

Homemade Apple ButterYum

Healthy Crockpot Recipes: Apple Butter
 
Save Print
Author: Laura
Ingredients
  • 1 quart homemade apple sauce
  • 2 Tablespoons sucanat
  • 1 teaspoon cinnamon
Instructions
  1. Stir ingredients into a crock pot.
  2. Cook on low for about six hours on low setting, with LID OFF, stirring occasionally.
  3. Store the apple butter in the refrigerator - or process in a hot water bath for 10 minutes to seal.
  4. If the jars are sealed properly, you can store your apple butter in the pantry until you're ready to serve.
3.4.3177

Find my Homemade Apple Sauce recipe here. Read information on how to process in a hot water bath for 10 minutes to seal your jars here.

apple_butter

Caution:  Contents cooking in crock pot are hot. Refrain from sticking a finger into the crock pot for a lick, even though the delicious smell will create a major temptation. Dipping in with a teaspoon is obviously a much better option. No double dipping allowed. In addition, be aware that partaking in too many licks from the crock pot will result in a smaller amount of finished product, which will mean that all of the math I labored over above, rounding carefully to the nearest half of a half pint, will be null and void.

Heavenly Homemaker's Club Members: Access your homepage and all your fantastic resources here! Not a member yet? Please join us!

My Favorite, Versatile Whole Wheat Dough

October 5, 2011 by Laura 67 Comments

This post may contain affiliate links. For more information, please see our disclosure policy.

You’ve been seeing this same dough recipe pop up over and over as I post new recipes. It has definitely become my go-to dough recipe for quick, kid-friendly meals that are also healthy. I decided today to highlight and feature my friend, The Versatile Dough. He (she?) is a winner in my book and can multitask in my kitchen to create all kinds of wonderful food.

I guess that must mean that this dough is definitely a “she”. He’s can’t multitask as well as she’s can. This is not an insult to the he’s – no not at all. I’m thankful that God made males able to focus on one thing well. We females can multitask so well, it’s sometimes hard for us to focus on just one thing. Trust me, I’m a she. I know these things. (See, like right now I’m typing this, thinking about the meat thawing in my kitchen for lunch tomorrow, making a plan for what to do with the apples on my porch and creating a chore list for my kids – all at the same time. It’s amazing that my post makes any sense at all. Case in point. So far, this post hasn’t made a whole lot of sense. After all, I’ve just assigned a gender to my whole wheat dough.)

So back to my point, because surprisingly, I really do have one. I love this Whole Wheat Dough. I use it a lot. I think you will love it too.

Versatile Whole Wheat DoughYum

3 to 3 1/2 cups whole wheat flour (I use freshly ground hard white wheat flour)
1 teaspoon sea salt
1 cup butter, melted and cooled
1 cup plain yogurt

Mix all ingredients and knead together until a nice dough has formed. (If you’re using store-bought flour, you will probably not need all 3 1/2 cups of flour.)  You can roll out and use this dough right away, or you can allow it to sit on the counter-top overnight (covered) in order to break down the phytates in the wheat and make it more digestible.

If you do allow the dough to sit overnight, it is best to knead this dough for several minutes before you try to roll it out. :)

What to Make With This Versatile Whole Wheat Dough

(Click on the links above the pictures to find the specific recipes.)

Pizza Crust

pizzasm.JPG

Poptarts

Pigs in a Blanket

Mini Apple Pies and Pockets

miniapplepies9sm

Pizza Pockets

pizzapockets2sm.JPG

I bet if I think real hard, I can come up with several more ways to use this dough. Have you tried making this dough before or any of the above recipe ideas? You MUST try it – it’s buttery, flaky, healthy, tasty and EASY!

And if you think I’m weird calling my dough a “she” you should hear me talking to my frozen/thawing chickens as I prepare them for soup. Wouldn’t you just like to be a fly on the wall in my kitchen sometime? Oh the things you would learn about me then. ;)

Heavenly Homemaker's Club Members: Access your homepage and all your fantastic resources here! Not a member yet? Please join us!

Homemade Peach Syrup (made with unprocessed sugar)

October 2, 2011 by Laura 13 Comments

This post may contain affiliate links. For more information, please see our disclosure policy.

We usually top our pancakes with real maple syrup or homemade applesauce. Sometimes peanut butter and jelly. Or peanut butter with maple syrup. Or honey. Or if we sprinkle a few mini chocolate chips into the pancakes, we don’t really need syrup at all. But last week when we had some fresh, local peaches in our kitchen, I made a quick and healthy homemade peach syrup that is oh-my-goodness good.

You need exactly two ingredients to make this: peaches and sucanat. The two together cook to form a syrup. No water necessary. Can you believe how easy this is?

Homemade Peach SyrupYum

Homemade Peach Syrup (made with unprocessed sugar)
 
Save Print
Author: Laura
Ingredients
  • 3 fresh peaches (or 2 cups frozen)
  • 2 Tablespoons sucanat or brown sugar
Instructions
  1. Slice peaches into a saucepan.
  2. Stir in sucanat and cook on medium heat, stirring occasionally until the peaches are tender and the ingredients have formed a syrup.
3.4.3177

You can add a few shakes of cinnamon if you like. Of course I love doing that in the fall when everything seems to need to smell and taste like cinnamon.

I love how the fruit and sugar cooked together form a syrup naturally. This works with both fresh or frozen fruit. No need to thaw the frozen fruit before cooking!

Homemade Peach Syrup


Another variation of this Peach Syrup recipe is…

Easy Raspberry Pancake and Waffle Syrup

Easy Raspberry Pancake and Waffle Syrup - Only Two Ingredients!

It’s the same idea – just sub out peaches for raspberries. Or use blueberries instead. Or strawberries. Or any combination of peaches or berries to make a multi-fruit syrup. See how easy this is?

In case you need them (and of course you do want them), here are our family’s favorite pancake and waffle recipes:

  • Whole Wheat Waffles
  • Quick Mix Pancakes
  • Peanut Butter Pancakes
  • Pumpkin Pancakes

What’s your favorite way to top pancakes and waffles?

Heavenly Homemaker's Club Members: Access your homepage and all your fantastic resources here! Not a member yet? Please join us!

Coconut Flour Brownies (Gluten Free!)

September 28, 2011 by Laura 57 Comments

This post may contain affiliate links. For more information, please see our disclosure policy.

I decided to follow my “What Kind of Wheat Flour is Best?” post with a gluten free recipe. Talk about swinging from one side of the pendulum to the other, huh? I’m either trying to be accommodating – or keeping you forever on your toes with what to expect when you check in here. ;)

Beth emailed this recipe to me, saying she found it on the Azukar Coconut Flour package that I’d posted a deal for recently. (The deal is still good, by the way!)  I tweaked the recipe slightly by replacing the regular sugar with sucanat. Also, you could add chocolate chips if you’re feeling the need for a major chocolate fix, or chopped nuts if you’re feeling nutty. Personally, I can always use a chocolate fix, and nutty as I am, I don’t care for chopped nuts in my brownies.

Coconut Flour BrowniesYum

1/3 cup melted butter or coconut oil
1/2 cup cocoa powder
1 cup sucanat
6 eggs
1/2 teaspoon vanilla extract
1/2 cup coconut flour
1/2 cup chocolate chips (optional)
1/2 cup chopped nuts (optional)

Stir together melted butter (or oil), cocoa and sucanat. Add eggs and vanilla, mixing well. Stir in coconut flour, stirring until all ingredients are well combined. (Coconut flour likes to clump together a little bit – I find a whisk usually helps smooth out the mixture as I stir.)  Fold in chocolate chips and/or nuts if you choose.

Pour into an 8×8 inch baking dish. Bake in a 350° oven for about 30 minutes.

Whether or not you need to eat a gluten free diet, I really recommend that you check into using coconut flour every once in a while. It’s a very healthy flour. Read more about why I love coconut flour.

What have your coconut flour experiences been like so far? Are you a nutty brownie sort of person, or simply just…nutty?

Heavenly Homemaker's Club Members: Access your homepage and all your fantastic resources here! Not a member yet? Please join us!

Whole Wheat Pumpkin Chocolate Chip Muffins

September 26, 2011 by Laura 69 Comments

This post may contain affiliate links. For more information, please see our disclosure policy.

Whole Wheat Pumpkin Chocolate Chip Muffins anyone? Grab a cup of coffee or hot chocolate! What a delicious combination, and perfect for fall!

Yum

As several of you requested, I’m sharing my healthy variations to Crystal’s Pumpkin Chocolate Chip Muffins. These were a big hit yesterday morning when I served them in our marriage class.

If you’d like to read more about how I adapt a recipe to make it healthier, check out this post. You’ll find a free, downloadable recipe conversion sheet which you can tack onto your refrigerator to reference when you need to convert a recipe.

Whole Wheat Pumpkin Chocolate Chip Muffins

(adapted from MoneySavingMom)

5.0 from 1 reviews
Whole Wheat Pumpkin Chocolate Chip Muffins
 
Save Print
Author: Laura
Serves: =24
Ingredients
  • 3 cups whole wheat flour (I used freshly ground hard white wheat)
  • ½ cup sucanat
  • 1 teaspoon baking soda
  • 2 teaspoons baking powder
  • 1 teaspoon sea salt
  • 1 teaspoon cinnamon
  • 4 eggs
  • 2 cups pureed pumpkin (or one 16 ounce can)
  • 1 cup melted coconut oil (or butter)
  • 1 cup chocolate chips
Instructions
  1. In a large mixing bowl, stir together all dry ingredients.
  2. Add eggs, pumpkin and oil.
  3. Mix well.
  4. Fold in chocolate chips.
  5. Spoon batter into 24 paper lined muffin cups.
  6. Bake in a 400° oven for 16-22 minutes or until the muffins are golden brown.
3.5.3229


(I prefer either homemade chocolate chips or soy free chocolate chips)


These are easy to put together and make your house smell just like the fall season is supposed to smell. Pumpkin and cinnamon smell awesome. Plus, adding chocolate to a muffin never, ever hurts my feelings. :)

Want more pumpkin recipes?

  1. Overnight Pumpkin Spice French Toast Casserole (Such a wonderful recipe to put together at night, then bake and serve to guests in the morning!)
  2. Super Moist Sour Cream Pumpkin Bread
  3. Pumpkin Spice Roll-Out Cookies (Simple and sweet, one of my favorites!)
  4. Pumpkin Chocolate Chip Bread
  5. Pumpkin Donuts (I make these all year round as an excuse to feed my kids a vegetable for breakfast.)
  6. Warm Pumpkin Custard (Oh yes, you should drink your pumpkin.)
  7. Simple Pumpkin Pancakes
  8. Pumpkin Chocolate Chip Cake
  9. Pumpkin Pecan Pie Squares (Such a fun combination of two holiday favorites.)
  10. Pumpkin Pie
  11. Pumpkin Breakfast Cake
  12. Pumpkin Cheesecake (Making life better, one delicious bite at a time.)
  13. Pumpkin Pie Bars (These are a Thanksgiving tradition at our house.)
  14. Pumpkin Cream Cheese Muffins
  15. Easy Pumpkin Cheesecake Muffins (With chocolate chips on top. Amen.)
  16. Flourless Pumpkin Muffins (Flourless and fabulous!)
Heavenly Homemaker's Club Members: Access your homepage and all your fantastic resources here! Not a member yet? Please join us!

Homemade Beef Bologna

September 14, 2011 by Laura 77 Comments

This post may contain affiliate links. For more information, please see our disclosure policy.

I did it. I made bologna. Mine didn’t turn out nearly as pretty as Tammy’s. Maybe that’s because I adapted the recipe? Or maybe it’s simply because Tammy has a magic touch I don’t seem to have. (Tammy is super talented!)  Either way, we have a healthy, easy-to-make lunch meat that I will feel no guilt about feeding to my family.

A couple of notes about this recipe:

In order to avoid artificial flavorings, you’ll want to use a liquid smoke which does not have any additional ingredients beyond “liquid smoke”. Some liquid smoke varieties have caramel coloring and I don’t know what else. I have found that Lazy Kettle Brand contains only liquid smoke. I’m sure there are other “all natural” brands of liquid smoke – this is the one I found first.

In addition, Tammy’s recipe includes Morton’s Tender Quick Salt, which is a great salt for preserving. However, I hesitate to use this salt now that I’ve learned that it contains nitrates. Therefore, I tried simply using my trusty Redmond’s Real Sea Salt. I figure, I’m keeping the bologna in the fridge or freezer anyway so I don’t need to worry about “preserving” the meat, right?

Overall, I’m pleased with how the bologna turned out. Well, aside from the fact that mine didn’t turn out pretty like Tammy’s. Tammy, how do you do it? :)

Homemade Beef Bologna (adapted from Tammy’s Recipes)Yum

3 pounds ground beef (I used grass-fed beef)
2 Tablespoons sea salt
1 cup water
1/4 teaspoon garlic powder
1/2 teaspoon onion powder
1 1/2 teaspoons “all natural” liquid smoke

Mix all ingredients together, sticking your hands into the bowl to squish it all together in order to mix the ingredients well. Mmmhmm, that’s the fun part.

Divide the mixture into two parts and shape two “logs” of meat. I don’t like having plastic touch my raw meat if at all possible, so I placed parchment  paper on top of plastic wrap to help form the log and to wrap it for the fridge. (Yes, this may seem obsessive, but I’m weird – what can I say?)

Wrap the bologna logs well and place them into the refrigerator for 24 hours.

Unwrap the meat and place both logs into a buttered baking dish. I used a 9×13 inch Pyrex dish. Bake in a 300° oven for 30 minutes, then in a 200° for another 2 1/2 hours.

Cool and store in the freezer or fridge.

Homemade Beef Bologna

A big thanks again for Tammy’s Recipes for inspiring this recipe! Now, on to her Spicy Beef Pepperoni!

I’m super thrilled with this recipe because I totally love bologna. I know that’s a silly thing to love, but love it I do. Kinda like how I love beef hot dogs.

Do you like hot dogs and bologna, or do you think I’m a little bit nuts for thinking they taste good? Hey, at least now I can eat bologna again without feeling like my stomach is turning inside out!

Heavenly Homemaker's Club Members: Access your homepage and all your fantastic resources here! Not a member yet? Please join us!

Easy Chicken Burritos (Perfect for the Freezer!)

September 13, 2011 by Laura 103 Comments

This post may contain affiliate links. For more information, please see our disclosure policy.

As I sat down to write this post, I could think of nothing exciting to say about these Easy Chicken Burritos. Therefore, I have decided to see if I can win “The Most Boring Blog Post Ever Award”. Most of this post has nothing to do with burritos, but really, there’s only so much a person can say about burritos. See look – there they sit:

Here is my very boring post:

Today I cleaned my ceiling fans and dust bunnies fell down onto the math books below. It was gross. When I got the mail this morning, most of it was junk mail so I put it directly into the recycling. We can’t find Malachi’s left tennis shoe. Today I’m wearing a brown shirt. I have a lot of brown shirts. I like brown.

I gouged my thumb on a kitchen cabinet yesterday. It hurts. Today I bonked it again. That hurt worse. The weather today is nice. Tomorrow it might get cooler. I need to pick green beans. And tomatoes.

I picked up our Azure Standard order today. We got a box of strawberries. They are good. Somehow we got strawberry juice on our kitchen floor tonight. I wiped it up.

I did four loads of laundry yesterday. They aren’t folded yet. Asa’s jeans are all too short. So are Elias’. So are Justus’. Kids grow fast.

We have crickets in our house. They are loud.

Here is a burrito recipe. These taste good. They are pretty much exactly like the Bean and Cheese Burritos and Beef and Cheese Burritos I’ve already written about, except that instead of using beans or beef, you use chicken.

(Told ya it was boring. Although that part about the weather was really pretty exciting. Except for not really.)

Easy Chicken BurritosYum

10 whole wheat tortillas (one batch homemade)
2 cups cooked chicken
1 cup shredded cheese (I use white cheddar)
1 cup salsa
Sea salt and/or chili powder to taste

Chop cooked chicken into tiny pieces or run it through a food processor. Stir together shredded chicken, cheese, salsa and spices. Spoon mixture into a warm, soft tortilla. Wrap and serve.


We like freezing these burritos, then rewarming them for quick lunches. To rewarm:  Place desired number of burritos on a baking stone or cookie sheet. Heat in a 350° oven for about 15 minutes or until slightly brown, crispy and hot.

What’s the most boring thing you can think of to tell me right now? Or maybe the most exciting? (If your laundry is folded and put away, I don’t want to hear about it. Over-achievers.)

Heavenly Homemaker's Club Members: Access your homepage and all your fantastic resources here! Not a member yet? Please join us!

Healthy Homemade Pigs in a Blanket

September 6, 2011 by Laura 158 Comments

This post may contain affiliate links. For more information, please see our disclosure policy.

Pigs in a Blanket

Have I ever told you about the trophy I won back when I was in high school? I’m not very athletic, so I hope you aren’t imagining some sport trophy. If so, you’re going to be rather disappointed, although amused, I’m sure.

My trophy proudly displayed a golden pig. Don’t laugh. It had a wooden base and stood about 15 inches tall and there at the top was a golden hog that was probably around 3 inches long. Oh how I wish I still had it so that I could take a picture to show you. Wait – what did I just say? Do I really wish I still had my pig trophy? Why? So that I could use it to decorate my living room? (Precious Moments figurines, family pictures, pig trophy…)  Yes, I think I’m glad my golden swine got misplaced.

In case winning pig trophies aren’t common where you’re from, let me explain my prize. I was a farm girl and we were involved in 4-H. Each year, we raised pigs to take to the fair. One year, my pig won Reserve Grand Champion. It was a proud moment – and also a little embarrassing because well, what teenage girl do you know that can truly appreciate being awarded with a trophy of a pig? The only one at the fair more excited/embarrassed than me was my brother. His pig took the Grand Champion prize, so his pig trophy was even bigger than mine. Yep, those were some pigs.

Kind of makes you want to read Charlotte’s Web again, doesn’t it?

I say all of that to say: “I had a pig trophy and you didn’t, neener-neener-neeeeeener.”

Just kidding. (Even though it’s probably true – neener-neener.)

But really, I just wanted to share a new idea I’ve come up with for making a healthy variety of Pigs in a Blanket. I don’t want to get all “farm animal technical” here on you, but even though these are called “Pigs in a Blanket”, there’s actually no pork in these. I prefer my hot dogs to be all beef, no nitrate, no nitrite, no nootrote (I made that one up) and otherwise as healthy as a processed meat can possibly be. But to call these “Cows in a Blanket” – well, that just does nothing for me. It doesn’t sound nearly as cute. And really, these treats do look like little pigs wrapped up taking a nap. As we all know, pigs are always willing to be swaddled. I know my 4-H pigs always went directly where I told them to go. (bah)

Healthier “Pigs in a Blanket”Yum

3 1/2 cups whole wheat flour
1 teaspoon sea salt
1 cup melted butter
1 cup plain yogurt
16 beef hotdogs, cut in half (I buy Applegate Farm Beef Hotdogs from Azure Standard)
32 small pieces of cheddar cheese (optional)

That dough recipe may sound a bit familiar. It’s my go-to recipe for Homemade Pizza Pockets, Homemade Poptarts and a variety of other goodies that require a flaky, buttery crust.

Mix flour, salt, butter and yogurt together. Knead ingredients together on a floured countertop until the dough is ready to be rolled out. Use a floured rolling pen to roll the dough to a 1/8 inch thickness. Use a knife to cut the dough into 32 rectangles.

Place one piece of cheese (if desired) and one hotdog half on each rectangle.

Roll it up and place it on a well buttered baking dish. Bake at 350° for 30 minutes or until the crust is lightly browned.

My kids especially like the Pigs in a Blanket made with cheese. These warm up great as leftovers and can be frozen. (I’d bake them first before freezing, then pull them out and rewarm them in the oven for a few minutes.)

I’m posting this recipe as a part of our Funky Fresh Kitchen series to remind us all that you can make all kinds of great dishes that are kid friendly and fun AND healthy!

Tell me all about your trophies, pigs, brothers, athleticism (or lack thereof), carrot sticks, or anything else remotely relating to this post. Your comment is your entry for a chance to win one of five $10 gift certificates to the Heavenly Homemakers Shop.

Heavenly Homemaker's Club Members: Access your homepage and all your fantastic resources here! Not a member yet? Please join us!

Peanut Butter Brownie Cups (made with whole wheat and sucanat)

August 31, 2011 by Laura 262 Comments

This post may contain affiliate links. For more information, please see our disclosure policy.

The delightful thing about eating healthy, whole foods is that you can still have your cake and eat it too – you just need to make treats with real, wholesome ingredients. It also helps you to stay healthy if you refrain from eating the entire batch of goodies. Shucks.

Read through this post about Healthy Sweeteners, this post about Healthy Fats and this post about Whole Grain Flour to answer questions you may have about how to make treats that still have lots of great nutrients! While we still limit the sweets and treats at our house, I don’t feel guilt when feeding my family delicious desserts that are made with these whole foods and healthy fats. (You’ll see a big list of our healthier treat recipes here.)

And now, my friends, I have a very exciting new recipe to share with you that contains wholesome, funky fresh ingredients. Warning:  You may want to sit down when you take your first bite so that you don’t faint from the pure joy of it all.

A Heavenly Homemakers reader, Katie, gave me the idea for these Peanut Butter Brownie Cups. With tears in my eyes, my hand clutched to my chest and a sob in my throat, I’d just like to say from the bottom of my heart, “Katie…thank you.”

Yes, gooey chocolate and peanut butter makes me completely sappy. You can only imagine that this type of behavior is what my children and husband experience on a regular basis while living with me. If you think my reaction to this recipe is overwhelming, you should have heard me trying to get through the end of Little Britches when I was reading it out loud to the boys. Don’t even ask about Old Yeller.

Peanut Butter Brownie CupsYum

1 cup melted butter
1 1/2 – 2 cups sucanat (depending on your preference)
1/2 cup cocoa powder
2 eggs
1 teaspoon vanilla extract
1 1/2 cups whole wheat flour
1/2 cup natural peanut butter (I use homemade peanut butter)
2 Tablespoons honey

Stir together melted butter, sucanat and cocoa. Add eggs and vanilla and stir well. Mix in flour until batter is thoroughly mixed. Scoop batter into 24 paper lined muffin tins (filling each one about 1/3 full).

Stir peanut butter and honey together. Spoon 1/2- 1 teaspoon of peanut butter mixture into the center of each brownie cup.

Bake in a 350° oven for 20-25 minutes. Makes 24 Peanut Butter Brownie Cups.

Have you tried baking treats with whole wheat flour and sucanat (or honey)? Do you use real butter (instead of margarine or crisco)? Does the thought of chocolate and peanut butter together make you swoon?

Leave a comment on this post for an additional entry for our drawing for 5 $10 Gift Certificates to the Heavenly Homemakers Shop!

Heavenly Homemaker's Club Members: Access your homepage and all your fantastic resources here! Not a member yet? Please join us!
« Previous Page
Next Page »

Join Our Community!

 Facebook Twitter E-mail Instagram Pinterest

Popular Posts

~ Will All of the Real Moms Please Stand Up?
~ Easy! Stir-and-Pour Whole Wheat Bread
~ How to Make Gatorade
~ 31 Real Food Breakfast Ideas
~ Dear Teenage Girls...
~ When Mom Takes a Step Back
~ The Inexpensive Health Insurance We Love!
~ Let's Talk Real Food Grocery Budgets

Check out our latest posts!

  • Big Family Food and Fun: May 10-16, 2026
  • Big Family Food and Fun: May 3-9, 2026
  • Help Your Kids Become Independent in the Kitchen!
  • Big Family Food and Fun: April 26-May 2, 2026
  • Big Family Food and Fun: April 19-25, 2026
Home  ~  Simple Meals  ~  Club Membership  ~  Shop  ~  Privacy Policy  ~  Disclosure  ~ Contact

Copyright © 2026 · Beautiful Pro Theme on Genesis Framework · WordPress · Log in