Heavenly Homemakers

Encouraging women in homemaking, healthy eating and parenting

  • Home
    • About
    • FAQs
  • Recipes
    • Bread and Breakfast
    • Condiments
    • Dairy
    • Main Dishes
    • Side Dishes and Snacks
    • Desserts
    • Gluten Free
    • Instant Pot
    • Crock Pot
    • Heavenly Homemaker’s Weekly Menus
  • Homemaking
    • Real Food Sources
  • Store
  • Contact
    • Advertise
    • Disclosure
    • Privacy Policy
  • Simple Meals
  • Club Members!

Homemade Peppernuts (the best little cookies in the world)

December 7, 2010 by Laura 124 Comments

This post may contain affiliate links. For more information, please see our disclosure policy.

Peppernuts

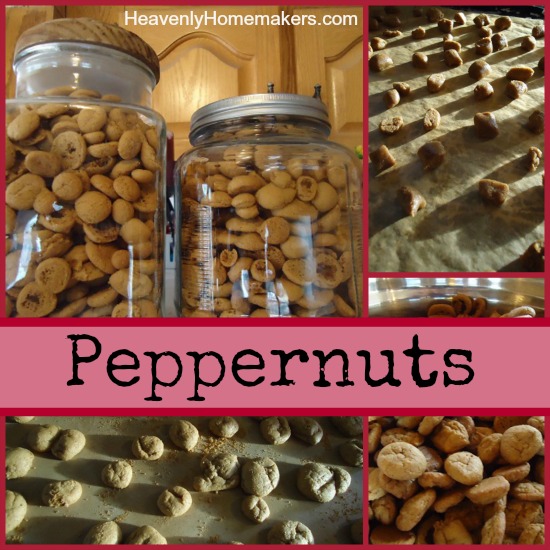
There’s pepper in these cookies? Surely not! Yes, that’s why they’re called Peppernuts. Oh, but there are no nuts in the cookies. They’re called peppernuts because they have pepper in them, they are tiny and you eat them like you would eat a handful of nuts. Thus the name Peppernuts.

The best thing about Peppernuts? They taste just like my Grandma’s. I was so excited after I ate my first one twelve (it’s okay, they’re tiny, remember?). I hadn’t had a peppernut for YEARS, because the only person I ever knew to make them was Grandma and she’s been gone since before my oldest was born.  Peppernuts…such sweet little bites of memories.

Peppernuts had actually fallen off my radar until my friend Gail mentioned them to me a couple of months ago. Suddenly…I NEEDED some peppernuts. Gail found a recipe and emailed it to me. Then of course I “whole wheat floured” and “sucanated” it…and woohoo…just like Grandma’s!

This experience gave me a whole new respect for Grandma because these tiny little cookies are a little bit time intensive. They’re not hard to make mind you…but the recipe makes a HUGE batch of dough, then you roll the dough into teeny tiny snakes and cut off teeny tiny pieces and you bake them into teeny tiny cookie bites. It took two to three hours to get through all of the dough. It was worth the time and effort, but I’m guessing I’ll only be making these a few times a year.

Homemade PeppernutsYum

Homemade Peppernuts (the best little cookies in the world)
 
Save Print
Author: Laura
Ingredients
  • 1 cup butter, melted
  • 2-4 cups sucanat
  • 4 eggs
  • 1 teaspoon real maple syrup
  • 1 teaspoon vanilla extract
  • 2 teaspoons baking soda
  • 1 Tablespoon hot water
  • 6-7 cups whole wheat flour
  • 1 teaspoon cream of tartar
  • ½ teaspoon cinnamon
  • ½ teaspoon ginger
  • ½ teaspoon nutmeg
  • ½ teaspoon allspice
  • ½ teaspoon cloves
  • ½ teaspoon pepper
Instructions
  1. Beat first five ingredients well.
  2. Dissolve soda in water then add to first five ingredients.
  3. Mix well.
  4. Add dry ingredients to creamed mixture.
  5. Knead into firm dough (hand mixing will probably be required.
  6. This dough is too stiff for most electric mixers).
  7. Chill overnight or at least two hours.
  8. Roll into "snake-like rolls" a little smaller than dime size in diameter.
  9. Cut into small pieces about ¼" thick.
  10. Place on a cookie sheet and bake in 350° oven for 7-8 minutes.
  11. Store in an airtight container.
3.4.3177

And now, some Peppernut Pictures…

As you can see from the amount of ingredients, this recipe does make a huge big blob of dough:

If in fact you cut your tiny little pieces not quite tiny enough, they expand and bake together into one huge crazy looking…thing…on your baking pan. You will then learn that your idea of tiny wasn’t tiny enough and you need to cut them even tinier. Take note, the following peppernuts are cut too big (even though they look small) and are too close together on the pan.

Which resulted in something freaky like this:

Instead cut them teeny-tiny like this:

So that they will look like this:

It is a little bit fun if they are too close together on the pan and you get a peppernut snowman:

Or a peppernut worm:

After you have rolled and cut your twenty sixth snake, you will realize that it’s easier to line up a snake or two and cut them at the same time. This revelation saves you 18 precious seconds.


These Peppernuts fill up the biggest bowl you have and then some. They’re great to package up in small bags to give as Christmas time gifts to coworkers and neighbors.


But of course, you should put some in cute jars and keep them in your kitchen for family time munching with Hot Cocoa.

You know what’s better than eating  Peppernuts?

Looking at Peppernuts in cute jars.

Or is that just me?

~~~~~~~~~~~~~~~~~~~~~~~~~~~~~

Save your holiday season by letting Simple Meals do your thinking for you. Imagine! You can still put healthy meals on the table even during the hubbub of all your holiday duties!

page_header

Heavenly Homemaker's Club Members: Access your homepage and all your fantastic resources here! Not a member yet? Please join us!

Homemade Healthy Poptarts

November 16, 2010 by Laura 422 Comments

This post may contain affiliate links. For more information, please see our disclosure policy.

Yay…the promised homemade poptart recipe!!

Homemade Poptarts

I truly don’t like boxed poptarts…blech. But these I DO  like…which is why I hesitate to even call them poptarts. Can we call them Delightful Little Jelly Pastries? Maybe we could call them Flaky Fruity Melty Yumminess?

At our house, I suppose I’d have to call them “Gone“. Or “The Empty Plate“. They don’t last long. :)

For the crust, I found that using the same recipe I use for my Homemade Pizza Pockets and Mini Apple Pies works the best. Buttery and flaky…and oh so easy.

Homemade Healthy PoptartsYum

5.0 from 1 reviews
Homemade Healthy Poptarts
 
Save Print
Author: Laura
Serves: 15-20
Ingredients
  • 3½ cups whole wheat flour
  • 1 teaspoon sea salt
  • 1 cup melted butter
  • 1 cup plain yogurt
  • About 5 ounces of 100% fruit jelly or jam - any flavor you like!
Instructions
  1. Begin by mixing the flour, salt, butter, and yogurt.
  2. Knead the dough just a little bit to make it nice and workable.
  3. Roll out the dough on a large, well floured surface.
  4. Use a knife to cut the dough into the desired poptart size you would like.
  5. Place about a ½ teaspoon of jelly on ½ of the dough rectangles (squares?).
  6. Spread the jelly around, leaving the edges free.
  7. Find a second square or rectangle or thingamajigger that matches closely with each jellied one.
  8. Place it on top and use a fork to seal the edges.
  9. Lay each poptart in a single layer on a baking sheet.
  10. Bake in a 350° oven for about 25 minutes or until the crust is lightly browned.
3.4.3177

This recipe makes around 15-20 poptarts, depending on how big you make them.

I have found that making them ahead of time and then putting them in our toaster oven to re-heat makes for a very fast and popular breakfast! These CAN be frozen as well. Bake them first, let them cool and the freeze until you’re ready to re-heat and eat!

Is it just me, or is it more than a little bit tempting to reach through the screen to lick the jelly oozing out of that poptart?

Edited to add:  Many of you who are new to this site are commenting that while this is a healthier poptart, this isn’t necessarily a healthy breakfast. Sure, good point. I totally hear what you’re saying. This was a reader requested recipe. Many are taking baby steps toward better nutrition and working their way “out of the box” when it comes to feeding their families. If you’re looking for a healthier variety of Poptart…this is your recipe. If you’re looking for a special treat for your family…here you go. If you’re looking for a well balanced diet…don’t eat these Poptarts for every meal. :)

Want to see my menu plans to know how I feed my family regularly? I’d love for you to click over and take a peek!! Maybe you’ll even find more recipes you’re interested in!!

Heavenly Homemaker's Club Members: Access your homepage and all your fantastic resources here! Not a member yet? Please join us!

Buttermilk Whole Wheat Chocolate Cake

October 28, 2010 by Laura 117 Comments

This post may contain affiliate links. For more information, please see our disclosure policy.

Say, would you like a little chocolate cake with that chocolate fudge frosting? :)

This recipe is great because you can soak the flour to break down the phytates if you want. Or if you don’t, that’s okay too. 

Buttermilk Whole Wheat Chocolate CakeYum

2 cups whole wheat flour
1 1/3 cups sucanat
1/3 cup cocoa powder
1 teaspoon baking powder
1/2 teaspoon baking soda
3 eggs
1/3 cup melted coconut oil or melted butter
1 1/3 cups buttermilk
Chocolate Fudge Frosting

If you choose to soak your flour, mix the 2 cups of whole wheat flour with the 1 1/3 cups buttermilk. Cover and allow this mixture to soak overnight on the countertop. Add remaining ingredients (everything but the frosting, that is) and bake as directed.

Otherwise…

Mix dry ingredients together in a large mixing bowl. Add eggs, oil or butter and buttermilk. Mix with beaters until batter is smooth and well mixed.

Work very hard to avoid grabbing a spoon and eating the entire batter directly out of the bowl before it has been baked. 

Butter two round cake pans or one 9×13 inch cake pan.

Bake round cakes at 350° for 25-30 or a 9×13 inch cake for 35-40 minutes. OR, leave the cakes in the oven until a toothpick poked in the middle comes out clean. Every oven is different, right?

Allow the cakes to cool completely before removing them from the pans. I used a butter knife to loosen the edges from the sides of the pan. Place the cakes on plates.

Did I forget to mention that you would need some of this Chocolate Fudge Frosting? Oh yes, you DO need a batch of this Chocolate Fudge Frosting. Plop a nice amount of frosting on one cake and spread it around well.

Like this…

Carefully place the other layer of cake on top of the frosted layer.

Oh look…it’s a chocolate fudge sandwich!!

Plop another nice amount of frosting on top of the second layer. Carefully spread the frosting over the top and sides. This step is not very easy for me and I’m usually messy and have to lick my fingers. Bummer.

All done.

Ah, a slice of chocolate heaven…

I will work (sometime within the coming months) to come up with a white cake and white frosting. However, when you’re using whole wheat flour and sucanat, the results are not going to be white. Anyone up for a Tan Cake?  Mmm, sounds good to me!

Get ready to share YOUR recipes Friday!!! Can’t wait to see what you’re going to share!!!

Heavenly Homemaker's Club Members: Access your homepage and all your fantastic resources here! Not a member yet? Please join us!

Meals to Take Others and Getting It All Done – Podcast #4

October 21, 2010 by Laura 24 Comments

This post may contain affiliate links. For more information, please see our disclosure policy.

Somehow in between drywall going up and all the other living room mess, I was able to find a quiet(ish) moment to record a podcast. And somewhere in between putting up the drywall, going to work and catching a few winks, Matt was able to put it all together for you. He is SO the greatest.

Several of you have requested that I upload my podcasts to iTunes and I think it’s a great idea. Unfortunately, after spending several hours the past two weeks trying to get that all set up for you, I have hit a brick wall. It’s either really, really hard to do this, or my gifts lie more in the area of chocolate, beef and homemade vanilla. I’m having a very hard time getting it figured out and the tutorials I’ve found to help me are NOT written in my language. And so, I will be calling for back up.  My podcasts WILL be on iTunes soon, but I don’t think it will be me getting them there. Maybe there’s something simple I’m missing? We’ll get back to you on that. Thanks for your patience! In the meantime, they are currently an mp3 file and hopefully most of you are able just to click the link and it will begin to play for you right away on your computer.

I’m not sure if I ever told you this or not, but we live very close to train tracks. If you didn’t know that before, you will definitely know that after listening to podcast #4. Two trains in 17 minutes.

Also, feel free to enjoy the irony of the moment when JUST as I am saying something like “we like to do everything as a family”, the door creaks open and in comes Malachi to poke me and try to get my attention (because apparently we even like to record podcasts as a family). I TOLD the kids that when Mama is recording, the door is SHUT and we do NOT interrupt her, but it would appear that he didn’t think that statement applied to him. It has now been reinforced to him that the statement does in fact apply to him, but shucks…won’t that be cute to listen to for years to come?

Today, I will be addressing a question regarding food/meals that are easy to take to families with young children…plus I’ll tell you just how I “get it all done”. Just in case you don’t catch it in the podcast, I never get it all done. Ever. And just wait until you hear what time I’ve been getting up in the mornings lately. :)

Heavenly Homemakers Podcast Four

Links referred to in the podcast:

  • Meat and Cheese Burritos
  • Pizza Casserole
  • Pizza Pockets
  • Sloppy Cornbread Muffins
  • Sloppy Joes
  • Cheesy Beef and Rice
  • Corn Dog Muffins
  • Chicken and Noodles
  • Homemade Buns (I talk about my buns WAY too much in this podcast. I then actually used the phrase “grab some buns”. Lovely.)

If I forgot any links, please let me know and I’ll add them. Be sure to leave a comment suggesting questions for a future podcast!

So, what time do YOU get up every day?

Heavenly Homemaker's Club Members: Access your homepage and all your fantastic resources here! Not a member yet? Please join us!

Three Reasons I Love My Sourdough Starter

October 19, 2010 by Laura 19 Comments

This post may contain affiliate links. For more information, please see our disclosure policy.

Please welcome Katie from Kitchen Stewardship, sharing with you a fantastic opportunity to learn more about the wonderful art of sourdough! I never knew you could make so many delicous foods from sourdough! I think you’ll be as excited as I am as you read on…

“I have captured YEAST!” I cried, in the midst of my sourdough happy dance, the day I first saw bubbles in my starter. (You can picture the scene if you overlay it with Tom Hanks in Castaway screaming, “I have created FIRE!”)

I used Laura’s photo tutorial to help me get started, but I was so nervous that I would fail, I refused to even take pictures for my own blog. I had zero confidence.

Fermentation and, you know, helping bacteria to grow and proliferate, is my hardest challenge as a real foodie. Sometimes I just need to see and experience something to really ‘get it’ and wish for someone to hold my hand a little. I wish the GNOWFGLINS Sourdough eCourse would have been available last fall to encourage me and ease my fears. I might have jumped in with both feet instead of stewing about sourdough for a year before trying a starter.

Now that I have a jar of flour and water bubbling away on my counter, I’ll never go back. I love my sourdough.


3 Reasons I Love My Sourdough Starter

  1. It’s More Forgiving Than a Fish. When someone overheard me explaining the care and feeding of my sourdough starter to someone with whom I was sharing a jar, she said, “Goodness, it sounds like you’re talking about a goldfish!” She’s not too far from the truth.I feed my starter some whole wheat flour every day and stir it well, adding water every other day or so. The starches give the natural yeasts something to eat, and they produce the bubbles that will make a lovely sourdough loaf.The difference between feeding my sourdough starter and feeding my son’s goldfish is simple: The starter doesn’t mind being forgotten in the refrigerator for a week. Sometimes we all need a break, and our kids goldfishes won’t “rise up” without constant TLC!
  2. I’m “in the club.” With my sourdough starter, I get to rub shoulders with sourdough masters Wardeh Harmon and Erin VanderLugt as they share 20 weeks of recipes. I tried to count how many actual things these women can make with their sourdough starters, but I lost count. From tortillas to spice cake, pita bread to cinnamon rolls, I quickly realize I’m a little fish in a big sourdough pond.Plus, I get to throw around terms like “active, domed state” and sound important!


Mmmm, cinnamon rolls. I think I know what’s going on the menu plan for Saturday morning!

3. I Make the Healthiest Bread on the Planet. Did you know whole grains can cause mineral absorption problems? God wisely created seeds to be difficult to digest, which is for the good of the seed and the proliferation of that species.

For the good of ourspecies, however, we like to eat the bread of life. To be most life-giving, whole grains need to be properly prepared to neutralize the enzyme inhibitors and phytic acid that hinder digestion. There’s much talk of soaking vs. sprouting vs. sourdough, but in my research, sourdough is the most traditional and Biblical form of bread. It’s also the most backed by scientific research on human beings. Added bonus!

Click HERE for more information on the art of sourdough baking via video, downloads, and recipes for everything you can imagine using sourdough.

The unique Pay What You Can philosophy allows you to preview the course and pay a fair price according to your means, and you can choose which lessons interest you the most and skip the rest without feeling like you’ve wasted a registration fee. Get a free thank-you gift every month when you make a payment! Enrollment never closes.

Disclosure: This post is sponsored by GNOWFGLINS eCourses.

Heavenly Homemaker's Club Members: Access your homepage and all your fantastic resources here! Not a member yet? Please join us!

Whole Wheat Hot Dog Buns

October 17, 2010 by Laura 71 Comments

This post may contain affiliate links. For more information, please see our disclosure policy.

I’ve admitted it here before: I love me a good beef hot dog. Do I love them because they are so very good for us and so highly nutritious? I wish.  But, at least I’ve been able to find some from our local meat farmers that are better than regular dogs from the store. I also often buy Shelton Turkey Franks from Azure Standard.

I had perfected my whole wheat hamburger bun recipe, but never took the time to make the dough into hot dog buns. In the past when I’d tried to make hot dog buns (from other recipes), they turned out as big as a baseball bat and about that heavy. (We’ve already talked about how none of us want our buns to be heavy.)  This time, when I tried to make hot dog buns, I focused on making the buns small. The smaller the buns, the better…right? :)

Using this whole wheat hamburger bun recipe, I rolled out the dough to about 1/4 inch thickness and cut the dough into circles using a wide mouth jar. A wide mouth jar isn’t going to make a very big circle, and you might think that the bun isn’t going to be big enough…but keep in mind that these rolls will rise and we do not want a bready bun. No indeed.

hotdog_buns_1

Yum

Take each circle and roll it up gently…

hot_dog_buns_3

Almost finished…

hot_dog_buns_5

And…done. Look at the cute little unbaked hot dog bun. Kinda makes you wish you were a hot dog so you could lay down in there and take a nap, doesn’t it?

hot_dog_buns_2

Put all the cute little rolled buns in a baking dish. Allow them to rise for about 20 minutes.

hot_dog_buns_6

Bake the buns for about 25 minutes at 350°. If they aren’t golden brown, leave them in there just a little bit longer. I kinda think it would be fun to bake the hotdog right into the bun, but I haven’t tried it yet. And just for the record, I don’t really wish I was a hot dog, no matter how inviting these buns look.

hotdog_buns_7

Carefully slit the buns open at the top with a knife and pop in a cooked hotdog.

hotdog_buns_1

Add all your fixin’s and you’ve got a tasty hotdog on a bun that has just a little more substance than the airy ones we find at the store, but they aren’t so bready you feel like you’re eating all bun and no dog.

So what do ya think? Should I try baking the hot dog right into the bun to make a sort of “pig in a blanket”? I think my kids would enjoy that surprise. Although since these hot dogs are made from beef or turkey, can we still call it a “pig in a blanket”? Sometimes life just throws us these difficult questions, ya know?

So humor me will ya? Are you a hot dog lover or not? Am I the only weird one who really appreciates eating real, whole foods…but still likes the occasional hot dog?  :)

Heavenly Homemaker's Club Members: Access your homepage and all your fantastic resources here! Not a member yet? Please join us!

Cooking Ahead for October

October 5, 2010 by Laura 29 Comments

This post may contain affiliate links. For more information, please see our disclosure policy.

Why does it always feel funny writing the phrase “cooking ahead…”? Have I just lived with boys for too long, or does it sound like I’m actually cooking-a-head? Yuck. I promise I’m not.

Yes, I know you were all concerned about that.

Now that we got all that cleared up, I’ll show you some pictures of the progress I’ve made over the past few days getting food made up to have on hand for this month. Like I mentioned here, we will have a lot of company this month. In an effort to ENJOY my company, I’ve got the majority of our main dishes and a few miscellaneous food items all made up and ready to pull out when needed. (More about hospitality and enjoying company in my new podcast Friday!)

You are all aware that my house has been run over by an apple truck, right? About the time I think I’m finished making applesauce and apple pie filling…more apples fall from the sky. My fingers are all brown in their crevices. It’s attractive.  I went real nuts one day and made two pans of Mini Apple Pies, a big apple pie and some Apple Pie Pockets. Oh, these are SO well worth the effort!!

I made a triple batch of Sloppy Joe Meat as Sloppy Joes are a wonderful quick meal to feed company. As long as I remember to get the dish out of the freezer to thaw, of course.

Mmmm, fresh whole wheat tortillas. We ate half of these right off the skillet as tacos, then I put the rest in the fridge for a quick meal of quesadillas.

There is something VERY not cute about the following picture. Raw meat in a pot…not so appetizing. However, I’m showing it to you anyway because you NEED to know how wonderful it is to make up a huge batch of Turkey Sausage to have on hand for breakfast casseroles or sausage-egg scrambles, or especially now for these Pancake-Sausage Muffins. The thing is, making this Turkey Sausage is a little tedious because you have to get out about 40 herbs and spices (give or take). If I’m going to do it in the first place, I’d rather do a bunch…and all the work of emptying and reloading my spice cabinet is worth it.

There it is…all browned up. I did six pounds of Turkey Sausage, then froze it in ten different containers. TEN meals ALL ready to go. Oh yes, that was time well spent.

I used some of the cooked turkey sausage to make a double batch of Pancake-Sausage Muffins. I think we may be addicted to these little treasures. Only a few of them actually made it into the freezer…

I plan to serve several salads to my guests, so I made three jars of salad dressing:  Italian, Ranch and Thousand Island. Can I have three cheers for easy, healthy dressings that don’t contain any HFCS!!! But hey…what happened to all the  Italian?

Because having cookies on hand when you have company is a must…or simply because I wanted one…I made a batch of Whole Wheat Chocolate Chip Cookies.

I still have to finish putting together a lasagna. I have the meat browned, so all I have to do is layer it up and put it in the fridge. And I didn’t get Mudballs made like I had planned. I DID get a triple batch of BBQ Meatballs made, but the pictures turned out scary so I won’t post them.

Now, I need to go vacuum my ceilings and walls.

I wish I was kidding.

Heavenly Homemaker's Club Members: Access your homepage and all your fantastic resources here! Not a member yet? Please join us!

Pancake and Sausage Muffins

October 3, 2010 by Laura 96 Comments

This post may contain affiliate links. For more information, please see our disclosure policy.

Pancake_Sausage_Muffins

Here’s what you need to know if you ever send me a recipe request:  I do get around to it eventually.  I don’t even remember WHO emailed this idea to me, but I do know that it was MONTHS ago. It went on my list…the long, long list of reader recipe requests, post ideas, questions to be answered. But see, lookie…here it is! I finally got a round tuit!

The original suggestion (from the reader who shall remain nameless, not in an effort to protect her privacy, but because I have misplaced the note with her name) was to use this Corn Dog Muffin idea, but do a breakfast Pancake – Sausage Muffin instead. Brilliant!!! After experimenting and making these last week and watching my family devour them in about five minutes, I did have to ask myself why I took so long trying this idea.

Now, we don’t do much pork at our house, but I do have this killer turkey sausage recipe . I make it up in big quadrupal (or more!) batches, cook  it up, then freeze it until we’re ready to eat it. Having cooked turkey sausage on hand for recipes like this one is a huge life saver!! So easy! If you choose, you could use sausage links instead, making the muffins like these Corn Dog Muffins. Instead, I just stirred cooked turkey sausage right into the batter:

Pancake-Sausage MuffinsYum

2 cups whole wheat flour
1 teaspoon baking powder
1/2 teaspoon sea salt
1 1/2 cups milk or buttermilk
2 eggs
1/3 cup melted butter
1/2 pound cooked turkey sausage (or nine sausage links, cut in half)
Real grade B maple syrup

Mix dry ingredients together. Add milk or buttermilk, eggs and melted butter. Stir in browned turkey sausage.

Pour batter into 18 buttered muffin tins. (I don’t recommend paper muffin liners for this as it will stick.)  Bake at 350° for 15-20 minutes or until the muffins are lightly browned. Serve with a lovely drizzle of maple syrup!

This is a great recipe to bake up ahead of time, freeze, then pull out and rewarm in the oven or toaster oven at breakfast time!

Now, don’t wait months to try this like I did. This recipe is SO easy and my whole family LOVED them!! You can never have too many easy breakfast recipes!

Heavenly Homemaker's Club Members: Access your homepage and all your fantastic resources here! Not a member yet? Please join us!

Homemade Whole Wheat Pasta

September 1, 2010 by Laura 92 Comments

This post may contain affiliate links. For more information, please see our disclosure policy.

I’ve been making homemade pasta for several years. It is SO easy and everyone loves it. I mostly use the noodles for Chicken and Noodle Soup or Beef and Noodles. Or, sometimes I roll the recipe into Lasagna Noodles (I’ll share how I do that soon).

By the way…I can’t decide whether to call this pasta or noodles. Is there a difference? If it’s okay with you, I’ll just keep using the words interchangeably since I apparently can’t make a decision about which one to use. Hopefully I won’t accidentally combine the two and call it poodles because that’s a different thing entirely and poodles can neither be mixed in a bowl nor rolled out on a well floured surface.

I think most people assume it’s hard to make your own noodles. If you are one of those people, please try mixing these up really quickly and find out how EASY they are to make!! Here…I’ll show you…

Whole Wheat PastaYum

2 1/3 cups whole wheat flour (I use freshly ground flour)
1/2 teaspoon sea salt
2 beaten eggs
1/3 cup water
1 teaspoon olive oil

Grain Soaking Instructions (so that the grain will be more easily digested):

Use the same ingredients, substituting the water with a cultured dairy product like buttermilk or plain yogurt. Mix then cover with a towel and let it sit for 12-24 hours.

First mix the flour and salt together in a bowl and make a little”pit”  in the middle.

homemade_noodles_1

Beat your eggs in a separate bowl, then pour them into the flour mixture.
Add the water (or buttermilk) and olive oil.

homemade_noodles_2

Stir well until the ingredients are mostly combined.

homemade_noodles_4

Dump it out onto a floured surface and knead it a little bit to get the ingredients combined well.
(If you are planning to soak the grain, you would begin at this point.
Put the “blob of dough” back into your bowl, cover and let it sit for 12-24 hours.)

homemade_noodles_7

Make sure your surface has a LOT of flour all over it so that your noodles won’t stick when you roll out the dough. Sticky noodles are not fun. (I would imagine that sticky poodles are not fun either, but I don’t have any experience in this area.)

homemade_noodles_6

Use a well floured rolling pin and roll and roll and roll until your noodle dough is almost hanging off the side of your counter top. Or at least until it is very thin, about 1/8 inch in thickness. You may need to keep tossing some flour under the dough as you roll to keep it from sticking.

homemade_noodles_8

I use a pizza cutter to cut long strips in my noodle dough.
That’s what Grandma used to do after all.

homemade_noodles_10

Ooh, isn’t it purty?

homemade_noodles_11

Cut your noodles any length you want.

homemade_noodles_13

In case you’re wondering…I made a double batch. Yeah…that’s a lot of noodles.

homemade_noodles_14

 Once you’ve cut your noodles you can either use them right away, or you can let them dry so that you can store them and have them ready for when you need them.

I used my new dehydrator to dry the noodles, but you can just leave them on the countertop to dry if you want. It will take a while…like several hours or even an entire day. You may also need to turn the noodles over after a few hours so that the under side can dry.

Once the noodles are completely dry, store them in an air tight container in your pantry. They will stay good for up to a month. They can also be frozen….just let them thaw a little before you cook them.

homemade_noodles_17

To cook your noodles:

Bring six cups of chicken, beef or vegetable broth to a boil. (I like to include cooked meat and veggies in my broth too when I add noodles.)  Stir in the noodles, making sure they don’t stick to each other. Salt well. Cover and simmer for 20-25 minutes or until the noodles are fat and tender.

Heavenly Homemaker's Club Members: Access your homepage and all your fantastic resources here! Not a member yet? Please join us!

Healthy Strawberry Shortcake

June 10, 2010 by Laura 67 Comments

This post may contain affiliate links. For more information, please see our disclosure policy.

When fresh strawberries are in season, nothing much tastes better than Strawberry Shortcake. This variation of Strawberry Shortcake is lightly sweetened with honey and made with whole wheat flour. We had the entire cake eaten up in just a few minutes!

strawberry_shortcake_2

Yum

 Strawberry Shortcake

1 1/3 cups whole wheat flour (I use freshly ground whole wheat)
1 teaspoon baking powder
2 eggs
1/2 cup honey
1/3 cup oil (I use coconut oil)
1 teaspoon vanilla extract
1/2 cup milk

4-5 cups of fresh, sliced strawberries
Whipped cream (fresh cream whipped to form soft peaks, with a bit of stevia added for sweetness)

Mix together flour and baking powder. Add in eggs, honey, oil, vanilla and milk. Stir well (or mix well with hand mixer). Pour into a well buttered 8×8 inch baking pan. Bake at 350° for 20-25 minutes.

Allow cake to cool completely. Top with fresh strawberries and whipped cream. (9 servings)

Strawberry Shortcake with Whole Wheat and Honey

If you’d like more ideas for what to do with all the fresh strawberries that are in season right now, you may want to take a look at this fun recipe list!

Heavenly Homemaker's Club Members: Access your homepage and all your fantastic resources here! Not a member yet? Please join us!
« Previous Page
Next Page »

Join Our Community!

 Facebook Twitter E-mail Instagram Pinterest

Popular Posts

~ Will All of the Real Moms Please Stand Up?
~ Easy! Stir-and-Pour Whole Wheat Bread
~ How to Make Gatorade
~ 31 Real Food Breakfast Ideas
~ Dear Teenage Girls...
~ When Mom Takes a Step Back
~ The Inexpensive Health Insurance We Love!
~ Let's Talk Real Food Grocery Budgets

Check out our latest posts!

  • Big Family Food and Fun: May 3-9, 2026
  • Help Your Kids Become Independent in the Kitchen!
  • Big Family Food and Fun: April 26-May 2, 2026
  • Big Family Food and Fun: April 19-25, 2026
  • Big Family Food and Fun: April 12-18, 2026
Home  ~  Simple Meals  ~  Club Membership  ~  Shop  ~  Privacy Policy  ~  Disclosure  ~ Contact

Copyright © 2026 · Beautiful Pro Theme on Genesis Framework · WordPress · Log in