Baked Oatmeal Cups are perfect for a spring breakfast.
My four boys are just about getting too old to appreciate anything cutesy I try to make with food.
When they get up in the morning, they bound into the kitchen, excited to see a big pile of bacon on a tray with a dozen scrambled eggs and mountain of pancakes. Does it really matter to them if I tried to arrange the food in such a way as to make the platter look pretty? Do they even care that I woke up extra early, and lovingly mustered all of my artistic ability to form the pancakes into the shape of the country of India? After all, we’ve all been enjoying our studies about William Carey and his missionary efforts there. Who wouldn’t have fun smearing butter all over Calcutta? I figured they’d be thrilled!
But no. They don’t care at all. They just want me to hurry up and pass them the maple syrup and while I’m at it, another slice of bacon.
I’m telling you, I am sooooo unappreciated around here. From now on, I think I’ll just flip some boring ol’ round pancakes straight off the griddle and onto their plates ten feet away. I’ll skip the serving platter. I won’t mess with a lovely presentation of fruit arranged on a plate in the shape of a clown face. They can just stuff their faces with “normal” food for all I care.
Hmmph.
Now that I’ve thrown a fit that is so becoming of a grown-up, I suppose I should now confess that my intentions and my artistic abilities are not even close to being able to pull off much of the above. I’ve never really attempted to make pancakes into the shape of India – or any other country for that matter. Incidentally, I did turn out the state of Texas once, but that was totally an accident and as usually happens when I have not gone out of my way one little bit, my boys were actually quite impressed.
“Whoa Mom! You made a Texas pancake! Can you make me a Maryland and an Idaho next?”
I obviously got right on that, but ended up instead with a lopsided gourd and another pancake that resembled the fuzz under my couch. I gave up at that point and figured they could chew the pancakes into the shapes of their requested states, because really, have you ever tried to pour Florida onto a griddle with a spoon?
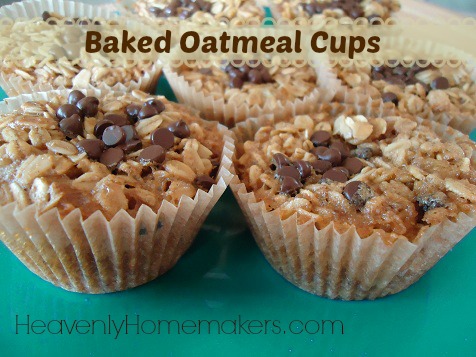
This leads me to the special breakfast I made recently in an effort to be cute. It is spring after all. Doesn’t the idea of eating a bird’s nest for breakfast sound simply delightful?
Okay fine. We can just call these Baked Oatmeal Cups. Either way, these are easy to throw together and are versatile enough to add variety and meet your family’s taste preferences.

Baked Oatmeal Cups (or Bird’s Nests if you’re feeling cute)
- 2 cups rolled oats
- ½ cup sucanat or honey
- ½ teaspoon sea salt
- 1 teaspoon baking powder
- 2 eggs
- ¾ cup milk
- ⅓ cup melted butter
- Topping choices: mini chocolate chips, raisins, other dried fruit, coconut flakes, apple chunks
- Mix together oats, sucanat, salt and baking powder.
- Stir in eggs, milk, and melted butter.
- Scoop batter into 12 paper lined muffin cups.
- Sprinkle toppings of choice into the center of each cup.
- Bake in a 350° for about 30 minutes, or until the oats are golden brown.
These are easier to eat with a fork, unless you like cleaning partial bird’s nests up off of your table and floor.

If you prefer, simply spread the mixture into a 9×9 inch baking pan. Bake in a 350° oven for 25-30 minutes.
Do you try to be cute when you cook and bake at your house? And how do those efforts go over for you? Ever tried to make India out of pancake batter?


