Turkey Gravy is easy when you follow these steps!
I think gravy is my family’s favorite part of the holiday meal. “You want any potatoes with that gravy?!”
I know some people are intimidated by making gravy…afraid to make it lumpy and all that. (And then there are people who like lumps in their gravy. “What are these delicious lumps you put in your gravy?”)
Here’s the easiest way I’ve found to make turkey (or chicken or beef) broth gravy:
Easy Turkey Gravy
You will need:
- Turkey broth (Hopefully you saved your broth after you made your turkey.)
- Arrowroot powder, cornstarch or flour (about 3 teaspoons for every 2 cups of broth)
- Water (about 1/3 cup for each of your 3 teaspoons of arrowroot powder)
- Salt
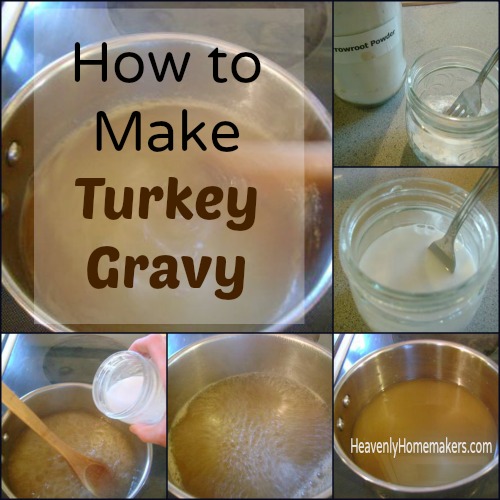
Step One: Pour broth into a medium saucepan.

Step Two: Spoon arrowroot powder (or cornstarch or flour) into a small jar or glass.
(Surprise, surprise…I use a jar.)

Step Three: Add water to arrowroot powder and whisk smooth with a fork.

Step Four: Bring broth to a boil (Try saying “bring broth to a boil” five times fast.)

Step Five: Slowly pour arrowroot powder (or cornstarch, or flour)/water mixture into boiling broth, stirring while you pour. (I usually make gravy with a whisk. On picture taking day, I used a wooden spoon. Either one works, but a whisk usually helps in case lumps want to form.

Step Six: Stir at medium to high heat until gravy thickens.
Turn down the heat and allow the gravy to simmer for a minute or two.
Salt to taste and serve your gravy.

Trouble Shooting:
- If gravy refuses to thicken, stir in tiny bits of arrowroot powder (or cornstarch, or flour)/water mixture until it is thick enough for your liking.
- If gravy is too thick, stir tiny bits of water or milk to thin it out.
- If gravy doesn’t have enough lumps for your liking, add sprinkles of arrowroot powder or flour and just try to stir them in. They won’t stir in no matter what you try, thus causing lumps.
- If conversation around the Thanksgiving Table is lagging…challenge your guests to say “Bring Broth to a Boil” five times fast. That’s sure to liven up any party.


 Check out my four-penny purchase!