Heavenly Homemakers

Encouraging women in homemaking, healthy eating and parenting

  • Home
    • About
    • FAQs
  • Recipes
    • Bread and Breakfast
    • Condiments
    • Dairy
    • Main Dishes
    • Side Dishes and Snacks
    • Desserts
    • Gluten Free
    • Instant Pot
    • Crock Pot
    • Heavenly Homemaker’s Weekly Menus
  • Homemaking
    • Real Food Sources
  • Store
  • Contact
    • Advertise
    • Disclosure
    • Privacy Policy
  • Simple Meals
  • Club Members!

How To Make Geoboards ~ Homemade Gifts for Less Than $5

December 8, 2014 by Laura 1 Comment

This post may contain affiliate links. For more information, please see our disclosure policy.

Cantina sent in this idea, along with instructions and pictures. This is a great homemade gift for kids!

geoboard 1

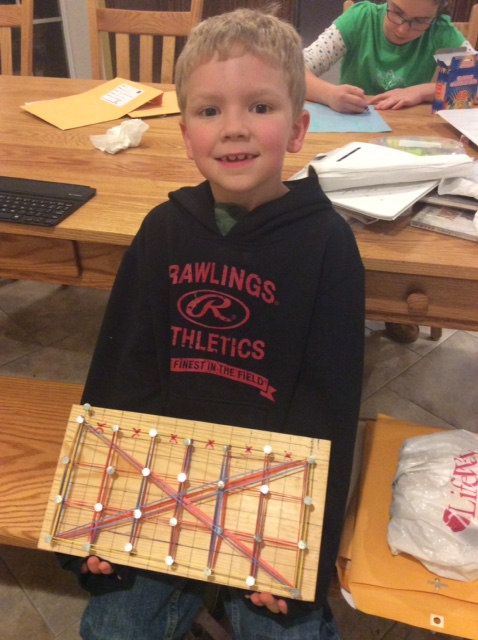
Our middle child loves to build and he is great with a hammer. With a little help he is making geo-boards this year.

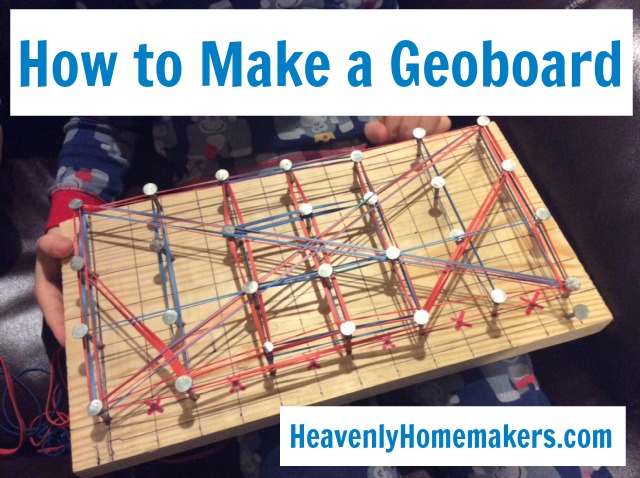
We had a scrap piece of lumber that he spray painted (picture above is the first one we did and it wasn’t painted). Then we use graph paper to hammer in nails in 2 inch squares. Don’t nail them all the way down. Then with colored rubber bands you can make all kind of fun shapes. My children have had the best time with this board and Elijah is now making a few for Christmas presents. The nails cost $1.97 per pack and the rubber bands were $.97 a pack. Since we had the scrap lumber and spray paint these will cost us under $5 per board.

How to Make a Geoboard

Thank you, Cantina! I think I will put my 12 year old on this project. What a fun idea!

Heavenly Homemaker's Club Members: Access your homepage and all your fantastic resources here! Not a member yet? Please join us!

Pinecone Holiday Decor ~ Homemade Gifts for Less Than $5

December 5, 2014 by Laura 4 Comments

This post may contain affiliate links. For more information, please see our disclosure policy.

I can’t take credit for this idea, which is probably obvious to you once you see how clever, beautiful, and well-done this decoration is! Vickie sent in this idea with fabulous instructions and pictures. Bless you, Vickie!

pinecone decor

I’m super impressed that this entire craft decoration (worth $20) only cost Vickie 50¢. Amazing!

Here’s Vicki:

This gift has about a $20 value and I made it for 50 cents out of stuff I already had.
  • 12 pinecones (selling for 50 cents each at the local store or harvest them from your backyard for free)
  • 2-3 ft of ribbon ($4-6 or use repurposed ribbon for free)
  • basket ($5-10 or again, repurpose one for free. You can also shop 2nd hand stores for baskets.)
  • craft paint ($1 per bottle)  I used 1/2 bottle of yellow and a smidge of white. You can also use any old leftover paint.
  • glue
  • optional picture hanger and felt pads (cost ?, I found these in my tool drawer so for me they were free)
Wash and paint your basket to the desired color. Dry brush the tips of the pinecones with white paint. You may want to wear gloves if you have sappy pinecones like I did. Let everything dry well. Arrange the pinecones in a decorative manner in the basket, remove carefully trying to remember your pattern, then apply glue to the back/bottom of cones and replace in basket. You don’t want the glue to show when finished. Wrap with a festive ribbon and you are done! If you want to hang your basket you may need a picture hanger of some sort. Mine had a smooth wood back so I screwed and hot-glued the hanger to the back. I also added some felt pads to protect any surface it may hang/sit on.
This took me one full day with dry time. The basket, painted yellow and white, makes a nice seasonal decoration that can be hung on a door/wall or just set on it’s side.
Pinecone Holiday Decor for Less Than $5

This is such a lovely idea. I think my boys might even enjoy collecting and painting pinecones for this. Vickie:  Thank you! Keep the ideas coming, Dear Readers. I love your brilliance and creativity!

Heavenly Homemaker's Club Members: Access your homepage and all your fantastic resources here! Not a member yet? Please join us!

Homemade Seasoned Salt with Recipe Cards Attached ~ Homemade Gifts for Under $5

December 3, 2014 by Laura 10 Comments

This post may contain affiliate links. For more information, please see our disclosure policy.

Homemade Seasoned Salt is a recipe I’ve had on my list to try to recreate for several months. What better time than now while we’re thinking about inexpensive gifts!

Homemade Gifts for Less Than $5

What’s fun is that not only did I come up with a very easy and MSG free way to make this seasoing (similar to Lawry’s), I also came up with ideas for delicious ways to use it in new yummy recipes. Now we can mix up some Seasoned Salt for gift purposes, as well as print off cute recipe cards so our recipients will have fun ideas for cooking with their gift. Package it all up together and it will be a hit!

Homemade Seasoned Salt Shaker Gift

Homemade Seasoned Salt

Homemade Seasoned Salt with Recipe Cards Attached ~ Homemade Gifts for Under $5
 
Save Print
Author: Laura
Ingredients
  • ½ cup sea salt
  • 2 teaspoons sucanat
  • 1½ Tablespoons paprika
  • 1 teaspoon turmeric (optional)
  • 1  teaspoon onion powder
  • 1 teaspoon garlic powder
  • 1 teaspoon cornstarch
Instructions
  1. Mix all ingredients well.
  2. Funnel mixture into a salt shaker.
  3. This recipe makes about ⅔ cup of Seasoned Salt.
3.4.3177

(I use Redmonds Sea Salt.) This seasoning is perfect for your French fries, for your burgers or steaks, for chicken – for adding a little pizzazz to just about any food. In addition, you’ll want to download these Seasoned Salt Recipes for tasty and easy ideas. Mixing this seasoning up to give as a gift? Print those recipe cards and include them in the package.

Look how pretty all the colors are before you mix them all together!

Homemade Seasoned Salt Recipe

I found the shaker jar for this at Wal-mart for 97¢. I’d look at the dollar store too for fun shaker variations at a low cost. The ingredients cost a minimal amount, making this gift delicious, fun, and inexpensive too!

More Homemade Gifts for Under $5 coming soon. This is too much fun!

Download Your Free Seasoned Salt Recipe Cards here.

Heavenly Homemaker's Club Members: Access your homepage and all your fantastic resources here! Not a member yet? Please join us!

Quick and Easy Fabric Bracelets ~ Homemade Gifts For Less Than $5

December 2, 2014 by Laura 6 Comments

This post may contain affiliate links. For more information, please see our disclosure policy.

Homemade Gifts for Less Than $5

Don’t even want to spend $5.00 on a gift? Well then, how does 8¢ sound to you?  Yeehaw.

Remember when I asked “what do you get when you cross some scraps of fabric with shower curtain rings?” THIS. This is what you get. (I found the idea here.)

Easy Fabric Bracelets for Less Than $1

Now I know what you’re thinking, but just settle down. Cute as these are, you need to leave your shower curtain right where it is. Your family will not be nearly as thrilled to see your creations at the end of the day if they walk into the bathroom and see the shower curtain crumpled on the floor.

Instead, I suggest that everyone of you needs to head to the store right this minute (after you finish reading this) to pick up a package of shower curtain rings. I got a 12-pack for just 97¢.

If you have little girls in your life, you should pick up several packs because these bracelets are sooooo much fun to make! These would be perfect gifts for friends at school, cousins, nieces – and if you cut off the end of the ring, these should fit many adult ladies too.

I made 12 bracelets in less than an hour using my handy new $3 hot glue gun. If I can make these, anyone can make them – guaranteed. If you have bits of fabric lying around, this is a great way to use it up and avoid spending extra money on this gift.

Fabric Bracelet Supplies

How to Make Quick and Easy Fabric Bracelets

What You’ll Need

  • Shower Curtain Rings
  • Fabric Scraps, cut into about 1/2″ x 18″ strips
  • Hot Glue Gun
  • Scissors

What To Do

  1. Begin by hot gluing one end of the fabric strip to the inside of a shower curtain ring.
  2. Tightly wrap the fabric around and around the ring, adding one or two more drops of hot glue to secure the fabric as you go.
  3. Cut any left-over fabric off at the end and glue in place.

Quick and Easy Fabric Bracelets

I plan to gift some of these to my elementary-aged prayer pal at church – a little reminder that I’m praying for her. I’ll let my nieces pick out a few. Malachi even suggested that we send some to Gladis. Won’t she have fun sharing some of these with her friends!

Hope you have as much fun with these as I am having. Thanks to everyone who has sent in Homemade Gifts for Under $5 ideas. Keep them coming! I’ll be sharing them here soon. You won’t believe how many great ideas there are for inexpensive homemade gifting!

Now, go. Go buy shower curtain rings.

Heavenly Homemaker's Club Members: Access your homepage and all your fantastic resources here! Not a member yet? Please join us!

Homemade Gifts for Less Than $5

December 1, 2014 by Laura 12 Comments

This post may contain affiliate links. For more information, please see our disclosure policy.

What do you get when you cross a hot glue gun with a pair of socks? Some scraps of fabric with shower curtain rings? A jar with some freshly ground flour?

The sky’s the limit, right? Homemade gifts are loads of fun to make, give, and receive. I have some fun ideas I’m working on, and I’m hoping you have some even better ideas. But you know how I am with crafts, right? I beg of you – help a girl out?

Homemade Gifts for Less Than $5

During the next two weeks, I’d love to share many ideas so that we can all put together some simple and inexpensive gifts. Whatcha got for me?  I’d love to feature your ideas here!

No pressure, but if your homemade gift ideas can include words like no-sew, easy-peasy, or maybe even crafts for dummies, I for one would really appreciate it. My clumsy thumbs shy away from difficult projects. I break out in hives when I see crafts that include more than 5 simple steps. I love making gifts, and swoon over homemade crafts, but I’m not gifted in this area and I don’t even know what “modge-podge” is. (Noun or verb? I seriously don’t know.)

So let’s review. I want homemade gift ideas. I want the ideas to be easy enough for a fifth grader (wait, let’s go with third grader, just to be safe). And I want to be able to make the gift for $5 or less. An added bonus would be that the gift actually be useful and make the recipient joyful instead of forcing them to politely say, “Oh, this is…interesting. Isn’t that nice.”

If you have an idea, take a picture, write detailed (but simple – bless you) instructions, and email them to me. My younger boys and I have a sack full of project ideas we’ll be working on this week. If any of them actually turn out – and they totally should because I did invest $2.97 in a new glue gun today – I’ll be sharing my ideas with you soon.

Stay tuned during the next few weeks for these Homemade Gifts for Less Than $5 tutorials, plus plenty of yummy new recipes for the holiday season.

Ahhhhh, recipes. That I can do. Don’t worry. I’ll keep my new glue gun out of the kitchen….

Heavenly Homemaker's Club Members: Access your homepage and all your fantastic resources here! Not a member yet? Please join us!

Merry Christmas and a Hoppy New Year ~ Simple Craft for Kids

November 29, 2014 by Laura Leave a Comment

This post may contain affiliate links. For more information, please see our disclosure policy.

I originally posted this fun craft idea back in 2008. That translates to the dark ages ago in blog years. Not only did you probably not know this idea existed on my site – I had even forgotten all about it.

Hoppy New Year Christmas Craft

I think that frog is too cute to be ignored, and that this craft is to simple not to bring to your attention. For those of you who love detailed craft projects – this one will not interest you and I say, “You go, Girl!” I am simply not super gifted in the crafting arena, so I stick with cut out frogs, hole punches, and candy canes.

Supplies you will need:

  • Red cardstock, cut in half and folded over to make a card
  • Frog pattern
  • Green cardstock for frogs
  • Print out of Merry Christmas sign
  • Googly eyes
  • Candy canes
  • Blow markers (optional)
  • Markers
  • Glue bottle
  • Glue stick
  • Hole punch
  • Scissors

To Make:

Print frog pattern, trace onto green cardstock and cut out. Punch a hole on both sides of the frog. Carefully slide candy cane through the holes to look like the frog is “holding” it. Draw a smile onto the frog. Use green blow marker to make “speckles” (optional).

Use a glue stick to glue frog onto card. Glue googly eyes on with glue bottle.

Use glue stick to attach “Merry Christmas and a HOPPY New year” sign to card.

It’s as easy as that. Your kids can enjoy making these cards for classmates, Bible class teachers, neighbors – whoever you’d like to bless. :)

Heavenly Homemaker's Club Members: Access your homepage and all your fantastic resources here! Not a member yet? Please join us!

Fun Fall Crafts and a “Share Your Story” Service Challenge

October 24, 2014 by Laura 3 Comments

This post may contain affiliate links. For more information, please see our disclosure policy.

Service challenge time. Gather the family. :)

Share Your Story Service Challenge 2

I’m not a very artsy-craftsy person. In fact, once when I was a teenager, I was trying to make a basket that looked like a bunny rabbit. When I handed it to the recipient she exclaimed, “Oh what a cute kitten!” Whenever I attempt to make Snowman Pancakes, they look like blobs with a chocolate chip face. It was a miraculous feat when I pulled off making a piñata in the shape of a Lego with a shoe box, eight bottle lids, and sheets of tissue paper.

This is why, when I got a fun idea to make gift sacks with owls on them, I was not very confident. My boys didn’t help matters. “Nice turkey, Mom,” said one. When I asked another what he thought it was, he said, “I can definitely tell it’s a bird. If it was black, I’d say penguin. I’ll just stick with bird.” But then, when one of my friends walked into my house while I was putting the finishing touches on my gift sacks, she exclaimed, “Oh look at your owls! You are so clever!”

YESSSSSSSS! My owls look like owls! (and turkeys and penguins)

owl gift sacks

Are you up for a service challenge?

While I’m a far better cook that I am a craft creator, I do really enjoy putting together simple projects – especially if it means I can bless someone. This project happens to involve food too, so yay for me! I’ll fill the gift sacks with homemade goodies and deliver them to our “adopted college students.” Even if they can’t tell it’s an owl, I’m pretty sure they’ll recognize the Chocolate Chip Brownies inside, right?

So here’s what I’m thinking:  Crafty or not, you should join me by blessing someone! We have some fun (and easy!) free printables for you, as well as plenty of recipes to choose from. Pick a project or three, get your whole family involved, and love up on the people around you.  The best way for your kids to learn to serve others is by serving right along side you! Let’s all do this together. It’ll be fun!

Serve With Your Family

1. Pray with your family about who you would like to bless.
2. Pick your project. Make a craft and/or choose a recipe from our site to make and take to someone.
3. Work on the project together.
4. Deliver your goodies.

You’ve already got oodles of ideas for ways to serve people with your kids if you have our Learn Your Letters, Learn to Serve curriculum. Keep at it! Your kids are learning so much about how to bless people! Need more ideas? Well, here’s what we’ve worked up for you:

Owl Gift Sacks Free Printable

Download the cut-outs for the Owl Gift Sacks here. Grab some lunch sacks, scissors, and a glue stick and have fun making your sacks. Fill them with goodies and go bless someone!

Be Thankful Owl Craft Share on Blog

Download your Build-an-Owl Be Thankful Craft.  Make it into a card for someone, an ornament for someone, or a treat topper. Bake up some goodies, attach your owl, and make your delivery.

Pumpkin and Apple Stickers

Here are some fun sticker labels for delicious fall treats to go with recipes you’ll find here at Heavenly Homemakers. Get the download links and details about these stickers here. Below, you’ll find the links to each Fall Recipe.

  • Applesauce Bread
  • Apple Butter
  • Applesauce
  • Apple Pie
  • Pumpkin Chocolate Chip Muffins
  • Pumpkin Pie
  • Pumpkin Chocolate Chip Cake
  • Warm Pumpkin Custard

More treat ideas you’ll find here to help you bless someone:

  • Blueberry Streusel Muffins
  • Cream Cheese Pumpkin Muffins
  • Pumpkin Chocolate Chip Bread
  • Homemade Caramel Sauce (you can download free printable gift tags to go with this!)
  • Caramel Brownies
  • Chocolate Chip Brownies
  • Cream Cheese Fruit Dip with a basket of apples
  • Hot Chocolate Mix
  • Lemon Pound Cake
  • Peanut Butter Apple Cookie Bars
  • Pumpkin Pecan Pie Squares
  • Zucchini Carrot Bread

The possibilities are limitless. Have fun serving with your family!

Want more freebies?

Want more free printables and fun activities to do with your kids? Sign up for the Heavenly Homemaker’s Learning Zone free newsletter. We’ll supply you with fun freebies and share ways you can learn and serve with your family on the cheap!

Heavenly Homemaker's Club Members: Access your homepage and all your fantastic resources here! Not a member yet? Please join us!

Homemade Liquid Hand Soap

March 13, 2014 by Laura 7 Comments

This post may contain affiliate links. For more information, please see our disclosure policy.

Have you tried making the Liquid Hand Soap recipe I have here on my site? It will save you a lot of money, and it’s very easy to make! Your kids can help. Who wouldn’t love grating a bar of soap? :)

Homemade Liquid Hand Soap

Homemade Non-Toxic Liquid Hand Soap

4 ounce bar of natural soap (I used a bar of coconut oil soap from Tropical Traditions. Any natural bar of soap would work.)
1 gallon of water

Heat the water in a pot, just long enough to steam. Grate the bar of soap with a cheese grater. Take the steaming water off the heat. Immediately pour the grated soap into the water. Stir the mixture, then let it sit for about 15 minutes. Use a hand mixer to blend the soap and water mixture well. Let it sit overnight. The next morning, use the hand mixer again to blend well. Pour mixture into a soap dispenser for use. Save remaining hand soap in a gallon jug.

You can check out the entire picture tutorial here.  You’re well on your way to saving lots of money on non-toxic hand soap!

Heavenly Homemaker's Club Members: Access your homepage and all your fantastic resources here! Not a member yet? Please join us!

Homemade Bubble Bath

March 11, 2014 by Laura 4 Comments

This post may contain affiliate links. For more information, please see our disclosure policy.

I’ve had this Homemade Bubble Bath recipe on my site for over six years. Since it’s become buried among all the food recipes, I decided to pull it out and share it again. I first made this when Elias turned 6. As far as I can remember, his 6th birthday was about twenty minutes ago. But in fact, Elias is now 12 – and not so much into bubble baths. (He is learning some great card tricks, though!)

Why make homemade bubble bath? Well, because it’s fun. Because it is very inexpensive. Because you can personalize it if you want to give it as a gift. And because you can use ingredients you feel good about.

I think making this together with your kids, then letting them enjoy using it might just be a very helpful way to get through these spring/winter/warm/cold/rainy/windy/crazy days many of us are experiencing this March!

Homemade Bubble Bath

1/2 cup shampoo (I use this shampoo)
3/4 cup water
1/4 teaspoon sea salt

In a bowl, mix the shampoo and water until well combined. Add salt and stir until it thickens slightly. Use a funnel to pour it into a bottle.

Homemade Bubble Bath
To use this Bubble Bath, pour a few Tablespoons into the bath water as the tub is filling. Have fun!

Want more fun activities to do with your kids?

  • Free Downloadable Spring Activity Packets
  • Free Fun, Fabulous, and Mostly Free Preschool Projects ebook
  • Homemade Flubber
  • Homemade Tootsie Roll Candy
  • Recipe Card Holder Craft
  • Valentine Kiss-Tac-Toe Game
  • Owl Gift Sacks
  • Animal Muffin Toppers
Heavenly Homemaker's Club Members: Access your homepage and all your fantastic resources here! Not a member yet? Please join us!

Valentine’s Day Craft Ideas

February 9, 2012 by Laura 10 Comments

This post may contain affiliate links. For more information, please see our disclosure policy.

Need some fun Valentine’s Day ideas? Too bad I don’t have any for you. Just kidding. While I’ll never claim to be super crafty, I do have a few fun ideas that I’ve shared through the years here that I thought I’d remind you about.

First up, I’ll show you the “You’re The Bomb” Valentines we made last year. They were a hit with all of our friends, who thankfully, embrace the fact that we are a household full  of boys who like the idea of blowing things up. ;)

This year, we printed these fun, free Valentines from Diva Entertains to share with friends at our Valentine Party. Simple, inexpensive, done.

Any excuse to make Homemade Soft Pretzels works for me. No one in my family minds if we celebrate February 14 with fresh pretzels shaped like hearts.

heartpretzelssm.JPG

I’m not sure why I don’t think to make these Chocolate Caramel Truffles and Peanut Butter Truffles other times of the year beyond Valentine’s Day. Any random day should work, don’t you think? It’s always great to celebrate a regular Monday afternoon with truffles. Someone remind me of this in June.

truffles3sm

My boys obviously liked the above “bomb” valentines more than these flower valentines, but hey, I like flowers and pink hearts, and I live here too, so there. Here’s a Valentine in “Mint” Condition, which uses a York Peppermint Patty in the center.

valentinemint8sm1.jpg

And speaking of York Peppermint Patties, you might have fun making Homemade Peppermint Patties this year as a special treat. Call me if you do – I’d be happy to help you eat them.

What better way to end this post than by showing a picture of myself looking rather like a dork? These “The Better to See You With” Valentines are very easy to make and are fun for your kids to give to their friends. You’ll find the pattern here, and also see a picture of my oldest almost a foot shorter than he is now, and also with much shorter hair. Where has the time gone?

valentineglasses2sm.jpg

Are you making or doing anything fun for Valentine’s Day this year?

Heavenly Homemaker's Club Members: Access your homepage and all your fantastic resources here! Not a member yet? Please join us!
« Previous Page
Next Page »

Join Our Community!

 Facebook Twitter E-mail Instagram Pinterest

Popular Posts

~ Will All of the Real Moms Please Stand Up?
~ Easy! Stir-and-Pour Whole Wheat Bread
~ How to Make Gatorade
~ 31 Real Food Breakfast Ideas
~ Dear Teenage Girls...
~ When Mom Takes a Step Back
~ The Inexpensive Health Insurance We Love!
~ Let's Talk Real Food Grocery Budgets

Check out our latest posts!

  • Easy Side Dishes for Summer
  • Big Family Food and Fun: May 10-16, 2026
  • Big Family Food and Fun: May 3-9, 2026
  • Help Your Kids Become Independent in the Kitchen!
  • Big Family Food and Fun: April 26-May 2, 2026
Home  ~  Simple Meals  ~  Club Membership  ~  Shop  ~  Privacy Policy  ~  Disclosure  ~ Contact

Copyright © 2026 · Beautiful Pro Theme on Genesis Framework · WordPress · Log in