Heavenly Homemakers

Encouraging women in homemaking, healthy eating and parenting

  • Home
    • About
    • FAQs
  • Recipes
    • Bread and Breakfast
    • Condiments
    • Dairy
    • Main Dishes
    • Side Dishes and Snacks
    • Desserts
    • Gluten Free
    • Instant Pot
    • Crock Pot
    • Heavenly Homemaker’s Weekly Menus
  • Homemaking
    • Real Food Sources
  • Store
  • Contact
    • Advertise
    • Disclosure
    • Privacy Policy
  • Simple Meals
  • Club Members!

Gratituesday: Great Christian Role Model

September 8, 2008 by Laura 12 Comments

This post may contain affiliate links. For more information, please see our disclosure policy.

gratituesday2.jpg

Last Gratituesday I told you about our chance to go to Kansas City to watch our good friend Brad Ziegler pitch for the Oakland A’s. We were almost to KC when we got the phone call that the game we had tickets for was rained out. (We’d been driving through a lot of rain, so we had been dreading the thought of having to sit out in it for three hours.)

So, instead of going to a game, we were able to meet Brad and all of his family at McDonalds, which was super fun and a great chance to visit with everyone. 

Then, Thursday we were able to watch a double header since the Wednesday game was re-scheduled for Thursday afternoon, and there was already a Thursday game scheduled for that night…so we got to watch both. (Did that just make any sense?)

Oh, it was SO MUCH FUN!! The boys had a blast, and so did we! 

However…Brad is the “closer” for his team (which means that if his team is ahead…he goes in for the last 2-3 innings and pitches to “seal the deal” because he’s such an awesome pitcher) (and I know you knew what a “closer” was already…but just in case you didn’t…). The Royals were ahead in both games, which meant that Brad didn’t pitch either game. Talk about disappointing. We watched him warm up once just in case…but they ended up not needing him, and the A’s lost both games. 

Sigh.

Oh, but it was so much fun anyway being at a major league baseball game with so many people that we loved. Even my brother met us there because he happened to be in KC for business that week!

While I am typing this post…all four boys are outside with baseball caps on playing a baseball game in the yard. Before they went outside, I got to listen to them (kindly) argue about which one of them got to be the “closer”. How sweet is that? I’m so very grateful that my boys have such a great Christian role model in Brad Ziegler. You can bet they think he’s great! He even signed baseballs for each of them! (Balls they had been using for warm up even!!)

boyswithbradsm.JPG
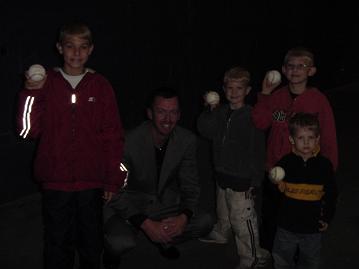
I was disappointed that this picture turned out so dark…
but here are the boys with their signed baseballs with Brad.

oaklandgame3sm.JPG
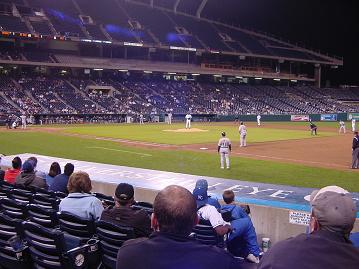
And here is a picture of the back of several people’s heads…
and a picture of the teams on the field.

oaklandgame1sm.JPG
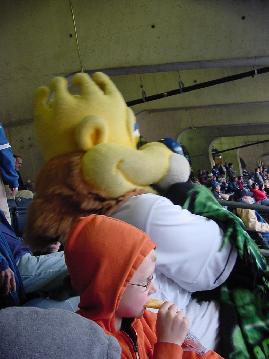
I quickly grabbed my camera for this shot when the Royal’s mascot came and sat down by Justus and started to steal his blanket from him. Justus didn’t quite know what to do! :)

We sure did make some great memories! God is good!
——————————————-

What are you grateful for? Read the Gratituesday guidelines here, then come link up with us!
——————————————-

[blenza_autolink code]

Heavenly Homemaker's Club Members: Access your homepage and all your fantastic resources here! Not a member yet? Please join us!

Soaking Those Grains…What is THAT about?

September 8, 2008 by Laura 62 Comments

This post may contain affiliate links. For more information, please see our disclosure policy.

I’ve had tons of emails lately asking if I soak my grains and how I do it and why I do it!

Most of the recipes on my site have not shown that I soak my grains. Mostly I did that because I know that many of my readers are just beginning to look into making changes toward healthy eating. I decided…if you are just starting out trying to switch over from fruit roll-ups to real fruit…from white flour to whole wheat…from boxed foods to foods made from scratch…it would be very discouraging to hear that you also should “prepare your grains 12-24 hours ahead of time by soaking them in something that is lacto-fermented in order to break down the phytic acid…”

It’s overwhelming enough sometimes just to try to get your kids to eat a green bean…and to wrap your brain around the fact that almost every food on the shelves that we might be used to eating has a no-no ingredient in it.

So, if you’re just starting out on the healthy eating trail…read over the information in this post and tuck it away for whenever or if ever you’re ready. Continue to take baby steps and make small changes. Read the Getting Real with Food series here to give you some basic ideas of where to start and what to do.

But, if you’re eating a lot of whole grains already and are used to baking from scratch anyway, and you want to take this nutrition thing one step farther…here’s some information for you about soaking grains that I am paraphrasing from Sally Fallon’s book “Nourishing Traditions”:

Eating whole grains is important because they provide vitamin E, B vitamins, many important minerals and fiber. But the phytic acid in the grain combines with the iron, calcium, magnesium, copper and zinc in the intestinal tract, blocking their absorption. They also contain enzyme inhibitors that can interfere with digestion.

So, Nourishing Traditions recommends that we soak our grains in either whey, cultured yogurt, kefir, cultured buttermilk…or in lemon juice or vinegar if you can’t tolerate milk products. Soaking them for at least seven hours allows the enzymes to break down and neutralize the phytic acid. Then, more of the good nutrients in the grain are released and all the good stuff is more readily absorbed in our systems and the grain is digested much more easily.

Okay…so quick re-cap. Eating whole grains is so, so much better for you than processed grains that have almost all of their nutrients stripped from them. Eating whole grains that have been soaked is even better.

How do I do this?

It’s really not hard…I just have to plan ahead a little more. And I don’t always soak everything even though I know I should. I try to just do the best I can. (That’s the goal right?)

So, here’s a quick run down of the basics of how I soak my grains when preparing recipes:

Pancakes and Waffles…I stir the whole wheat flour and the buttermilk together, cover it with a cloth and let it sit overnight. The next day, I add the remaining ingredients and cook the pancakes or waffles. They are SO YUMMY made like this!

Quick Breads and Muffins…I mix the flour with the butter (melted and cooled) or oil that the recipe calls for and add enough buttermilk to make it “soakable”. I let it sit overnight, then mix in the remaining ingredients.

Giant Breakfast Cookies and Breakfast Bars…I mix the melted butter, flour and oats with enough buttermilk to soak then let it sit overnight. I have found these to be VERY HARD to stir the next morning, so putting the soaked mixture into my food processor with the other ingredients so that it doesn’t take me 45 minutes (or until lunchtime) just to stir the silly things. Yea for food processors.

Tortillas…I mix up the tortillas as the recipes says, only I put in 1/4 cup less water and add 1/4 cup yogurt, kefir or buttermilk as I’m making the recipe. Then, I let them sit for the day, and roll them and cook them that night for dinner. They roll out so nicely after they’ve been soaked.

Breads, Rolls and Pretzels…These belong in the “I don’t soak these but I should” category. When I’m really on the ball, I make sourdough bread…but my sourdough starter isn’t starting anymore, so I need to get a new one going. In the meantime, I’m compromising and making Honey Whole Wheat Bread, and that’s okay with me. After I get my sourdough going again, I’ll post about it. Sourdough bread is so tasty!

Cookies and Brownies…I rarely soak these either, mostly because I’m lazy about it. When I do soak them, I mix the butter and flour called for in the recipe with a few tablespoons of buttermilk, kefir or yogurt…allow them to sit for a few hours, then add the remaining ingredients and bake.

I hope that helps. I’ll cover soaking other grains like rice and oats in the future. And, as I slowly but surely get around to it…I’ll go back through each of my site recipes and blog recipes and add a brief explanation of how to soak the grains if you choose to do so. That way, you have the option if you’d like!

And now, I think I’ll go grind me some flour and soak something. Because looking at all these recipes put me in the mood to bake.

(Like I’m ever not in the mood to bake?!)  :)

Heavenly Homemaker's Club Members: Access your homepage and all your fantastic resources here! Not a member yet? Please join us!

Menu Plan for the Week

September 7, 2008 by Laura 17 Comments

This post may contain affiliate links. For more information, please see our disclosure policy.

I survived the weekend without my family. It was very nice having all the quiet time to get things done (and boy did I get things done!)…but I like it much better when there’s loudness and craziness and….boys. 

Now they’re back…my boys (Daddy included)…along with the loudness and craziness. Ah, life is good.

Because of our trip last week and the Dads-n-Lads retreat over the weekend, we’re all excited and ready for home cookin’ again! Bring on the vegetables! (Because McDonalds french fries do NOT count.)

Sunday, Sept. 7
The guy’s arrived home in time for lunch!
Veggie soup, cornbread
Hearty bean casserole, peaches

Monday, Sept. 8
Whole wheat pancakes
Pizza casserole, corn on the cob
Grilled chicken, stir fried rice and veggies

Tuesday, Sept. 9
Scrambled eggs, oranges
Leftover roast beef, green bean casserole
Beef enchiladas, salad

Wednesday, Sept. 10
Blueberry coffeecake
Homemade chicken nuggets and fries
Potato soup, bread and butter, carrot sticks

Thursday, Sept. 11
Fruit and yogurt delight, granola
Grilled cheese sandwiches, tomato soup
Turkey ham, scalloped potatoes and carrots, peas

Friday, Sept. 12
Peanut butter honey toast, kefir-fruit smoothies
Homemade pizza
Tacos

Saturday, Sept. 13
We’re headed off to Kansas! It’ll be a super quick trip for a wedding reception…and to see my new baby nephew!!! I’ve already warned my sister-in-law that the only time she’ll be able to hold her son is to nurse him…other than that – he’s MINE! 

So that’s the menu! You’ll find many more menu ideas at Organizing Junkie!

Can you tell we’re having fall weather around here? Bring on the soup!! And with fall in the air…I created a few new free downloadable menu planners JUST FOR FALL!! 

fallmenuplanner3sm.JPG
Here’s a peak at one of them! 
There are five more new ones! 
Go help yourself!

Heavenly Homemaker's Club Members: Access your homepage and all your fantastic resources here! Not a member yet? Please join us!

How to Make and Can Applesauce

September 5, 2008 by Laura 75 Comments

This post may contain affiliate links. For more information, please see our disclosure policy.

***UPDATE***

I no longer peel my apples, nor do I slice them. I simply wash them, core them, cook them as described below, then run them through my Blendtec Blender. It is much healthier and saves so much time to do it this way! And the applesauce is delicious. That’s always nice. :)

~~~~~~~~~~~~~~~~~~~~~~~~~~~~~

One of the best “fall smells” I can think of is applesauce cooking on the stove. It is SO YUMMY!!!

Here’s a step by step of the easiest way I’ve found to make applesauce. (But be sure to read Canning 101 first if you’re unfamiliar with the basic steps of canning safely!)

applesauce1sm.JPG
I slice my apples like this, then peel each slice.
I find this to be much easier than peeling the whole apple first and then slicing it.

applesauce2sm.JPG
As I slice and peel, I put my apples into a big pot. At the bottom of my pot is 5 cups of water and 3 teaspoons of ascorbic acid (powdered vitamin C).

applesauce3sm.JPG
As I continue to add apples, I stir them into the water/ascorbic acid frequently so that the apples are all coated with the mixture and are much less likely to turn brown.

applesauce4sm.JPG
Once I have my pot 3/4 full of apples, I put it on the stove…

applesauce5sm.JPG
and bring it to a boil, then simmer it (uncovered)
for about 30 minutes or until the apples are tender.

applesauce8sm.JPG
Then, I spoon the tender apples with some of the liquid into my blender (I highly recommend the Blendtec now)
and blend it all up until it is smooth.

applesauce9sm.JPG
Isn’t it pretty!!! Next, I pour the applesauce
into sterilized jars with a wide mouth funnel.

applesauce13sm.JPG
I hot water bath my jars for about 25 minutes.

applesauce11sm.JPG

And like always, after I pull them out of the hot water, I set them on my counter for several hours (or days) so that I can admire them and feel happy about my applesauce. Ahh…..beautiful!

This post contains affiliate links.

Heavenly Homemaker's Club Members: Access your homepage and all your fantastic resources here! Not a member yet? Please join us!

Learning to be Flexible

September 4, 2008 by Laura 11 Comments

This post may contain affiliate links. For more information, please see our disclosure policy.

Remember our plans to go to the Oakland A’s vs. the Kansas City Royals game yesterday? Well, as we traveled toward KC yesterday for the game…the rain kept getting heavier and heavier. Yeah, so the game got rained out and cancelled. Big bummer.

However…the game was rescheduled for today. So, we made a few phone calls to get things squared away at home. Now we get to have bonus time with Brad’s family while we’re here hanging out in KC waiting for today’s game. Guess God knew we needed a bit of extended vacation! 

And, well…it’s a tough thing for me to be flexible and change my plans sometimes…but shucks…there’s an outlet mall just down the road that I’ll now have time to go check out. See, I’m growing as a person all the time.

It’s good to be flexible.

:)

Heavenly Homemaker's Club Members: Access your homepage and all your fantastic resources here! Not a member yet? Please join us!

Listen to the Apple Tree

September 2, 2008 by Laura 23 Comments

This post may contain affiliate links. For more information, please see our disclosure policy.

appletree.jpg

Today, I must draw your attention to the apple tree. Just a common, regular apple tree. The kind that grows in many a back yard and makes…apples. That’s what it does. That’s what it’s job is. To produce sweet, crisp, delicious apples. Every year at almost the exact same time each year.

Most years, an apple tree will produce a pretty decent harvest of apples.

And some years, the apple tree will produce so many apples, that it seems that there’s more apples on it than leaves. It will sometimes be so full of apples that some of the branches will break off and fall to the ground because of the heavy load of apples on it. And we say to each other, “Wow…that apple tree sure had a good year!”

But that very next year, that very same apple tree may not produce even one apple. Not one.

Because guess what? Apple trees need to rest. They can not continue year after year after year to produce tons and tons of apples without occasionally just sitting out a year and letting the other apple trees produce the apples for the people.

And after a year of rest, an apple tree can come back the following year and produce a great crop of sweet, crisp, delicious apples again.

That, my friends, is the way God designed…apple trees. :)

So, for all of us “apple trees” out there who think we must do all and be all and look all and take all and show all and have all – all at the same time – we’re not really being a very healthy apple tree.

If you are at a season in your life that you have more time to do more and be more beyond your home and family responsibilities, then by all means, please be the apple tree that has a bumper crop.

But if you have a husband and/or children, or other family members that need you, then enjoy serving and loving and caring for and being with them. Because that is enough.

And if your “apple tree” needs to take time off to rest…then please do rest. You will be able to produce more apples later, after you have rested.

It is simply not up to you or me alone to make sure everyone always has enough apples to eat. Sometimes, I can sit back and focus on other priorites and let other people produce the apples for a while. And then when it’s my time again, I can let others rest while I produce apples.

And those, my friends, are my extremely profound thoughts about apple trees.

And that, my extended family who live in other states, is why you no longer receive adorable handmade birthday cards from me anymore. (And why you’re lucky to even receive a phone call…four to seven days after your birthday.)  ;)

So while I still don’t have a complete understanding of what all I should be doing and what all I should be taking a rest from…I do know that absolutely my most important job and focus is my husband and our four boys and taking care of our home.

I guess I’m “pruning back my branches” so that I’ll be able to give more of the best of me to my family. And God is helping me figure out which branches to prune.

Okay, now I’m going to go eat an apple. Which has nothing to do with my profound thoughts about the apple tree, except for the fact that thinking profound thoughts made me hungry.

Anybody else need to prune back a little? And if so…what kinds of things can you prune back?

Heavenly Homemaker's Club Members: Access your homepage and all your fantastic resources here! Not a member yet? Please join us!

Gratituesday: Take Me Out to the Ballgame!

September 1, 2008 by Laura 12 Comments

This post may contain affiliate links. For more information, please see our disclosure policy.

gratituesday24.jpg

There is MUCH excitement going on at our house right now! Tomorrow we’re leaving to go to Kansas City for just a real quick overnight trip…to go watch the KC Royals play the Oakland Athletics (um, that’s baseball, for some of you who might be a little like me when it comes to sports). 

And guess WHY we’re going? Because a friend of ours, Brad Ziegler, was pulled up several weeks ago to pitch for the Oakland A’s…and he’s doing awesome…and he’s already broken a major league record…and we decided that if he ever played in a game close enough to us…we’d HAVE to go watch!! 

So, we went online to get tickets, and found that there’s all kinds of silly hidden “convenience fees”. Then Matt suggested we check on Ebay. Would you believe we got six tickets (for decent seats I might add) for the grand total of $22!!!! That’s less than $4 a ticket!!! I almost feel bad for the person we bought them from. (Almost)

And of course, not only will we be able to watch an awesome major league baseball game…we’ll be able to see Brad’s wife and baby, and his parents, and enjoy a great visit! (We’re not sure if we’ll get to visit with Brad or not…depends on the night.)

I’m not sure who’s the most excited around here! All four boys are old enough to be able to enjoy the game…and just the experience of being at a major league baseball game. And Matt and I are so excited about the get away and the fun of the game…we’re just giddy! 

So…WooHoo for us! We’re headed out to the ballgame! 

I’m so grateful for this wonderful, fun opportunity to go on a little trip with my family that is sure to create awesome memories for us all. And I can’t wait to see our friends! And I’m so thankful God provided such a great price for tickets. What a treat!
————————————————-
What are you grateful for this Gratituesday? Read the Gratituesday guidelines here, then come link up with us. I LOVE reading about what you all are grateful for! God is so good!

[blenza_autolink code]

Heavenly Homemaker's Club Members: Access your homepage and all your fantastic resources here! Not a member yet? Please join us!

Freezing and Canning Peaches for Winter

September 1, 2008 by Laura 142 Comments

This post may contain affiliate links. For more information, please see our disclosure policy.

I mentioned that over the weekend I received millions and millions (okay, maybe not millions) of peaches from a lady in town. I’ve been busy preserving them for winter and thought I’d walk through the steps with you.

Please note:  These peaches were so awesome and juicy, and since there were so many of them, I felt that none of us needed to hold back on how many we ate. So, as I was standing in my kitchen peeling and slicing peaches, and  peach juice was running down my arms…I was also biting into peaches as I worked, because I just couldn’t resist. Therefore, I also had peach juice running down my chin. But with peach juice all over my hands and running down my arms, it’s not like I could do much about my chin, you know? Not one of my finer moments.

Thought you might like to picture that.

peaches7sm.JPG

If you remember, I was given four boxes of peaches. (I did share a few with some friends.)

peaches5sm.JPG

In the past, I’ve always peeled my peaches with a knife…and that’s been fine. But I had so many peaches this time, I went ahead and tried this method of peeling, and whoa was it a time saver! Just put your peaches into boiling water for about 30 seconds…pull them out…

peaches2sm.JPG

And those skins just peel right off!! It was awesome. Except for when they didn’t peel right off, which happened with a few of them for some reason. (Just thought I’d tell you that so that if not all of them peel right off for you, you’ll know that you aren’t the only one!) 

(You don’t have to peel your peaches if you’re going to freeze them. They’ll be more nutritious if you leave the peelings on, and it will save so much time too!) 

freezingpeachessm.JPG

To freeze peaches, just peel, slice and lay the peach slices on a cookie sheet lined with parchment paper. Put the pan into the freezer until the peaches are frozen, about two hours. (Or longer if you forget they’re in there.)  Then put them into a freezer bag and you’ve got great peaches for smoothies and slushies!! And cobblers and crisps! (If you feel like skipping this step and simply just putting your peach slices directly into a pan without freezing them individually like this first, you can…but you’ll end up with one big gallon sized frozen peach-sicle, and you may be very frustrated when you want only part of the rock hard peach-sicle for a smoothie. Just so ya know.)

Now…to can peaches…this is what I do. There are other ways to do it…this is just the way I do it! Please be sure to go back and read Canning 101 for the canning basics!

peaches3sm.JPG

I make a honey/water solution on my stove…which is 2 T. honey to every 5 cups of water. Heat it on the stove and let it sit warm while you prepare your peaches.

Sterilize your jars.

peaches1sm.JPG

Take out a hot jar and put in about 1/16 teaspoon of ascorbic acid to keep your peaches pretty. Just dump it into the bottom of the jar. (Some people use lemon juice)

ascorbicacidsm.JPG

Ascorbic acid is powdered vitamin C. I get mine at a health food store.

peaches4sm.JPG

Fill the jar with sliced peaches. Then, use a funnel to pour your honey/water into the jar, to about a half inch from the top. Place a sterilized lid and ring onto the full jar.

applesauce13sm.JPG

Now it’s time to give your full jars a hot water bath to seal the lids. Put your full jars into the water. Once the water is boiling,  boil the jars for about 25 minutes. (And yes, this is actually a picture of applesauce jars boiling…I forgot to take a picture of the peaches boiling and I’m too tired to go can more peaches just so that I can go take a picture of the jars boiling.)

Oh, and boil your jars with the lid on the water bath pot…I just took off the lid for the picture. :)

peaches6sm.JPG

After the jars have boiled for 25 minutes, take them out with tongs…or better yet, this cool gripping tool made especially for jars and hot water baths. Then you get to listen for the caps to seal. I can’t think of a way to blog the way it sounds…but after all your hard work, it sure is a cool sound to hear them seal! (Thhhhp!) (Or something like that!)  You can be sure they sealed if you can push down on the top and it is down firm. It takes anywhere from 1 second to 30 minutes for the lid to seal after you’ve taken it out of the water. 

Then, just leave your canned peaches out on the counter for a few hours or several days so that you can admire them and smile and feel happy every time you walk into the kitchen and see them. (Okay, that’s what I like to do anyway.)  (Because I’m weird like that.)

Heavenly Homemaker's Club Members: Access your homepage and all your fantastic resources here! Not a member yet? Please join us!

Canning 101

September 1, 2008 by Laura 86 Comments

This post may contain affiliate links. For more information, please see our disclosure policy.

Just in case you may be unfamiliar with the beautiful art of canning fruits and veggies…I thought I’d do this post to explain some of the basics. Then later, I can post about the specifics!

Here are some of the basic supplies you will need in order to can food. Some of these supplies are not entirely neccessary…just really, really helpful. Some of these supplies are entirely neccessary.

canning1014sm.JPG
If you are planning on canning fruits or veggies, you will need jars. 
(Oh, how I love jars!)  I like having both quart and pint sized…
and my favorites are the wide mouth jars.

canning1015sm.JPG
You’ll also need lids and rings. The rings you can re-use year after year,
but in order to have your lid seal, you must use new ones each year.

canning1012sm.JPG
This handy dandy tool is a magnetic wand, which I use to retrieve lids
and rings out of hot sterilizing water. (See below)  I love this tool!!

canning101sm.JPG
This tool helps me grip the jars as I pull them out of the hot water bath. 
Since I’ve had this tool, I have broken fewer jars and burned myself less often. 
I SO recommend one of these.

canning1016sm.JPG
This wide mouth funnel is a lifesaver when you’re trying to get
your produce into the jar without making a big mess. 

canning1013sm.JPG
A water bath pot is pretty neccessary…
if you’re planning to seal your jars in a water bath. 

Okay…next…

Here are a few things you need to know if you don’t want to die from botulism…

*Using the hot water bath system to seal your jars is only safe if you’re canning something acidic. Otherwise, food must be sealed in a pressure cooker. Food that I know of to be safe to can in a hot water bath:  tomatoes, apples, peaches, pears. If you aren’t for sure what’s safe…please look it up to be sure before you use a hot water bath to seal your lids!

*You need to sterilize your jars, lids and rings before you put food into them. All I do is put my clean jars upside down into a shallow pan of boiling water for a couple of minutes.

applesauce7sm.JPG

applesauce10sm.JPG
I do the same with my lids and rings.

applesauce12sm1.JPG
See, this is where that magnetic wand comes in very handy!

*When you put your jars full of yummy fruits or veggies into the hot water bath, I recommend putting them in before you start to boil the water. If your water is already boiling hot, you run the risk of breaking your jars and losing all of the work you put into filling. So, put your jars into the pot of water, then turn it on to begin to get hot. Once it finally starts to boil, then start your timer for the recommended boiling time.

Okay…this will all make more sense with my other posts about canning specific fruits and veggies. But…that gives you the basic information you’ll need so that those posts will make sense. Or maybe none of it makes any sense and you’d rather just come over and watch. (Watch, nothin’. I’d hand over a knife and some apples and tell you to get busy.)  :)

Stay tuned…canning peaches and applesauce coming soon!
————————————————-

Find more kitchen tips on Tammy’s Recipes.

Heavenly Homemaker's Club Members: Access your homepage and all your fantastic resources here! Not a member yet? Please join us!

Menu Plan for the Week

August 31, 2008 by Laura 13 Comments

This post may contain affiliate links. For more information, please see our disclosure policy.

We had a super productive weekend!!! We cleaned and cleaned and cleaned this house!! Whew did it need it!

And I made applesauce and salsa.

And a lady called and asked if I wanted some peaches. Well, of course I wanted some peaches! I told her I’d take whatever she wanted to give me. (She wouldn’t let me pay her either!)  Boy oh boy did she give us some peaches. 

peaches7sm1.JPG
This was only half of them! 

Sunday, August 31
Oatmeal with apples and cinnamon
Roast, gravy, corn on the cob, cherry tomatoes
Peanut butter and honey sandwiches, fruit

Monday, September 1
Whole wheat waffles with peach syrup (I’m going to experiment to make this!)
Beef and cheese burritoes, cantaloupe
Cookout with some friends!

Tuesday, September 2
Scrambled eggs, homemade turkey sausage
Grilled cheese sandwiches, cherry tomatoes, strawberry-peach slushies
Shepherd’s pie, salad

Wednesday, September 3 – Thursday, September 4
We’re going on a quick fun family trip!! I can’t wait to tell you about it on Gratituesday!!

Friday, September 5
Fruit-kefir smoothies, granola
Homemade pizza
Cheesy beef and rice, steamed carrots

Saturday, September 6
Giant breakfast cookies
Hamburgers (on homemade buns), onion rings
Lamb chops, baked potatoes, green beans

This week I’ll post about freezing and canning all those peaches. (If I ever finish freezing and canning all those peaches!)  And I’ll show you how to make applesauce!

With all this fruit in my kitchen…you can just imagine the party all the little fruit gnats are having! Anybody have a solution for those pesky little critters? (Aside from “hurry up and get your fruit canned and frozen”?!)

Find many other menu ideas at Organizing Junkie!

Heavenly Homemaker's Club Members: Access your homepage and all your fantastic resources here! Not a member yet? Please join us!
« Previous Page
Next Page »

Join Our Community!

 Facebook Twitter E-mail Instagram Pinterest

Popular Posts

~ Will All of the Real Moms Please Stand Up?
~ Easy! Stir-and-Pour Whole Wheat Bread
~ How to Make Gatorade
~ 31 Real Food Breakfast Ideas
~ Dear Teenage Girls...
~ When Mom Takes a Step Back
~ The Inexpensive Health Insurance We Love!
~ Let's Talk Real Food Grocery Budgets

Check out our latest posts!

  • Big Family Food and Fun: June 14-20, 2026
  • Big Family Food and Fun: June 7-13, 2026
  • Big Family Food and Fun: May 31-June 6, 2026
  • Big Family Food and Fun: May 24-30, 2026
  • Free 7-Day Summer Menu Plan
Home  ~  Simple Meals  ~  Club Membership  ~  Shop  ~  Privacy Policy  ~  Disclosure  ~ Contact

Copyright © 2026 · Beautiful Pro Theme on Genesis Framework · WordPress · Log in