Heavenly Homemakers

Encouraging women in homemaking, healthy eating and parenting

  • Home
    • About
    • FAQs
  • Recipes
    • Bread and Breakfast
    • Condiments
    • Dairy
    • Main Dishes
    • Side Dishes and Snacks
    • Desserts
    • Gluten Free
    • Instant Pot
    • Crock Pot
    • Heavenly Homemaker’s Weekly Menus
  • Homemaking
    • Real Food Sources
  • Store
  • Contact
    • Advertise
    • Disclosure
    • Privacy Policy
  • Simple Meals
  • Club Members!

Homemade French Dressing

August 22, 2010 by Laura 38 Comments

This post may contain affiliate links. For more information, please see our disclosure policy.

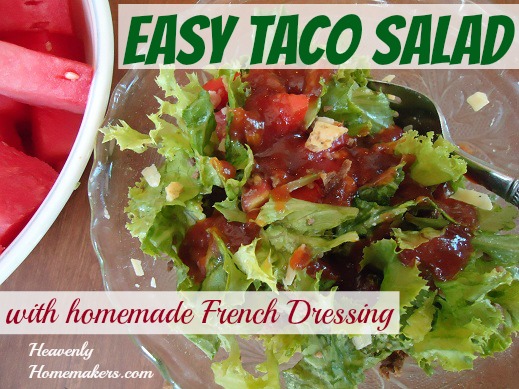
I figured out a French Dressing recipe that includes only real food ingredients and avoids high fructose corn syrup! It also means I can enjoy Taco Salad the way I used to – again without the high fructose corn syrup. Mmm, real food. I love revisiting my favorites and eating them in a healthier way!

french_dressing_2

Back in the day when I didn’t know what high fructose corn syrup was or understand that it was bad for us…I used to make a killer taco salad with Catalina Salad Dressing. Man that stuff tasted good!

I’d mix up a big bowl of lettuce, taco seasoned meat, shredded cheese, chopped tomatoes, chili beans, crunched up tortilla chips – and toss it all with Catalina. Such a perfect summer supper (or dinner, or whatever).

After a little experimenting, I came up with a yummy homemade French salad dressing that tastes even better than the store bought ever tasted! It’s so easy to put together, it’s inexpensive to make, and it tastes wonderful in my taco salad! It’s a blast from the past, only better.

Homemade French DressingYum

Homemade French Dressing
 
Save Print
Author: Laura
Ingredients
  • ¾ cup ketchup
  • 2 Tablespoons sucanat (you can substitute brown sugar if you want)
  • ½ cup olive oil
  • ¼ cup red wine vinegar
  • ½ teaspoon garlic powder
  • ¼ teaspoon liquid smoke
  • 1 Tablespoon ground celery seed
Instructions
  1. Put all ingredients directly into a pint sized jar.
  2. Put the lid on and shake it well.
  3. Refrigerate.
3.4.3177

I recommend Muir Glen Organic ketchup because guess what? It doesn’t include high fructose corn syrup.

Easy Taco Salad with homemade French Dressing

Remember that you can also find recipes for homemade Ranch Salad Dressing, Italian Salad Dressing and Thousand Island Salad Dressing in the Condiments Page of my recipe section!

And also…if that’s just too much salad for ya…you can find a recipe for Chocolate Caramel Truffles on the Desserts Page. I’m always willing to accommodate. ;)

Heavenly Homemaker's Club Members: Access your homepage and all your fantastic resources here! Not a member yet? Please join us!

Homemade Ice Cream Sandwiches

August 18, 2010 by Laura 21 Comments

This post may contain affiliate links. For more information, please see our disclosure policy.

When I mentioned that I was making homemade ice cream sandwiches for the YC ladies soccer team, several of you said, “You ARE going to share your recipe aren’t you?!”

Uh yeah. Who am I to hold back on a recipe that includes cookies and ice cream? That would just be mean. Although this isn’t really a recipe exactly.  I just put ice cream between two cookies and called it a sandwich. I didn’t even make the homemade ice cream this time. I needed to make 40 of these and I was making homemade ice cream for the team another day…so this time it was Breyers to the rescue!

First off, I baked TWO double batches of these chocolate chip cookies. I used a Pampered Chef medium sized scoop so that my cookies would mostly, sort of turn out uniform in size. You must make sure your cookies are completely cooled for obvious ice cream sliding avoidance purposes. In fact, I made mine ahead and froze them. Then they were nice and cold and ready for ice cream.

Here’s the Homemade Ice Cream Sandwich math:

~A double batch of chocolate chip cookies made about 40 big cookies, which was enough for 20 ice cream sandwiches. Therefore I needed TWO double batches of chocolate chip cookies to make 40 ice cream sandwiches. I suppose that would be a quadruple batch, wouldn’t it?
~One container of Breyers Ice Cream was enough for thirty ice cream sandwiches.

I let the ice cream soften just a bit on my counter top. By “just a bit” I mean I have  no idea exactly how long I left it there. I brought it home from the store and put a few other groceries away and helped one of the kids on a math problem then got out supplies to make the sandwiches then started some meat cooking on the stove then washed my hands and finally started putting the sandwiches together. Yeah, about that long. The ice cream was then nice and soft for scooping, but not yet running all over my counter and down into my silverware drawer.

Once your ice cream is soft – but not too soft, good luck with that – pick two cookies that look pretty similar in size.

ice_cream_sandwich_1

Yum

Place a scoop of ice cream onto one of the cookies. If you get some on your fingers you are not allowed to lick it off. You are making these to share with other people right? Work hard to avoid the temptation to lick your ice creamy fingers. It will not be easy. But you can do it. If I can do it, you can do it. Believe me. Because it was lunch time and I hadn’t eaten yet.

ice_cream_sandwich_2

Place the second cookie on top of the ice cream which is on top of the first cookie. Squish it down just a little bit. But not too much. If you squish too much the ice cream will ooze all out of the sides of the sandwich and wow will you have a mess. So don’t blame me if you squish too hard. I warned you to do slight squishing.

ice_cream_sandwich_3

Hold up the pretty ice cream sandwich and show all family members and friends who are around and wish to see it. And then tell them that sorry, they can’t eat it yet.

ice_cream_sandwich_4

Place each ice cream sandwich in a little fold top sandwich bag. Who knew those were really for ice cream sandwiches and not just ham and turkey?

ice_cream_sandwich_6

Place all the wrapped sandwiches on a pan in the freezer for at least two hours or for however long you need to keep them there. Or for however long you can keep them there as these are rather tasty and people will want to take them out of the freezer and eat them.

ice_cream_sandwich_7

When you are eating your very own ice cream sandwich, you are then allowed to do all the squishing of the ice cream you would like to do. You are also then allowed to lick your fingers…and the ice cream that may or may not be running all the way down your arm toward your elbow.

Go ahead, see if you can lick your elbow.

You tried it just now didn’t you?

For the record, I am not quite able to reach my elbow to lick it. I will need to catch the running ice cream before it reaches my elbow. You?

No, not my elbow…yours. You may NOT lick my elbow.

Lick your own elbow…if you can.

Can you?

Yeah, explain this one to your family.

“Mama, why are you sitting at the computer trying to lick your elbow?”

“Just getting ready to make Ice Cream Sandwiches, Dear.”

Heavenly Homemaker's Club Members: Access your homepage and all your fantastic resources here! Not a member yet? Please join us!

Where to Buy Vanilla Beans

August 17, 2010 by Laura 61 Comments

This post may contain affiliate links. For more information, please see our disclosure policy.

I’m often asked where I recommend you buy vanilla beans to make homemade vanilla extract. You have checked into making homemade vanilla, right?! :)  Ooh, it’s so delicious…and easy…and can save you a lot of money!

I recently began a new batch of homemade vanilla extract but since I don’t purchase vanilla beans very often, I didn’t have a “go-to” source for them. I did a little research, and liked Olive Nation as they appeared to have a high-quality vanilla bean for a very reasonable price, plus they offered free shipping on orders over $50 and 15% off when we use the coupon code home. So I ordered a pound of vanilla beans from Olive Nation.

When my vanilla beans arrived just a few short days later I was very, very impressed. The beans were shipped very promptly. They were packaged very nicely. The beans were excellent quality.

I thought to myself, “I like how these people do business. I’m going to contact them.”

So I did….and they agreed to give all of you a discount on vanilla beans!!! They already offer free shipping and reasonable prices, so for them to offer a 15% discount on top of that for Heavenly Homemaker’s readers is awfully nice, wouldn’t you think?

If you order your vanilla beans through Olive Nation and use the code:  home you’ll receive a 15% discount on any size order of vanilla beans. Plus free shipping on orders over $50. Plus receive prompt service. Plus receive excellent quality vanilla beans.

When I did the math on how much it would cost me to make a big batch of homemade vanilla using beans from Olive Nation and inexpensive vodka from the store…it ended up saving me more than 50% over store-bought vanilla. So, yes making homemade vanilla does save money. Plus the homemade vanilla you make using this method makes very strong vanilla…so you can use half of what a recipe calls for! More savings!!!

The process I use for making homemade vanilla takes about six months, but if you want to start a batch now and have it ready for Christmas gifts…it will still work (if you hurry and get it started!!)…it just won’t be quite as strong as if you’d given it the full six months to “extract”. I say go for it! Your family and friends will love it and you will have made them a wonderful gift at a very low cost to you. If you do, check out these pretty labels! They are customizable, and come in several fun designs!

I’d like to thank Olive Nation again for offering the coupon code (home) to all of Heavenly Homemakers readers. Be sure to check them out…I was very pleased with their service and prices and I think you will be too!

OliveNation banner 460x60

(disclosure)

Heavenly Homemaker's Club Members: Access your homepage and all your fantastic resources here! Not a member yet? Please join us!

A Recipe, A Giveaway, and Oh Yeah – A Menu Plan

July 11, 2010 by Laura 47 Comments

This post may contain affiliate links. For more information, please see our disclosure policy.

Welcome to my very long post. I’m not sure if this is called multitasking…or if it’s called the best way to overwhelm your audience. Maybe it’s simply called Laura is trying to play catch-up. Yes, apparently I’m trying to kill three birds with one…post.

Disclaimer:  No birds were harmed during the writing of this post.

The Menu Plan:

Sunday, July 11
Oatmeal, pears
Cheddar ranch burgers, corn on the cob (while we watch the World Cup finals!)
Bean and rice bowls, fresh pineapple

Monday, July 12
Whole wheat waffles
Grilled cheese sandwiches, tomato soup, carrot sticks
Venison roast, potatoes, carrots, gravy

Tuesday, July 13
Scrambled eggs, oranges
Homemade pizza, grapes
Crunchy ranch chicken, stir fried rice and veggies

Wednesday, July 14
French toast, blueberries
Tuna on tomatoes, crispy cheese crackers, fruit kefir smoothies
Chicken fried steak strips, mashed potatoes, gravy, green beans

Thursday, July 15
Mini apple pies, cheese
Corn dogs, watermelon
Egg/turkey sausage/hashbrown casserole, orange muffins

Friday, July 16
Peanut butter honey toast, applesauce
Popcorn chicken, green beans
Sloppy cornbread, strawberry-peach slushies, peas

Saturday, July 17
Funnel cakes
Leftovers
Tacos

The Recipe

Back when I threw out the question about grills, Christy left a comment about how she makes Apple Crisp on the grill. I asked her for the recipe…and she kindly sent it to me. Doesn’t this sound SO good?

Apple Crisp on the Grill

In a bowl, mix together the apples, cinnamon and flour. Coat well, and add apple juice and sugar/or honey. Mix in with apples and fold in until mixture is combined. Place in an old metal bread pan or two disposable pie plates.

5-6 apples diced w/skins on (Adds color and extra vitamins)
2 T Sugar or honey
2 T. Apple juice
1 t . cinnamon
2T. whole wheat or AP flour

Topping:
1/4 c. whole wheat flour
1/4 c. rolled oats
1/4 c. butter (cold is good)
3 T . Brown Sugar
1 t. cinnamon

Mix topping ingredients together, and crumble evenly to the top of the apples! Wrap tightly in foil.

Christy says, “I put the crisp on the BBQ on low, at the same time as I I put on my potatoes, followed by the vegetables, then the burgers! When our main course is ready I turn off the heat, and let the crisp finish, and let the juices get nice and thick. The smell is amazing and brings a touch of fall to the air” :)

The Giveaway:

n251771458485_4895[1]

I was sent TWO coupons for a FREE package of Original Brat Hans Sausages. My grocery stores don’t carry these sausages (I think you can find them at Whole Foods), so they said I could give them away to two of you!! If you’re interested in these Brat Hans Gourmet Chicken Sausages with No Nitrates, No Nitrites, No MSG, No Fillers, No Antibiotics, No Added Hormones, No Preservatives…leave a comment on this post! I’ll draw two random winners at the end of the week.

You may also be interested to know that I will be drawing the winner for Learn Your Letters, Learn To Serve Curriculum Kit tonight…and you know what comes after that!!!

Heavenly Homemaker's Club Members: Access your homepage and all your fantastic resources here! Not a member yet? Please join us!

Healthy Strawberry Shortcake

June 10, 2010 by Laura 67 Comments

This post may contain affiliate links. For more information, please see our disclosure policy.

When fresh strawberries are in season, nothing much tastes better than Strawberry Shortcake. This variation of Strawberry Shortcake is lightly sweetened with honey and made with whole wheat flour. We had the entire cake eaten up in just a few minutes!

strawberry_shortcake_2

Yum

 Strawberry Shortcake

1 1/3 cups whole wheat flour (I use freshly ground whole wheat)
1 teaspoon baking powder
2 eggs
1/2 cup honey
1/3 cup oil (I use coconut oil)
1 teaspoon vanilla extract
1/2 cup milk

4-5 cups of fresh, sliced strawberries
Whipped cream (fresh cream whipped to form soft peaks, with a bit of stevia added for sweetness)

Mix together flour and baking powder. Add in eggs, honey, oil, vanilla and milk. Stir well (or mix well with hand mixer). Pour into a well buttered 8×8 inch baking pan. Bake at 350° for 20-25 minutes.

Allow cake to cool completely. Top with fresh strawberries and whipped cream. (9 servings)

Strawberry Shortcake with Whole Wheat and Honey

If you’d like more ideas for what to do with all the fresh strawberries that are in season right now, you may want to take a look at this fun recipe list!

Heavenly Homemaker's Club Members: Access your homepage and all your fantastic resources here! Not a member yet? Please join us!

Sloppy Cornbread Muffins

May 26, 2010 by Laura 38 Comments

This post may contain affiliate links. For more information, please see our disclosure policy.

sloppy_corn_muffins_4

Yum

I’ve decided that I love sloppy joes more than any 36 year old mama ought to love sloppy joes. (Sloppy joes aren’t just kid food, right?)  I’m a little crazy when it comes to my hamburger meat. I like it a lot. Bring on the beef.

As you may recall, this Sloppy Cornbread is a very fun way to eat Sloppy Joes without buns. Over the weekend I experimented making the Sloppy Cornbread into muffins….and YUM!

To make Sloppy Cornbread Muffins you will need:

1 recipe of Cornbread
1/4 recipe of Sloppy Joes (which is 1/2 pound of meat)

which will make 12 Sloppy Cornbread Muffins 

These freeze and reheat very well…which means you may want to use:

a double batch of Cornbread
1/2 recipe of Sloppy Joes (which is one pound of meat)

which will make 24 Sloppy Cornbread Muffins

Is this getting confusing? If you make up the full Sloppy Joe recipe, you could just make some of it into Sloppy Cornbread Muffins, then freeze the remaining Sloppy Joes mixure. Or, you could just bring it over to me and I’ll get a fork and eat it right out of the pan.

sloppycornmuffins

First fill your muffin cups half full (or half empty depending on the kind of day you’re having) with cornbread batter.

The muffins do tend to stick a little to paper muffin liners…so you may have better success just buttering each muffin cup very well.

sloppycornmuffins2

 Spoon about a Tablespoon or two of Sloppy Joe meat into each muffin cup.

Bake in a 400° oven for 20 minutes.

sloppycornmuffins3

So, what kind of day are you having? Would your muffin cups be half empty…or half full?

Heavenly Homemaker's Club Members: Access your homepage and all your fantastic resources here! Not a member yet? Please join us!

Start Making Homemade Vanilla for Christmas!

May 24, 2010 by Laura 50 Comments

This post may contain affiliate links. For more information, please see our disclosure policy.

vanilla_beans

About a year ago, I told you about my vodka buying adventures. Fun times. It’s always neat to be carded when you’re in your 30’s. I was so honored. And also embarrassed. Hey, I was buying an entire gallon of vodka at one time. I looked like I was going a little overboard. Like a crazy lady who took her four children to the store with her at nine o’clock in the morning to buy a gallon of booze.

Well anyway, it was well worth it as I handed out nice bottles of homemade vanilla for Christmas last year. And as I continue to pull out bottles of homemade vanilla for our own use. Mmmmmm…it’s so delicious!

I know it’s a little bit early to be thinking about Christmas. Never mind – it’s never to early to be thinking about Christmas gifts. Starting now and planning ahead can save a lot of money. That’s why I’m writing this little post.

It takes six months to make good, strong homemade vanilla. If you’d like to give homemade vanilla to family and friends this Christmas…you’ll need to purchase vanilla beans and start making your vanilla soon! If you get all of your supplies in order now and get the vanilla started in June, you’ll be all set for Christmas!

Here’s what you need to do:

  1. Read this post about how to make homemade vanilla. (By the way, making vanilla is so completely easy!)
  2. Order Vanilla Beans (You’ll find details on the amount of beans you need here.)  If you order vanilla beans through Olive Nation you will receive free shipping, PLUS if you use the code home you will receive 10% off your order! I’ve been very pleased with the beans I ordered through Olive Nation!
  3. Buy some cheap vodka. (You’re on your own with this one. Best wishes.)
  4. Get ahold of a big jar to make your vanilla.
  5. Get your vanilla beans and put into your vodka (as directed here) to start extracting.

Then…in the next few months, you can

  1. Start thinking about purchasing small bottles for your vanilla gifts.
  2. Look into these fun Vanilla Recipe Cards to add to your gifts.
  3. Check out these pretty labels! They are customizable, and come in a variety of designs.
Heavenly Homemaker's Club Members: Access your homepage and all your fantastic resources here! Not a member yet? Please join us!

Whole Wheat Banana Bread and Muffins

May 19, 2010 by Laura 107 Comments

This post may contain affiliate links. For more information, please see our disclosure policy.

banana_bread

Did I ever tell you about the time I almost forgot to put the bananas into my banana bread?

I have these finer moments in my kitchen from time to time. They mostly happen while I’m trying to cook and talk simultaneously. If I’m talking on the phone while mixing up a recipe, I tend to leave out key ingredients. Or add the same ingredient twice.  It’s ridiculous.  I think it’s crazy that I can usually multi-task quite well…but I can barely have a conversation with someone while I cook. Duh. Just be glad I type these posts after I’m finished cooking. Otherwise, these recipes would just be plain scary.

And so, because I care too much not to share, here’s a handy baking tip:  When making Banana Bread or Muffins, be sure to add the bananas. The final product tastes much better this way. I’m nothing if not helpful.

Whole Wheat Banana Bread and MuffinsYum

1 3/4 cups whole wheat flour (I use freshly ground flour from hard white wheat)
1 teaspoon baking powder
1/2 teaspoon baking soda
1/4 teaspoon sea salt
1 cup mashed over-ripe bananas (about 2-3 bananas)
1/3 cup honey
1/4 cup melted butter
2 eggs

Stir together flour, baking powder, baking soda and salt. In a separate bowl, mash bananas, or puree them in a blender. Mix mashed bananas, honey, melted butter and eggs into flour mixture.

For Bread:  Spread batter into a well buttered bread pan. Bake in a 350° oven for 50-60 minutes or until a toothpick inserted into the middle comes out clean.

For Muffins:  Spoon batter into 12 buttered or paper lined muffin tins. Bake in a 400° oven for 20 minutes.

Speaking of finer moments in my kitchen…did I ever tell you about the time I made a lovely lasagna ahead of time so that I would be all ready for my company that night? Because, you see, it’s great to be prepared when you’re having company. Oh, and it also helps to get the lasagna out of the fridge and BAKE IT at dinner time. Being prepared doesn’t help at all if you don’t actually bake your lasagna. Yeah, dinner was a little late that night.

Heavenly Homemaker's Club Members: Access your homepage and all your fantastic resources here! Not a member yet? Please join us!

It’s National Pretzel Day! Make Some Memories!

April 26, 2010 by Laura 6 Comments

This post may contain affiliate links. For more information, please see our disclosure policy.

making_memories

First, I’d just like to say that I think it’s funny that there is a national ANYTHING day. You name it, there is a national day for it. While I’m not opposed to celebrating the day zippers became patented (because I happen to appreciate zippers very much), I just find it interesting that there is a day to honor this occasion.

That being said, in case you didn’t know, today (Monday April 26) is National Pretzel Day. Now this is one celebration I can get into. You know I love me some homemade soft pretzels!!

pretzels9sm.JPG

Perfectly fitting for today, Jennifer at Adventures in McQuill-land is hosting Making Memories Monday. I happen to think that making homemade whole wheat soft pretzels is a very fun way to make memories with your kids! Mixing them up, letting them rise, punching them down and shaping them – and then of course eating them together (with butter slathered all over) – what a great way to make memories! Maybe you could shape them into alphabet letters, spell out your child’s name or create some fun animals. Get creative! (Remember these fun pretzel shapes?)  Or you can of course just enjoy shaping them into regular ol’ pretzels!

One of my favorite ways to make memories with my kids is by having them in the kitchen with me! Be sure to see how others are making memories at Making Memories Monday. And…scroll through these posts to learn more about getting your kids into the kitchen with you! (Hey, if you do decide to make some fun pretzel memories today, can you email me your pictures?! I want to see what you came up with!)

So, what day should National Heavenly Homemaker’s Day be? (It would be a day to celebrate all of you!!! And there would be lots of chocolate.)

Heavenly Homemaker's Club Members: Access your homepage and all your fantastic resources here! Not a member yet? Please join us!

Chocolate Chocolate Chip Muffins

April 15, 2010 by Laura 118 Comments

This post may contain affiliate links. For more information, please see our disclosure policy.

I’m not sure if you are a chocolate lover like I am, but any recipe that has the words chocolate and chocolate written side by side makes me very happy and excited.

Chocolate_Chocolate_Chip_Muffins

My biggest hint on this recipe is to use sour cream instead of milk. (The recipe lists either one.) Sour cream makes these super moist.

This recipe is a definite family favorite. They taste amazing with a glass of milk or a cup of coffee!

Chocolate Chocolate Chip MuffinsYum

1 1/2 cups whole wheat flour
1/3 cup sucanat
1/4 cup cocoa powder
1/2 teaspoon sea salt
1/2 teaspoon baking powder
1/4 cup melted coconut oil or butter
2/3 cup milk or sour cream
1 egg
1/4 cup chocolate chips (I recommend these organic chips without soy lecithin)

Stir together dry ingredients. Mix in coconut oil, milk and egg. Fold in chocolate chips. Scoop into 9-12 paper lined muffin tins. Bake at 400° for 20  minutes. Makes about 9 muffins. (I double the recipe for my family of six.)

5.0 from 1 reviews
Chocolate Chocolate Chip Muffins
 
Save Print
Prep time
10 mins
Cook time
20 mins
Total time
30 mins
 
Author: Laura
Serves: 9 muffins
Ingredients
  • 1½ cups whole wheat flour
  • ⅓ cup sucanat
  • ¼ cup cocoa powder
  • ½ teaspoon sea salt
  • ½ teaspoon baking powder
  • ¼ cup melted coconut oil or butter
  • ⅔ cup milk or sour cream
  • 1 egg
  • ¼ cup chocolate chips
Instructions
  1. Stir together dry ingredients.
  2. Mix in coconut oil, milk and egg.
  3. Fold in chocolate chips.
  4. Scoop into 9-12 paper lined muffin tins.
  5. Bake at 400° for 20 minutes.
3.4.3177

If you have some good quality coconut oil, I highly recommend using it in this recipe. The coconut flavor with the chocolate is SO GOOD.

How about Chocolate Chip Bread?

Don’t mind if I do. Indeed, you can also make this recipe into a quick bread instead of muffins. Just spread the batter into a buttered loaf pan and bake at 350° for 50 minutes! Get all the details here.

chocolate_pumpkin_bread_2


Heavenly Homemaker's Club Members: Access your homepage and all your fantastic resources here! Not a member yet? Please join us!
« Previous Page
Next Page »

Join Our Community!

 Facebook Twitter E-mail Instagram Pinterest

Popular Posts

~ Will All of the Real Moms Please Stand Up?
~ Easy! Stir-and-Pour Whole Wheat Bread
~ How to Make Gatorade
~ 31 Real Food Breakfast Ideas
~ Dear Teenage Girls...
~ When Mom Takes a Step Back
~ The Inexpensive Health Insurance We Love!
~ Let's Talk Real Food Grocery Budgets

Check out our latest posts!

  • Big Family Food and Fun: May 10-16, 2026
  • Big Family Food and Fun: May 3-9, 2026
  • Help Your Kids Become Independent in the Kitchen!
  • Big Family Food and Fun: April 26-May 2, 2026
  • Big Family Food and Fun: April 19-25, 2026
Home  ~  Simple Meals  ~  Club Membership  ~  Shop  ~  Privacy Policy  ~  Disclosure  ~ Contact

Copyright © 2026 · Beautiful Pro Theme on Genesis Framework · WordPress · Log in