Heavenly Homemakers

Encouraging women in homemaking, healthy eating and parenting

  • Home
    • About
    • FAQs
  • Recipes
    • Bread and Breakfast
    • Condiments
    • Dairy
    • Main Dishes
    • Side Dishes and Snacks
    • Desserts
    • Gluten Free
    • Instant Pot
    • Crock Pot
    • Heavenly Homemaker’s Weekly Menus
  • Homemaking
    • Real Food Sources
  • Store
  • Contact
    • Advertise
    • Disclosure
    • Privacy Policy
  • Simple Meals
  • Club Members!

Cream Cheese Pumpkin Muffins

October 29, 2013 by Laura 20 Comments

This post may contain affiliate links. For more information, please see our disclosure policy.

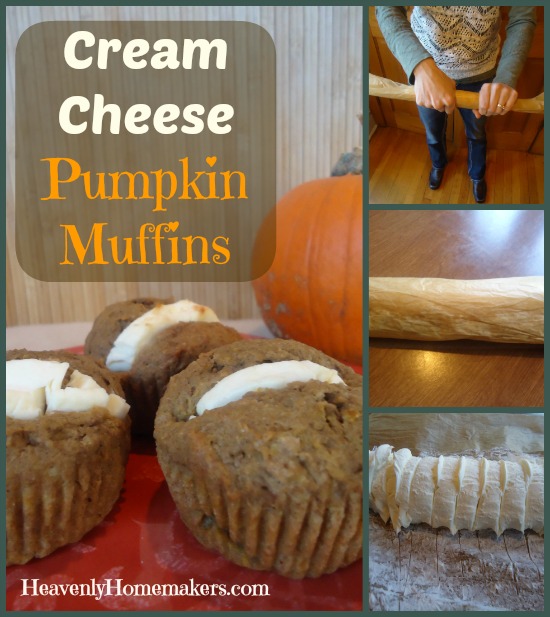
The first new healthy make-ahead snack recipe idea I am sharing (to go along with our Getting Ahead Challenge) was inspired by Kristen who left a comment on Facebook last week suggesting I make these muffins for a family game night. I experimented a little, and we loved the result! Cream cheese and pumpkin together in a muffin? Can be made ahead of time? Freezable? Yes, yes, yes. Not to mention, you get to learn to make cream cheese coins. Just when you thought life in the kitchen couldn’t be any more fun…

Cream Cheese Pumpkin Muffins

For those of you who notice fine details, you might realize that this recipe is very similar to my Pumpkin Chocolate Chip Muffin recipe. I simply took out the chocolate and added cream cheese. Why think hard when you already have a great pumpkin muffin recipe, right?

Cream Cheese Pumpkin MuffinsYum

3 cups whole wheat flour (I used freshly ground hard white wheat)
1 cup sucanat
1 teaspoon baking soda
2 teaspoons baking powder
1 teaspoon sea salt
1 teaspoon cinnamon
4 eggs
2 cups pureed pumpkin (or one 16 ounce can)
1 cup melted coconut oil (or butter)
8 ounces cream cheese

Before mixing together muffins, place cream cheese in the middle of a large piece of parchment or wax paper. Wrap the paper around the cream cheese and shape it into a long rope. Place it in the freezer while preparing the muffins.

Stir together flour, sucanat, baking soda, baking powder, salt, and cinnamon. Add eggs, pumpkin, and melted coconut oil. Mix well and scoop batter into 24 paper-lined muffin tins. Slice cream cheese into 24 “coins.” Slide one into the middle of each muffin. Bake in a 400° oven for about 20 minutes or until muffins are golden brown.

Cream Cheese Pumpkin Muffins
 
Save Print
Prep time
15 mins
Cook time
20 mins
Total time
35 mins
 
Author: Laura
Serves: 24 muffins
Ingredients
  • 3 cups whole wheat flour (I used freshly ground hard white wheat)
  • 1 cup sucanat
  • 1 teaspoon baking soda
  • 2 teaspoons baking powder
  • 1 teaspoon sea salt
  • 1 teaspoon cinnamon
  • 4 eggs
  • 2 cups pureed pumpkin (or one 16 ounce can)
  • 1 cup melted coconut oil (or butter)
  • 8 ounces cream cheese
Instructions
  1. Before mixing together muffins, place cream cheese in the middle of a large piece of parchment or wax paper.
  2. Wrap the paper around the cream cheese and shape it into a long rope.
  3. Place it in the freezer while preparing the muffins.
  4. Stir together flour, sucanat, baking soda, baking powder, salt, and cinnamon.
  5. Add eggs, pumpkin, and melted coconut oil.
  6. Mix well and scoop batter into 24 paper-lined muffin tins.
  7. Slice cream cheese into 24 "coins."
  8. Slide one into the middle of each muffin.
  9. Bake in a 400° oven for about 20 minutes or until muffins are golden brown.
3.4.3177

These muffins taste great hot out of the oven or cold several days later.

Want a little hint on forming that cream cheese? I found that wrapping it well with parchment paper, then running my hands over and over it easily shaped it into a long rope in just a few seconds. Like this –>

pumpkin_cream_cheese_muffins_3 (1)

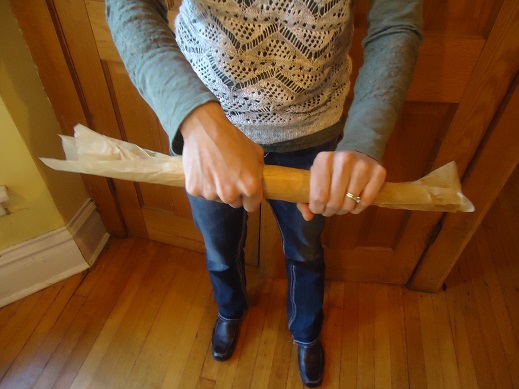
I like to refer to this gem of a portrait as “Headless Lady Shapes a Cream Cheese Log.”

 Feel free to sprinkle chopped nuts on top of the muffins before baking. I’m also thinking that adding chocolate chips (like in the original Pumpkin Chocolate Chip Muffin recipe) would taste incredible.

Which do you like better? Chocolate chips or cream cheese…or both?

Heavenly Homemaker's Club Members: Access your homepage and all your fantastic resources here! Not a member yet? Please join us!

How to Make Freezer Biscuits

October 23, 2013 by Laura 25 Comments

This post may contain affiliate links. For more information, please see our disclosure policy.

As with any freezer food, these freezer biscuits are going to make your life easier!

Freezer Biscuit Tutorial

Yum

My family loves biscuits and gravy. But by the time I brown sausage and make gravy, mix together biscuits, roll them, cut them out, and bake them – I end up with a very messy kitchen and a lot of time spent trying to get breakfast on the table. Therefore, I used to only make this meal on special occasions like birthdays and Father’s Day.

But now!! I have unlocked the secret to getting a meal of biscuits and gravy on the table within just a few minutes and with very little mess. My men think I’m wonderful for working so hard when they walk into the kitchen to see the delicious breakfast feast. Little do they know that making biscuits and gravy has become easier than trying to get them to see the laundry that is waiting for them to fold and put away. How can they not see it when they have to step over it to get to their room, I’d like to know. But back to the biscuits…

Making a super fast meal of biscuits and gravy is dependent on two simple tasks:

  1. Have sausage pre-made, browned, and frozen in meal-sized portions.
  2. Make biscuits ahead of time, then freeze them to pull out and bake.

If you recall, I typically make 12 pounds of Homemade Turkey Sausage at one time. It just makes sense. I’m already getting out all of the spices. I’m already dirtying a pot. Might as well just dirty a bigger pot and make a huge batch of sausage, right? Then I freeze the cooked meat in 12 quart-sized freezer bags. The night before I’m planning to make biscuits and gravy, I get out one bag of meat and put it into the fridge to thaw. Easy!

How to Make Freezer Biscuits

Now how about the biscuits? I’ve learned to mix up a triple or quadruple batch of Quick Mix Biscuits, roll and cut, then freeze the unbaked biscuits on a parchment paper-lined cookie sheet. One mess, lots of biscuits. So easy! Once the biscuits are frozen, I transfer them to gallon-sized freezer bags. The night before I want to bake them, I place the desired number of frozen biscuits on a baking sheet, cover them with a cloth, then let them thaw on the countertop overnight.

The next morning, all I have to do is slide the biscuits into the oven to bake while I quickly make Homemade Sausage Gravy with the pre-cooked sausage. Slice some fruit, and I’ve got a favorite, hearty meal on the table within about 15 minutes.

My family will now be enjoying biscuits and gravy more often, thanks to these quick freezer methods!

Have you tried freezing unbaked biscuits before?

Heavenly Homemaker's Club Members: Access your homepage and all your fantastic resources here! Not a member yet? Please join us!

Easy Oatmeal Breakfast Bars

October 16, 2013 by Laura 60 Comments

This post may contain affiliate links. For more information, please see our disclosure policy.

Easy_Oatmeal_Bars

Yum

What’s great about these Easy Oatmeal Breakfast Bars?  You can eat them in a house. You can eat them in a rush. You can eat them in a car. You can eat them near or far. Inside outside upside down. Sam…I am.

We’re in the process of trading in Seuss for Shakespeare at this point in our lives, so apparently I felt the need for a Dr. Seuss flashback. I mean, I could have gone with Macbeth or Romeo and Juliet and said, “All that glitters is not breakfast” or “An oatmeal bar by any other name would smell as sweet” but those didn’t make nearly as much sense within the context of this post. And as all of us who have ever come across a nooth grush on our tooth brush can attest to, Dr. Seuss always makes perfect sense.

You might look at this recipe and ask, “How is this one different from your Breakfast Cake, Giant Breakfast Cookie, and Oatmeal Cookie recipes? I would answer by telling you that they are all similar, except that this recipe uses the fewest ingredients and is easiest to throw together. It’s also a little gooier and chewier and at this point in my life, since it’s so fast and easy, it has become my favorite of them all.

I usually try to make these at night before going to bed so that when we get up in the morning, breakfast is ready to eat right away. Which leads me back to how you can eat them in a rush, in a car, with your coffee, wherever you are. Parting is such sweet sorrow. I’ll stop now.

Easy Oatmeal Breakfast Bars

1 cup melted butter
3/4 cup sucanat or 1/2 cup honey
2 eggs
1/2 teaspoon baking soda
1/2 teaspoon sea salt
1 teaspoon vanilla extract
2 cups rolled oats
2 cups whole wheat flour (I use freshly ground hard white wheat)

Stir together melted butter and sucanat. Add eggs, baking soda, salt, and vanilla, mixing well. Stir in oats and flour until well combined. Spread mixture in a 9×13 inch baking dish. Bake in a 350° oven for 20-25 minutes until golden brown.

Feel free to stir 1/2 cup chocolate chips or dried fruit to the batter before baking!

To Freeze These Bars:  Bake as directed and allow them to cool completely. Cut into bars, then wrap individually. Place wrapped bars in a freezer bag in the freezer. Thaw for at least one hour before eating.

Who do you enjoy more? Seuss or Shakespeare?

Heavenly Homemaker's Club Members: Access your homepage and all your fantastic resources here! Not a member yet? Please join us!

Making Homemade Soft Pretzels

October 15, 2013 by Laura 4 Comments

This post may contain affiliate links. For more information, please see our disclosure policy.

The recipe is a tiny bit more time consuming that some of my other baked goods, so I find that I don’t make my Homemade Soft Pretzels very often anymore. But now that the weather has cooled off, I’m excited to make these pretzels to go with a pot of soup. I guarantee my family will not argue with my idea.

Have you tried making Homemade Soft Pretzels? Give this recipe a try. They are SO delicious!

Whole_Wheat_Soft_Pretzels

Yum
Heavenly Homemaker's Club Members: Access your homepage and all your fantastic resources here! Not a member yet? Please join us!

Instant Oatmeal in a Jar

October 8, 2013 by Laura 19 Comments

This post may contain affiliate links. For more information, please see our disclosure policy.

Remember the Homemade Instant Oatmeal Packets recipe I shared a few weeks ago?

Instant Oatmeal in a Jar

Yum

I wanted to suggest that in an effort to cut down on waste (that’s a lot of little plastic bags) and effort (it takes extra time to scoop each serving into bags) – you may want to simply store your Instant Oatmeal Mix in an airtight container.

I made a double batch recently, which filled almost three half-gallon jars. On the lids, I wrote,

“Shake well. Scoop 1/2 cup of mix into a bowl. Add 1/2-3/4 cup boiling water.” My boys can take it from there.

instant_oatmeal_jars
This is super easy – and I can’t tell you how nice it is to have this instant oatmeal on hand for busy mornings and for mid-afternoon snacks. The kids stir in any dried fruit or other add-ins they want with their oatmeal.

Here is the Homemade Instant Oatmeal Recipe. And you’ll find more great and fast breakfast recipes in this FREE Healthy Breakfast Made Simple eBook.

And a quick note to reinforce that you shake the jar before scooping out your 1/2 cup serving. One of our boys made a bowl without shaking first. All of the sucanat had sunk to the bottom, so his scoop tasted rather bland. Always shake the jar to make sure you get a more tasty bowl of oatmeal!

Have you tried making this Homemade Instant Oatmeal Recipe?  I highly encourage it. What a time and money saver!

Heavenly Homemaker's Club Members: Access your homepage and all your fantastic resources here! Not a member yet? Please join us!

One Hour Whole Wheat Yeast Rolls (No Kneading Required)

September 25, 2013 by Laura 78 Comments

This post may contain affiliate links. For more information, please see our disclosure policy.

I got this recipe idea here. Then, I experimented and remade it with more wholesome ingredients.
Here are all of my Real Food Recipe Makeovers so far.

No Knead Rolls

You know all those excuses we use for not making homemade rolls very often? This recipe smacks them all down. Here, witness the smacking:

Homemade Roll Excuse #1 – It takes too long.

Not with this recipe. These take one hour – from the time you get out the bowl until the time you serve these fresh out of the oven. I didn’t believe it myself. But now I do. Because I proved it. {Smack.}

Homemade Roll Excuse #2 – It makes a huge mess.

Not these. You mix everything in one bowl, don’t have to knead the dough, grab the dough straight from the bowl to form rolls, then put them directly onto the pan. I shed not a single tear over the fact that I didn’t have to spend several minutes after kneading dough to scrape crusty flour paste off of my countertop.

Homemade Roll Excuse #3 – I’ll eat too many.

This recipe only makes 12-16 rolls, just enough for a meal or two. Plus, the rolls freeze well if you have leftovers.

Homemade Roll Excuse #4 – It’s hard to make homemade yeast breads.

Oh please. My eleven year old could make these. Measure, stir, wait, stir, wait, stir, wait, roll dough into balls, wait, bake, wait, eat. The hardest part is waiting (and trying to figure out if you already added the salt before the phone rang and distracted you).

Are you now ready to get out a bowl and have hot, fresh rolls ready to go with your dinner? Here’s how to make it happen:

One Hour Whole Wheat Yeast RollsYum

1 cup warm water
2 Tablespoons yeast (I use dry active)
1/4 cup honey
1/3 cup melted butter, coconut oil, or palm shortening (make sure it isn’t too hot)
1 teaspoon sea salt
1 egg
3 – 3 1/2 cups whole wheat flour (I use freshly ground hard white wheat)

1. In a large bowl, mix together water, yeast, and honey. Let the mixture sit for 15 minutes.
2. Add melted butter, salt, and egg.
3. Gradually stir in the flour. The dough will be sticky but manageable. Cover the bowl of dough with a towel and let it rest for 10 minutes.
4. With your hands, shape dough into 12-16 balls. Place the balls so that they don’t touch each other on a buttered cookie sheet. Cover and let rise for 20 minutes.
5. Bake rolls in a 375° oven for 10-15 minutes.
6. If you like (and I do recommend it), brush tops of rolls with a mixture of 4 Tablespoons of butter and 1 Tablespoon honey. Perfection.

one_hour_rolls_1

Why am I featuring these during the week of the Getting Ahead Dinner Challenge? Can you make these ahead of time to go with your dinner? Sure, if you want. But here’s where I really think it comes in handy:  If I have a simple dinner already prepared and ready to cook, but I want a quick dinner roll to go with it, these rolls are perfect! Plus, since the rest of my dinner is already prepared, I actually now have time to surprise my family with fresh rolls too!

OR, what if you need some buns to go with Sloppy Joe Meat or Barbecue Chicken that you have prepared in your freezer? These rolls are perfect.

So what are you waiting for? You have one hour to make delicious, homemade rolls….GO!

Heavenly Homemaker's Club Members: Access your homepage and all your fantastic resources here! Not a member yet? Please join us!

Breakfast Crock Pot Casserole

September 18, 2013 by Laura 25 Comments

This post may contain affiliate links. For more information, please see our disclosure policy.

Every once in a while I think to myself, “Surely someday I will run out of recipes and ideas to share on my website.” But after blogging for almost six years, I have decided that no – the ideas will never run out. Why? Because when food meets internet {splat} – recipes, tips, ideas, and suggestions are never ending. I learn something new, I share it with you. You learn something new, you share it with me. As we all ask questions, learn from others, see new ideas, remember timeless ideas, or come across an idea quite by accident – and we share it with each other via this awesome tool called the internet – our healthy eating journey together continues on a fun and delicious path.

Case in point:  On my own, I would never have thought to make a breakfast casserole in my crock pot. I freeze my Easy Breakfast Casserole and for an easy breakfast to bake in the morning. But this crock pot idea is even better, because we can roll right out of bed and eat a hot, hearty meal within minutes.

A big thanks goes to Karli who sent me this idea. We’re lovin’ it! (So much that I named this recipe after you, and included it in my free Healthy Breakfast Made Simple eBook.)

Karli’s Breakfast Crock Pot CasseroleYum

1 pound turkey sausage
6 cups hashbrowns
1 green pepper, chopped
1 onion, chopped
2 1/2 cups shredded cheddar cheese
salt and pepper to taste
1 cup milk
12 eggs

Brown turkey sausage. Butter the inside of a slow cooker, then stir in cooked sausage, hashbrowns, pepper, onions, and cheese. Whisk together milk and eggs, then pour mixture over the top of the contents in the slow cooker. Cover and cook on low overnight – about 10 or 12 hours. Serves 8-10.

Crock_Pot_Casserole

I thought it was funny that the sausage didn’t show up on the plate. It’s in there, I promise. :)

This recipe is very versatile – mix and match any veggies, meats, or cheeses that your family likes or that you have available.

How is the Getting Ahead for Breakfast Challenge coming for you?  I love that there are so many ways to get ahead for breakfast, and not all of them involve putting food in the freezer. This crock pot casserole is a great example. As is the Homemade Instant Oatmeal Packet recipe and the Dark Chocolate Almond Granola recipe. And the Homemade Grape Nuts Cereal. And the Freezing Muffin Batter idea. Oh wait. That one does involve the freezer. I guess I just couldn’t pass up the opportunity to bring it up again.

I also wanted to mention that I’ve had great feedback from people taking the Let’s Do This! Getting Ahead in Your Real Food Kitchen eCourse. Families are finding new ways to get ahead in the kitchen, saving time, saving money, and becoming healthier. I LOVE it!

Heavenly Homemaker's Club Members: Access your homepage and all your fantastic resources here! Not a member yet? Please join us!

Dark Chocolate Almond Granola Recipe {Real Food Dollar Menu}

September 17, 2013 by Laura 48 Comments

This post may contain affiliate links. For more information, please see our disclosure policy.

Ever paid over $6 for a tiny box of cereal, and then witnessed that the contents in the tiny box only fed three people one small serving? As delicious and convenient as the box of Dark Chocolate Almond Granola was from Cascadian Farm – that is one pricey breakfast.

I actually got a box of this cereal with some Vitacost credit I had – just to try it. It was a huge hit in our family. That’s what made me decide that surely I could figure out a similar recipe and make my own. Besides, I like the idea of eating chocolate for breakfast. What a way to start the day. :)

The result of my experimenting turned out delicious! I did a little rough math to determine how much money I saved. These aren’t the cheapest of ingredients, but they are hearty and can stick to the ribs. I found that I cut the cost from over $2 per serving to around 75¢ per serving – even using mostly organic ingredients.

What I love best is that this is a recipe that can be made ahead of time for a quick meal or snack. (It’s a perfect recipe to work into your Getting Ahead in the Kitchen routine.)

dark_chocolate_almond_granola

Dark Chocolate Almond GranolaYum

Dark Chocolate Almond Granola Recipe {Real Food Dollar Menu}
 
Save Print
Author: Laura
Ingredients
  • 4 cups rolled oats
  • ¾ cup shredded, unsweetened coconut
  • 1 cup slivered almonds
  • ¾ cup honey
  • ¾ cup coconut oil
  • ½ cup dark chocolate chips or chunks
Instructions
  1. In a small saucepan, melt coconut oil and honey together.
  2. Stir oats, shredded coconut, and slivered almonds together in a large bowl.
  3. Drizzle on the honey/coconut oil mixture and stir well.
  4. Pour mixture onto a large, parchment paper-lined baking sheet (or two 9x13 inch dishes).
  5. Bake at 300° for 35-45 minutes, stirring after the first 20 minutes.
  6. Allow mixture to cool.
  7. Stir in dark chocolate chunks.
  8. Store granola in an air-tight container.
  9. Makes 12-14 servings.
3.4.3177

You may have noticed that this recipe is in the Healthy Breakfast Made Simple eBook. Haven’t downloaded that yet? Get it here for free!

dark_choc_granola_3
Just a couple of days left in our Getting Ahead for Breakfast Challenge. How’s it going for you? Have you made some breakfast foods ahead to save you the effort in the morning?

Looking for more meals on our Real Food Dollar Menu? Here are the recipes I’ve shared so far:

  • Hearty Chili
  • Spanish Rice
  • Pasta Alfredo
  • Crock Pot Barbecue Chicken
  • Crock Pot Beef Stew
  • Easy Chicken Pot Pie
  • Chili Mac
  • Breakfast Pizza
Heavenly Homemaker's Club Members: Access your homepage and all your fantastic resources here! Not a member yet? Please join us!

FREE eBook: Healthy Breakfast Made Simple {Free Printable From Heavenly Homemakers}

September 15, 2013 by Laura 18 Comments

This post may contain affiliate links. For more information, please see our disclosure policy.

It’s an entire eBook, filled with ten healthy, easy breakfast recipes – and it’s FREE for Heavenly Homemakers Subscribers! To encourage us all as we work to get ahead in our kitchens, here is Healthy Breakfast Made Simple:

breakfast_e-book cover_sm

Yum

I’ve decided that we can never have too many quick and healthy breakfast recipes. I love recipes that can be made ahead of time (or thrown together quickly), and my family really appreciates a variety. I shared the Homemade Instant Oatmeal Packets recipe a few days ago, which is the recipe that inspired the idea for this eBook several weeks ago. I thought it would be nice to have the instant oatmeal recipe in a handy printable, then as I began putting it together, an entire eBook evolved. It’s not a fancy eBook, but who needs fancy? We just need simple, right? A Healthy Breakfast Made Simple. :)

This eBook, Healthy Breakfast Made Simple, has ten healthy breakfast recipes for you, many of which can be prepared ahead of time. Here’s what you’ll find in this eBook:

healthy_breakfast_contents

Get this freebie by subscribing to our free daily newsletter here.

OR get this freebie by subscribing to our free once-a-week newsletter here.

dark_choc_granola_4

applesauce_squares_1


Heavenly Homemaker's Club Members: Access your homepage and all your fantastic resources here! Not a member yet? Please join us!

Homemade Instant Oatmeal Packets (without the microwave)

September 13, 2013 by Laura 48 Comments

This post may contain affiliate links. For more information, please see our disclosure policy.

A breakfast of oatmeal is fast, easy, nourishing, and filling. Making a pot of it on the stovetop is not hard. So why make Homemade Instant Oatmeal Packets? Are they really that much of a time saver?

oatmeal_packet_10

For my family – yes. I’m working to get my boys more independent in the kitchen. Having a variety of homemade instant oatmeal packets around for them to grab and fix themselves is a great time saver for me. Plus, it’s nice to have a variety of choices for them so that they can make whichever kind sounds good to them. These are great afternoon snacks too!

Inspired by MoneySavingMom to make Homemade Instant Oatmeal packets, I did a little research to discover the easiest and healthiest way to do this. Here are the tricks I learned through my experimenting:

  • Sucanat works just fine in place of sugar
  • Combining a big batch of the instant oatmeal mixture in a big bowl, then scooping out individual sized portions makes this process very easy
  • Blending a portion of the oats in a blender first to create a powder will help the instant oatmeal packets cook faster
  • A microwave is not necessary to cook this – simply boil water, stir in packet, walk away, then come back and eat
  • The add-in options are endless

Instant_Oatmeal_Packets

It took about 20 minutes to mix this and prepare the packets. Not bad for 24 quick breakfasts or snacks!

Homemade Instant Oatmeal PacketsYum

Homemade Instant Oatmeal Packets (without the microwave)
 
Save Print
Author: Laura
Ingredients
  • 10 cups rolled oats (divided)
  • 2 cups sucanat
  • 2 teaspoons sea salt
Instructions
  1. Measure 7 cups of oats into a large mixing bowl. Blend the remaining 3 cups (1/2 cup at a time) until powdery and stir into the mixing bowl. Add sucanat and sea salt. Mix well.
  2. Measure ½ cup of mix into a small zip baggie, making about 24 Instant Oatmeal Packets.
  3. Be sure to scoop the mix from the bottom of the bowl as the sucanat tries to separate and settle there.
  4. Store in a dry, cool place.
  5. If you'd prefer not to scoop the mix into individual baggies, simply place the entire mix in a large, airtight container, scooping out ½ cup of mix for each serving.
  6. When ready to serve the oatmeal, empty contents of baggie into a cereal-sized bowl.
  7. Add ¾ cup boiling water.
  8. Stir.
  9. Allow the oatmeal and water to sit for about 5 minutes.
  10. Stir and eat.
3.4.3177

Skip the Packets!

Want to make this even easier? Since originally coming up with this idea, I switched to simply making the Instant Oatmeal and keeping it in big jars. My kids scoop out 1/2 cup of mix, add 3/4 hot water, and they are good to go!

Instant Oatmeal in a Jar

Instant Oatmeal Varieties

By sprinkling in various fruits, spices, chocolate chips, or nuts – you can create many different types of instant oatmeal packets! I fill my bags with the basic mix, then sprinkle in various add-ins so as to have a variety of packages available for my family to pick from. Here are a few ideas:

Chocolate Swirl

Add a few mini chocolate chips

Blueberries and Cream

Add freeze dried blueberries, then cook oatmeal with milk instead of water

Strawberries and Cream

Add freeze dried strawberries, then cook oatmeal with milk instead of water

Cinnamon Raisin

Add 1/4 teaspoon cinnamon and a few raisins

Apples and Cinnamon

Add 1/4 teaspoon cinnamon and a few dehydrated apple chunks

Banana Nut

Add a few crushed walnuts and some freeze dried bananas

The blender does a great job chopping up the whole oats.
Remember, just do about 1/2 cup at a time to make the process work better.
oameal_packets (1)

Mix the blended oats (3 cups) with the remaining oats (7 cups),
then stir in the sucanat and sea salt. See how easy this is?

oameal_packets (3)

Scoop 1/2 cup of mix into small zip baggies. Add any add-ins you wish. Seal and store.

oameal_packets (9)

To Prepare:  Pour contents of baggie into a cereal bowl.

oameal_packets (4)

Add 3/4 cup boiling water. Stir. Let it sit for 5 minutes.

oameal_packets (5)

After 5 minutes, stir again, then eat!

oatmeal_packet_10

Having these homemade instant oatmeal packets has been so helpful. They are much cheaper than buying pre-made oatmeal packets – plus I can be sure we are only including the ingredients we feel good about eating.

Haven’t decided what to make for our Getting Ahead for Breakfast Challenge? This Instant Oatmeal Packets idea is a great choice. Learn more about this challenge here.

How About Giving the Gift of Instant Oatmeal?

Consider sharing this Instant Oatmeal with new moms, someone who has been sick, or anyone you know would appreciate this thoughtful and practical gift? Get all the directions here for making this happen, and even some cute free printable labels!

Homemade Instant Oatmeal in a Jar Gift Idea

Ever tried making homemade oatmeal packets? What are your favorite ingredients to stir into oatmeal?

Heavenly Homemaker's Club Members: Access your homepage and all your fantastic resources here! Not a member yet? Please join us!
« Previous Page
Next Page »

Join Our Community!

 Facebook Twitter E-mail Instagram Pinterest

Popular Posts

~ Will All of the Real Moms Please Stand Up?
~ Easy! Stir-and-Pour Whole Wheat Bread
~ How to Make Gatorade
~ 31 Real Food Breakfast Ideas
~ Dear Teenage Girls...
~ When Mom Takes a Step Back
~ The Inexpensive Health Insurance We Love!
~ Let's Talk Real Food Grocery Budgets

Check out our latest posts!

  • Big Family Food and Fun: May 24-30, 2026
  • Free 7-Day Summer Menu Plan
  • Big Family Food and Fun: May 17-23, 2026
  • Easy Side Dishes for Summer
  • Big Family Food and Fun: May 10-16, 2026
Home  ~  Simple Meals  ~  Club Membership  ~  Shop  ~  Privacy Policy  ~  Disclosure  ~ Contact

Copyright © 2026 · Beautiful Pro Theme on Genesis Framework · WordPress · Log in