Heavenly Homemakers

Encouraging women in homemaking, healthy eating and parenting

  • Home
    • About
    • FAQs
  • Recipes
    • Bread and Breakfast
    • Condiments
    • Dairy
    • Main Dishes
    • Side Dishes and Snacks
    • Desserts
    • Gluten Free
    • Instant Pot
    • Crock Pot
    • Heavenly Homemaker’s Weekly Menus
  • Homemaking
    • Real Food Sources
  • Store
  • Contact
    • Advertise
    • Disclosure
    • Privacy Policy
  • Simple Meals
  • Club Members!

Crock Pot Barbecue Chicken – Real Food Dollar Menu

December 13, 2012 by Laura 29 Comments

This post may contain affiliate links. For more information, please see our disclosure policy.

It might sound kind of silly for me to say this, but I’ve typically thought that making a meal of Barbecue Chicken Breasts is a bit of a “splurge” for us. Why? Because hardly ever do I just cook boneless, skinless chicken breasts as our “main dish” without spreading them out within a casserole to make them “stretch”.

Even so, this meal costs just a tiny bit more than one dollar per plate. Sweet! I’m so glad to know the price breakdown on this, because we love it. Plus, this meal is super fast and easy to prepare. I’m talking five minutes tops. I can quickly throw chicken breasts and homemade barbecue sauce into the crockpot on a Sunday morning before church, or right after lunch on a weekday – and a few hours later, our main dish is ready! Add a veggie or two, and maybe some bread, and your meal is complete.

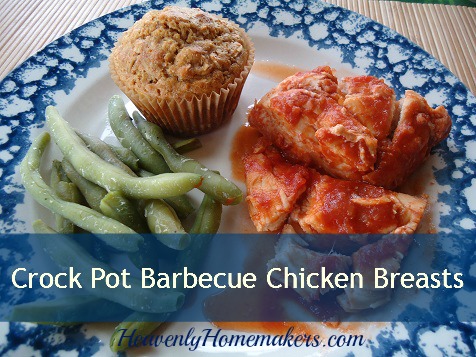
We used (free) green beans from our garden for this meal, but to be fair to those who don’t have garden beans in their freezer, I included the price of purchased, frozen beans as I calculated the cost of this meal. Altogether with the chicken, sauce, beans, and muffins, this meal ends up being $1.09/plate. (I calculated my cost based on the food sources and prices I have available to me. Most of the ingredients I use are organic. Your cost may be slightly more or less depending on where you find your ingredients.)

In case you’re wondering – I use Smart Chicken Brand boneless skinless chicken breasts in recipes like this. That is the best I can find around here – and I wait for them to go on sale. (My friend recently got me a case at a great price from her local store. Smart Chicken breast for just $2.71/pound…so exciting!)

Crock Pot Barbecue ChickenYum

Crock Pot Barbecue Chicken - Real Food Dollar Menu
 
Save Print
Author: Laura
Ingredients
  • 2 pounds boneless, skinless chicken breasts
  • ½ recipe of Homemade Barbecue Sauce (about ½ cup)
Instructions
  1. Cut chicken breasts into portion sized pieces.
  2. Place in a crock pot, top with barbecue sauce, and cook on low for about four hours or until meat is no longer pink.
  3. BONUS: Don't have time for the crock pot? Simply put the chicken and sauce into a saucepan over medium heat on the stove. Cook for 20-30 minutes until cooked through. Serve!
3.4.3177

Here’s my Homemade Barbecue Sauce recipe. :)

crock_pot_bbq_chicken

Do you often use boneless, skinless chicken breasts for a main dish…or do you typically try to “stretch” them into more meals?

Looking for more meals on our Real Food Dollar Menu? Here are the recipes I’ve shared so far:

  • Hearty Chili
  • Spanish Rice
  • Pasta Alfredo


Heavenly Homemaker's Club Members: Access your homepage and all your fantastic resources here! Not a member yet? Please join us!

Whole Wheat Butterhorns ~ Real Food Makeover

December 12, 2012 by Laura 52 Comments

This post may contain affiliate links. For more information, please see our disclosure policy.

Have a recipe you’d like me to try and make over?
Submit your recipes on this Real Food Recipe Makeover Submission Page.

Did you know that I really, really love butter?

Let’s see – which do I love more? Butter…or jars? That’s a toss up. Hey, did you know you can make butter IN a jar? That tidbit of information is irrelevant to this post, but still worth mentioning…just because it involves two of my favorite things.

It is a fact that Matt’s eyes got really big as I was buttering my biscuit last week – even though he obviously knows how much I love butter. I mean – it was enough to stop our conversation at the time.

“What?” I said,  “You’ve never seen me butter my biscuit before?”

“Yes,” he said, “I’ve seen you. But there is almost more butter than biscuit this time.” (At which point I grinned – and got just a tiny bit more butter because there was a spot on my biscuit not yet covered…)

Alrighty. So I like a little biscuit with my butter. And I like it to be all melty down the sides. Then I like to sop the buttery drippings off of my plate as I eat my biscuit. It’s just best that way if you ask me.

Which is why I was excited to make over this recipe. I mean, they are called Butterhorns! I didn’t have to make many changes in this recipe – just a few minor tweaks. And wow is it delicious!

With Christmas coming, many of you are looking for a yummy, whole grain roll to make with your holiday meal. This would be perfect if you ask me. :)

Whole Wheat Butterhorns

Whole Wheat ButterhornsYum

2 Tablespoons dry yeast
1/3 cup warm water
9 cups whole wheat flour, divided (I use freshly ground hard white wheat)
2 cups warm milk
1 cup butter, melted
1 cup sucanat or 3/4 cup honey
6 eggs
2 teaspoons salt
3-4 Tablespoons butter, melted

In a large mixing bowl, dissolve yeast in water. (Water should be warm, but not so warm that you can’t comfortably put your finger in it to test the temp.)  Add 4 cups flour, milk, butter, sucanat, eggs, and salt. Beat with an electric mixer until contents are smooth.

Add enough remaining flour to form a soft dough. I found it easiest to do this by hand. Although if you have a Kitchen Aid type mixer, I’m sure that would work well too! Turn mixture onto floured surface and knead for 3-4 minutes.

Place dough in a bowl, cover, and let rise in a warm place until doubled (1-3 hours).

Punch dough down and divide into four equal parts. Roll each part into a 12-inch circle and brush with melted butter.

Cut each circle into 8 pie-shaped wedges.

Roll up each wedge from wide edge to tip of dough and pinch to seal. Place rolls, top down, on baking sheets.


Allow rolls to rise again for about 30 minutes or until they have doubled in size. Bake at 375° for 10-20 minutes (every oven is different!) or until they are lightly browned. Brush with melted butter as soon as they come out of the oven. Remove and serve immediately or cool on wire racks.

This recipe makes about 30 rolls. These freeze very well! I found that having a batch of these in the freezer is wonderful when I need something additional to help stretch a meal! I simply take out the amount we  need, warm them in our toaster oven, and serve them with…you guessed it…butter.

Who loves butter as much as I do?  Do tell.

Heavenly Homemaker's Club Members: Access your homepage and all your fantastic resources here! Not a member yet? Please join us!

Be “All There” For Your Family This Christmas Season {A Guest Post}

December 12, 2012 by Laura 3 Comments

This post may contain affiliate links. For more information, please see our disclosure policy.

Please welcome Jeanette, one of our site sponsors who blogs at A Moment With Mom. She wrote a beautiful post that I wanted to share with you. I know for me, as a mom who has a brain that is often three tasks ahead, I often struggle to be “all there” in the moment. I hope you are also blessed by what Jeanette has to share:

———————————————-

What is your favorite Christmas memory?

I would venture to bet it has very little to do with “things” and more to do with relationships. As a mother of 11, it has been important to me to cultivate memories for my family that were of substance. While a child may jump up and down with glee for that new toy they’ve had on their list, it’s only a few months before the newness is worn off and the excitment is gone. However, when I put my attention on creating memorable moments, I hear the excitment and impact they had in my children’s lives for years to come.

There were many years of our marriage that we had very little. We have lived off the grid in a tent with five children at the time, while my husband built our cabin. We have washed clothes in the creek, used a wood cookstove to cook a pot of my home made potporri, and I harvested our food from wild plants. I know how to live with a little.

In that season of life I was always trying to create an environment that welcomed the beauty that was all around us. I would go out and cut cedar branches with the children and then sit and work with them on making our own wreath for the front door. These were some precious moments together as a family. We would sit and string cranberries and popcorn while talking about special family memories. Taking a drive to see the lights has always been a fun treat, especially with a cup of home made hot cocoa.

We’ve always had the family tradition of creating a gingerbread house, even though we’re terrible at it. It’s not about how the gingerbread house turned out, it’s about the laughter and working together that makes it a memory worth repeating each year.

How can you cultivate a favorite Christmas memory for your family? Singing Christmas songs while baking cookies? Taking a ride to see the lights and drinking hot cocoa along the way? Eating candy canes together as a family while reading a favorite story? There are so many simple things we can do with our family to cultivate environments for that special moment, but we have to be all there!

Jim Elliot once said, “Where ever you are be all there.” I believe we as wives and mothers we can apply that concept to our homes. We have so many distractions around us and it’s taking a toll in our home making. In order for us to purposefully create memories we can’t be distracted with texts, phone calls, Facebook, or other social outlets. We each need to take the time to be “all there” for our family!

These days will go by fast and before too long we’ll see that all we have are memories. Let’s make them meaningful memories!

I encourage you to read more of what Jeanette has to share on her blog A Moment with M.O.M.

Heavenly Homemaker's Club Members: Access your homepage and all your fantastic resources here! Not a member yet? Please join us!

The First Five Steps to a Real Food Kitchen eCourse…Coming in January!

December 11, 2012 by Laura 29 Comments

This post may contain affiliate links. For more information, please see our disclosure policy.


“I’d like to begin eating healthy, but I really have no idea where to start. Help!”

My inbox is full of emails stating this or something similar. So many of you are interested in feeding your families a diet of real, whole food. With all the “healthy food” information out there, much of it contradictory, where do you even start? It’s overwhelming, and it’s life changing. Some even feel like the changes are so huge, it’s not even worth the effort!

I remember the feelings so very well. Seven years ago when we started our own Healthy Eating Journey, I knew my family needed to stop eating so many processed foods. But all of the information I read about switching over to whole foods had my head spinning. And then I started reading that not only did I need to eat more vegetables, but they needed to all be organic. And fermented. And our meat needed to be grass fed. And our milk needed to be raw. And our….

STOP!!!!!!!!!!!!!

It was all too much. Not only did I feel like throwing in the towel, I felt like burning the towel and stomping on the ashes. (Yes, an adult-sized temper tantrum. Sounds pretty, huh?)

Frustrated or not, I knew that my family needed to make healthy changes. So what was I to do?

I prayed. I researched. I wrestled. I experimented. I worked. I asked others for help.

And guess what? Over the last few years, I have figured out that not only does creating and maintaining a Real Food Kitchen not have to be difficult, it’s actually quite fun. And the food tastes amazing and is very easy to prepare! 

I am excited to share that over the last few months, I have been developing what I hope will keep you all from experiencing so much of the same frustration that I did when we first began our healthy eating journey. 

Introducing….

This eCourse will take you through five simple and practical lessons that can be tailor made for your lifestyle and needs. And guess what? We won’t even touch on buying organic or grass fed food! I mean, you can go there during this eCourse if you want to and if you’re ready, but when I say “the first five steps”, I’m really talking about the first five steps.

What’s even better? Your first five steps don’t have to look like someone else’s first five steps. They can look the way they need to look for YOUR family! Yay! By the time you’ve completed the five lessons in this eCourse, you will be well on your way to a Real Food Kitchen, all while making painless and uncomplicated changes. And did I mention that real food is delicious? :)

We are working hard to put the finishing touches on this eCourse to have it ready to launch in January. You’ll need no special equipment to be a part of this class. You can work on it during any time of the day or night that works for you. You can finish it in one week, in one year, or in whatever time frame you need. You can do it in your pajamas. You can do it while standing on your head. (And if you do, please take a picture and send it to me.)

And best of all? It will only cost you $5 for the entire course. We want everyone to have a chance to participate. And we want everyone to know that when it comes to eating a healthy diet – YOU CAN DO IT!

Be watching for more information about this eCourse and others that we will be completing and featuring in 2013. 

As we finalize our lessons, I’d really love to hear from you – What is your biggest challenge when it comes to creating a Real Food Kitchen?

Heavenly Homemaker's Club Members: Access your homepage and all your fantastic resources here! Not a member yet? Please join us!

Cream Cheese Cookie Cutouts

December 11, 2012 by Laura 18 Comments

This post may contain affiliate links. For more information, please see our disclosure policy.

In preparation for a Christmas Cookie Exchange with several of my friends tonight, I made our favorites – Cream Cheese Cookie Cutouts. The cookies have cream cheese in them and the frosting is made with cream cheese. Let’s just say these cookies are soft, rich, and I have to work hard to keep myself out of them.

Cream Cheese Cookie CutoutsYum

1/2 cup melted butter
4 ounces softened cream cheese
1 cup sugar (sucanat works, as does brown sugar)
1 egg
1/2 teaspoon baking powder
1/2 teaspoon vanilla extract
2 cups flour (I use freshly ground hard white wheat flour)

Stir together melted butter, softened cream cheese, and sugar. Add egg, baking powder, and vanilla. Stir in flour until well combined. (Use a little less or a little more flour as needed.)  Place dough in the refrigerator for at least two hours.

Once dough is chilled, roll on a well floured surface and cut out into desired shapes. Bake in a 350° oven for 10-15 minutes or until cookies are lightly browned. (I prefer mine just barely done so that they stay soft!)  Allow cookies to cool completely before frosting.

Cream Cheese Frosting

1/2 cup butter, softened
8 ounces cream cheese, softened
4 1/2 cups unbleached organic powdered sugar
1/2 teaspoon vanilla extract

Whip butter and cream cheese with beaters until fluffy. Add vanilla and powdered sugar and beat until mixed thoroughly.

Makes about 30 cookies.

My (poor, deprived, starving) boys were not very happy with me when I told them that most of the cookies were  going to the Christmas Cookie Exchange. Not to worry, I told them. They could have all the broken cookies. Considering the fact that I am not a perfectionist, I’d say they made out just fine with a lovely assortment of broken stars, branchless trees, and torn stockings. 

 
If you’d like a printout of the Cream Cheese Cookie Cutouts recipe, you can download it here. I needed to print off the recipe anyway for the cookie exchange, so thought I’d share it with you too!

Heavenly Homemaker's Club Members: Access your homepage and all your fantastic resources here! Not a member yet? Please join us!

Gratituesday: Our Newest Endeavor

December 10, 2012 by Laura 20 Comments

This post may contain affiliate links. For more information, please see our disclosure policy.

I’m not sure if I’ve mentioned it lately, and I certainly don’t say it enough – but my husband is an incredible entrepreneur. He’s clever, wise, and thoughtful about creating and running businesses – always on the look-out for a need that can be met in our community which will provide for our family and/or bless others. 

He looks for good investment opportunities, and does hours of research before pursuing a new idea. I love that he is “visionary” and very intentional about not having all of our “eggs in one basket”. As a result, it’s hard for us to answer the question, “So Matt – what do you do for a living?” 

Short answer:  He’s a self-employed business owner. Long answer:  He has a snow removal/lawn care business, does small construction jobs for people, and manages the storage units we own and rent out. He is also an assistant coach for our York College ladies soccer team. (And those are just the jobs that earn money. I won’t take the time right now to list everything he does on a volunteer basis to bless people in our church and community.)

Well, as of last Friday, you can add one more title to Matt’s name:  Landlord.

Yep, we have invested in our first rental home. If you can believe it, we put an offer on the house way back in July. One crazy thing after another kept coming up to prevent us from closing on the house – from basement issues to paperwork delays. We were sure we would close by the end of September – so sure in fact that we had renters planning to move in October 1st. When we got the call on September 29 that there was a delay – we almost panicked. 

I should clarify. I panicked. Matt calmly solved the problem. Thankfully, we were buying this house from friends who had moved away, so they let the renters move in and we acted as temporary “property managers”.

Finally, on Friday we signed the final paperwork. The house is ours! Now, along with the storage units we rent out, we also rent out a home to a nice family here in town.

Oh, and here’s a (not so) funny story:  This morning Matt’s cell phone rang early. Of all things – just three days after the house became ours, a knob in the shower busted off, causing water to “leak” from the second floor through to the kitchen on the main floor, and all the way down to the basement. Wasn’t that a nice way to welcome us to the life of a landlord? :)

Thankfully, not only is Matt a savvy business man and investor, but he is also quite handy with home repairs. Several hours of work and $0.63 later, all is well in the rental home. 

Seriously…63¢. I can’t believe that’s all the money that repair took. I love this guy and his home improvement abilities, ambitions, goals, and business sense. And I’m thankful for how God continues to provide for our family – even if it is sometimes hard to give the short answer for “what we do for a living”. :)

Share how God is working in your life on your blog, then come link up with us here. If you don’t have a blog, be sure to leave a comment letting us know what you’re grateful for! Please read through the Gratituesday Guidelines so that you understand what kinds of posts you can link up to share here. Posts that are linked but do not fit our Gratituesday theme will be deleted.

If you are linking up a blog post for Gratituesday,
please copy and paste the following sentence into your post! Thanks!

Join us for Gratituesday at Heavenly Homemakers!

Heavenly Homemaker's Club Members: Access your homepage and all your fantastic resources here! Not a member yet? Please join us!

12 Days of Gifts in a Jar Recap

December 9, 2012 by Laura 4 Comments

This post may contain affiliate links. For more information, please see our disclosure policy.

Thank you all so much for your fun input as I shared 12 days of Gifts in a Jar ideas! To make things simpler for us all, I compiled a list of all of the ideas and links here. Need some ideas for inexpensive, homemade gifts? We’ve gotcha covered!

1. Applesauce Bread
2. Cranberry Biscuit Mix
3. Steak Rub
4. Homemade Bubble Bath
5. Caramel Sauce with Apple Basket
6. Chocolate Chocolate Chip Muffin Mix
7. Apple Crisp
8. Peppernuts
9. Santa’s Snot
10. Cranberry Pecan Granola
11. Whole Wheat Pancake Mix
12. Fruit and Nuts Trail Mix

For more ideas, don’t forget to download our FREE Gifts in a Jar eBook!

Be sure to Download Your Free Gifts In A Jar Tags too!

Heavenly Homemaker's Club Members: Access your homepage and all your fantastic resources here! Not a member yet? Please join us!

Menu Plan for the Week, My Busy Kitchen, and a Persimmon Question

December 9, 2012 by Laura 21 Comments

This post may contain affiliate links. For more information, please see our disclosure policy.

I decided this weekend to make two week’s worth of High School Huddle food. With it being such a busy time of year, anything I can do to get ahead is great! 

And so, on Saturday morning I cooked up several pounds of hamburger meat and chicken breasts at the same time. Not in the same pot. Just at the same time. In different pots. Try to keep up.

Then I boiled noodles in the hamburger meat sauce for Italian Pasta Bake. And I cooked rice in broth for Creamy Chicken and Rice. Thankfully, I didn’t mess up and put the rice in the red sauce and noodles in the chicken broth. I mean, I could have made do with that, but it would have certainly made for some interesting concoctions that I’m not sure the High Schoolers would have appreciated.

Several huge casseroles (and a lot of dirty dishes) later, we are ready for the remaining Huddle get-togethers before Christmas. 

You may be very interested to know that, at the suggestion of my good friend Kim, I also experimented this weekend with my Fudge Brownie recipe and my Homemade Caramel Sauce recipe – to make Caramel Brownies. Let’s just say that this was a very successful experiment and you will be hearing more about it soon. The kids at Huddle tonight will be testing them out for us. But since my family and I already tasted them, we’re pretty sure they will approve. ;)


I’m hoping to get a little freezer cooking done later this week. If that happens, I’ll be sure to take pictures of the mess for you at that time too. :)

Here’s what our menu looks like for this week:

Sunday, December 9
Oatmeal bars, clementines
Potato soup, raw veggies
High School Huddle – Creamy chicken and rice casserole, carrots, green beans, bread and butter, peanut butter brownie cups

Monday, December 10
Whole wheat waffles, blueberries and whipped cream
Cheeseburger macaroni, green beans
Beefy enchilada bake, salad

Tuesday, December 11
Baked oatmeal cups, bananas
Chicken burritos, fruit salad
Pizza boats, tossed salad

Wednesday, December 12
Mini breakfast pizza, clementines
Easy noodle stir-fry with broccoli and carrots
Italian cream cheese chicken, tossed salad

Thursday, December 13
Honey whole wheat bagels, apple slices
Pigs in a blanket, baby carrot, pineapple
Fiesta chicken, tossed salad

Friday, December 14
Easy no-knead bread, fruit and yogurt smoothies
Sloppy cornbread muffins, baby carrots, apples
Lasagna casserole, tossed salad, green beans

Saturday, December 15
Giant breakfast cookies, applesauce
Leftovers
Grilled cheese, tomato soup, veggies

Heya, a friend of mine just sent me these awesome persimmons from California. I’m very excited to use them as I never have tried them before. I just wondered if any of you have some fun recipe suggestions for me?

Heavenly Homemaker's Club Members: Access your homepage and all your fantastic resources here! Not a member yet? Please join us!

Fruit and Nuts Trail Mix {Gifts in a Jar ~ Day Twelve}

December 8, 2012 by Laura 8 Comments

This post may contain affiliate links. For more information, please see our disclosure policy.

We made it! 12 days in a row of Gifts in a Jar.

(I wasn’t actually sure it was going to happen today. Did you try to check my site today and see that it was nowhere to be found? My server was down ALL day. Wow.  I never realized how much I rely on my own website to look up recipes until I didn’t have access to it today. Anyway, here we are and all is well. Even if I did have to wing it when I made Breakfast Cookies this afternoon.)

Today’s Gift in a Jar idea is really too simple. There’s not really a “recipe” for this trail mix, because you can throw in whatever dried fruit and nuts that you like. Of course, I like to pour in some chocolate chips for good measure. :)

Here are some suggestions for ingredients to use when creating your Trail Mix:

Roasted peanuts, cashews, pecans, and/or almonds.
Dried cranberries, blueberries, cherries, and/or raisins
Chocolate Chips – any variety (dark, semi-sweet, or milk)

You can use any size jar – and simply fill it with the recipients favorite trail mix treats. 

And there you have it. Twelve days of Gifts in a Jar that ended just a little bit…nutty. But you expected nothing less, right? :)

Heavenly Homemaker's Club Members: Access your homepage and all your fantastic resources here! Not a member yet? Please join us!

Whole Wheat Pancake Mix {Gifts in a Jar ~ Day Eleven}

December 7, 2012 by Laura 1 Comment

This post may contain affiliate links. For more information, please see our disclosure policy.

Our family devours homemade whole wheat pancakes! Storing this mix in the freezer is best. Be sure to attach mixing instructions if you’re giving this as a gift. 

I think it would be fun to tie a whisk and/or a metal spatula (for flipping pancakes) to this jar of mix. And, you could sprinkle mini chocolate chips into the mix to make Chocolate Chip Pancake Mix, which would be even more fun!

Whole Wheat Pancake Mix

6 cups whole wheat flour
1/4 cup baking powder
3 teaspoons sea salt
3 teaspoons sucanat (optional)

Mix ingredients and place in a 1.5 quart jar. 

Instructions for making pancakes:  Mix 1 cup mix with 1 egg, 1 cup of milk, and 1 Tablespoon melted butter or coconut oil. Cook pancakes on a hot griddle or skillet.

Want a fun tag to use for your gift? Download Your Free Gifts In A Jar Tags Here!


Heavenly Homemaker's Club Members: Access your homepage and all your fantastic resources here! Not a member yet? Please join us!
« Previous Page
Next Page »

Join Our Community!

 Facebook Twitter E-mail Instagram Pinterest

Popular Posts

~ Will All of the Real Moms Please Stand Up?
~ Easy! Stir-and-Pour Whole Wheat Bread
~ How to Make Gatorade
~ 31 Real Food Breakfast Ideas
~ Dear Teenage Girls...
~ When Mom Takes a Step Back
~ The Inexpensive Health Insurance We Love!
~ Let's Talk Real Food Grocery Budgets

Check out our latest posts!

  • Big Family Food and Fun: June 21-27, 2026
  • Big Family Food and Fun: June 14-20, 2026
  • Big Family Food and Fun: June 7-13, 2026
  • Big Family Food and Fun: May 31-June 6, 2026
  • Big Family Food and Fun: May 24-30, 2026
Home  ~  Simple Meals  ~  Club Membership  ~  Shop  ~  Privacy Policy  ~  Disclosure  ~ Contact

Copyright © 2026 · Beautiful Pro Theme on Genesis Framework · WordPress · Log in