Heavenly Homemakers

Encouraging women in homemaking, healthy eating and parenting

  • Home
    • About
    • FAQs
  • Recipes
    • Bread and Breakfast
    • Condiments
    • Dairy
    • Main Dishes
    • Side Dishes and Snacks
    • Desserts
    • Gluten Free
    • Instant Pot
    • Crock Pot
    • Heavenly Homemaker’s Weekly Menus
  • Homemaking
    • Real Food Sources
  • Store
  • Contact
    • Advertise
    • Disclosure
    • Privacy Policy
  • Simple Meals
  • Club Members!

Super Healthy, Freezer Friendly Chicken Sandwiches

July 20, 2012 by Laura 54 Comments

This post may contain affiliate links. For more information, please see our disclosure policy.

My wonderful friend Jenny shared this recipe with me. I love that these are so full of good protein, and have veggies in them too! What a great way to get more nutrients packed into a meal.

You can make up a big batch of these and freeze them for a quick meal another time. You know I love recipes like this that help me avoid a panic attack on busy days!

Chicken Patty SandwichesYum

3 boneless skinless chicken breasts
2 cloves of garlic or 1 teaspoon garlic powder
3/4 cup shredded carrots
1 medium onion, chopped
6 eggs
sea salt to taste
Coconut Oil or Palm Shortening

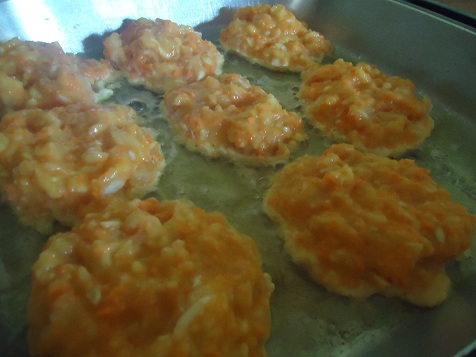
In a food processor, grind raw chicken, garlic, carrots, and onions together. Add eggs and salt, blending all ingredients together well. Spoon mixture (about two tablespoons at a time to form a patty) into hot oil, frying on both sides for about 4-5 minutes each, or until chicken is cooked thoroughly. (I use Palm Shortening from Tropical Traditions because heating it for frying purposes does not compromise its health qualities. I also sometimes use Expeller Pressed Coconut Oil as it is just as healthy.)

Makes about 10 patties.

These patties taste great without a bun, topped with a tomato and sandwiched between pieces of lettuce. We also really like them with sprouted wheat buns we get from Azure Standard. Oh, and melted cheese on top is pretty tasty too!

Chicken Patty Sandwiches

Allow leftover patties to cool, then place them in a freezer bag for another meal. Rewarm in the oven or toaster oven for about 10 minutes.

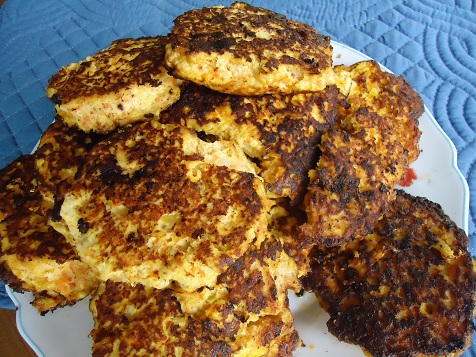
I realize the following picture doesn’t look super pretty, but I wanted to show you the nice stack of chicken patties I was able to put into the freezer! You can’t even tell there are carrots in there. ;)

When served with lettuce and tomatoes, and a fruit smoothie or another side dish of fruits and veggies, this is one super healthy meal!

Heavenly Homemaker's Club Members: Access your homepage and all your fantastic resources here! Not a member yet? Please join us!

Be Efficient in the Kitchen – {Eat Healthy ~ Save Time}

July 18, 2012 by Laura 18 Comments

This post may contain affiliate links. For more information, please see our disclosure policy.

I am often asked, “How do you do it all?” 

Oh my. Without a doubt, my answer to that question is always, “Mercy, have you seen my closets?” (or cabinets, or laundry pile, or toilets, or pick your messes depending on the day…)

I don’t do it all. I don’t even do half of it all. In fact, it’s almost 6 pm as I’m trying to write this. I still haven’t done my breakfast dishes and I haven’t started to make dinner. For the first time today, I finally got a chance to sit down and work on my website at 5:35 – and I’ve had three interruptions since I started. I think I forgot to have the boys put the laundry into the dryer, which means that the clothes might start to smell sour soon. I didn’t make my bed this morning. I didn’t hang my dress up after wearing it on Sunday. My hair looks kinda funny. And it seems that I have misplaced all of the pens that are supposed to be in my cute pen basket in the kitchen. (FYI:  It does not work to write a check with a fat sharpie or an unsharpened pencil.)

But for all of my unmade bed and missing pen issues, one thing I feel that I am getting figured out is efficiency in the kitchen. I believe that one of the reasons I am able to feed my family a (mostly) healthy diet while keeping up with a very busy schedule is because I try to make very good use of my time in the kitchen. I’m not sure I could make it work otherwise. (Although some days, no matter what I do, nothing works, of course. Those are my pancakes and creamy mac and cheese fall back days.)

Here’s what works for me:  Hardly ever do I just stand and do one thing at a time. I grind flour while I’m washing dishes; prepare a casserole for dinner while I’m making lunch; bake breakfast muffins while I’m finishing dinner; chop veggies while I’m waiting for butter to melt; shout out spelling words while I’m stirring noodles; get out ingredients while going back and forth to the stove to brown meat…

(And if my boys are capable of doing any kitchen or cleaning chores that need to be done – and at their ages, they definitely are capable of much! – I pull them in with me to help cook or cleanout the dishwasher, or send them upstairs to do some cleaning. It’s multi-tasking at it’s finest! Those of you with little bitty ones, hang in there. It does get easier as your children get older!)

Want to know one of my favorite ways to save time in the kitchen? Make one big mess. (This sounds sooo efficient doesn’t it?)  What I mean is – there are some kitchen tasks that are pretty messy or take a while to clean up after. Take homemade peanut butter for example. Making peanut butter isn’t difficult at all, but I have found that washing my food processor afterward takes quite a bit of time. Therefore, I have begun to make two or three or even four batches of peanut butter while I’ve got the food processor already peanut buttery. It keeps just fine in the fridge, so if I’m going to make a mess, why not make plenty of peanut butter so that I don’t have to wash the food processor as often? Makes sense to me. (Kinda sounds like my lasagna making process, huh?)

Oh, and since we are on the topics of peanut butter and kitchen efficiency, you will be glad to know that while my peanuts are whirling about in the food processor becoming peanut butter, I am busy stirring up a batch of muffins, slicing fruit for a salad, or standing on my head trying to get a pyrex dish out while it sits at the bottom of a heavy (and slightly unorganized) stack of dishes in the cabinet. Why not? The peanuts don’t need help turning themselves into peanut butter. A watched food processor never boils you know. Or at least I believe that is how the saying goes. 

What tasks have you found that you can do in the kitchen to keep you efficient with your time?

Heavenly Homemaker's Club Members: Access your homepage and all your fantastic resources here! Not a member yet? Please join us!

Gratituesday: Coppinger Sister Symposium

July 16, 2012 by Laura 15 Comments

This post may contain affiliate links. For more information, please see our disclosure policy.

I am blessed beyond words. Not only did I marry a great man – part of my marriage package includes a great set of in-laws.

As a part of this prize package that I acquired upon becoming a Coppinger, I received two sisters-in-law: Matt’s sister, and Matt’s brother’s wife. Blessing upon blessing – all three of us get along.

Actually, to simply say that we “get along” may be an understatement. Our relationships are so much deeper than that. We laugh, we cry, we pray, we share…and oh my…we shop.

Which is what the three of us did for several days together last week. Don’t worry, we did much more than shop. We laughed, we cried, we prayed…and we ate cheesecake. It was awesome. Our get-away time together is something we started probably around eight years ago (none of us can remember exactly). Since the two of them live in California, and I live in Nebraska, we rarely see each other. Therefore, we’ve been intentional about meeting up for a long weekend every two or three years.

We now lovingly call our get-away time the “Coppinger Sister Symposium”. Sounds so much more fun and official than just a simple “sister weekend”, don’t you think? ;)

I flew to L.A. on Wednesday, and the fun began. (As did the lack of sleep. There was too much fun to be had!) 

Here we are at Malibu beach one evening. Oh my word – I couldn’t get over the beauty. And joy upon joy, with bare feet in the glorious sand – I took off for a short run. Walking and jogging on the concrete of Nebraska may never be the same again after the exhilaration I felt during and after that run. Wowza.

Oh, and we saw dolphins! And as we watched the tide roll in, we sat on a blanket and shared – praising God for our marriages and children. The shopping, the partaking of awesome California food (can you say fresh strawberries?!) was all wonderful. But that time together on the beach, I will be gushing about forever.

I came home tired, yet incredibly refreshed and encouraged. I thank God for putting these wonderful gals in my life. (And a big shout-out goes to our three husbands who willingly and sweetly took over in our homes while we enjoyed our “CSS”.)

Share how God is working in your life on your blog, then come link up with us here. If you don’t have a blog, be sure to leave a comment letting us know what you’re grateful for! Please read through the Gratituesday Guidelines so that you understand what kinds of posts you can link up to share here. Posts that are linked but do not fit our Gratituesday theme will be deleted.

If you are linking up a blog post for Gratituesday,
please copy and paste the following sentence into your post! Thanks!

Join us for Gratituesday at Heavenly Homemakers!

Heavenly Homemaker's Club Members: Access your homepage and all your fantastic resources here! Not a member yet? Please join us!

Menu Plan for the Week – and a Vanilla Announcement!

July 15, 2012 by Laura 26 Comments

This post may contain affiliate links. For more information, please see our disclosure policy.

I am blessed to have just arrived home after a lovely three day get-away with my sisters-in-law. I’ll tell you all about it on Gratituesday, but in the meantime, take a look at where I was on Friday:

Matt and the boys managed great on their own, eating much of what I had stocked away in the freezer. Now that I’m home, I’m anxious to get back in the kitchen. The break from the norm was refreshing, but now I feel the need to cook something. :)

Here’s what we’ll be eating this week:

Sunday, July 15
Oatmeal, fruit
Hamburger green bean casserole, cantaloupe
Leftovers

Monday, July 16
Turkey sausage and scrambled eggs, oranges
Homemade corndogs, fruit-kefir smoothies
Grilled bbq chicken, tossed salad, corn on the cob

Tuesday, July 17
Whole wheat pancakes, blueberries
Black bean taco salad, watermelon
Easy noodle stir fry

Wednesday, July 18
Mini breakfast pizza, strawberries
Fried zucchini, cantaloupe, peas
Chicken alfredo, steamed broccoli and carrots

Thursday, July 19
Granola, dried fruit
Tuna casserole, green beans, peaches
Creamy crock pot chicken and rice, tossed salad

Friday, July 20
Giant breakfast cookies, applesauce
Taco corn fritters, watermelon
Grilled steak, zucchini and yellow squash, tossed salad

Saturday, July 21
Chocolate chocolate chip muffins, bananas
Leftovers
One dish meat and potato casserole

And now for the Vanilla Extract announcement!

We have a batch of Homemade Vanilla Extract bottled and ready for sale. We will be offering this on Wednesday, July 18 on a first-come-first-served-while-supplies-last-get-it-while-you-can basis. :)  The sale will begin around 8:00 CST. Mark it down and come to the website early if you’re interested as we usually sell out very quickly. We have two, four, and eight ounce bottles to ship out.

If you’re interested in making your own vanilla, read instructions here. Now is the perfect time to start a batch so that you can bottle it and give it away as Christmas gifts!


Heavenly Homemaker's Club Members: Access your homepage and all your fantastic resources here! Not a member yet? Please join us!

40 Real Foods Menu Plans Downloadable Packet

July 15, 2012 by Laura 7 Comments

This post may contain affiliate links. For more information, please see our disclosure policy.

40MenuPlanCover3sm

Need some inspiration when it comes to planning simple, yet wholesome meals each week?

The 40 Real Food Menu Plans Downloadable Packet includes 40 (of course) real food, real easy menu plans – 10 for each season of the year. In each menu plan, you’ll find ideas for all 3 meals each day for an entire week. No need to follow the menu plan to the letter. Change them as needed to fit your family’s schedules and preferences. You’ll find most of the recipes included in the menu plans here on the Heavenly Homemakers website (hyperlinks included on the pages!) or in the Oh, For Real Cookbook.

See some sample pages of 40 Real Food Menu Plans Here.

40 Real Food Menu Plans Downloadable Packet
$5.00

Add to Cart

Heavenly Homemaker's Club Members: Access your homepage and all your fantastic resources here! Not a member yet? Please join us!

Staying Fit While on Vacation

July 12, 2012 by Laura 5 Comments

This post may contain affiliate links. For more information, please see our disclosure policy.

Many people that I talk to share how they can be on a roll in their fitness routine, then go on vacation and everything falls apart. It makes complete sense. While on vacation, we’re out of the “norm”, we don’t have the same equipment, we’re on a different time schedule. I think these are all very valid reasons to struggle to keep up with working out. But is there any way to avoid falling off the workout wagon while on vacation?

Because I am getting ready to go on a short vacation soon with two of my sisters-in-law, this has been on my mind quite a bit. I asked Jen, my workout buddy from Getting Fit With Jen, to give me some pointers on ways to avoid losing the workout momentum we’ve had for so many months. Here’s what she had to offer. (And I have to say, she makes it seem so simple. I do believe I was making it more complicated than I should have.)

1. Go with a plan.  

If you don’t plan some workout time into your vacation and travels, it will be very easy to let it slip. Figure out how and when you can fit exercise into your trip. Make a plan, be prepared to be flexible, and do what you can to make your plan work. 

2. Make modifications to the norm.

You may lift weights when you’re at home, but taking dumbbells in your suitcase isn’t very practical! How about packing your resistance bands instead? You may take long walks or do workout videos at home, but your vacation may not allow time for either. How about taking advantage of short breaks between your travel activities to squeeze in a shorter walk or some crunches, lunges, squats, and/or push-ups?

3. Recognize that some of your vacation is likely to involve exercise, intentional or not!

You’ll get great exercise while you’re walking through an airport, swimming in the pool, taking a stroll with the family – even shopping! Hopefully your vacation will include plenty of rest, but don’t discredit the exercise you’ll be getting while participating in some really fun activities.

4. Give yourself a break.

Hey, you’re on vacation. Enjoy some down time. If you regularly work out pretty hard, your body may appreciate the rest and recovery period. 

5. Get right back into your workout routine once you get home. 

The longer you wait to get back into a regular workout routine once you get home, the harder it will be to get it going again. Be intentional about starting your exercise program within a day or two of settling back in. Your body will appreciate you for it!

And with that, I feel like I’m ready to head off for my vacation. I will power walk through the airport, shop till I drop, and without a doubt, I will eat cheesecake at the Cheesecake Factory. What?  Did you or did you not read number four above?  ;)

Heavenly Homemaker's Club Members: Access your homepage and all your fantastic resources here! Not a member yet? Please join us!

How To Make Pizza on the Grill

July 10, 2012 by Laura 15 Comments

This post may contain affiliate links. For more information, please see our disclosure policy.

Yum

I’ve always left the grilling up to Matt. He would head outside and cook the meat, I would be in the kitchen making the side dishes, and all was well.

But one day several weeks ago, I felt like cooking something on the grill for lunch. It just sounded good, you know? But Matt wasn’t home. It was then that I realized that I had no earthly idea how to even turn on the grill. Duh. But it’s true.

Why, yes I do feel ridiculous admitting that to you. And hey, if you want, I could list off all kinds of things I have no clue about.  Nah, how about we save that list for another day?

Well anyway, when he got home later that day, I asked my loving husband to teach me the fine arts of turning on a grill, which involved, as most of you probably already know, the push of a button and the turn of a knob. Wow, do I ever feel so much smarter than I did before.

With my newly found knowledge, I have become a little bit addicted to the grill. It is as if a whole new world has opened up to me. And this is why, after mastering burgers, hot dogs, bbq chicken legs, Italian chicken breasts, and several other varieties of meat,  I decided to try making pizza on the grill. I had heard it was great, so why not?

The good news:  Pizza on the grill tastes incredible and my whole family loves it. The bad news:  Pizza on the grill takes more time and effort than a hot dog or even chicken on the grill. Shucks. But hey, it sure beats heating up the house by baking it in the oven. And well, it tastes so good that I think it is worth the effort. 

How To Make Pizza on the Grill:

1. Make pizza crust – I used my favorite Whole Wheat Pizza Dough recipe. Roll it thin, and keep it small.  Individual sized pizzas are best for the grill.

2. Freeze the unbaked pizza crusts on a cookie sheet lined with parchment paper. This will make your crusts much easier to work with on the grill. 

3. Prepare all pizza toppings. It is important to have this done before you begin cooking your pizzas. Really, really important.

4. Get your grill hot and ready. (If you need my husband to come show you how to turn on your grill, he is very nice and I’m sure he would be happy to walk you through this step.)

5. Place crusts on the grill on low heat, as many as your grill will hold. Close the lid and allow the crusts to cook on one side for about three minutes.

6. Remove the crusts from the grill. Turn them cooked side up and fill with sauce and toppings of your choosing. Go easy on the sauce, unless you want soggy pizza. 

7. Place the topped pizzas back on the grill, close the lid, and cook for another 3-5 minutes or until cheese is melted.

Not that I personally experienced any moments of absolute insanity my first time making these, but be aware that you may be forced to deal with a bit of craziness while feeling like everything needs to be done at once and everyone needs to get out of your way and not ask you any questions while you are trying to grill the crust, top the crust, grill the pizza, and not burn anything along the way. Just so you know. (It does get easier after you’ve done it once.)

And that is why it is very important that your pizza toppings are prepared and ready ahead of time. I am so not kidding. ;)

Heavenly Homemaker's Club Members: Access your homepage and all your fantastic resources here! Not a member yet? Please join us!

Gratituesday: The End of My Cell Phone Rebellion

July 9, 2012 by Laura 22 Comments

This post may contain affiliate links. For more information, please see our disclosure policy.

Hello Laura, and welcome to 2012. 

Ladies and Gentlemen, last week, I got my first cell phone.

I know, I know.  While I know I’m not the last person in America to get a cell phone, I do believe I am among the last. And I am very okay with that. I’ve never been one to do something just because everyone else is doing it. In addition, neither Matt nor I ever buy something without seeing the big picture and recognizing the big need. He has had a cell phone for several years and has made very good use of it. But me? I really didn’t feel that I needed one, and admittedly, I’ve been rebellious about getting one. I’m home (with a land line) most of the time and ultimately, when I’m away from home, I have been very glad to have a bit of silence. No one can call and ask me where their shoes are? Sweet. My inbox isn’t screaming at me while I’m at Wal-mart? Okeedokee. I’ve been just fine without a phone.

Until recently.

As our children get older, as our schedules outside the home get busier, as my business grows…the need for a cell phone seemed to be coming up more frequently. And at times, I’ve even had moments of frustration that I haven’t had a phone with me when I’ve really needed it.

And so, last week, Matt and I headed downtown to check out our options. While I was fine to stick to something very basic, Matt was assessing my needs and looking at how a nice cell phone with great perks would benefit me and make my life much easier. We spent the good part of that afternoon asking questions, discussing our options, and considering the financial picture. And wow did we get an incredible deal! (It pays to spend three hours making a decision, apparently.)

Friends, my husband didn’t just get me a cell phone. He shocked me and got me a cell phone with some bells and whistles. One that truly will make my life easier in all kinds of ways. To be able to check and answer email during half time of one of a million soccer games this fall? To be able to moderate comments on this site while waiting to pick up a boy from practice? To be able to quickly text Matt to find out where he is and to ask what time we should meet him after a game? Well, instead of being a nuisance to me like I had once felt a phone would be – I suddenly felt that I’d been given a third hand and a few more hours in my day. (If only the cell phone could clean my house…)

Oh, and for those moments when I don’t want anyone to call and ask where their shoes are, and I don’t want my inbox screaming at me while I’m at Wal-mart? There’s a lovely little “off” button on the side of my phone, and I’m not afraid to use it.

Share how God is working in your life on your blog, then come link up with us here. If you don’t have a blog, be sure to leave a comment letting us know what you’re grateful for! Please read through the Gratituesday Guidelines so that you understand what kinds of posts you can link up to share here. Posts that are linked but do not fit our Gratituesday theme will be deleted.

If you are linking up a blog post for Gratituesday,
please copy and paste the following sentence into your post! Thanks!

Join us for Gratituesday at Heavenly Homemakers!

Heavenly Homemaker's Club Members: Access your homepage and all your fantastic resources here! Not a member yet? Please join us!

Menu Plan for the Week

July 8, 2012 by Laura 22 Comments

This post may contain affiliate links. For more information, please see our disclosure policy.

If you recall, three out of four of our boys were at their grandparent’s house for several days last week. I missed them like crazy. But I sure did get a lot of work done! I helped Matt paint the front of our house (leaving the high ladder parts up to him). And I was able to spend hours writing a new eBook that I’ve had tons of requests for. This felt like a great accomplishment, as I’ve been working on this book here and there for almost three years. More details coming, just as soon as I feel I’m far enough along in the process to get my hopes up about ever finishing it. ;)

Our boys are all home, so now all is right in my world. A great friend of ours got married this weekend. We are so excited for her and her new husband! Here’s a shot of our family, taken just before the wedding started.

Is it just me, or do any of you married gals feel a little sense of “vow renewal” after attending a wedding? I always leave a wedding with all kinds of sappy feelings of newly married affection toward Matt. Eighteen years and four kids later, I remember how I felt on the day of our wedding so clearly. They tell you on your wedding day that your love will continue to grow. At that time, you can’t imagine that it’s possible. But wow, it’s so very true. Okay…just needed to share all of that since I’ve been feeling all kinds of mushy since yesterday. :)

Moving on to talk of food, since this is my menu plan post, let’s talk homemade chicken nuggets. I find that if I prepare (cut and bread) several batches ahead of time, then freeze them – grabbing them out to make for a quick lunch is super easy!

In case you were wondering, I had served the nuggets with
peas and Creamy Mac and Cheese the day of this picture.

Here’s our menu for this week:

Sunday, July 8
Oatmeal, apples
Grilled marinated Italian chicken, grilled potatoes, tossed salad, peas
Grilled hotdogs, carrot sticks, watermelon (We use all beef, organic Applegate hotdogs that we get from our health food co-op, Azure Standard.)

Monday, July 9
Whole wheat pancakes, blueberries
Homemade chicken nuggets, peas, cantaloupe
Hamburgers, green beans, watermelon

Tuesday, July 10
Coconut flour banana muffins, applesauce
Tuna salad with tomatoes, cottage cheese and pineapple
Spaghetti, zucchini and yellow squash

Wednesday, July 11
Giant breakfast cookies, bananas
Calzones, watermelon
Cheesy beef and rice, green beans

Thursday, July 12
Whole wheat waffles, applesauce
Ham and cheese with crackers, smoothies
Cheesy salsa enchiladas, tossed salad

Friday, July 13
Whole wheat donuts (frozen and rewarmed in the toaster oven)
Corn dog muffins, raw veggies
Leftovers

Saturday, July 14
Scrambled eggs, oranges
Creamy mac and cheese, peas
Bbq chicken, corn on the cob, tossed salad

If menu planning is a struggle for you (or even if it’s not!),
be sure to check into Plan to Eat and enter to win a free year’s subscription!

Heavenly Homemaker's Club Members: Access your homepage and all your fantastic resources here! Not a member yet? Please join us!

Putting Up Green Beans From Our Garden

July 6, 2012 by Laura 15 Comments

This post may contain affiliate links. For more information, please see our disclosure policy.

Our green bean plants are beautiful this year. Matt and the boys have been picking beans like crazy. I guarantee that when they bring a bucket of green beans in to me, I display a much more excited reaction than if they were to bring me a bouquet of flowers. Garden produce makes my heart flutter. :)

Here was our counter-full of beans last week once we picked, snapped, and blanched them for the freezer. (Don’t you worry. We ate a bunch of them too.)  :)

You can learn more about how we prepare green beans from the garden here. Even if you don’t grow your own beans, I’d recommend looking into purchasing fresh beans from your local farmer’s market or another resource near you. They are soooooo good!

If you have any fun homemaking tips, we’d love for you to share them in the comments section or link them up here today. Feel free to share kitchen tips, cleaning solutions, recipe ideas, cooking short-cuts, household money-saving suggestions, decorating ideas, gardening tips, or anything else you feel fits this category. (No product reviews or giveaways – thanks!) As always, when linking your blog post, please post a link back to this blog so that your readers will know where to find more Homemaking Hints.


Heavenly Homemaker's Club Members: Access your homepage and all your fantastic resources here! Not a member yet? Please join us!
« Previous Page
Next Page »

Join Our Community!

 Facebook Twitter E-mail Instagram Pinterest

Popular Posts

~ Will All of the Real Moms Please Stand Up?
~ Easy! Stir-and-Pour Whole Wheat Bread
~ How to Make Gatorade
~ 31 Real Food Breakfast Ideas
~ Dear Teenage Girls...
~ When Mom Takes a Step Back
~ The Inexpensive Health Insurance We Love!
~ Let's Talk Real Food Grocery Budgets

Check out our latest posts!

  • Big Family Food and Fun: September 13-19, 2026
  • Big Family Food and Fun: September 6-12, 2026
  • Big Family Food and Fun: August 30-September 5, 2026
  • Big Family Food and Fun: August 23-29, 2026
  • Big Family Food and Fun: August 16-22, 2026
Home  ~  Simple Meals  ~  Club Membership  ~  Shop  ~  Privacy Policy  ~  Disclosure  ~ Contact

Copyright © 2026 · Beautiful Pro Theme on Genesis Framework · WordPress · Log in