Heavenly Homemakers

Encouraging women in homemaking, healthy eating and parenting

  • Home
    • About
    • FAQs
  • Recipes
    • Bread and Breakfast
    • Condiments
    • Dairy
    • Main Dishes
    • Side Dishes and Snacks
    • Desserts
    • Gluten Free
    • Instant Pot
    • Crock Pot
    • Heavenly Homemaker’s Weekly Menus
  • Homemaking
    • Real Food Sources
  • Store
  • Contact
    • Advertise
    • Disclosure
    • Privacy Policy
  • Simple Meals
  • Club Members!

Homemade Chewy Granola Bars (without corn syrup!)

March 25, 2010 by Laura 420 Comments

This post may contain affiliate links. For more information, please see our disclosure policy.

Chewy Granola Bars. No corn syrup. Easy recipe. Grab-and-go snack option. Fantastic.

Chewy Granola Bars - No Corn Syrup

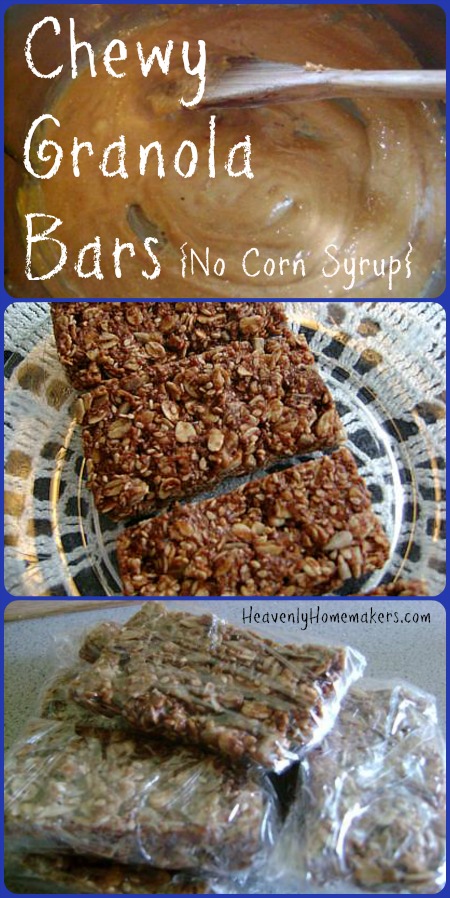
Every homemade chewy granola bar recipe I’ve ever seen includes corn syrup and/or marshmallow cream (not ingredients we feel okay about eating or feeding my family). Even most pre-made granola bars I have seen at the store (even the organic ones) have ingredients I don’t like feeding my family.

I finally figured out a chewy granola bar recipe that we like! It’s easy and includes all natural sweeteners and ingredients! These bars are way cheaper than store bought granola bars! Plus you can customize it according to your family’s taste and allergies! They can be easily wrapped individually to take in the car or packed in a lunch!

Homemade Chewy Granola BarsYum

5.0 from 2 reviews
Homemade Chewy Granola Bars (without corn syrup!)
 
Save Print
Author: Laura
Ingredients
  • ½ cup peanut butter or sunbutter
  • ⅓ cup honey
  • ¼ cup coconut oil (or another oil of your choice)
  • 1 cup oats
  • 1 cup total of any combination of: sesame seeds, coconut flakes, sunflower seeds, dried fruit, mini chocolate chips
Instructions
  1. In a medium sized saucepan, melt together peanut butter, honey and coconut oil.
  2. Remove from heat and add one cup of oats.
  3. Choose your favorite combination of coconut flakes, sesame seeds, sunflower seeds, dried fruit and mini chocolate chips, to equal a total of ONE CUP. (I just got out my one cup measuring cup and poured in the ingredients until the cup was full.)
  4. Pour in and stir well.
  5. Spread mixture into a 8x8 or 9x4 pan.
  6. Chill for two hours, then cut into bars.
3.4.3177

granola_bars_1

granola_bars_2

granola_bars_3

Wrap in plastic wrap for a quick grab and go snack!

granola_bars_4

Many have said that these taste similar to the oldie-but-goodie No Bake Cookie recipe we’re all familiar with. How fun that these are quite a bit healthier!

I’ve found that these keep best in the fridge as they get a little bit too soft if left out for too long. What a perfect grab-and-go snack!

Heavenly Homemaker's Club Members: Access your homepage and all your fantastic resources here! Not a member yet? Please join us!

How Much Should You Pay Your Babysitter? A Guest Post

March 23, 2010 by Laura 54 Comments

This post may contain affiliate links. For more information, please see our disclosure policy.

Today’s post is by Craig Ford from Money Help For Christians. Craig is a missionary overseas who writes about issues related to faith and finances. If you read his blog you’ll learn about things like how to afford to be a stay at home wife. Since I’ve never had a CLUE how much to pay a babysitter, I am SO excited about his guest post today!!
—————————————————–

One of the reasons why some people don’t like to get babysitters is because they are clueless about the going rate. They want to pay the babysitter a decent amount, but they also want to be sure they are are not overpaying the babysitter.

One way around a paid baby sitter is by forming a frugal community. This way you can share babysitting responsibilities, and the best part is that no one pays anything.

However, there will still be occasions where you need a babysitter.

A Guide For Determining How Much To Pay Your Babysitter:

  1. Ask your babysitter – If you are contacting a new babysitter, don’t be afraid to ask about their usual rate. Some babysitters have an hourly rate set.
  2. Ask your friends – If you have a new baby, call someone in your church and ask them what they typically pay for a babysitter. If the amount sounds off, make a couple of calls so you have a point of comparison.
  3. Check online – The babysitter rate calculator allows you to enter your zip code, age of the sitter, and their years of experience, and they will give you a suggested rate. I was shocked to see an 18 year old with a couple of years of experience suggested $13.25. Either I’ve lived overseas too long, or I’m in the wrong business. On the other hand, an About.com article suggests we pay babysitters between $4 – $12 per hour. In general, on Yahoo answers, the consensus was much lower – closer to $5-$6 for a babysitter.
  4. Compare it to other typical teen jobs.  What is McDonald’s paying new workers?

Factors that Influence Babysitter Pay:

  • Age of the babysitter – Obviously, your 12 year old neighbor is going to make less than a 19 year old college student.
  • Number of kids – Are you a Cheaper By the Dozen family? Well, you’re really going to pay for it.
  • Age of the kids – The younger and more dependant they are, the more it is going to cost.
  • Is your kid difficult? Some babysitters deserve more money just because your kid is a lot of work.
  • Special needs – Do you need a babysitter with any special qualifications? If so, the sitter should be compensated accordingly.
  • Time of day – If the kids are going to be sleeping for 1/2 of the night, then the babysitter does not need to be paid as much.
  • Weekends vs. Weeknights – Weekends cost more.
  • Location – How far do you live from your babysitter? Does he or she need to drive a long distance? Are you providing transportation?
  • Are you exchanging anything else? Providing the babysitter a meal or allowing them to do their laundry is a good way to offer a non-financial incentive.

We all know raising kids can be expensive. However by saving money while raising young kids we can always make a dollar go just a little bit further. So here’s ..

5 Ways to Reduce Babysitting Costs:

  1. Find someone you know.  Teenagers at church often already have a relationship with your kids and are happy to do it for a service with less pay. Just don’t take advantage of them.
  2. Offer non-financial benefits.  This could include making the job easier by setting rules for your kids. Rent their favorite movie for after the kids go to bed. Cook their favorite meal. Tutor them.
  3. Go out on week nights.  Babysitters are in less demand during the week.
  4. Move overseas.  I pay my babysitter $1.25 per hour, and that’s double minimum wage! Still, I’m not sure that babysitting rates are a big enough reason for moving overseas. What do you think?
  5. Plan at home dates.  For several months, one night a week my wife and put the kids to bed and then cooked a late dinner together. Creativity can make an at home date a lot of fun. Anytime you avoid the restaurant you save money.

How much do you pay your babysitter? What do you think is a fair rate? How do you determine how much to pay your babysitter? How do you reduce babysitting costs?

Heavenly Homemaker's Club Members: Access your homepage and all your fantastic resources here! Not a member yet? Please join us!

Gratituesday: Cornucopia

March 22, 2010 by Laura 16 Comments

This post may contain affiliate links. For more information, please see our disclosure policy.

gratituesday

Tonight while my husband and I were getting dinner ready to put on the table (and munching on the food as we went), we were both struck by the variety. And Matt said, “THIS is a regular cornucopia. It should be your Gratituesday post tonight.”

So if our cornucopia is my Gratituesday post, that would make this a Graticopia…a CornuGratitiduh…a

Yeah, okay never mind. That doesn’t work. 

Anyway, having an incredible variety of food is seriously something to be grateful for. Many people all over the world are just happy to have one thing to eat…and they eat it day after day after day…hopefully.

But for our one meal tonight…we had chicken fried steak strips, potatoes, gravy, steamed broccoli and cauliflower, chocolate milkshakes and yogurt with honey oat crunch cereal. One meal.  (And yes, I veered off of our planned menu just a bit…I sometimes do.)  (And no, we didn’t over-eat like it sounds like we did with all that food…there were just little bits of each of the above, so our portions were small.)  Oh, and then since Daddy was home for the evening, we played Family Cranium and ate a special treat of popcorn and Easy Butterscotch Bars.

So much variety. So many great choices. So much food. 

We are spoiled. We are blessed. 

We can not take this for granted.

What are you thankful for this Gratituesday? Write about it on your blog, then come link up with us here. If you don’t have a blog, be sure to leave a comment letting us know what you’re grateful for!

If you are linking up a blog post for Gratituesday,
please copy and paste the following link into your post! Thanks!


Join us for Gratituesday at Heavenly Homemakers!

Heavenly Homemaker's Club Members: Access your homepage and all your fantastic resources here! Not a member yet? Please join us!

Unclog a Drain Naturally Without Bleach or Drano

March 21, 2010 by Laura 36 Comments

This post may contain affiliate links. For more information, please see our disclosure policy.

I’ve mentioned before that our house has a lot of character. (I have to say it that way just in case my house is listening and so that it won’t get its feelings hurt.)

Our house is over a hundred years old, and while we love our house and feel completely blessed to live in such a nice, large house…it does have some crazy weird issues.  (Sounds like the lady of the house too, doesn’t it? Crazy weird issues indeed.)

One of the biggest issues in our house involves the plumbing. You don’t want to know the details, but let’s just say… No. Let’s not. You don’t want to know the details.

What I will tell you is that keeping our sinks and bathtubs draining nicely feels next to impossible. And as you know, we’d like to keep our house free from harmful chemicals like bleach and drano.

A good friend of ours was over recently and told us a nice tip for unclogging the bathtubs and sinks naturally using the ever wonderful baking soda and vinegar.

Here’s what you do:

  1. Take out your sink or bathtub stopper.
  2. Use an wet washrag to clean out around the drain hole.
  3. Pour 1/2 cup of baking soda down the drain.
  4. Pour 1 cup white distilled vinegar down the drain.
  5. Stop the volcano from bubbling up out of the drain by placing a wash rag over the drain hole. You want the action to take place down where stuff is clogged, not all over your bathtub or sink.
  6. After thirty minutes, pour a big pot of boiling water down the drain.

And there you go.

I love that we can work on our drain issues using natural ingredients…thus avoiding an asthma attack and whatever other icky things we’re avoiding when we skip using bleach and other harmful chemicals in our home. And, as a side benefit…this method saves a lot of money. Do you know how expensive drano is?!

What other great uses have you found for baking soda and vinegar?

I wonder if they would help with the… Oh wait. We weren’t going to talk about that.

Heavenly Homemaker's Club Members: Access your homepage and all your fantastic resources here! Not a member yet? Please join us!

Menu Plan for the Week

March 21, 2010 by Laura 12 Comments

This post may contain affiliate links. For more information, please see our disclosure policy.

On Thursday of last week, it was 68 degrees. The next day it snowed. This…is springtime in Nebraska. I am happy to report though that within the last week I have seen three or even four blades of green grass. And also, I heard something strange the other day and it turned out to be the beautiful chirping of a bird. I think it is so nice that the birds are kind enough to fly back and join us in the springtime. 

Our family is in the midst of lots of spring activities. We’re busy getting ready for LTC (Leadership Training for Christ), a convention for 3rd graders up through 12th graders. Asa and Justus have been studying hard for the Bible bowl, plus practicing several times a week for dramas and puppet shows and choirs. Soccer season has also started for some of our boys and will start for ALL of them in two weeks. Did I mention all the boys are in our home school musical in April? 

I’m letting you know about all this because if I forget to complete any sentences around here…it’s because my brain might be on the fried side (more than normal). 

Thank goodness for the menu plan! 

Sunday, March 21
Oatmeal, pears
Cheesy beef and rice, green beans
Taco Potatoes, applesauce

Monday, March 22
Whole wheat waffles, blueberries
Potato soup, fruit-kefir smoothies, carrot sticks
Cheddar ranch burgers, steamed carrots, broccoli and cauliflower

Tuesday, March 23
Mini breakfast pizza, oranges
Cheesy Salsa Enchiladas, tossed salad
Chicken and noodles, carrots

Wednesday, March 24
Chocolate chocolate chip muffins, apples
Turkey sausage, ranch potato wedges, peas
Homemade pizza, tossed salad, fruit

Thursday, March 25
Warm vanilla soother, homemade oat crunch cereal
Corn dog muffins  , carrot sticks, apples
Chicken Fried Steak Strips, simple mashed potatoes, gravy, asparagus

Friday, March 26
Sourdough English muffins with peanut butter and honey, pears
Grilled cheese, tomato soup
Lamb-burgers on whole wheat hamburger buns, homemade onion rings

Saturday, March 27
Honey whole wheat bagels, milk
Leftover buffet
Italian stew with green beans, tossed salad

If you haven’t already, be sure to sign up to win free Learn and Grow Pre-school Curriculum! A random winner will be selected in just a few more days!

Also, I just wanted to let you know that while I know you are are anxiously awaiting the continuation of my Journey to Healthy Eating series, I may take a break from it this week (don’t throw tomatoes!). Last week’s entry kinda took the soup out of me, plus I’ve been busy trying to catch up on other writing I’ve needed to get done. I’m also not sure I’ll get around to another post in the Becoming a Better Help Meet series this week. In the meantime, keep praying for your husbands!! :)

Ooh, and I’m very excited about a couple of new giveaways coming up this week. Stay tuned!
—————————————

Find more menu planning inspiration at Organizing Junkie!

Heavenly Homemaker's Club Members: Access your homepage and all your fantastic resources here! Not a member yet? Please join us!

Dessert or More Dinner – Question #61

March 19, 2010 by Laura 53 Comments

This post may contain affiliate links. For more information, please see our disclosure policy.

I like my sweets. I wish I didn’t.

Even though most of the treats I eat are made with the good stuff (whole wheat flour/natural sugars), I still have to be really careful that I don’t eat too many sweets.

Because I LOVE them.

My husband, on the other hand would rather eat seconds or thirds of our main dish than to finish his meal off with something sweet. Often, he’ll say, “Well….I’m gonna have me some dessert” while he reaches over to scoop another spoonful of enchiladas onto his plate.

The boys gave him a Snicker bar with almonds for Christmas. He still hasn’t eaten it. I think he’s saving it for a special occasion. Like next Christmas perhaps? I would have eaten mine before I finished opening my stocking stuffers. Nothing says Christmas morning like a mom with nougat stuck to her chin.

Kristy’s comment on my Butterscotch Bar post got me to thinking. She wrote:  “Okay, here’s a good afternoon snack for my kiddos (and me!) to munch on! Can’t wait to try them.  I REALLY like the fact that you seem to have a sweet tooth, like me!!”

So yeah, I have a sweet tooth. A mouth full of ’em actually.

How about you? Are you a desserty kinda person…or would you rather skip the sweets and have another round of the main course?

Heavenly Homemaker's Club Members: Access your homepage and all your fantastic resources here! Not a member yet? Please join us!

High Five Recipes: Layered Cheesy Salsa Enchiladas

March 18, 2010 by Laura 24 Comments

This post may contain affiliate links. For more information, please see our disclosure policy.

Layered Cheesy Salsa Enchiladas are about to become one of your family’s favorite recipes!

High Five Recipes 2

Yum

This recipe can not get any easier! Typically, I have all the ingredients on hand for these Layered Cheesy Salsa Enchiladas. So that means I can throw this together at the last minute whenever we need it. Everyone in my family loves this, which is a huge score!

We prefer flour tortillas, but these enchiladas can also be made with corn tortillas if you have a gluten intolerance or if you just like corn tortillas better.

Layered Cheesy Salsa Enchiladas

High Five Recipes: Layered Cheesy Salsa Enchiladas
 
Save Print
Author: Laura
Serves: 4-6
Ingredients
  • 1 pound ground beef
  • sea salt to taste
  • 2 cups salsa
  • 2 cups shredded cheddar cheese, divided (I use raw white cheddar)
  • 8 whole wheat flour tortillas (or corn tortillas)
Instructions
  1. Brown meat. Stir in salsa and ½ cup of cheese.
  2. Lay 4 tortillas in the bottom of a 9x13 inch baking dish.
  3. Spread half of meat mixture over tortillas.
  4. Layer again with the 4 remaining tortillas.
  5. Spread remaining meat mixture over tortillas.
  6. Top with 1½ cups cheese.
  7. Bake uncovered at 350° for 20-25 minutes.
3.4.3177


Save Print
3.4.3177

Cheesy Salsa Enchiladas
This dish freezes easily too, making it a great make ahead meal!

Freezing Instructions:  Cover dish well and freeze. Thaw and bake as directed above. Or, if the enchiladas are frozen, bake in a 250° oven for one hour, then at 350° for another 30 minutes or until cheese is bubbly.

Serve these Cheesy Salsa Enchiladas with a tossed salad and fresh fruit. This meal is as simple as can be!

creamy salsa enchiladas

I have several more High Five Recipes up my sleeve (not literally of course, but wouldn’t that be fun to see?). Oh, and actually if you haven’t already, you should go read the story of my sleeves because, well it’s always fun to read about sleeves.

It’s here! Check out our amazing Simple Meals program!

728x90

Heavenly Homemaker's Club Members: Access your homepage and all your fantastic resources here! Not a member yet? Please join us!

The little Green Project 2010

March 16, 2010 by Laura 34 Comments

This post may contain affiliate links. For more information, please see our disclosure policy.

 littlegreenproject

My husband and I decided that this year for our little Green Project, we’d show you how we manage our compost. Composting is SUCH a great way to use produce waste to put nutrients back into the soil. See, we have this great little plot out in our back yard that we…

Hold on. Why don’t I just let Matt tell you about it. For the record, can I just tell you what an honor it is to have my beloved describing the contents of my bucket of garbage to you?

And there you go. Our compost plot. 

As you can imagine, digging a hole and burying our slimy banana peels and cantaloupe guts is one of the boys’ favorite summer chores. Nothing…I repeat nothing is more fun for them than being sent out with a shovel on a 103° day to bury a bucket of slop. 

SO…what’d you come up with for your little Green Project this year? Tell us about anything green:

  • Saving Green
  • Eating More Greens
  • Earning Extra Green
  • Going Green
  • Your Green Thumb
  • Crafting Something Green

You’re welcome to link up an older post if it fits the above categories. You’re welcome to link up more than one post. If you don’t have a blog, please leave a comment letting us know of your little Green Project! Then let’s all go visit everyone’s blog and learn more about their little Green Project!

If you’re linking up a post, please copy and paste the following link into your post…

Join us at Heavenly Homemakers for the little Green Project!

Heavenly Homemaker's Club Members: Access your homepage and all your fantastic resources here! Not a member yet? Please join us!

Gratituesday: We’ve Come a Long Way

March 15, 2010 by Laura 21 Comments

This post may contain affiliate links. For more information, please see our disclosure policy.

gratituesdaynov09

I’m sorry if it appears that I’m stuck on the subject of eczema, but while I’ve been writing during the past few days about our battle with Malachi’s eczema , I have been amazed at all the emotions it has brought out in me.  I’ve been bawling over the keyboard like crazy.  One of the biggest emotions I’ve felt is thankfulness! (Is thankfulness an emotion? I sure am feeling it!)

Those were some tough years. Many days we felt like we were fighting a losing battle. We got little sleep. The kind of sleep you get when you first bring a newborn baby home from the hostpital? We got that kind of sleep for three years. After Malachi turned three he finally started sleeping through most nights, only occasionally waking up scratching and crying. He slept the most peacefully if he was in our bed, so that is exactly where he slept until about a year ago (he’s five now).

At about age 3, the eczema gradually began to clear. It started healing first on his head and slowly moved down his body until now he mostly just suffers from sores on his legs. How I wish he didn’t suffer with eczema at all anymore…but WOW am I thankful that it is “only” on his legs now. He is not nearly as miserable as he had been. And he’s now able to sleep the night through and feel healthy and rested.

As I’ve been writing about our fight against chronic eczema, I’ve sifted through his baby pictures so that I could post one or two for you to see the severity of his problem. I’ve just not been able to post one though. Those pictures are painful for me to look at and I’m sure they’d be painful for you to look at too. The poor guy. What a tough kid. 

BUT, because looking at all his baby and toddler pictures reminded me of how far we’ve come and made me so incredibly thankful to be at this point in our battle, I decided to go ahead and give you an idea of what we’ve been fighting against.

This picture was taken on Mother’s Day ’07, almost three years ago when Malachi was about 2 1/2. It’s not a super close up pic, because I just couldn’t post one that was. But, you get an idea of how the rash covered his face and neck (also arms and legs, but you can’t tell that in the picture).

Boys- Mothers Day '07(3) sm

Incidently, while we were fighting Malachi’s eczema issue, we were simultaneously fighting a battle of stubborn-ness with our then five year old Elias. There wasn’t an easy remedy for that issue either, but I think we’re on the winning end of it now.. ;)

And now here we are, three years later…

malachism

I am overjoyed with thanks that Malachi is feeling so much better!! Is it any wonder I can’t stop kissing those soft cheeks?! 
—————————————————

What are you thankful for this Gratituesday? Write about it on your blog, then come link up with us here. If you don’t have a blog, be sure to leave a comment letting us know what you’re grateful for!

If you are linking up a blog post for Gratituesday,
please copy and paste the following link into your post! Thanks!


Join us for Gratituesday at Heavenly Homemakers!


Heavenly Homemaker's Club Members: Access your homepage and all your fantastic resources here! Not a member yet? Please join us!

What We Did To Help Our Son’s Eczema – Without Drugs

March 15, 2010 by Laura

This post may contain affiliate links. For more information, please see our disclosure policy.

If you’ve had a child suffer from eczema, even a mild case, it can be incredibly frustrating to helplessly watch them suffer. Today I’m happy to share what we did to help our son’s ezcema. His case was a chronic one. :(

What We Did To Help Our Son's Eczema - Without Drugs

Our youngest son developed severe eczema when he was just two months old. We allowed one round of an oral steroid and half a tube of cortisone cream before learning that his condition was chronic and the drugs, if they were to get rid of the eczema symptoms, would be a permanent part of his life. So would be the terrible side effects of the drugs if we continued to give them to him.

So we chose to stop. We refused to give these life altering drugs to our baby. Eczema has been a part of his life for ten years now. Thankfully, we’ve found some answers and help.

We were learning more about nutrition, drugs, whole body health at that time. Through MUCH trial, error and prayer…we found a few things that helped him. There was NO quick fix because it has been a matter of healing his body from the inside out. Some of the things we did helped immediately (like changing detergents and soaps), but overall healing is STILL taking place five years later. I wish I could tell you otherwise.

I want to share these ideas with you…not because I’m just SURE they’ll help your child. Every child and every eczema case is different. Plus, I’m not a doctor…I’m just a mama.

What We Did To Help Our Son’s Eczema – Without Drugs

Remember, we learned that eczema is not merely a skin issue…there’s much more to it than that. But, here are the best changes we’ve made and the best products we’ve found to help our son Malachi with his eczema symptoms:

  1. We began eating organic, natural and unprocessed whole foods. You’ll read more about all of this (all over my site), specifically in my Journey to Healthy Eating series. We specifically kept Malachi away from grains and sugar for quite a while to help his immune system and to help with his digestion.
  2. We found this fragrance and dye free laundry detergent from Shaklee to be the best and only one that would not make his rash worse. Many people have suggested that we make our own detergent, but I have yet to see a homemade detergent without borax as an ingredient, and I’m not convinced that borax is okay for our skin.
  3. We use only pure coconut soap from Tropical Traditions.
  4. Lotion in general just doesn’t offer much comfort for Malachi’s dry itchy skin. After each bath we rub him down with BeeSilk Lotion Bar from MadeOn. BeeSilk Lotion Bar is made from three completely pure and natural ingredients. We fully trust this product. Straight coconut oil can also be helpful.
  5. We started supplementing him with Black Current Seed Oil that we got from our chiropractor. Malachi takes it orally, plus we open up a tab and rub the oil onto his worst sores. This has been a HUGE help for his overall healing (digestive system healing) and I’ll talk more about it in my Journey to Healthy Eating series.
  6. Speaking of chiropractors, we try to take Malachi in for regular chiropractic adjustments. If his body is in alignment, he does better. Plus, our chiropractor focuses on nutrition, allergies, and needed supplements.
  7. We limit the baths. The water seems to dry his skin more, so once or twice a week is his limit. Faithfully after a bath, we slather him with BeeSilk Lotion Bar. (Edited to note…we’re now experimenting with bathe him daily, let him have a good long soak, then immediately rub BeeSilk Lotion Bar on his skin. This seems to offer him quite a bit of itchy relief.)BeeSilk MadeOn Hard Lotion
  8. He wears mostly 100% cotton clothing so his skin can “breathe” better.
  9. We clean the house either with good old fashioned water and vinegar…or Basic H from Shaklee. We have NO toxic cleaners in our house anymore. Read here about all of the soaps and cleaners we use.
  10. Allergy testing…and desensitizing. Our chiropractor tested Malachi, then one by one he desensitized him for any allergies that he was showing a sign of. We were surprised that as he got older, different allergies showed up that hadn’t when he was tiny. It never hurts to try again. (P.S. The desensitizing process is super simple and painless…just a little different if you’re used to conventional methods of doctoring. Here’s a link my chiropractor directed me to, explaining more about this process. Not that I completely understand it. But it did help Malachi quite a bit.)
  11. I can’t say enough about this one:  SUNSHINE. We completely avoid sunscreen because it makes Malachi break out terribly. However, the sunshine makes his rash SO much better. Summer is our favorite time of the year. He always feels so much better in the summer when he’s in the sun. We just make sure he’s in the sun long enough to grab some good vitamin D…but not long enough to get a sunburn. We call it the “in the sun…out of the sun…in the sun…out of the sun…” method.
  12. Our natural doctor helps keeps his liver and kidneys functioning properly so that toxins will be taken out of his body the way they are supposed to, instead of coming out through his skin. Find a natural doctor close to you who looks at the cause of the problem, not just the symptoms!! We could not have helped solve this chronic condition without professional help.
  13. Prayer, prayer, prayer. God is the ultimate healer and we are so thankful to know that He loves Malachi even more than we do.

Ultimately, we have found that eczema or not…using high quality products in our home for cleaning and eating high quality unprocessed foods is best for all of us! We are so thankful for the changes we’ve made for our family…and for the relief Malachi has found as well!

Now that Malachi is older, his eczema is much better. The worst area is on his legs, and we’re hoping that once the sun starts shining a little more regularly again and he can be out in it…his legs will clear up more. His cheeks are now SO SOFT that I CAN’T stop kissing them. And he just lets me…great little accommodating guy that he is.

If you know of any other great, natural remedies for eczema, please leave a comment letting us know. I’d love for this post and all the comments to be a great resource for parents looking for answers!

P.S. If you’re interested in trying any of the products from Tropical Traditions I mentioned in this post, click here to read about how you can receive a free book from TT about the great benefits of coconut oil. I also highly recommend that you look into  BeeSilk Lotion Bar from MadeOn. It truly is a wonderful product and I am so thankful to have access to it!

Heavenly Homemaker's Club Members: Access your homepage and all your fantastic resources here! Not a member yet? Please join us!
« Previous Page
Next Page »

Join Our Community!

 Facebook Twitter E-mail Instagram Pinterest

Popular Posts

~ Will All of the Real Moms Please Stand Up?
~ Easy! Stir-and-Pour Whole Wheat Bread
~ How to Make Gatorade
~ 31 Real Food Breakfast Ideas
~ Dear Teenage Girls...
~ When Mom Takes a Step Back
~ The Inexpensive Health Insurance We Love!
~ Let's Talk Real Food Grocery Budgets

Check out our latest posts!

  • Big Family Food and Fun: June 21-27, 2026
  • Big Family Food and Fun: June 14-20, 2026
  • Big Family Food and Fun: June 7-13, 2026
  • Big Family Food and Fun: May 31-June 6, 2026
  • Big Family Food and Fun: May 24-30, 2026
Home  ~  Simple Meals  ~  Club Membership  ~  Shop  ~  Privacy Policy  ~  Disclosure  ~ Contact

Copyright © 2026 · Beautiful Pro Theme on Genesis Framework · WordPress · Log in